
Check the Compatibility between Projector and Computer
Before connecting your projector to your computer, it’s crucial to ensure compatibility between the two devices. This will prevent any potential issues and guarantee a seamless connection. Here are a few key aspects to consider:
1. Ports: Take a look at the available ports on both your computer and projector. Common projector connection ports include VGA, HDMI, DVI, and DisplayPort. Check if your computer has a corresponding port that matches one of these options.
2. Resolution: Verify that your computer’s screen resolution is compatible with the native resolution of the projector. Mismatched resolutions can result in distorted images or an inability to display content properly. Consult the specifications of both devices to ensure they align.
3. Operating System: Confirm that your computer’s operating system is compatible with the projector. Most projectors support Windows, Mac, and Linux systems, but it’s always a good idea to double-check the specifications to avoid any software conflicts.
4. Graphics Card: Check if your computer’s graphics card can handle the demands of projecting content. Some high-definition videos or graphics-intensive applications may require a more robust graphics card for optimal performance.
5. Cable Compatibility: Ensure that the necessary cables and adapters are compatible with both your computer and projector. Different cables, such as VGA, HDMI, DVI, or DisplayPort, may be required depending on the available ports on each device.
6. Software and Drivers: Ensure that your computer has the appropriate software and drivers installed to communicate with the projector effectively. You may need to download and install specific drivers from the projector manufacturer’s website for optimal compatibility.
7. Projector Settings: Familiarize yourself with the projector’s settings and functionality. Some projectors have specific settings that need to be adjusted to work correctly with a computer. Read the user manual or consult the manufacturer’s website for instructions on optimal projector settings.
By considering these compatibility factors, you can confidently proceed with connecting your projector to your computer, knowing that both devices are capable of establishing a successful connection and delivering an exceptional viewing experience.
Gather the Necessary Cables and Adapters
Once you have verified the compatibility between your projector and computer, it’s time to gather the necessary cables and adapters to establish a connection. The specific cables and adapters required will depend on the available ports on your devices. Here are the common options:
1. VGA Cable: A VGA cable is a common choice for connecting a projector to a computer. It is an analog cable that carries video signals. Ensure that your computer and projector both have VGA ports. If your computer doesn’t have a VGA port, you may need to use a VGA to HDMI or VGA to DVI adapter.
2. HDMI Cable: HDMI cables are capable of transmitting high-definition video and audio signals. If both your computer and projector have HDMI ports, using an HDMI cable will provide superior image quality. In most cases, you won’t need any additional adapters for this connection.
3. DVI Cable: Some projectors and computers have DVI ports. A DVI cable is capable of carrying both analog and digital video signals. If your computer has a DVI port and your projector has a DVI input, you can use a DVI cable for the connection. However, if your computer has only a DVI output and your projector only has VGA or HDMI input, you’ll need a DVI to VGA or DVI to HDMI adapter.
4. DisplayPort Cable: Newer computers and projectors often feature DisplayPort technology. DisplayPort cables can transmit high-definition video and audio signals. If your computer and projector both have DisplayPort ports, using a DisplayPort cable is a convenient option. Check if any adapters are needed to connect your computer and projector if they have different port types.
5. Adapters: In certain cases, you might need adapters to connect your computer and projector. For example, if one device has a VGA port and the other has an HDMI port, you’ll need a VGA to HDMI adapter. Similarly, if one device has a DVI port and the other has a DisplayPort port, you’ll require a DVI to DisplayPort adapter. Make sure to gather any necessary adapters to facilitate the connection between your devices.
By gathering the appropriate cables and adapters, you’ll have all the necessary tools to establish a secure and reliable connection between your projector and computer. This step is essential to ensure a smooth and hassle-free setup process.
Power up the Projector and Computer
Once you have gathered the necessary cables and adapters, it’s time to power up both your projector and your computer. Here’s how to do it:
1. Projector: Plug the power cord of the projector into a power outlet. Make sure the power source is nearby and easily accessible. Once connected, press the power button on the projector to turn it on. Allow a few moments for the projector to warm up and initialize.
2. Computer: Ensure that your computer is connected to a power source and turned on. Press the power button to start your computer. Wait until it boots up completely and reaches the desktop or login screen.
It’s important to power up the projector before connecting it to the computer. This allows the projector to establish its settings and prepare for receiving signals from the computer.
3. Adjust Display Settings (Windows): On your computer, right-click on the desktop and select “Display Settings” or “Screen Resolution.” In the display settings window, you can adjust various parameters such as resolution, orientation, and display mode. Select the appropriate settings that match your projector’s resolution and aspect ratio.
4. Adjust Display Settings (Mac): On a Mac, go to the Apple menu and select “System Preferences.” In the “System Preferences” window, click on “Displays.” From there, you can modify display settings such as resolution, arrangement, and mirroring options. Ensure that the settings are compatible with your projector’s specifications.
Adjusting the display settings on your computer is crucial to ensure that the content is displayed correctly on the connected projector.
By powering up both the projector and computer and adjusting the display settings accordingly, you are one step closer to establishing a successful connection. Next, we will explore different methods of connecting the projector to the computer using various cable options.
Connect the Projector to the Computer using VGA Cable
If you have a VGA port on both your projector and computer, connecting them using a VGA cable is a straightforward and common method. Follow these steps:
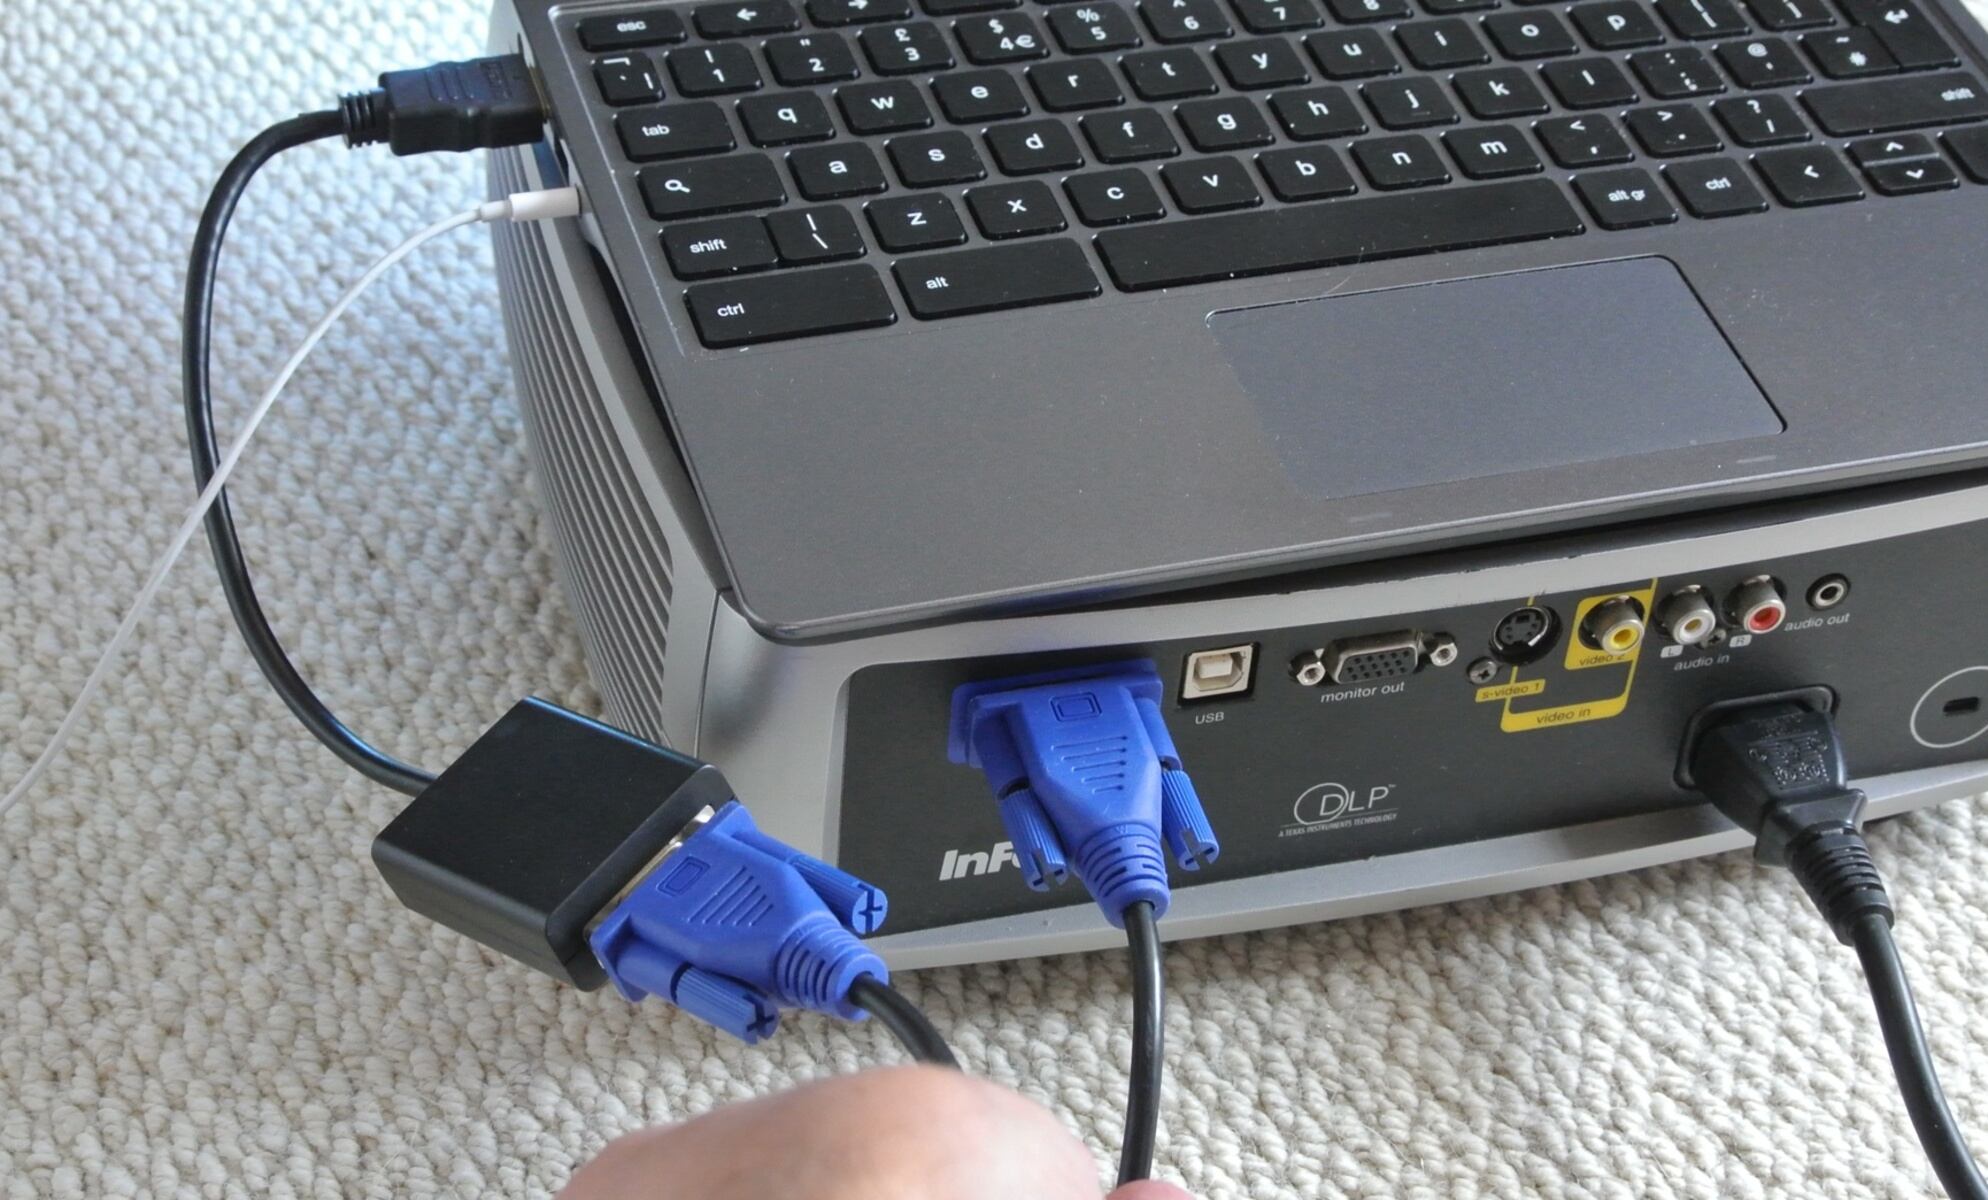
1. Identify the VGA ports: Locate the VGA port on your projector and computer. They are typically blue in color and have 15 pins. Make sure to align the pins properly when connecting the cable.
2. Connect the VGA cable: Take one end of the VGA cable and insert it into the VGA port on the back of your computer. Tighten the screws on the cable to secure it in place. Then, take the other end of the VGA cable and connect it to the VGA input on your projector.
3. Select the VGA input: On your projector, use the remote control or the control panel buttons to select the VGA input source. This will ensure that the projector receives the signal from your computer through the VGA cable.
4. Adjust screen resolution (if needed): Once the connection is established, you may need to adjust the screen resolution on your computer to match the native resolution of the projector. Refer to the user manual of your projector for the recommended resolution.
5. Test the connection: Turn on both the projector and the computer. Your computer’s screen should now be projected onto the projector. If not, try pressing the “Input” or “Source” button on the projector’s remote control to cycle through different input sources until the computer’s display appears.
Connecting your projector to the computer using a VGA cable is a traditional and reliable method. However, it’s worth noting that VGA technology transmits analog signals, which may not provide the highest-definition image quality compared to digital connections like HDMI or DVI.
If your computer does not have a VGA port but your projector does, you can use a VGA to HDMI or VGA to DVI adapter to bridge the connection between the devices. Follow the same steps as above, but instead of connecting the VGA cable directly, connect the VGA adapter to the appropriate port on your computer, and then connect the HDMI or DVI cable from the adapter to the projector.
Now that your projector is successfully connected to your computer using a VGA cable, you’re ready to enjoy your presentations, videos, or other multimedia content on the big screen.
Connect the Projector to the Computer using HDMI Cable
If your projector and computer both have HDMI ports, using an HDMI cable is an ideal method for connecting the two devices. HDMI delivers high-definition audio and video signals, providing a crisp and clear image quality. Follow these steps to connect the projector to the computer using an HDMI cable:
1. Locate the HDMI ports: Identify the HDMI port on both your computer and projector. They are typically rectangular in shape and labeled “HDMI.” Ensure that both devices have an HDMI port available for connection.
2. Connect the HDMI cable: Take one end of the HDMI cable and insert it into the HDMI port on the back of your computer. Gently push the cable in until it is securely connected. Next, insert the other end of the HDMI cable into the HDMI input on your projector.
3. Select the HDMI input: On your projector, use the remote control or the control panel buttons to select the HDMI input source. This tells the projector to receive the signal from your computer through the HDMI cable.
4. Adjust screen resolution (if needed): In some cases, you may need to adjust the screen resolution on your computer to match the native resolution of the projector for optimal display. Check the user manual of your projector for the recommended resolution settings.
5. Test the connection: Power on both the projector and the computer. The computer’s display should now be projected onto the projector. If not, try pressing the “Input” or “Source” button on the projector’s remote control to toggle between different input sources until the computer’s display appears.
Connecting your projector to the computer using an HDMI cable offers the advantage of transmitting both audio and video signals with one cable, eliminating the need for separate audio connections. Additionally, HDMI provides a digital signal, resulting in crystal-clear image quality.
If your computer does not have an HDMI port, but both the projector and computer have DVI ports, you can use an HDMI to DVI cable or adapter to connect them. Simply connect one end of the HDMI to DVI cable or adapter to the HDMI port on the projector and the other end to the DVI port on the computer.
Now that your projector is successfully connected to your computer using an HDMI cable, you can enjoy high-definition multimedia content on a larger screen, making it ideal for presentations, gaming, or movie nights.
Connect the Projector to the Computer using DVI or DisplayPort Cable
If your projector and computer have DVI or DisplayPort ports, you can establish a connection using a DVI or DisplayPort cable. These connections provide high-quality digital signals that ensure sharp and vibrant visuals. Here’s how to connect your projector to the computer using a DVI or DisplayPort cable:
1. Identify the DVI or DisplayPort ports: Locate the DVI or DisplayPort ports on both your computer and projector. DVI ports are rectangular and may have pins on one side, while DisplayPort ports are typically square with beveled corners. Ensure that both devices have the appropriate port available.
2. Connect the DVI or DisplayPort cable: Take one end of the DVI or DisplayPort cable and insert it into the corresponding port on the back of your computer. Make sure the cable is securely connected. Next, connect the other end of the cable to the DVI or DisplayPort input on your projector.
3. Select the DVI or DisplayPort input: Use the remote control or control panel buttons on your projector to select the DVI or DisplayPort input source. This prompts the projector to receive the signal from your computer via the DVI or DisplayPort cable.
4. Adjust screen resolution (if needed): Depending on your computer’s settings, you may need to adjust the screen resolution to match the native resolution of the projector. Consult the user manual of your projector for the recommended resolution.
5. Test the connection: Power on both the projector and the computer. The computer’s display should now be projected onto the projector. If the display doesn’t appear, press the “Input” or “Source” button on the projector’s remote control to cycle through different input sources until the computer’s display is visible.
If your computer has a DVI port and your projector only has a DisplayPort input, use a DVI to DisplayPort adapter or cable to make the connection. Simply connect one end of the DVI to DisplayPort adapter or cable to the DVI port on the computer and the other end to the DisplayPort input on the projector.
Connecting your projector to the computer using DVI or DisplayPort cables ensures a high-quality digital connection, resulting in sharp and detailed visuals. Enjoy your presentations, videos, or any other multimedia content on the big screen with exceptional clarity.
Adjust the Display Settings on the Computer
After connecting your projector to the computer, it’s important to adjust the display settings to ensure optimal projection quality and compatibility. By adjusting the display settings on your computer, you can customize various parameters to suit the specific requirements of your projector. Here’s how to do it:
1. Windows:
- Right-click on the desktop and select “Display Settings” or “Screen Resolution.”
- In the display settings window, you can modify the screen resolution, orientation, and other display-related preferences.
- Ensure that the resolution selected matches the native resolution of your projector for the best picture quality.
- Adjust additional settings such as color calibration, refresh rate, and multiple displays if applicable.
2. Mac:
- Go to the Apple menu and select “System Preferences.”
- Click on “Displays” to access the display settings.
- In the display settings window, you can adjust the screen resolution, arrangement, and other visual preferences.
- Select the appropriate resolution that corresponds to your projector’s native resolution.
- Make additional adjustments like color profiles and mirroring options as needed.
It’s essential to match the resolution of your computer’s display settings to the native resolution of the projector. Mismatched resolutions may result in distorted or pixelated images.
Furthermore, you may need to adjust other display-related settings like color calibration, brightness, contrast, and gamma to achieve the desired visual quality and to make the content appear accurately on the projected screen.
If you’re using multiple displays, make sure to configure the settings accordingly, such as extending the display or duplicating it depending on your presentation requirements.
Remember to save the changes and exit the display settings window once you have adjusted all the necessary parameters.
By fine-tuning the display settings on your computer to match the specifications of your projector, you can ensure a seamless and visually pleasing projection experience. Take some time to experiment with the settings to achieve the best results for your specific setup.
Configure the Projector Settings
Once you have connected your projector to your computer and adjusted the display settings on your computer, it’s time to configure the settings on the projector itself. Configuring the projector settings ensures that the projected image is aligned, sized correctly, and optimized for your specific needs. Here are the steps to configure the projector settings:
1. Keystone Correction: Most projectors have a keystone correction feature that corrects any distortion caused by projecting at an angle. Use the keystone adjustment buttons or options in the projector menu to align the vertical and horizontal image edges so that they appear straight and well-proportioned.
2. Projection Distance and Zoom: Adjust the projection distance and zoom to achieve the desired image size. Use the projector’s zoom control or lens adjuster to increase or decrease the image size according to your needs. Refer to the projector’s user manual for recommended projection distances and zoom ratios.
3. Focus: Ensure that the projected image is in sharp focus. Use the focus ring or digital focus adjustment options on the projector until the text and images appear clear and well-defined. Make fine adjustments until you achieve the desired level of sharpness.
4. Color and Image Settings: Access the projector’s menu and explore various image settings such as brightness, contrast, color temperature, and saturation. Adjust these settings to enhance the visual quality and ensure accurate color reproduction based on your preferences or the specific requirements of your content.
5. Audio Settings (optional): If your projector has built-in speakers or audio output ports, configure the audio settings accordingly. Adjust volume levels, audio input sources, and speaker modes to achieve the desired audio experience for your presentations, videos, or other multimedia content.
6. Save Settings: Once you have configured the projector settings to your satisfaction, consider saving the settings as a custom preset if your projector supports this feature. This allows you to easily recall your preferred settings for future use.
By configuring and fine-tuning the settings on your projector, you can optimize the projected image to align with your specific requirements and ensure the best possible visual and audio experience.
Take the time to experiment with different settings and make adjustments as needed. Remember to consult the projector’s user manual for specific instructions on accessing and adjusting the various settings available on your specific model.
Now that you have successfully connected and configured both your computer and projector, you’re ready to enjoy a seamless and visually captivating projection experience.
Troubleshoot Common Connection Issues
While connecting a projector to a computer is generally a smooth process, there can be occasional connection issues that may arise. Understanding and troubleshooting these common issues can help you resolve them quickly and ensure a successful connection. Here are some common connection issues and their possible solutions:
1. No Signal: If the projector displays a “No Signal” message or fails to project the computer’s display, double-check the cable connections. Ensure that all cables are securely plugged in, and the right input source is selected on the projector.
2. Wrong Input Source: If the projected screen remains blank, try cycling through different input sources on the projector using the remote control or control panel buttons. It’s possible that the projector is not set to the correct input source for the connected computer.
3. Screen Resolution Mismatch: If the projected image appears distorted or not fitting properly on the screen, adjust the screen resolution settings on your computer to match the native resolution of the projector. This ensures that the content is displayed correctly and fits the projector’s screen.
4. Audio Issues: If you encounter audio problems, check the audio settings on both the computer and the projector. Ensure that the correct audio input source is selected and that the volume is not muted or set too low on either device. If necessary, try using external speakers or connecting audio cables directly to external speakers.
5. Faulty Cables or Adapters: Inspect the cables and adapters for any signs of damage. Faulty or damaged cables can cause connection issues. Try using different cables or adapters to determine if they are the root cause of the problem. Replacing them with new ones may resolve the issue.
6. Compatibility Issues: Verify the compatibility between your computer and projector. Confirm that the computer’s operating system, graphics card, and the projector’s supported resolutions and formats align. Check for any firmware or driver updates for both devices, as outdated software can sometimes cause compatibility issues.
7. Power Source Problems: Ensure that both the projector and the computer are connected to a power source and turned on. In some cases, power fluctuations or insufficient power supply can disrupt the connection. Try using a different power outlet or using a surge protector to eliminate any power-related issues.
8. Restart and Reset: If all else fails, try restarting both the projector and the computer. Power them off, wait a few seconds, and then power them back on. Additionally, you can try performing a factory reset on the projector to restore default settings.
If you continue to experience connection issues, consult the user manuals for your computer and projector or reach out to the manufacturer’s technical support for further assistance. They can provide specific troubleshooting steps based on your device’s model and configuration.
By understanding and addressing these common connection issues, you can ensure a smooth and trouble-free experience when connecting your projector to your computer.