
Why Clear Kindle History?
When using a Kindle device or the Kindle app, your reading and browsing history is automatically recorded. This includes the books you have read, the websites you have visited, and the searches you have conducted. While this history can be convenient for keeping track of your reading habits and revisiting websites, there may be times when you want to clear this history for privacy or organizational reasons.
Here are a few reasons why you might consider clearing your Kindle history:
- Protecting your privacy: Clearing your Kindle history helps ensure that others who may access your device or app cannot see which books you have read or the websites you have visited. This can be especially important if you share your Kindle with others or use a public device.
- Removing clutter: Over time, your Kindle history can become cluttered with books you no longer need or websites you no longer visit. Clearing this history can help streamline your library and browsing experience, making it easier to find the content that truly matters to you.
- Starting fresh: Sometimes, you may want to begin anew with a clean slate. Clearing your Kindle history allows you to start afresh, without any previous browsing or reading activities influencing your current experience.
- Managing recommendations: Amazon’s recommendation algorithm takes into account your reading and browsing history to suggest new books or related content. By clearing this history, you can reset the algorithm and receive fresh recommendations based on your current interests.
- Deleting sensitive content: If you have accessed or downloaded any content that you no longer want visible on your Kindle, clearing the history can remove any trace of it from the device or app.
By understanding the reasons for clearing your Kindle history, you can decide when it is appropriate to do so. Whether for privacy, organization, or a fresh start, clearing your Kindle history can help optimize your reading and browsing experience.
Steps to Clear Kindle History
If you’re ready to clear your Kindle history, follow these simple steps based on the specific Kindle device or app you are using:
Clearing Browsing History on Kindle Fire:
- On your Kindle Fire, navigate to the home screen and tap on the “Settings” icon.
- In the settings menu, scroll down and tap on “Applications.”
- Next, select “Manage All Applications” or “Apps & Notifications.”
- Scroll through the list of applications and find the browser you use, such as Silk or Firefox.
- Tap on the browser app, and then choose “Storage.”
- Select “Clear Data” or “Clear Cache and Data” to delete your browsing history.
- Confirm the action when prompted, and your browsing history for that specific browser will be cleared.
Clearing Browsing History on Kindle Paperwhite:
- On your Kindle Paperwhite, tap on the menu button (the three vertical dots) at the top-right corner of the screen.
- From the dropdown menu, select “Settings.”
- Navigate to “Device Options” or “Device,” depending on your Paperwhite’s software version.
- Choose “Advanced Options.”
- Scroll down and select “Privacy & Security.”
- Tap on “Clear History” to remove all browsing history from your Kindle Paperwhite.
- Confirm the action if prompted.
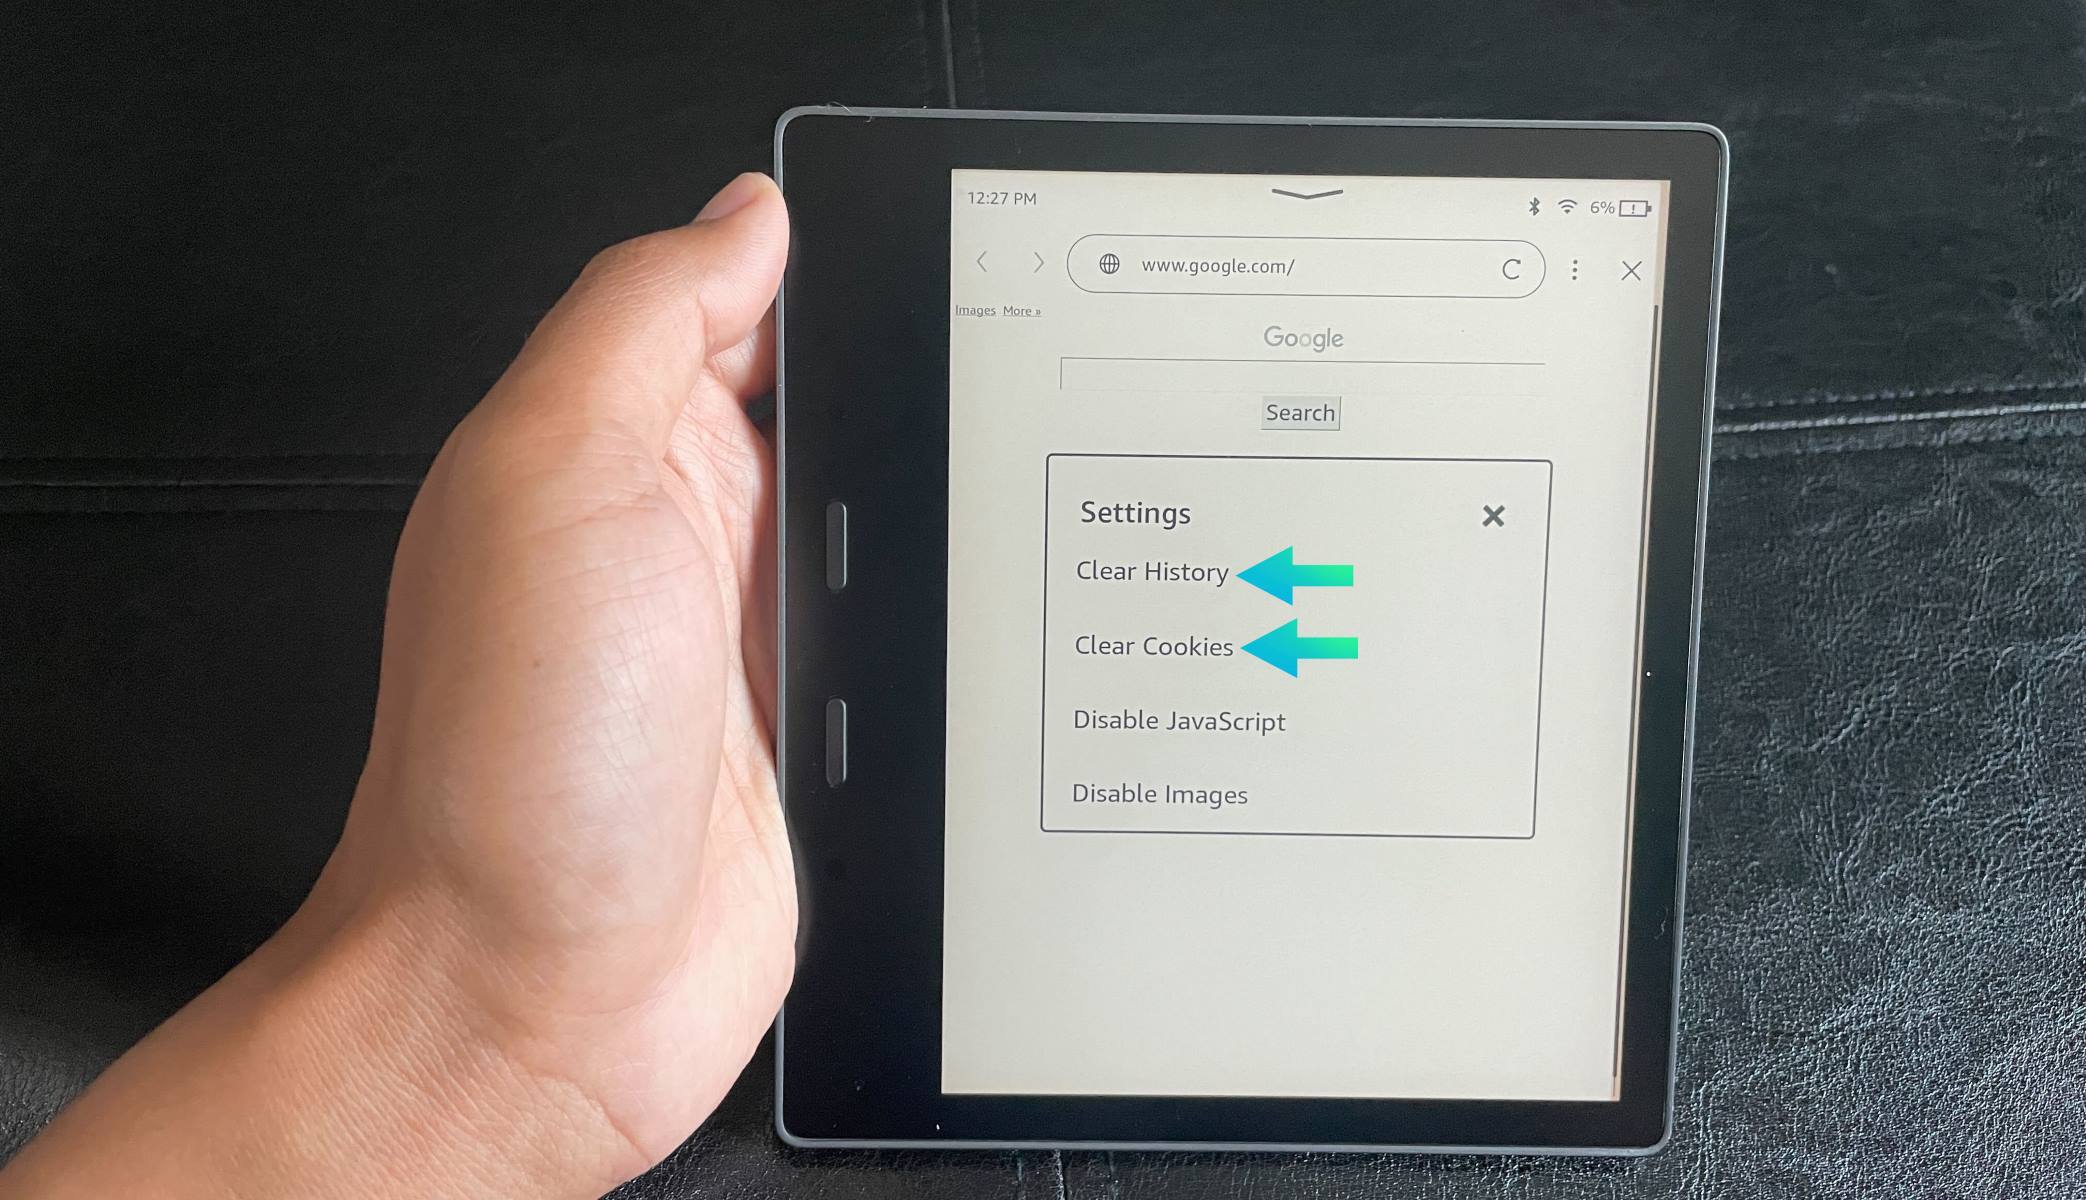
Clearing Browsing History on Kindle Oasis:
- On your Kindle Oasis, swipe down from the top of the screen to open the quick actions menu.
- Select the “Settings” icon (gear symbol).
- In the settings menu, tap on “Device Options.”
- Choose “Advanced Options.”
- Select “Privacy & Security.”
- Tap on “Clear History” to remove all browsing history from your Kindle Oasis.
- Confirm the action if prompted.
Clearing Browsing History on Kindle App:
- Open the Kindle app on your device.
- Tap on the menu button (usually represented by three horizontal lines) at the top-left corner.
- From the menu, select “Settings.”
- Tap on “Privacy.”
- Scroll down and select “Clear Browsing Data.”
- Choose the data you want to clear, such as browsing history, cached images, or cookies.
- Tap “Clear Data” to confirm and remove the selected browsing history from your Kindle app.
Follow these steps on your specific Kindle device or app to clear your browsing history and enjoy a clean, fresh reading and browsing experience.
Clearing Browsing History on Kindle Fire
If you’re using a Kindle Fire tablet and want to clear your browsing history, follow these step-by-step instructions:
- On your Kindle Fire, navigate to the home screen and tap on the “Settings” icon. It looks like a gear.
- In the settings menu, scroll down and tap on “Applications.”
- Next, select “Manage All Applications” or “Apps & Notifications,” depending on your device’s software version and settings layout.
- Scroll through the list of applications and look for the browser you use, such as Silk or Firefox. Tap on the browser app.
- In the browser settings, choose “Storage.”
- You will see options to clear different types of data, including cache, cookies, and browsing history. Select “Clear Data” or “Clear Cache and Data” to delete your browsing history.
- A confirmation message may appear to verify your action. Confirm or tap “OK” to proceed with the clearing process.
By following these steps, the browsing history for the specific browser app on your Kindle Fire will be cleared.
Clearing your browsing history can help protect your privacy and keep your Kindle Fire organized. It ensures that others who may access your device cannot see the websites you’ve visited or the pages you’ve browsed. Additionally, clearing your browsing history can free up some storage space on your device, as cached files and website data can take up storage over time.
Remember that clearing your browsing history will remove all record of the websites you’ve visited, so if there are any important sites you want to remember or revisit, make sure to bookmark them or make note of their URLs before clearing your history.
Now that you know how to clear the browsing history on your Kindle Fire, you can maintain your privacy and keep a clutter-free browsing experience on your device.
Clearing Browsing History on Kindle Paperwhite
If you own a Kindle Paperwhite and want to clear your browsing history, follow these simple steps:
- On your Kindle Paperwhite, tap on the menu button (the three vertical dots) at the top-right corner of the screen. This will open the menu options.
- From the dropdown menu, select “Settings.”
- Navigate to the “Device Options” or “Device” section, depending on the software version of your Paperwhite.
- Choose “Advanced Options.”
- Scroll down and select “Privacy & Security.”
- In the privacy settings, you will find the option to “Clear History.” Tap on it.
- A confirmation message will appear, asking if you want to clear your browsing history. Confirm the action to proceed.
By following these steps, you will clear all browsing history from your Kindle Paperwhite, ensuring that no traces of the websites you’ve visited remain on the device.
Clearing your browsing history on the Kindle Paperwhite can be beneficial for privacy reasons. It helps protect your personal information and ensures that others who may use your device cannot see the websites you’ve visited.
It’s important to note that clearing your browsing history on the Kindle Paperwhite will remove all record of the websites you’ve visited. If there are any important sites you want to remember or revisit, make sure to bookmark them or take note of their URLs before clearing your history.
By regularly clearing your browsing history, you can keep your Kindle Paperwhite organized and maintain your privacy while enjoying a hassle-free reading experience.
Clearing Browsing History on Kindle Oasis
If you own a Kindle Oasis and want to clear your browsing history, you can follow these steps:
- On your Kindle Oasis, swipe down from the top of the screen to open the quick actions menu.
- Select the “Settings” icon (represented by a gear symbol) from the top-right corner of the screen.
- In the settings menu, tap on “Device Options.”
- Choose “Advanced Options.”
- Scroll down and select “Privacy & Security.”
- In the privacy settings, you will find the option to “Clear History.” Tap on it.
- A confirmation message will appear, asking if you want to clear your browsing history. Confirm the action to proceed.
By following these steps, you will clear all browsing history from your Kindle Oasis, ensuring that no traces of the websites you’ve visited remain on the device.
Clearing your browsing history on the Kindle Oasis can be beneficial for maintaining your privacy. It helps protect your personal information and ensures that others who may use your device cannot see the websites you’ve visited.
It’s important to note that clearing your browsing history on the Kindle Oasis will remove all record of the websites you’ve visited. If there are any important sites you want to remember or revisit, make sure to bookmark them or take note of their URLs before clearing your history.
Regularly clearing your browsing history can help keep your Kindle Oasis organized and maintain your privacy while enjoying a seamless reading experience.
Clearing Browsing History on Kindle App
If you’re using the Kindle app on your device and want to clear your browsing history, follow these steps:
- Open the Kindle app on your device.
- Tap on the menu button, usually represented by three horizontal lines, located at the top-left corner of the screen.
- From the menu that appears, select “Settings.”
- In the settings menu, tap on “Privacy.”
- Scroll down and select “Clear Browsing Data.”
- You will see options to clear different types of data, such as browsing history, cached images, and cookies. Choose the data you want to clear.
- Tap on “Clear Data” to confirm and remove the selected browsing history data from your Kindle app.
By following these steps, you will be able to clear browsing history from the Kindle app on your device.
Clearing your browsing history on the Kindle app helps protect your privacy and ensures that others who may use your device or access your app cannot see the websites you’ve visited or the pages you’ve viewed.
It’s important to note that clearing your browsing history will remove all record of the websites you’ve visited. If there are any important sites you want to remember or revisit, make sure to bookmark them or make note of their URLs before clearing your history.
Regularly clearing your browsing history on the Kindle app can help keep your app organized and maintain your privacy while enjoying your reading experience.
How to Clear Search History on Kindle
If you want to clear your search history on your Kindle device or app, follow these simple steps:
- First, open the Kindle device or app on which you want to clear the search history.
- On the home screen or main menu, navigate to the search bar.
- Within the search bar, you may see a small symbol or icon, such as a magnifying glass or a clock. Tap on this symbol to access your search history.
- You will now see a list of your previous searches. Tap and hold on the search term you want to remove from your history until a menu appears.
- In the menu, select the option to “Delete” or “Remove” the search term.
- Repeat this process for each search term you want to clear from your history.
- Once you have deleted all the desired search terms, you can exit the search history menu.
By following these steps, you can easily clear your search history on your Kindle device or app.
Clearing your search history can be useful for maintaining privacy and decluttering your search suggestions. It ensures that others who may access your device or app cannot see your previous search queries.
Additionally, clearing your search history can also help personalize your future search suggestions, ensuring that they are based on your current interests and preferences rather than outdated searches.
It’s important to note that clearing your search history only removes the search terms from the history list. It does not affect the availability or accessibility of the books, articles, or websites associated with those search terms.
By regularly clearing your search history on your Kindle device or app, you can enjoy a cleaner and more personalized search experience.
How to Delete Books from Kindle History
If you want to remove books from your Kindle history, whether for organization or privacy purposes, follow these steps:
- First, open your Kindle device or app.
- Navigate to your Library or Home screen, where you can see a list of all the books in your collection.
- Locate the book you want to delete from your history.
- On most Kindle devices, you can press and hold the book cover or title until a menu appears. On the Kindle app, you can tap and hold the book cover or use the options icon (typically represented by three vertical dots).
- In the menu that appears, select the option to “Remove from Device” or “Delete.”
- Confirm the deletion if prompted.
By following these steps, you can successfully delete books from your Kindle history.
Deleting books from your Kindle history helps keep your library organized and allows you to focus on the books that are most relevant to you. It can also ensure your privacy by removing any trace of particular books from your history.
It’s important to note that deleting a book from your history does not remove it from your Amazon account or permanently delete the book from your Kindle account. The book will still be available in your cloud library, and you can easily re-download it if desired.
You can always access your deleted books in the “Manage Your Content and Devices” section on Amazon’s website, where you can restore any previously deleted books to your Kindle device or app.
By regularly deleting books from your Kindle history, you can maintain an organized library and prioritize the books that matter most to you.
How to Remove Items from Kindle Reading History
If you want to remove specific items from your Kindle reading history, whether it’s books, articles, or other content, follow these steps:
- Open your preferred web browser and navigate to the Amazon website.
- Click on “Sign In” at the top-right corner and enter your Amazon account credentials.
- Once signed in, hover over the “Account & Lists” option and select “Your Content and Devices” from the drop-down menu.
- In the “Your Content and Devices” page, click on the “Content” tab.
- You will see a list of all the items you have purchased or downloaded on your Kindle device or app. If necessary, use the search or filter options to locate the specific item you want to remove from your reading history.
- Locate the item you want to remove and click on the “…” or “Options” button next to it.
- From the menu that appears, select “Delete” or “Remove from Library” to remove the item from your reading history.
- If prompted, confirm the deletion to remove the item from your reading history.
By following these steps, you can easily remove items from your Kindle reading history.
Removing items from your reading history can help you keep track of the books and content that are truly relevant to you. It allows you to prioritize your reading list and maintain a clean and organized history.
It’s important to note that removing an item from your reading history does not impact your ownership or access to that item. The item will still be available in your cloud library or can be re-downloaded if desired.
By regularly removing items from your Kindle reading history, you can curate a personalized and organized reading experience that aligns with your current interests.
How to Hide Purchased Items on Kindle
If you want to hide purchased items on your Kindle device or app, follow these simple steps:
- First, open your web browser and go to the Amazon website.
- Click on “Sign In” at the top-right corner of the page and enter your Amazon account credentials.
- Once signed in, hover over the “Account & Lists” option and select “Your Content and Devices” from the drop-down menu.
- In the “Your Content and Devices” page, click on the “Preferences” tab at the top of the page.
- Scroll down to the “Visibility” section, and you will see two options: “Books” and “Personal Document Settings.”
- To hide purchased books, click on the “Books” option.
- Uncheck the box next to “Show Kindle Unlimited and Prime Reading” if you want to hide those specific items as well.
- To hide personal documents or items that were side-loaded, click on the “Personal Document Settings” option and uncheck the box next to “Automatically deliver to all devices.”
- Once you have made your desired changes, scroll down and click on the “Save Preferences” button to save the settings.
By following these steps, you can hide purchased items on your Kindle device or app.
Hiding purchased items can be beneficial if you want to keep your library more organized or prefer to focus on specific books or content. It allows you to declutter your library and customize your reading experience according to your preferences.
It’s important to note that hiding purchased items does not delete or remove the items from your account. The hidden items will still be accessible and can be unhidden at any time by modifying the visibility settings.
If you have multiple Kindle devices or apps linked to your Amazon account, the changes you make to hide purchased items will apply to all devices and apps that are associated with your account.
By managing the visibility of your purchased items on the Kindle, you can tailor your reading experience to your liking and create a more personalized library.