
Method 1: Using the Increase/Decrease Decimal Buttons
One of the simplest ways to change the number of decimal places in Excel is by using the Increase/Decrease Decimal buttons. These buttons are conveniently located in the Home tab of the ribbon, making it easy to adjust decimal places on the fly.
To use these buttons, follow these steps:
- Select the cell or range of cells that you want to modify.
- Locate the Increase Decimal and Decrease Decimal buttons in the ribbon. They are represented by icons in the Number group.
- To increase the number of decimal places, click on the Increase Decimal button (it looks like an arrow pointing to the right with a small dot next to it).
- If you want to decrease the number of decimal places, click on the Decrease Decimal button (it looks like an arrow pointing to the left with a small dot next to it).
- Each time you click on the Increase or Decrease Decimal buttons, Excel will add or remove one decimal place from the selected cells. You can continue clicking until you reach the desired number of decimal places.
It’s important to note that the Increase/Decrease Decimal buttons modify the display format of the cells. The underlying values in the cells remain unchanged, only the visual representation is affected. If you want to permanently modify the values, you’ll need to use other methods such as formatting or formulas.
This method is perfect for situations where you need to quickly adjust the decimal places for a small set of cells. It’s simple, fast, and doesn’t require any complex formatting or formula adjustments. However, if you need to apply the same change to a larger range of cells, you might find the next method more efficient.
Method 2: Using the Increase/Decrease Decimal Option in the Ribbon
Another way to change the number of decimal places in Excel is by utilizing the Increase/Decrease Decimal option in the ribbon. This method provides more flexibility compared to the Increase/Decrease Decimal buttons as it allows you to specify the exact number of decimal places.
To use this method, follow these steps:
- Select the cell or range of cells that you want to modify.
- Go to the Home tab in the ribbon and locate the Number group.
- Click on the “Increase Decimal” button (represented by an icon of an upward arrow with a small dot) to increase the decimal places.
- Click on the “Decrease Decimal” button (represented by an icon of a downward arrow with a small dot) to decrease the decimal places.
- Alternatively, you can directly click on the “More Decimal Places” button (represented by an icon of two decimal places) to open the “Format Cells” dialog box.
In the “Format Cells” dialog box, you can adjust the number of decimal places and customize other formatting options as well. You can also set a specific number of decimal places by typing it directly into the “Decimal places” box. Once you’re satisfied with the settings, click “OK” to apply the changes.
The advantage of this method is that it allows for precise control over the decimal places. You can easily increase or decrease the decimal places to match your requirements. Additionally, the “Format Cells” dialog box offers more extensive formatting options, allowing you to further tailor the appearance of the cells.
Whether you have a small or large range of cells to modify, this method proves to be efficient and effective. It provides you with the flexibility to choose the exact number of decimal places you need, ensuring your data is displayed accurately.
Method 3: Using the Format Cells Dialog Box
If you require more advanced formatting options or want to apply changes to a larger range of cells, using the Format Cells dialog box is the ideal approach. This method allows you to customize various formatting settings, including the number of decimal places.
Follow these steps to use the Format Cells dialog box:
- Select the cell or range of cells that you want to modify.
- Right-click on the selected cells and choose “Format Cells” from the context menu, or go to the Home tab in the ribbon and click on the “Format” button in the Number group, and then select “Format Cells”.
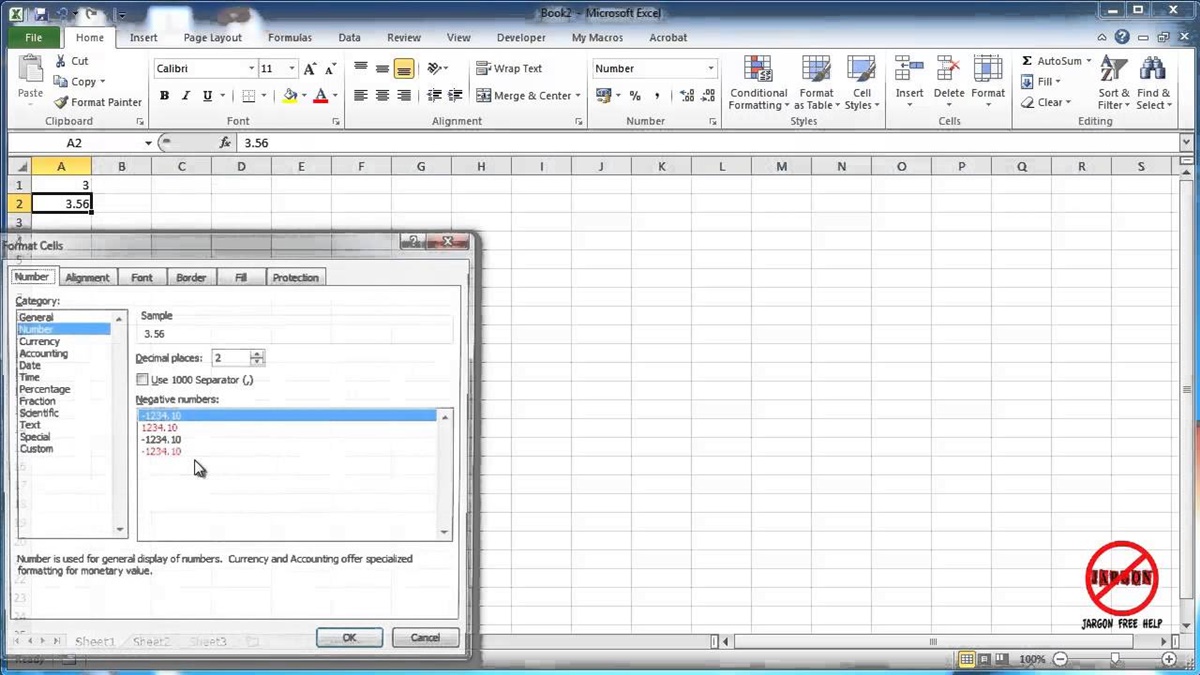
- In the Format Cells dialog box, navigate to the “Number” tab.
- Under the “Category” section, choose “Number” to display numeric values.
- In the “Decimal places” box, enter the desired number of decimal places you want to display.
- Additionally, you can customize other formatting options, such as adding a thousands separator or prefix/suffix, by selecting the respective options in the dialog box.
- Once you have made your desired adjustments, click “OK” to apply the changes and close the dialog box.
The Format Cells dialog box provides a comprehensive range of formatting options, allowing you to not only adjust the decimal places but also modify other aspects of the cell formatting. Whether you need to display currency values or format percentages, this method enables you to tailor the appearance of your data precisely.
Moreover, the Format Cells dialog box is particularly useful when you need to format a large range of cells consistently. Instead of modifying each cell individually, you can apply the desired formatting to multiple cells simultaneously, saving you time and effort.
By utilizing the Format Cells dialog box, you gain full control over the display format of numeric values, ensuring accurate representation of your data with the desired number of decimal places.
Method 4: Changing the Decimal Places with a Formula
If you need to change the number of decimal places in Excel using a formula, you can do so by utilizing the built-in functions for rounding or formatting. This method is ideal when you want to change the decimal places dynamically based on certain conditions or calculations.
Follow these steps to change the decimal places with a formula:
- Open the spreadsheet and select the cell or cells where you want to modify the decimal places.
- In the formula bar, enter the formula that will adjust the decimal places according to your requirements.
- For example, to reduce the number of decimal places to two, you can use the formula =ROUND(A1, 2), where A1 represents the cell reference. Adjust the formula according to the cell you want to modify and the desired number of decimal places.
- Press Enter to apply the formula and change the decimal places in the selected cell or cells.
Using formulas to change the decimal places provides the advantage of dynamic and automated adjustments based on your desired criteria. You can apply different formulas based on various conditions, ensuring that your data is displayed accurately with the appropriate number of decimal places.
Additionally, you can combine formulas with conditional formatting to further enhance the visual representation of your data. By formatting cells based on specific criteria, you can create meaningful visual cues that help interpret the data more effectively.
Keep in mind that when using formulas, the underlying values in the cells are not permanently changed. The formula simply adjusts the displayed result. If you need to modify the actual values, consider using formatting or other methods.
By leveraging formulas in Excel, you can conveniently change the number of decimal places in your data, providing precise representation and flexibility for your calculations and analyses.
Method 5: Applying the Decimal Places to a Range of Cells
When you have a range of cells that require the same number of decimal places, manually adjusting each cell can be time-consuming. Fortunately, Excel provides a convenient method to apply the decimal places to a range of cells simultaneously.
Follow these steps to apply the decimal places to a range of cells:
- Select the range of cells that you want to modify.
- Right-click on the selected cells and choose “Format Cells” from the context menu, or go to the Home tab and click on the “Format” button in the Number group, and then select “Format Cells”.
- In the Format Cells dialog box, navigate to the “Number” tab.
- Under the “Category” section, choose “Number” to display numeric values.
- In the “Decimal places” box, enter the desired number of decimal places you want to apply to the selected cells.
- Click “OK” to apply the changes.
By following these steps, you can quickly apply the same number of decimal places to a range of cells. This method is particularly useful when dealing with large data sets or when you need to maintain consistency across multiple cells.
Applying the decimal places to a range of cells ensures that all the values are displayed uniformly and accurately. It helps maintain data integrity and consistency in your worksheets, making it easier to understand and analyze the information.
Remember, this method only alters the display format of the cells. The original values within the cells remain unchanged. If you need to modify the underlying values, you may need to use formulas or other methods.
With the ability to apply decimal places to a range of cells, Excel enables you to efficiently format and present your data, ensuring readability and consistency throughout your worksheets.
Method 6: Adjusting the Decimal Places for a PivotTable
PivotTables in Excel allow you to analyze and summarize large amounts of data. When working with PivotTables, you may need to adjust the number of decimal places displayed for the calculated values. Excel provides a straightforward method to customize the decimal places in a PivotTable.
Follow these steps to adjust the decimal places for a PivotTable:
- Select a cell within the PivotTable.
- The “PivotTable Fields” pane will appear on the right side of the Excel window.
- In the “Values” section of the “PivotTable Fields” pane, find the field that you want to adjust the decimal places for.
- Right-click on the field and select “Value Field Settings”.
- In the “Value Field Settings” dialog box, go to the “Number Format” tab.
- Select the desired format category, such as “Number” or “Currency”.
- In the “Decimal places” box, enter the number of decimal places you want to display for the field.
- Click “OK” to apply the changes.
By following these steps, you can easily adjust the decimal places for a specific field in a PivotTable. This allows you to control the level of precision in your calculations and present the results in a way that best suits your needs.
Changing the decimal places in a PivotTable helps improve data visualization and ensures consistency across the analyzed values. It enables you to present the data in a more concise and understandable manner, making it easier to draw insights and make informed decisions.
It’s important to note that adjusting the decimal places in a PivotTable does not affect the underlying data or calculations. It merely changes the display format of the summarized values. If you need to modify the actual data, you may need to make adjustments in the source data or use other data manipulation techniques.
With the ability to customize decimal places in PivotTables, Excel provides a powerful feature for analyzing and presenting data effectively. This method allows you to refine the precision of your calculations, enhancing the accuracy and clarity of your reports.
Method 7: Rounding to a Specific Decimal Place
When working with numerical data in Excel, you may need to round numbers to a specific decimal place. Rounding helps simplify values and makes them easier to read and work with. Excel provides various functions that allow you to round numbers to a specific decimal place.
Follow these steps to round numbers to a specific decimal place:
- Select the cell or range of cells that contain the numbers you want to round.
- Open the formula bar and enter the rounding formula for the desired decimal place. For example, to round to two decimal places, use the formula: =ROUND(A1,2) where A1 represents the cell reference.
- Press Enter to apply the formula and round the numbers in the selected cell or cells.
Excel offers several rounding functions that you can use depending on your specific needs. These functions include ROUND, ROUNDUP, and ROUNDDOWN. The ROUND function is the most common choice for rounding to a specific decimal place.
You can also combine rounding functions with conditional logic to create more complex rounding rules. For example, you can use the IF function to round numbers to different decimal places based on specific criteria.
Rounding numbers to a specific decimal place in Excel ensures uniformity and readability of your data. It helps eliminate unnecessary precision and presents values in a more user-friendly format.
It’s important to note that rounding affects the display format of the numbers and not the underlying values. If you want to permanently change the values, consider using the ROUND function in combination with the Paste Values option to replace the original values with the rounded ones.
By utilizing the rounding functions in Excel, you can easily round numbers to a specific decimal place. This method allows for greater clarity and readability in your data, making it easier to understand and work with numerical values.