
Check the current date and time
To change the date and time on your Mac manually, the first step is to check what the current date and time is set to. This will help ensure that you make the necessary adjustments accurately. Here’s how you can check the current date and time:
- Click on the Apple menu in the top-left corner of your screen.
- Select “System Preferences” from the drop-down menu.
- In the System Preferences window, click on “Date & Time.”
- If the Date & Time preference pane is locked, click on the lock icon at the bottom-left corner of the window and enter your administrator password.
- You will see the current date and time displayed at the top of the Date & Time preference pane.
Confirm that the displayed date and time match the actual date and time before proceeding to make any changes. This step is crucial to ensure that you adjust the date and time accurately.
Open System Preferences
In order to change the date and time on your Mac manually, you need to access the System Preferences menu. Here’s how you can open System Preferences:
- Click on the Apple menu located in the top-left corner of your screen. It resembles the Apple logo.
- A drop-down menu will appear. Select “System Preferences” from the options listed. Alternatively, you can use the keyboard shortcut by pressing the Command and Spacebar keys simultaneously, type “System Preferences,” and hit Enter.
- The System Preferences window will open, displaying various icons representing different settings.
- Take a moment to familiarize yourself with the different categories available, such as System, Hardware, Internet & Wireless, and Personal.
- To proceed with changing the date and time, locate and click on the “Date & Time” icon. It is usually represented by a calendar icon.
Once you have successfully opened the System Preferences menu and selected the Date & Time icon, you are now ready to make the necessary adjustments to the date and time settings on your Mac.
Click on the Date & Time preference pane
After opening the System Preferences menu, the next step is to locate and click on the “Date & Time” preference pane. This is where you can make changes to the date and time settings on your Mac. Here’s how you can access the Date & Time preference pane:
- Once inside the System Preferences window, take a moment to look at the various icons representing different settings.
- Locate and click on the “Date & Time” icon. It is usually represented by a calendar icon.
- The Date & Time preference pane will now open, displaying several tabs with different options.
- By default, you will be on the “Date & Time” tab, which allows you to adjust the current date and time on your Mac.
- If the Date & Time preference pane is locked, click on the lock icon at the bottom-left corner of the window and enter your administrator password to make changes.
Once you have successfully accessed the Date & Time preference pane, you can proceed to make manual adjustments to the date and time based on your preferences.
Click on the lock icon and enter your admin password
In order to make changes to the date and time settings on your Mac, you may need to unlock the Date & Time preference pane by entering your administrator password. Here’s how you can do it:
- If the Date & Time preference pane is locked, you will see a lock icon at the bottom-left corner of the window.
- Click on the lock icon to unlock the preferences.
- A prompt will appear asking for your administrator password. Enter the password and click “OK” to proceed.
- Once you have entered the correct password, the Date & Time preference pane will be unlocked, allowing you to make changes.
It’s important to note that only users with administrative privileges can unlock the Date & Time preference pane. If you are not an administrator, you’ll need to seek assistance from someone with admin access or log in with an admin account to proceed with changing the date and time settings.
By entering your administrator password and unlocking the preference pane, you gain the necessary permissions to modify the date and time settings to match your desired changes. Ensure you use the correct password to ensure a successful unlock.
Enable set date and time automatically if not already enabled
Before manually changing the date and time on your Mac, it’s important to check if the “Set date and time automatically” option is already enabled. Enabling this option allows your Mac to automatically synchronize its date and time with the network time server, ensuring accuracy. Here’s how you can enable this option:
- Open the Date & Time preference pane by following the steps mentioned earlier.
- Click on the “Date & Time” tab if it’s not already selected.
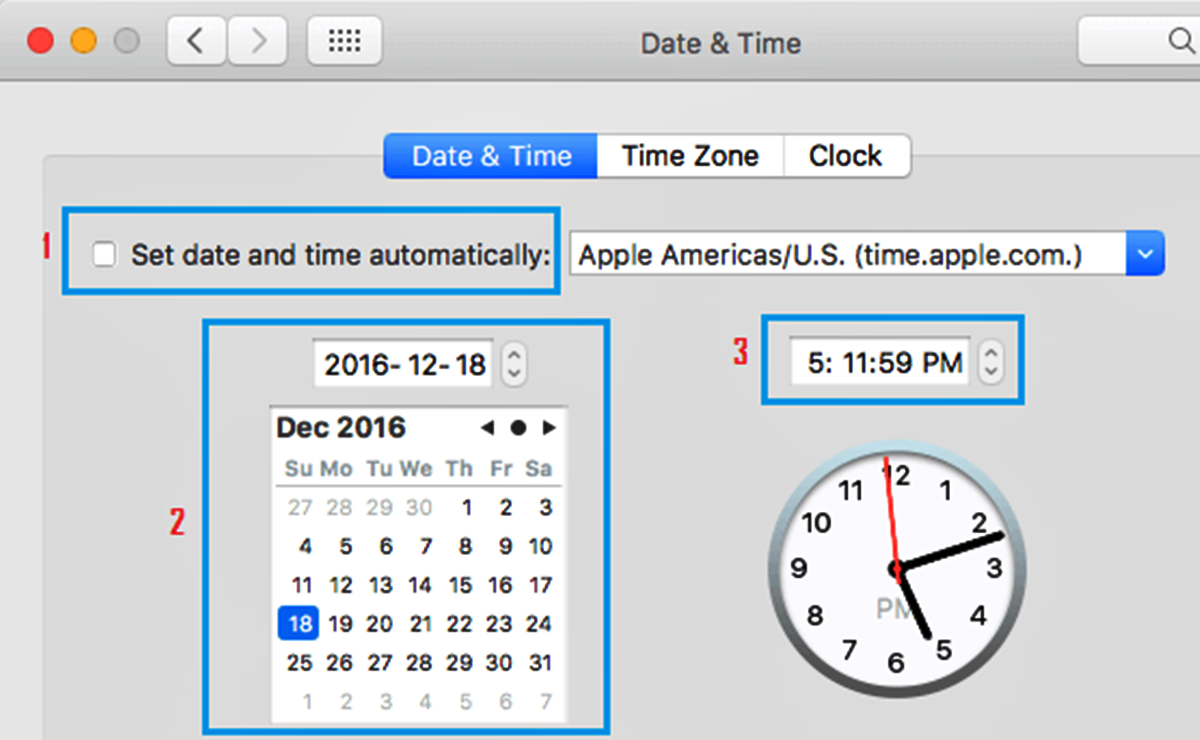
- Within the preference pane, you’ll find the “Set date and time automatically” option. It’s usually located under the clock display.
- If the option is already enabled (a tick mark will be present), you can skip this step. If not, click on the checkbox to enable it.
Enabling the “Set date and time automatically” option ensures that your Mac stays updated with the correct date and time information obtained from the network time server. This automatic synchronization is useful in maintaining accuracy, especially when traveling across different time zones or during daylight saving time changes.
If the option was already enabled, you can proceed with manually changing the date and time on your Mac. However, if you prefer to continue with the automatic synchronization, make sure to disable it before proceeding to manual adjustments.
Click on the Time Zone tab
In addition to changing the date and time, you may also need to adjust the time zone on your Mac. This is particularly important when you travel to a different region or country with a different time zone. Here’s how you can access and modify the time zone settings:
- If you haven’t already done so, open the Date & Time preference pane by following the steps outlined earlier.
- Within the Date & Time preference pane, click on the “Time Zone” tab. It is usually located next to the “Date & Time” tab.
- The Time Zone tab displays a map with location and time zone information.
- You will notice that the current time zone will be highlighted on the map, along with the city or region name.
- If you are in a different time zone than the one displayed, or if you are traveling to a different time zone, you need to adjust the time zone settings.
- To change the time zone, you can either manually select a different city from the map or enable the “Set time zone automatically using current location” option.
The Time Zone tab allows you to ensure that your Mac’s clock accurately reflects your current location, prevents confusion caused by time zone differences, and helps you stay in sync with the local time of where you are.
Take a moment to verify that the correct time zone is selected and adjust it as necessary before proceeding with any further changes to the date and time settings.
Select your current time zone
To ensure that your Mac displays the correct time, it’s important to select your current time zone within the Date & Time preference pane. Here’s how you can choose your time zone:
- If you haven’t done so already, open the Date & Time preference pane by following the steps mentioned earlier.
- Once you are in the Date & Time preference pane, make sure you are on the “Time Zone” tab.
- In front of you is a map with various cities and regions, each representing a different time zone.
- Locate your current location on the map or find the city that corresponds to your time zone.
- Click on the city or region to select it as your current time zone. You will notice that the selected city is highlighted.
Selecting your current time zone is important, especially if you are in an area with a different time zone or if you are traveling to a different location. By choosing the correct time zone, your Mac will accurately display the local time, ensuring that your activities and schedules are aligned with the local time of your location.
Once you have selected your current time zone, you can proceed with the next steps to manually change the date and time on your Mac, if necessary.
Manually change the date and time
If you need to adjust the date and time on your Mac manually, you can do so within the Date & Time preference pane. Here’s how you can manually change the date and time:
- Open the Date & Time preference pane by following the steps mentioned earlier.
- Make sure you are on the “Date & Time” tab within the preference pane.
- Click on the lock icon at the bottom-left corner of the window and enter your administrator password if the preference pane is locked.
- Under the “Date & Time” tab, you will see the options to adjust the date and time manually.
- Click on the “Date & Time” button to the right of the calendar to open the date and time adjustment interface.
- Within the adjustment interface, you can modify the date and time using the available controls.
- Use the arrow buttons or click on the individual digits to adjust the date and time values as desired.
- Review the changes in the preview area to ensure the correct date and time are being set.
- Once you are satisfied with the adjustments, click the “Set Date & Time” button to apply the changes.
By manually changing the date and time, you have the flexibility to set it to a specific value that aligns with your needs. This can be particularly useful when dealing with expired certificates, troubleshooting time-sensitive issues, or adjusting the date and time for other specific requirements.
Remember to double-check the new date and time after making the changes to ensure that it reflects accurately on your Mac.
Click on the Date & Time tab
Once you have accessed the Date & Time preference pane, the next step is to click on the “Date & Time” tab. This tab contains the necessary options and settings to modify the date and time on your Mac. Here’s how you can navigate to the Date & Time tab:
- Open the Date & Time preference pane by following the steps mentioned earlier.
- Within the Date & Time preference pane, make sure you are on the “Date & Time” tab.
- The “Date & Time” tab is typically the default tab displayed when you open the preference pane.
- Here, you will find various options related to the date and time settings on your Mac.
- Under the “Date & Time” tab, you can manually adjust the date and time, enable/disable time zone settings, and more.
- Take a moment to familiarize yourself with the available options and settings within the Date & Time tab.
By clicking on the Date & Time tab, you gain access to the specific settings necessary to modify the date and time on your Mac. This tab serves as the central hub for all the adjustments and configurations related to the timing aspects of your device.
Once you are on the Date & Time tab, you can proceed with making the necessary changes to the date and time according to your requirements.
Click on the lock icon and enter your admin password
In order to make changes to the date and time settings on your Mac, you may need to unlock the Date & Time preference pane by entering your administrator password. Here’s how you can do it:
- If the Date & Time preference pane is locked, you will see a lock icon at the bottom-left corner of the window.
- Click on the lock icon to unlock the preferences.
- A prompt will appear asking for your administrator password. Enter the password and click “OK” to proceed.
- Once you have entered the correct password, the Date & Time preference pane will be unlocked, allowing you to make changes.
It’s important to note that only users with administrative privileges can unlock the Date & Time preference pane. If you are not an administrator, you’ll need to seek assistance from someone with admin access or log in with an admin account to proceed with changing the date and time settings.
By entering your administrator password and unlocking the preference pane, you gain the necessary permissions to modify the date and time settings to match your desired changes. Ensure you use the correct password to ensure a successful unlock.
Click on the “Date & Time…” button
Within the Date & Time preference pane, there is a specific button labeled “Date & Time…” that allows you to access additional options and settings related to the date and time on your Mac. Here’s how you can click on this button:
- Ensure that you have accessed the Date & Time preference pane by following the steps mentioned earlier.
- Once you are on the “Date & Time” tab, look for the “Date & Time…” button. It is typically located next to or beneath the calendar display.
- Click on the “Date & Time…” button to open an additional settings dialog box.
- Upon clicking the button, a new window will appear, providing a more detailed interface for adjusting the date and time settings.
- Within this new window, you will find options such as selecting a different time server, adjusting the time format, and specifying the time display preferences.
- Take a moment to explore and understand the various options available in the “Date & Time…” window.
By clicking on the “Date & Time…” button, you gain access to more advanced options and settings that allow for finer control and customization of the date and time settings on your Mac. This additional window provides a more detailed interface for configuring various aspects related to time synchronization, format, and display preferences.
Once you have made the desired changes within the “Date & Time…” window, make sure to click the appropriate buttons to save your settings and apply the changes accordingly.
Adjust the date and time as desired
Within the Date & Time preference pane, you have the ability to manually adjust the date and time on your Mac according to your specific needs. Here’s how you can modify the date and time settings:
- Make sure you have opened the Date & Time preference pane and are on the appropriate tab as mentioned earlier.
- If the preference pane is locked, click on the lock icon and enter your admin password to unlock it.
- Look for the controls that allow you to adjust the date and time manually. These controls are typically located within the “Date & Time” tab.
- Click on the designated fields or use the arrow buttons to modify the date and time values as desired.
- As you make adjustments, observe the preview area to ensure that the changes reflect the correct date and time.
- You may also have the option to adjust other settings, such as the time format or time synchronization preferences, within the same window, depending on the available options.
- Take your time to carefully set the date and time to the desired values.
By manually adjusting the date and time, you have the flexibility to set specific values that align with your requirements. This can be useful for various reasons, such as correcting an incorrect system time, handling international time differences, or accurately synchronizing activities with specific dates and times.
Once you have made the necessary adjustments, proceed to save and apply the changes to ensure that the new date and time settings are implemented on your Mac.
Click the “Set Date & Time” button to apply the changes
After making the desired adjustments to the date and time settings on your Mac, it’s important to click the “Set Date & Time” button in the Date & Time preference pane to apply the changes. Here’s how you can finalize the modifications:
- Ensure that you have completed the necessary adjustments within the Date & Time preference pane.
- Verify that the date and time values are set to your desired settings and accurately reflect your intentions.
- Once you are satisfied with the changes, look for the “Set Date & Time” button within the preference pane. It is usually located somewhere at the bottom of the window.
- Click the “Set Date & Time” button to initiate the application of the newly adjusted date and time settings.
- After clicking the button, your Mac will process the changes and implement the updated date and time values.
- Wait for the system to complete the process. You may see a spinning cursor or loading indicator while the changes are being applied.
- Once the changes are successfully applied, you will notice that the date and time displayed on your Mac’s clock reflect the new settings you have set.
By clicking the “Set Date & Time” button, you ensure that the adjustments you made to the date and time settings are finalized and fully implemented on your Mac. This allows your device to accurately display the new date and time according to your preferences.
Remember to check the clock on your Mac after applying the changes to confirm that the date and time are correctly updated to match the values you have set.
Additional tips and considerations
When changing the date and time on your Mac manually, there are a few additional tips and considerations to keep in mind. These can help ensure a smooth and accurate adjustment process. Here are some helpful tips:
- Ensure accuracy: Double-check the current date and time before making any changes to ensure you start from the correct point.
- Use a reliable time source: If you rely on accurate timekeeping for tasks such as scheduling or time-sensitive operations, consider syncing your Mac with a reliable time server.
- Be mindful of time zones: If you are in a different time zone, make sure to adjust both the time zone and the date and time accordingly to avoid any confusion.
- Consider daylight saving time (DST): Keep in mind the change in time during DST transitions and update your settings accordingly.
- Check for system updates: Periodically check for software updates from Apple to ensure your Mac’s timekeeping functions are up to date.
- Avoid manual changes unless necessary: It is generally recommended to keep the time settings on your Mac set to automatically update unless you have a specific reason for manual adjustments.
- Consider automatic time synchronization: For most users, enabling the “Set date and time automatically” option is the best practice to ensure accurate timekeeping.
- Seek professional assistance, if needed: If you encounter issues or require further assistance with date and time adjustments, don’t hesitate to reach out to Apple Support or consult a professional.
- Keep track of date and time changes: If you frequently adjust the date and time settings on your Mac, it may help to keep a record of any changes to maintain a clear audit trail.
By considering these tips and keeping these factors in mind, you can confidently and effectively manage the date and time settings on your Mac, ensuring accurate timekeeping and a smooth user experience.
Troubleshooting common issues
While changing the date and time on your Mac is usually a straightforward process, there might be instances where you encounter issues or unexpected behavior. Here are some common issues and troubleshooting steps you can take:
- Date and time not updating: If your Mac’s date and time are not updating automatically or even after manual adjustments, ensure that the “Set date and time automatically” option is enabled within the Date & Time preference pane. Additionally, check your internet connection and verify that your Mac can communicate with the time server.
- Incorrect time zone: If the time zone settings on your Mac are incorrect, make sure to select the proper time zone within the Date & Time preference pane. If the issue persists, try restarting your Mac to refresh the settings.
- Time discrepancy after waking from sleep: If your Mac displays incorrect time after waking from sleep, disable the “Put hard disks to sleep when possible” option within the Energy Saver settings in System Preferences. This can help prevent time syncing issues after waking from sleep mode.
- Invalid or expired certificate warnings: Changing the date and time on your Mac can sometimes trigger security warnings or errors related to expired certificates. In such cases, ensure that the date and time on your Mac are set correctly, and consult the relevant application or website support for further troubleshooting.
- Ensure system software is up to date: Keeping your Mac’s system software updated is essential for maintaining proper timekeeping functionality. Make sure to regularly check for and install any available software updates from Apple, as they may include fixes or enhancements related to date and time management.
- Resetting the NVRAM/PRAM: If you continue to experience date and time-related issues, you can try resetting the NVRAM (non-volatile random-access memory) or PRAM (parameter random-access memory) on your Mac. To do this, restart your Mac and hold down the Option + Command + P + R keys simultaneously during startup until you hear the startup sound for the second time.
In case none of the troubleshooting steps resolve the issues you are facing with date and time settings on your Mac, it is recommended to contact Apple Support or consult with a professional technician for further assistance.