
What is DNS?
DNS, short for Domain Name System, is a fundamental technology that enables the translation of human-readable domain names into numerical IP addresses. Every website on the internet has an IP address, which serves as its unique identifier. However, remembering a string of numbers for every website we visit would be impractical and challenging. That’s where DNS comes into play.
When you type a URL into the web browser, your device sends a request to the DNS server to resolve the domain name into its corresponding IP address. The DNS server acts as a directory that matches the domain name to the IP address, allowing your device to establish a connection with the server hosting the website you wish to visit.
Think of DNS as a phonebook for the internet. Instead of dialing a person’s phone number directly, you search for their name in the phonebook, which provides you with their contact information, including the phone number. Similarly, DNS acts as the intermediary between the domain names we type and the IP addresses that computers use to communicate.
In addition to translating domain names into IP addresses, DNS also helps with load balancing and providing additional services such as email routing and DNS-based authentication.
Overall, DNS plays a crucial role in allowing us to access the websites and online services we use every day, making it an essential component of internet connectivity.
Why Change DNS on Android?
Changing the DNS settings on your Android device can significantly enhance your internet browsing experience and provide several benefits. Here are some compelling reasons to consider changing your DNS on Android:
- Improved Internet Speed: By changing to a faster and more reliable DNS server, you can experience faster webpage loading times and reduced latency. This can be particularly beneficial if you frequently encounter slow internet speeds or buffering when streaming videos.
- Enhanced Security: Some DNS providers offer additional security features, such as blocking access to malicious websites and preventing phishing attempts. By using a trusted DNS provider, you can add an extra layer of protection against online threats.
- Access Blocked Content: In certain regions, certain websites or content may be restricted or blocked. By changing your DNS settings, you can bypass these restrictions and gain access to geo-blocked content or websites that are otherwise unavailable in your location.
- Parental Control: If you have children using your Android device, you can utilize DNS settings to block access to specific websites or content categories that may not be suitable for them. This allows you to create a safer online environment for your family.
- Customization and Privacy: Some DNS providers offer customization options, allowing you to personalize your browsing experience. Additionally, by selecting a privacy-focused DNS provider, you can have better control over your online privacy and limit the amount of data that is shared with third parties.
Changing the DNS settings on your Android device is a simple process that can yield significant benefits. Whether you’re looking to enhance your internet speed, improve security, access blocked content, or customize your browsing experience, changing DNS can be a worthwhile step to take.
Choosing the Right DNS Provider
When it comes to changing DNS settings on your Android device, selecting the right DNS provider is crucial. Here are some factors to consider when choosing a DNS provider:
- Reliability and Performance: Look for a DNS provider that offers reliable and fast servers. A reputable provider should have a robust infrastructure that ensures minimal downtime and low latency for optimal browsing speed.
- Security Features: Consider a DNS provider that prioritizes security by offering features such as DNSSEC (DNS Security Extensions) to protect against DNS hijacking and DNS spoofing. Look for providers that actively monitor and mitigate potential security threats.
- Privacy Policy: Evaluate the privacy policy of the DNS provider. Ensure they have strong privacy practices, such as minimal logging of user data and a commitment to not selling or sharing personal information to third parties.
- Additional Services: Some DNS providers offer extra services, such as malware blocking, ad blocking, and content filtering. Assess your needs and determine if these additional features align with your browsing preferences.
- Reputation and Reviews: Do some research to gauge the reputation of the DNS provider. Look for reviews and feedback from users to get an idea of their overall satisfaction and any potential issues you should be aware of.
- User-Friendly Interface: Consider a DNS provider that offers an intuitive and user-friendly interface. A well-designed interface can make it easier to manage and modify DNS settings on your Android device.
Some popular DNS providers that you can consider include Google Public DNS, Cloudflare DNS, OpenDNS, and Quad9. However, it’s essential to review and compare various DNS providers based on your specific needs and preferences.
Keep in mind that changing DNS settings on your Android device requires caution. Ensure you follow the provided instructions and backup your current settings before making any changes. By choosing a reliable and secure DNS provider, you can enjoy a faster, safer, and more customized browsing experience on your Android device.
Method 1: Changing DNS Settings in Network Settings
The first method to change DNS settings on your Android device involves adjusting the network settings:
- Open the Settings app on your Android device.
- Scroll down and select “Wi-Fi” or “Network & Internet,” depending on your device.
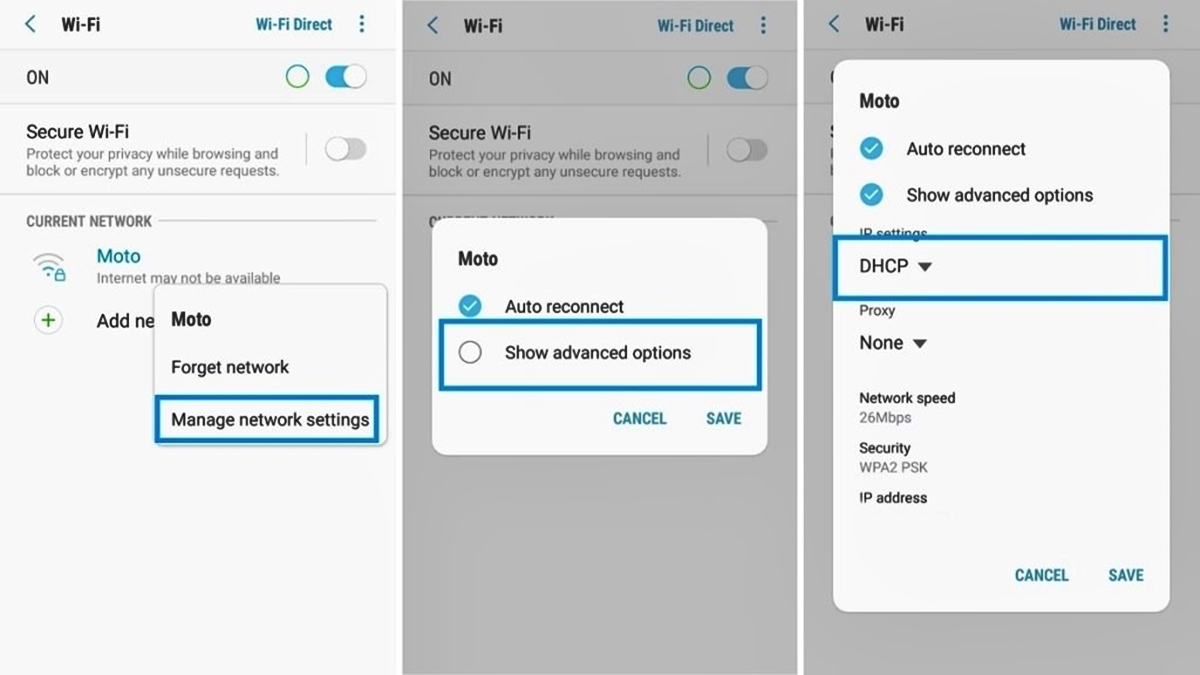
- Find and tap on the name of the Wi-Fi network you are currently connected to.
- In the network settings, tap on the “Advanced” or “Advanced Settings” option.
- Look for the “IP settings” section and select the option labeled “Static” or “Static IP.”
- Scroll down and locate the DNS 1 and DNS 2 fields.
- Enter the IP addresses of the desired DNS servers in the respective fields. You can choose from popular DNS providers like Google Public DNS (8.8.8.8 and 8.8.4.4) or Cloudflare DNS (1.1.1.1 and 1.0.0.1).
- Save the changes and exit the settings.
It’s important to note that the steps may vary slightly depending on your Android device’s version and manufacturer. If you’re unable to locate the DNS settings in the network settings, try searching for “DNS” in the settings search bar to narrow down the options.
Once you have changed the DNS settings, your Android device will use the newly configured DNS servers for all network connections. You should experience the benefits of using the selected DNS provider, such as improved speed, security, and access to blocked content.
If you encounter any issues or wish to revert to your default DNS settings, simply follow the same steps and select the option to obtain IP settings automatically or set it back to “DHCP” or “DHCP/IP auto” depending on the terminology used on your device.
Remember that changing DNS settings at the network level will impact all devices connected to the same Wi-Fi network. If you only want to change DNS settings on your Android device, you may consider using alternative methods like DNS changer apps or modifying DNS settings on a rooted device.
Method 2: Using a DNS Changer App
If you prefer a more straightforward approach to change DNS settings on your Android device, you can utilize a DNS changer app. These apps simplify the process and allow you to switch DNS servers with ease. Here’s how you can change DNS settings using a DNS changer app:
- Visit the Google Play Store and search for a DNS changer app. Some popular options include “DNS Changer – Lilly”, “1.1.1.1: Faster & Safer Internet”, and “DNS Changer (no root – IPv6 – All connections)”.
- Download and install the DNS changer app of your choice.
- Open the app and grant the necessary permissions when prompted.
- Explore the app’s interface to locate the DNS settings section.
- Enter the IP addresses of the desired DNS servers in the provided fields. You can find these IP addresses from reputable DNS providers like Google Public DNS, Cloudflare DNS, or any other preferred provider.
- Save the changes, and the DNS changer app will take care of applying the new DNS settings for you.
- Test your internet connection to ensure that the new DNS settings are functioning correctly.
DNS changer apps offer the advantage of convenience and simplicity, making it easier for users to switch between DNS servers on their Android devices. These apps often provide additional features such as automatic DNS switching based on network connection or battery-saving options.
Remember that some DNS changer apps may require root access on your device for full functionality, while others work without the need for root access. Ensure that you choose a DNS changer app that is compatible with your device and meets your specific requirements.
If at any point you wish to revert to your default DNS settings or switch to a different DNS server, simply open the DNS changer app and modify the settings accordingly.
It’s worth noting that while DNS changer apps can simplify the process of changing DNS settings, it’s essential to choose a reliable app from a trusted source to ensure the security of your network connections. Read user reviews and check the app’s reputation before installation.
Method 3: Changing DNS Settings on a Rooted Android Device
If you have a rooted Android device, you have the option to modify DNS settings directly in the system files. This method provides more advanced control over your DNS settings, but it requires root access. Here’s how you can change DNS settings on a rooted Android device:
- Ensure that your device is rooted. If it is not already rooted, you will need to follow the appropriate rooting methods for your specific device model and Android version.
- Download a file manager app that has root access capabilities, such as “ES File Explorer” or “Root Explorer”.
- Open the file manager app and grant it root access when prompted.
- Navigate to the root directory of your device, usually “/”.
- Locate the “system” folder and open it.
- Inside the “system” folder, search for the “etc” folder and open it.
- You will find a file named “hosts”. Long press on this file and select “Open with” or “Open as text”.
- Edit the file and add the IP addresses of the desired DNS servers in the following format:
IP_address_1    hostname1

IP_address_2 hostname2 - Save the changes and exit the file manager app.
- Restart your Android device to apply the new DNS settings.
By modifying the “hosts” file, you can directly specify the DNS servers to be used by your Android device. This method allows for granular control but requires caution and knowledge about editing system files.
It’s crucial to backup the original “hosts” file before making any modifications, as incorrect changes could potentially disrupt network connectivity. If you encounter any issues, you can restore the original “hosts” file from the backup.
Remember that modifying system files on a rooted Android device should be done carefully and responsibly. Ensure that you follow the steps accurately and exercise caution to avoid any unintended consequences.
Note that changing DNS settings at the system level on a rooted Android device will impact all network connections on that device. Ensure that the chosen DNS servers are reliable and meet your specific requirements before making any changes.
Troubleshooting DNS Issues
Despite the benefits of changing DNS settings on your Android device, you may encounter certain issues related to DNS. Here are some common DNS issues and troubleshooting steps to resolve them:
- Slow or Unresponsive Internet: If you experience sluggish internet speed or unresponsiveness after changing DNS settings, try restarting your device. This can help refresh the network settings and establish a new connection to the newly configured DNS servers.
- Inconsistent DNS Resolution: If you notice inconsistent DNS resolution, where some websites load correctly while others do not, it could be due to caching issues. Clear the DNS cache on your Android device by going to Settings > Apps > {Your browser} > Storage > Clear cache. Additionally, you can restart the router to clear its DNS cache.
- DNS Server Unreachable: If you are unable to connect to the DNS servers you specified, it could be due to network issues. Ensure that you have a stable internet connection and try using a different DNS server, preferably from a reputable provider. You can also contact your internet service provider (ISP) to check for any DNS server-related problems.
- Connection Drops: If you experience frequent connection drops or intermittent connectivity after changing DNS settings, it might be worth considering switching to a more reliable DNS service. It’s also advisable to check your Wi-Fi or mobile data connection to rule out any other underlying issues.
- Resetting DNS Settings: If you encounter persistent issues with the changed DNS settings, you can revert to the default settings. In the network settings, select the option to obtain IP settings automatically or set it back to “DHCP” or “DHCP/IP auto”.
In some cases, the DNS issues may not be directly related to the changes made on your Android device. It could be due to server-side problems or network configuration issues. If you continue to experience difficulties, it’s recommended to reach out to your internet service provider or consult with a technical professional for further assistance.
Remember that troubleshooting DNS issues requires careful observation and troubleshooting steps. It’s important to approach the process systematically and consider other possible factors that may be contributing to the issues you are facing.