
Understanding Display Settings
When it comes to using a monitor, understanding the display settings is essential for obtaining the best visual experience. Whether you are setting up a new monitor or need to make adjustments to an existing one, having a good grasp of the display settings will enable you to tailor the visuals to your preference and needs.
The display settings on your monitor control various aspects such as resolution, color settings, brightness, contrast, and orientation. These settings determine how the content is presented on the screen and can greatly impact your viewing experience.
Resolution: The resolution refers to the number of pixels that make up the display. Higher resolutions result in sharper and more detailed images. The most common resolutions are Full HD (1920×1080), Quad HD (2560×1440), and 4K Ultra HD (3840×2160). Selecting the right resolution ensures that the content is displayed correctly and in its intended quality.
Color Settings: Adjusting the color settings allows you to calibrate the display according to your preferences. You can tweak parameters such as brightness, contrast, and saturation to achieve the desired color accuracy and vibrancy. Proper color calibration is particularly important for graphic designers, photographers, and other professionals who rely on accurate color representation.
Brightness and Contrast: Controlling the brightness and contrast levels helps optimize the display for ambient lighting conditions. Increasing brightness enhances visibility in well-lit environments, while reducing it can prevent eye strain in darker settings. Likewise, adjusting the contrast improves the distinction between light and dark elements on the screen.
Orientation: In some cases, you may need to change the orientation of the display to suit your specific requirements. This is particularly useful when working with certain applications or when using a monitor in a portrait mode. Most displays support landscape (horizontal) and portrait (vertical) orientations, allowing you to select the one that best suits your needs.
By taking the time to understand and adjust these display settings, you can create a more comfortable and visually appealing viewing experience. Whether you’re using your monitor for work, entertainment, or both, optimizing the display settings will ensure that you make the most out of your screen.
Connecting Your Monitor
Before you can start using a new monitor, you need to ensure that it is properly connected to your computer or laptop. Following the correct steps for connecting your monitor will help you avoid any compatibility issues and ensure a smooth setup process. Here’s a step-by-step guide to help you connect your monitor:
- Check the ports: Identify the type of ports available on both your computer and the monitor. Common ports include VGA, DVI, HDMI, and DisplayPort. Make sure that your monitor and computer have compatible ports.
- Gather the cables: Once you know which ports you’re working with, gather the corresponding cables. For example, if your monitor has an HDMI port and your computer has an HDMI output, you will need an HDMI cable. If the monitor and computer have different ports, you may need an adapter to make the connection.
- Turn off the computer: Before making any connections, ensure that your computer is turned off. This will prevent any potential damage to the computer or monitor during the setup process.
- Connect the cables: Insert one end of the cable into the corresponding port on the monitor and the other end into the corresponding port on your computer. Ensure that the connections are secure and tight to avoid any signal disruptions.
- Power on the monitor: Once the cables are connected, turn on the monitor using the power button. Check the monitor’s user manual for any specific instructions on powering it on.
- Turn on the computer: After the monitor is powered on, you can turn on your computer. As it boots up, it should automatically detect the newly connected monitor and start displaying the content on both screens.
- Adjust display settings: Depending on your computer’s operating system, you may need to adjust the display settings to optimize the monitor’s resolution, orientation, and other visual options. Refer to your computer’s user manual or operating system documentation for guidance on adjusting display settings.
It’s important to note that some computers may require additional configuration steps, such as installing drivers or software, to fully utilize the features of the monitor. Check the manufacturer’s website or the monitor’s user manual for any specific instructions related to your computer model.
By following these steps, you can confidently connect your monitor and start enjoying a larger, clearer display for work, gaming, or entertainment purposes.
Adjusting Display Resolution
The display resolution refers to the number of pixels that make up the image on your monitor. It plays a crucial role in determining the clarity, sharpness, and overall visual quality of the content displayed on the screen. Adjusting the display resolution allows you to fine-tune the visuals according to your preference and the capabilities of your monitor. Here’s how you can adjust the display resolution:
1. Right-click on your desktop: Start by right-clicking anywhere on your desktop background. A context menu will appear.
2. Select “Display settings” or “Screen resolution”: In the context menu, look for an option that says “Display settings” or “Screen resolution.” Click on it to open the display settings window.
3. Adjust the resolution slider: In the display settings window, you will see a slider under the “Resolution” section. Move the slider to the left or right to adjust the resolution. As you do so, the preview will change to reflect the selected resolution.
4. Apply the changes: Once you have selected your desired resolution, click on the “Apply” button to apply the changes. Your monitor will briefly go black as it adjusts to the new resolution.
5. Confirm the new resolution: After the screen comes back on, a dialog box will appear asking if you want to keep the changes. If the new resolution looks good to you, click on the “Keep changes” button. Otherwise, click on the “Revert” button to return to the previous resolution.
It’s important to note that not all monitors support the same range of resolutions. The available options may vary depending on the capabilities of your monitor and the graphics card in your computer. Choosing a higher resolution than what your monitor can handle may result in a fuzzy or distorted image. Conversely, selecting a lower resolution than the maximum supported by your monitor may result in larger text and icons, but a less detailed image.
Experimenting with different resolutions can help you find the sweet spot that balances clarity and readability with the amount of content that can fit on the screen. Adjusting the display resolution to your liking can significantly enhance your viewing experience and make working, browsing, or gaming more enjoyable.
Changing Orientation
Changing the orientation of your display can provide a more comfortable and efficient viewing experience, especially when working with certain applications or using a monitor in a specific way. Most monitors support both landscape (horizontal) and portrait (vertical) orientations, allowing you the flexibility to adjust the display to suit your needs. Here’s how you can change the orientation of your monitor:
1. Right-click on your desktop: Start by right-clicking anywhere on your desktop background. A context menu will appear.
2. Select “Display settings” or “Screen resolution”: In the context menu, look for an option that says “Display settings” or “Screen resolution.” Click on it to open the display settings window.
3. Choose the orientation option: In the display settings window, look for the “Orientation” section. Here, you will find options such as “Landscape,” “Portrait,” “Landscape (flipped),” and “Portrait (flipped).” Select the desired orientation by clicking on the corresponding radio button.
4. Apply the changes: Once you have selected the desired orientation, click on the “Apply” button to apply the changes. Your monitor will briefly go black as it adjusts to the new orientation.
5. Confirm the new orientation: After the screen comes back on, a dialog box will appear asking if you want to keep the changes. If the new orientation looks good to you, click on the “Keep changes” button. Otherwise, click on the “Revert” button to return to the previous orientation.
Changing the orientation can be particularly useful for tasks such as reading lengthy documents, coding, or editing vertical content. It can also help improve the efficiency of certain software applications that are optimized for portrait mode.
Keep in mind that changing the orientation may also require adjusting the display resolution to ensure optimal image clarity and sharpness. Experiment with different resolutions to find the one that suits the new orientation.
Additionally, some monitors have physical rotation capabilities, allowing you to physically rotate the screen. Refer to your monitor’s user manual for instructions on how to rotate the display physically, if available.
By changing the orientation of your monitor, you can customize your viewing experience to better match your specific needs and preferences. Whether you’re working on text-intensive tasks or simply prefer a different layout, adjusting the orientation can significantly enhance your productivity and comfort.
Rotating the Display
Rotating the display on your monitor allows you to change the orientation from the default landscape mode to portrait mode or any other desired angle. This can be particularly useful for tasks that involve working with vertical content, such as reading or editing lengthy documents, coding, or graphic design. Here’s a step-by-step guide on how to rotate the display:
1. Right-click on your desktop: Start by right-clicking anywhere on your desktop background. A context menu will appear.
2. Select “Display settings” or “Screen resolution”: In the context menu, look for an option that says “Display settings” or “Screen resolution.” Click on it to open the display settings window.
3. Locate the rotation settings: In the display settings window, search for the rotation settings. The location and naming of these settings may vary depending on your computer’s operating system and graphics card.
4. Choose the desired rotation angle: Look for options like “0 degrees,” “90 degrees,” “180 degrees,” or “270 degrees.” Select the rotation angle that aligns with how you want to rotate the display.
5. Apply the changes: Once you have selected the desired rotation angle, click on the “Apply” or “OK” button to apply the changes. Your monitor will adjust its display according to the chosen rotation angle.
6. Confirm the new rotation: A dialog box may appear asking you to confirm the new rotation. If the new orientation looks good to you, click on the “Keep changes” button. Otherwise, click on the “Revert” or “Undo” button to return to the previous orientation.
It’s important to note that not all graphics cards or drivers support display rotation, so the options might be limited or unavailable in some cases. In such situations, you may need to update your graphics card driver or check for alternative software solutions.
Additionally, some monitors have physical rotation capabilities, allowing you to physically rotate the screen. Refer to your monitor’s user manual for instructions on how to rotate the display physically, if available.
Rotating the display can enhance your productivity and make working with vertical content more comfortable. It can also be beneficial for multi-monitor setups, allowing you to arrange your monitors in the most convenient way for your workflow.
Experiment with different rotation angles to find the one that suits your specific needs and preferences. Whether you’re working on documents, coding, or creative projects, rotating the display can provide a more effective and enjoyable user experience.
Calibrating Color Settings
Calibrating the color settings of your monitor is an important step to ensure accurate and vibrant color representation. Proper color calibration enhances the visual experience and is particularly crucial for professionals working in graphic design, photography, or any field where color accuracy is essential. Here’s a guide on how to calibrate the color settings of your monitor:
1. Adjust brightness and contrast: Begin by adjusting the brightness and contrast settings of your monitor. These settings affect the overall display and can impact color perception. Adjust the brightness to a level where you can clearly see details without straining your eyes. Then, adjust the contrast to achieve a balanced differentiation between light and dark areas.
2. Use a calibration tool: To achieve accurate color calibration, consider using a hardware calibration tool. These tools typically come with color measurement devices, such as colorimeters or spectrophotometers, which measure and analyze the colors displayed on the screen. The accompanying software helps create a custom color profile for your monitor.
3. Follow the calibration wizard: Install and launch the calibration software included with your calibration tool. The software will guide you through the calibration process step by step. Follow the instructions carefully to ensure accurate results. During the process, you may be prompted to adjust settings such as gamma, white point, and color temperature.
4. Adjust individual color settings: If you don’t have a hardware calibration tool, you can manually adjust the color settings using your computer’s built-in display settings. Most operating systems provide options to adjust individual color settings, such as red, green, and blue color levels. Make subtle adjustments to achieve the desired color balance.
5. Use visual reference materials: To ensure accurate color calibration, it’s helpful to use visual reference materials, such as color charts or test images. These materials allow you to compare the color accuracy of your monitor with standardized colors.
6. Regularly recalibrate: Monitor calibration is not a one-time process. Over time, the color performance of your monitor may change. Factors like aging, temperature, and ambient lighting conditions can affect color accuracy. It’s recommended to recalibrate your monitor periodically to maintain consistent and accurate color representation.
Remember, color calibration is subjective and can vary depending on personal preference and the specific requirements of your work. Calibration is also influenced by the quality and capabilities of your monitor. High-quality monitors with wider color gamuts and accurate color reproduction will yield better results.
By calibrating the color settings of your monitor, you can ensure that the colors displayed accurately represent your work. This leads to more precise editing, accurate color grading, and a more enjoyable visual experience overall.
Adjusting Brightness and Contrast
Adjusting the brightness and contrast settings of your monitor is essential for achieving optimal visual clarity and comfort. Properly adjusting these settings can enhance the overall viewing experience by improving the visibility of details, preventing eye strain, and ensuring a balanced differentiation between light and dark elements on the screen. Here’s how you can adjust the brightness and contrast of your monitor:
1. Locate the physical controls: Most monitors have dedicated buttons or knobs on the front or side panel for adjusting settings. These controls are usually labeled and easily accessible. Consult your monitor’s user manual or look for icons representing brightness and contrast.
2. Adjust the brightness: Begin by adjusting the brightness setting. This control determines the overall intensity of light emitted by the display. Increase the brightness if the screen appears dim or lacks clarity. Decrease the brightness if the screen appears too bright or causes eye strain. Aim for a level where you can comfortably view the content without straining your eyes or distorting colors.
3. Adjust the contrast: After adjusting the brightness, move on to the contrast setting. Contrast determines the difference in brightness between the dark and light areas on the screen. Increase the contrast for a more distinct differentiation between shades, enhancing detail visibility. Decrease the contrast if the screen appears harsh or washed out.
4. Use on-screen display (OSD) controls: Some monitors provide an on-screen display (OSD) menu for adjusting settings. Access the OSD menu by pressing the corresponding button on your monitor’s control panel. Navigate through the menu using the arrow buttons and locate the brightness and contrast settings. Make adjustments using the OSD controls until you achieve the desired settings.
5. Use calibration tools: If you require more precise adjustments, consider using calibration tools or software. These tools provide a more advanced and accurate method of adjusting brightness, contrast, and other display settings to achieve optimal visual performance. Calibration tools often come with additional features, such as color calibration and gamma correction.
6. Consider ambient lighting: Take the ambient lighting conditions into account when adjusting brightness and contrast. If you’re working in a well-lit environment, you may need to increase the brightness to compensate for the external light. In darker environments, lowering the brightness can prevent eye strain and provide a more comfortable viewing experience.
Regularly reassess and readjust the brightness and contrast settings, as lighting conditions may change throughout the day or in different environments. Additionally, different applications and media may require varying levels of brightness and contrast for optimal viewing.
By correctly adjusting the brightness and contrast settings of your monitor, you can significantly enhance your viewing experience by achieving optimal visual clarity, preserving eye health, and ensuring an accurate representation of colors and details on the screen.
Configuring Multiple Displays
Configuring multiple displays allows you to extend your desktop across two or more monitors, providing a larger workspace and improving productivity. Whether you’re using multiple monitors for multitasking, gaming, video editing, or any other task that requires increased screen real estate, configuring them correctly is essential. Here’s how you can configure multiple displays:
1. Check display ports and cables: Ensure that your computer or laptop has the necessary display ports to support multiple monitors. Common ports include HDMI, DVI, DisplayPort, and VGA. Check the available ports on your graphics card or motherboard and ensure that you have the corresponding cables to connect your monitors.
2. Connect the monitors: Connect each monitor to your computer using the appropriate cables. Depending on your computer’s graphics card, you may need to use different ports or adaptors to connect each monitor. Make sure the connections are secure.
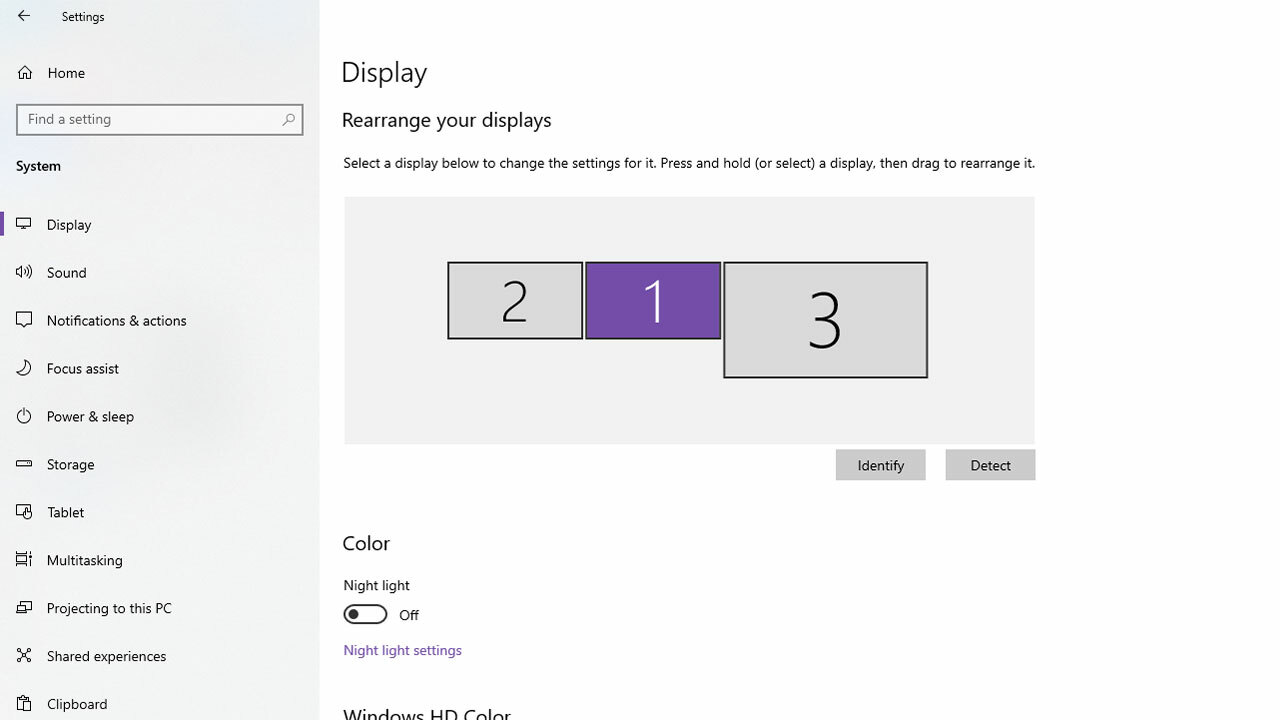
3. Identify and arrange displays: Once the monitors are connected, go to your computer’s display settings. You’ll see a visual representation of the connected monitors. Identify each display by its number or name, which should correspond to their physical locations in relation to your desk. Click and drag the display icons to arrange them in the desired position.
4. Choose display mode: Decide how you want to use the multiple displays. You can choose from the following display modes:
- Extended display: This mode allows you to extend your desktop across multiple monitors, effectively giving you more workspace. You can drag windows and applications between the screens.
- Duplicate display: This mode mirrors the same content on all connected displays. It’s useful for when you want to show the same content on multiple screens, such as in a presentation or demonstration.
- Single display: Select this mode if you want to focus on using only one of the connected monitors while disabling the others temporarily.
5. Adjust resolution and scaling: Depending on the size and resolution of your monitors, you may need to adjust the display settings to ensure that the content is properly sized and scaled across all displays. In the display settings, you can adjust the resolution and scaling options for individual monitors.
6. Customize display settings: Explore additional display settings to customize the behavior and appearance of your multiple displays. This may include settings for taskbars, wallpaper, screen savers, and other visual preferences.
7. Test and fine-tune: After configuring the multiple displays, test the setup to ensure they are working correctly. Drag windows and applications across the screens, check for any alignment issues, and make any necessary adjustments to optimize the viewing experience.
It’s worth noting that the capabilities and limitations of your graphics card and operating system may influence the number of displays you can connect and the available display modes. Consult your computer’s documentation or the manufacturer’s website for specific instructions and compatibility information.
By correctly configuring multiple displays, you can maximize your productivity by having more screen space for multitasking and organizing your work efficiently. Whether you’re working on complex projects, gaming, or simply want a seamless and immersive viewing experience, multiple displays offer an enhanced user experience and increased flexibility.
Customizing Screensavers and Wallpaper
Customizing screensavers and wallpapers allows you to personalize your computer’s display and add a touch of creativity to your desktop. Screensavers and wallpapers not only make your computer more visually appealing but also provide an opportunity to express your style and interests. Here’s how you can customize screensavers and wallpapers on your computer:
1. Selecting screensavers:
- Access the screensaver settings: Right-click on your desktop, select “Personalize” (on Windows) or “System Preferences” (on macOS), and navigate to the screensaver settings.
- Browse available screensavers: Choose from the pre-installed screensavers included with your operating system. Preview each screensaver to see how it looks.
- Adjust settings: Some screensavers may offer customizable options, such as speed, complexity, or specific themes. Experiment with different settings to find the one that suits your preferences.
- Set a screensaver timeout: Specify the amount of idle time before the screensaver appears. You can choose a shorter or longer timeout based on your preference and power-saving needs.
2. Customizing wallpaper:
- Access the wallpaper settings: Use the same method above to access the wallpaper settings on your operating system.
- Select a wallpaper: Choose from the pre-installed wallpapers, or use your own images. Most operating systems allow you to browse your computer’s folders to find the image you want to use as wallpaper.
- Adjust wallpaper position: Depending on the size and resolution of your display, you may need to adjust how the image is positioned or stretched. Options typically include centering, tiling, or filling the screen.
- Slideshow feature: Some operating systems offer a slideshow feature, allowing you to rotate through multiple wallpapers at set intervals. You can select a folder containing your desired images to create a dynamic desktop experience.
3. Explore third-party options:
- Third-party screensaver software: Download and install screensaver software from trusted sources to access a wider range of screensavers with unique features and customization options.
- Online wallpaper resources: Explore websites that offer a diverse collection of wallpapers, including photographs, artwork, and themed designs. Download wallpapers that resonate with your style and interests.
Remember to choose screensavers and wallpapers that are visually appealing, but also consider their impact on system performance and your personal preferences. Avoid screensavers or wallpapers that may cause distractions or interfere with daily tasks.
Customizing screensavers and wallpapers allows you to personalize your computer’s visual appearance, providing a fresh and inspiring environment. Whether you choose serene landscapes, artistic designs, or family photos, customizing these elements helps make your computer feel more inviting, familiar, and uniquely yours.
Troubleshooting Display Issues
Display issues can be frustrating, but with proper troubleshooting techniques, you can quickly identify and resolve common problems. Whether you’re experiencing a blank screen, distorted images, or unusual colors, here are some steps to help you troubleshoot display issues:
1. Check connections: Ensure that all cables connecting your computer and monitor are securely plugged in. Sometimes a loose or faulty cable can cause display problems. If possible, try using a different cable or port to rule out any issues with the connection.
2. Adjust resolution and refresh rate: Incorrect resolution or refresh rate settings can lead to display problems. Check your computer’s display settings and make sure they are set to the recommended values for your monitor. Adjust them if necessary to match the monitor’s specifications.
3. Update graphics drivers: Outdated or incompatible graphics drivers may cause display issues. Visit the website of your graphics card manufacturer and download the latest drivers for your specific model. Install the drivers and restart your computer to see if the display issues are resolved.
4. Test on different computer: If possible, connect your monitor to a different computer or laptop to see if the issue persists. This can help determine if the problem is with the monitor or the computer’s graphics card.
5. Check for firmware updates: Some monitors have firmware that can be updated to fix bugs or improve compatibility. Visit the manufacturer’s website and check if there are any firmware updates available for your monitor model. Follow the instructions to update the firmware if necessary.
6. Run diagnostic tests: Some monitors have built-in diagnostic tests that can help identify display issues. Refer to your monitor’s user manual for instructions on running these tests. They can help pinpoint the source of the problem, whether it’s related to the monitor hardware or the computer settings.
7. Disable third-party software: Certain third-party applications, particularly those related to graphics or display management, can interfere with the proper functioning of the display. Temporarily disable or uninstall any recently installed software to see if it resolves the issue.
8. Monitor self-test: Most monitors have a self-test feature that allows you to check if the problem is with the monitor itself. Consult the user manual for instructions on how to run the self-test. By doing this, you can determine if the issue lies with the monitor’s hardware.
9. Seek professional assistance: If you have tried the above troubleshooting steps and the display issues persist, contact the manufacturer’s customer support or consult a professional technician for further assistance. They can provide specific guidance based on the make and model of your monitor or computer.
Remember to document any error messages, unusual symptoms, or patterns related to the display issues. This information can be helpful when seeking assistance from technical support.
By following these troubleshooting steps, you can diagnose and resolve common display issues, ensuring a smooth and reliable visual experience on your computer or monitor.