
How to Change Alexa’s Language
Alexa, the voice assistant developed by Amazon, can be customized to speak in a variety of languages. Changing Alexa’s language can be useful if you are multilingual or if you prefer to interact with Alexa in a language other than the default one. In this guide, we will walk you through the steps to change Alexa’s language on your device.
1. Open the Alexa App: Begin by opening the Alexa app on your device. The app is available for both iOS and Android devices and can be downloaded from the respective app stores.
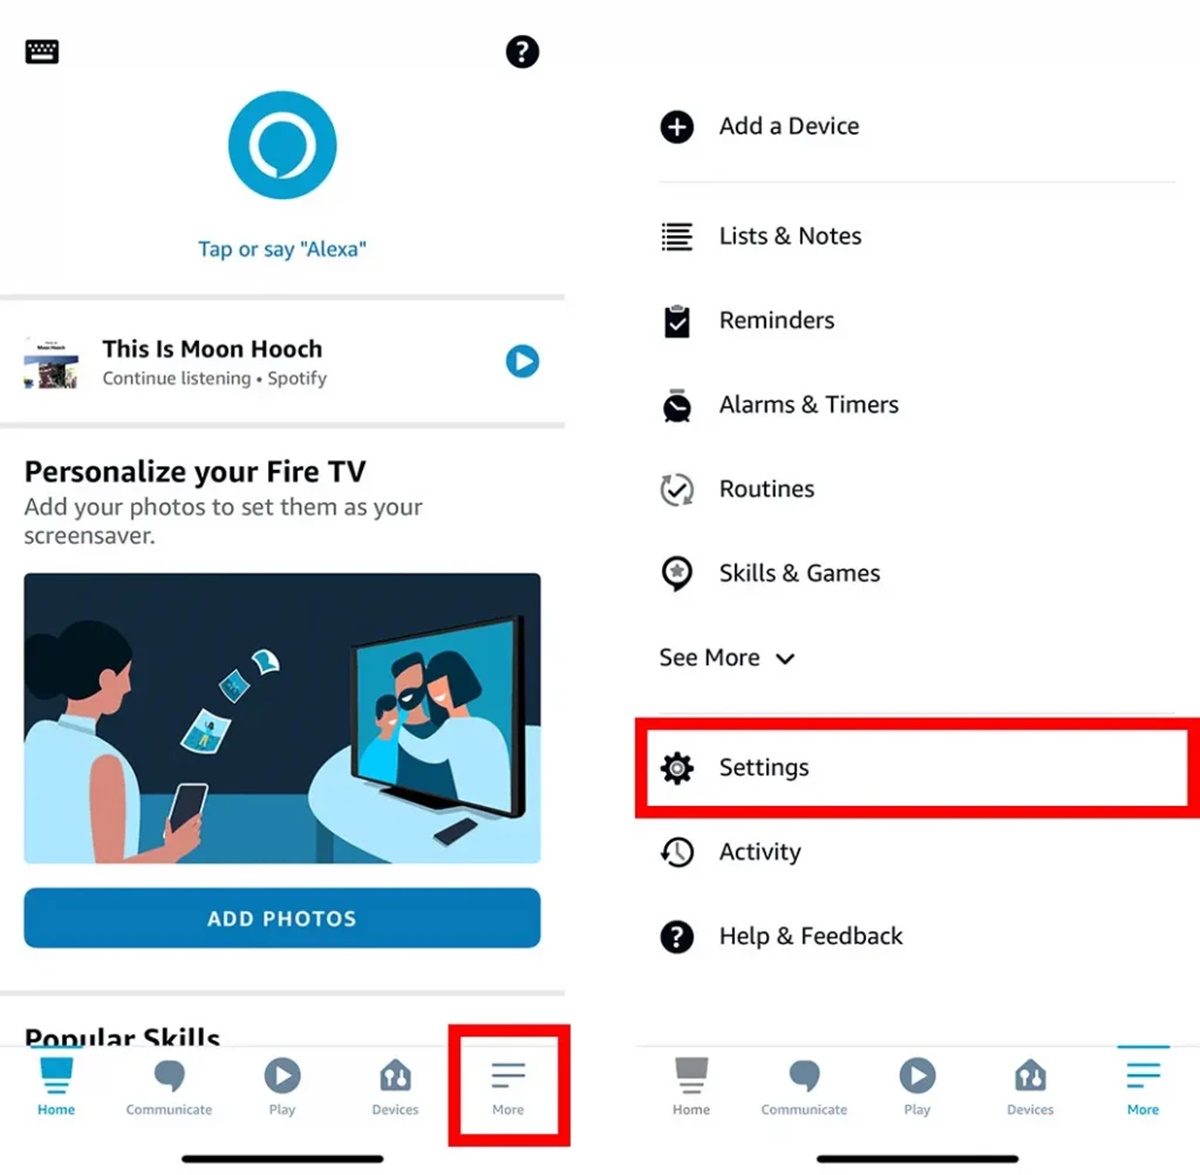
2. Go to the Settings Menu: Once you have opened the Alexa app, navigate to the settings menu. You can usually find this option by tapping on the menu icon in the top left corner of the app.
3. Select Your Echo Device: From the settings menu, look for the “Device Settings” option. Tap on it to view a list of all the Echo devices associated with your Amazon account. Select the specific Echo device for which you want to change the language.
4. Tap on Device Language: Inside the settings for the selected Echo device, you will find an option called “Device Language.” Tap on it to proceed.
5. Choose Your Preferred Language: You will now see a list of supported languages. Scroll through the list and select the language that you want Alexa to use. Keep in mind that not all languages may be available for all Echo devices.
6. Confirm the Language Change: Once you have selected the desired language, confirm the change by tapping on the “Save” or “Confirm” button. This will initiate the process of updating Alexa’s language on your device.
7. Wait for the Update: Your Echo device will now begin updating its language settings. This process may take a few minutes, so be patient while it completes.
8. Test Alexa’s New Language: Once the language update is complete, you can test Alexa’s new language by giving it voice commands. Interact with Alexa as you normally would and observe the responses in the new language.
9. Troubleshooting Tips: If you encounter any issues or if Alexa is not speaking in the selected language, try restarting your Echo device and going through the language change process again. It’s also worth checking for any available software updates for your Echo device.
Changing Alexa’s language is a straightforward process that allows you to have a more personalized experience with your Echo device. Whether you want to communicate with Alexa in your native language or simply explore a new language, the ability to change Alexa’s language opens up a world of possibilities.
Open the Alexa app on your device
To begin the process of changing Alexa’s language, you need to open the Alexa app on the device that is connected to your Echo device. The Alexa app is available for both iOS and Android devices, and it can be downloaded from the respective app stores. Once you have downloaded and installed the app, follow these steps:
1. Locate the Alexa App: Look for the Alexa app on your device’s home screen or in your app drawer. The app icon usually features the familiar Alexa logo, which is a blue ring with a white dot in the center.
2. Tap on the Alexa App Icon: Once you have found the Alexa app, tap on its icon to launch it. The app will open, and you will be presented with the Alexa home screen.
3. Sign in to Your Amazon Account (if necessary): If you haven’t already signed in to your Amazon account, you may be prompted to do so. Enter your Amazon account credentials to proceed. If you don’t have an Amazon account, you will need to create one in order to use Alexa and the Alexa app.
4. Navigate to the Settings Menu: Once you are signed in to the Alexa app, locate the menu icon. This icon is typically represented by three horizontal lines or dots and is usually found in the top left or top right corner of the app’s interface. Tap on the menu icon to open the settings menu.
5. Access Device Settings: Within the settings menu, look for an option called “Device Settings” or something similar. Tap on this option to view a list of the Echo devices that are associated with your Amazon account.
6. Choose the Echo Device: From the list of devices, select the specific Echo device for which you wish to change the language settings. This step is important if you own multiple Echo devices and want to change the language for a specific device.
Opening the Alexa app on your device is the first step to changing Alexa’s language settings. By following these steps, you can easily access the settings menu and move forward with the language change process. Let’s continue on to the next step.
Go to the Settings menu
Once you have opened the Alexa app on your device, the next step is to navigate to the Settings menu. This menu allows you to access various customization options for your Echo device, including the language settings. Follow these steps to find the Settings menu:
1. Locate the Menu Icon: In the Alexa app, look for the menu icon. This icon is typically represented by three horizontal lines or dots and is usually located in the top left or top right corner of the app’s interface. Tap on the menu icon to open the menu.
2. Access the Settings Menu: After tapping on the menu icon, a dropdown menu or a new screen will appear with various options. Look for the option labeled “Settings” and tap on it to open the Settings menu.
3. Explore the Settings Menu: The Settings menu contains a wide range of options that allow you to customize your Alexa experience. From here, you can manage device settings, personalize your preferences, and much more. Take some time to explore the different settings available.
4. Device Settings: Within the Settings menu, you will find a section specifically dedicated to device settings. This is where you can access options related to your Echo device, including language settings.
Accessing the Settings menu is an important step in changing Alexa’s language. It allows you to access the specific options needed to make the language change. Now that you know how to get to the Settings menu, let’s move on to the next step of changing the language settings.
Select your Echo device
After you have accessed the Settings menu in the Alexa app, the next step is to select the specific Echo device for which you want to change the language settings. This step is essential if you own multiple Echo devices and want to change the language for a particular device. Follow these steps to select your Echo device:
1. Navigate to Device Settings: Once you are in the Settings menu, look for an option labeled “Device Settings” or something similar. This option is usually located within the settings menu and allows you to manage the settings of your Echo devices.
2. Tap on Device Settings: Tap on the “Device Settings” option to proceed. This will take you to a screen where all the Echo devices associated with your Amazon account are listed.
3. Choose your Echo Device: From the list of devices, select the specific Echo device for which you want to change the language settings. This step is crucial if you have multiple Echo devices in different rooms or if you want to change the language for a specific device. Tap on the device that you wish to customize.
By selecting your Echo device, you are indicating which device’s language settings you want to modify. Ensure you choose the correct device to avoid any confusion. Now that you have selected your Echo device, let’s move on to the next step of changing the language settings.
Tap on Device Language
Now that you have selected the specific Echo device for which you want to change the language settings, the next step is to tap on the “Device Language” option. This option allows you to modify the language settings for your chosen Echo device. Follow these steps to access the Device Language settings:
1. Open the Device Settings: After selecting your Echo device, you will be taken to a screen that displays various settings and options specific to that device. Look for an option labeled “Device Language” or something similar. Tap on this option to proceed.
2. Tap on Device Language: Once you have located the “Device Language” option, tap on it to access the language settings. This will take you to a screen where you can view and select different languages for your Echo device.
3. Language Selection: On the language settings screen, you will see a list of supported languages. Scroll through the list to find the language that you want Alexa to use. Keep in mind that not all languages may be available for all Echo devices.
4. Select your Preferred Language: Once you have found your preferred language from the list, tap on it to select it as the new language for your Echo device. This selection will change the language in which Alexa responds to your commands and provides information.
By tapping on the “Device Language” option, you are accessing the language settings for your chosen Echo device. Take your time to explore the available options and choose the language that best suits your needs. Now that you have selected your desired language, let’s move on to the next step of confirming the language change.
Choose your preferred language from the list
Once you have accessed the “Device Language” settings for your Echo device, you will see a list of supported languages. This step is crucial as it allows you to choose the language in which you want Alexa to respond to your commands and provide information. Follow these steps to select your preferred language:
1. Scroll through the List: On the language settings screen, you will find a list of available languages that are supported by your Echo device. Take your time to scroll through the list and explore the various language options.
2. Evaluate the Language Choices: As you browse through the languages, consider factors such as your proficiency in the language, your preferred dialect or accent, and the availability of language-specific features or skills. Choosing a language that you are comfortable with will enhance your interaction with Alexa.
3. Select your Preferred Language: Once you have found your preferred language from the list, tap on it to select it as the new language for your Echo device. Make sure to choose the correct language as the selected language will determine how Alexa responds to your commands and provides information.
It is important to note that not all languages may be available for all Echo devices. The availability of languages may vary depending on the model and location of your Echo device. If your preferred language is not listed, it means that it is not currently supported on your device.
Choosing your preferred language is a crucial step in customizing your Echo device to meet your needs. Take your time to evaluate the available options and select the language that will enhance your Alexa experience. Once you have chosen your language, let’s move on to confirming the language change.
Confirm the language change
After selecting your preferred language from the list, the next step is to confirm the language change for your Echo device. This confirmation ensures that the selected language settings are applied and that Alexa will respond in the chosen language. Follow these steps to confirm the language change:
1. Save or Confirm the Change: Once you have selected your preferred language, look for a button or option that allows you to save or confirm the language change. This button may be labeled differently depending on the specific device and app version, but it is typically located at the bottom or top of the language settings screen.
2. Tap on Save or Confirm: Tap on the “Save” or “Confirm” button to proceed with applying the language change to your Echo device. This action will initiate the process of updating the language settings and configuring Alexa to respond in the newly selected language.
3. Wait for the Language Update: After confirming the language change, your Echo device will begin updating its language settings. This process may take a few moments, so be patient and allow the device to complete the update.
By confirming the language change, you are ensuring that the selected language settings are applied to your Echo device. This step finalizes the process and prepares your device to respond to your commands in the chosen language. Now that you have confirmed the language change, let’s proceed to the next step of waiting for your Echo device to update its language.
Wait for your Echo device to update its language
After confirming the language change for your Echo device, it is important to allow some time for the device to update its language settings. This process ensures that the new language is applied and that Alexa will respond in the selected language. Follow these steps to wait for your Echo device to update its language:
1. Be Patient: Once you have confirmed the language change, it is important to be patient and allow your Echo device some time to update its language settings. The duration of the update process may vary depending on factors such as your internet connection speed and the specific Echo device model.
2. Monitor the Device: While waiting for the update, keep an eye on your Echo device. It may display a visual indication, such as a spinning light ring or a status message, to indicate that the language update is in progress. If your device has a screen, it may display a progress bar or a notification regarding the language update.
3. Avoid Interruptions: To ensure a smooth language update process, avoid interrupting the device or disconnecting it from the power source. Allow it to complete the update without any interruptions.
4. Check for Completion: Once you have given your Echo device sufficient time to update its language settings, check if the process is complete. The visual indications mentioned earlier should stop, and your device should be ready to respond in the selected language.
Waiting for your Echo device to update its language is an important step to ensure that the new language settings are successfully applied. By allowing the update process to complete, you can ensure a seamless transition to your preferred language. Now that you have waited for the language update, it’s time to test Alexa’s new language by giving it commands.
Test Alexa’s new language by giving it commands
Now that your Echo device has updated its language settings, it’s time to put it to the test. By giving Alexa commands in the new language, you can ensure that the language change was successful and that Alexa is now responding accordingly. Follow these steps to test Alexa’s new language:
1. Wake Up Alexa: To begin, wake up Alexa by using the wake word. The default wake word is “Alexa,” but you can change it to a different wake word if you prefer. Simply say the wake word followed by your command to get Alexa’s attention.
2. Give Alexa a Command: Once Alexa is awake, give it a command in the new language. For example, you could ask Alexa the weather, set a reminder, or play your favorite music. Speak naturally and clearly, using the new language.
3. Observe Alexa’s Response: Alexa should respond to your command in the new language. Listen for the language and tone of voice used by Alexa, ensuring that it aligns with the language you have chosen. If Alexa is not responding in the selected language, double-check the language settings on your Echo device or repeat the previous steps to ensure proper configuration.
4. Try Different Commands: To further test Alexa’s new language, try different commands and inquire about various topics. Ask about the news, sports scores, or general knowledge questions. Interact with Alexa as you would in your preferred language, and see how well it understands and responds to your requests.
By testing Alexa’s new language, you can evaluate the success of the language change and ensure that Alexa is providing responses in the desired language. If you encounter any issues or if Alexa is not responding as expected, refer to the troubleshooting tips in the next section. Let’s proceed to the final step of troubleshooting tips in case you encounter any difficulties.
Troubleshooting tips
While changing the language on your Echo device is usually a straightforward process, you may encounter certain issues or challenges. Here are some troubleshooting tips to help you resolve any difficulties you may encounter:
1. Restart your Echo device: If you’re experiencing any issues with the language change, try restarting your Echo device. Disconnect it from the power source, wait for a few seconds, and then plug it back in. This simple step can often resolve minor glitches and help your device update its language settings properly.
2. Check your internet connection: A stable internet connection is crucial for your Echo device to communicate with the Alexa servers and update its language settings. Ensure that your device is connected to a reliable Wi-Fi network with a strong signal. If your internet connection is weak or unstable, it may affect the language update process.
3. Update your Echo device’s software: Keeping your Echo device’s software up to date can address any compatibility issues or bugs that may be affecting the language change. Go to the Alexa app and check for any available software updates for your Echo device. If updates are available, install them and then attempt to change the language again.
4. Verify language compatibility with your device: Not all languages may be available for all Echo devices. Double-check the language availability for your particular Echo device model. Some features and skills may also be limited in certain languages, so it’s important to ensure that your desired language is supported.
5. Reset your Echo device: If you’re still experiencing issues, you can try performing a factory reset on your Echo device. This will restore the device to its original settings. Keep in mind that resetting your device will erase all settings and personal preferences, so make sure to back up any important data before proceeding.
6. Contact Amazon Support: If you have tried the above troubleshooting steps and are still encountering issues, it may be time to reach out to Amazon support. They can provide further assistance and guide you through advanced troubleshooting techniques specific to your Echo device model.
By following these troubleshooting tips, you can overcome any obstacles you may face while changing the language on your Echo device. Remember to be patient and thorough in your approach, and soon you’ll be enjoying Alexa’s responses in your preferred language.