
Reasons for Cancelling a Print Job
Print jobs occasionally need to be cancelled due to various reasons. Whether it’s because you printed the wrong document, encountered a printing error, or simply changed your mind, cancelling a print job can save you time, money, and resources. Here are a few common reasons why you might need to cancel a print job:
- Print settings error: Sometimes, you realize that you’ve selected the wrong printer settings, such as the wrong page orientation, paper size, or print quality. Cancelling the print job allows you to correct these settings before wasting paper and ink.
- Mistakenly printed multiple copies: It’s not uncommon to accidentally hit the print button multiple times or forget to change the number of copies. Cancelling the print job can prevent an unnecessary waste of paper and ink.
- Printed the wrong document: Perhaps you selected the wrong file or sent the wrong document to the printer. Cancelling the print job allows you to print the correct document without wasting paper and ink on the wrong one.
- Print quality issues: If you notice that the print quality is poor, with streaks, smudges, or faded text, cancelling the print job can help you troubleshoot the issue, such as replacing ink cartridges or fixing paper jams.
- Network connectivity problems: In a networked environment, if the printer is experiencing connectivity issues or is offline, cancelling the print job can help troubleshoot the problem and prevent unnecessary delays.
Cancelling a print job is a simple and effective way to avoid wasting resources and ensure that you get the desired output. The following sections will guide you on how to cancel print jobs on different devices and platforms.
How to Cancel a Print Job on Windows
If you’re using a Windows computer and need to cancel a print job, follow these easy steps:
Step 1: Open the Print Queue
To access the print queue, click on the Windows Start button and navigate to the “Settings” menu. From there, select “Devices” and then “Printers & scanners.” Find the printer that you want to cancel the print job for and click on it.
Step 2: Cancel the Print Job
Once you’re in the printer settings, you’ll see a list of active print jobs. Right-click on the print job that you want to cancel and select “Cancel” from the context menu. Alternatively, you can select the print job and click on the “Cancel” button on the toolbar at the top of the print queue window.
If the print job is in progress and cannot be cancelled immediately, you may need to wait until it finishes printing before it can be cancelled.
By following these two simple steps, you can easily cancel print jobs on a Windows computer. This allows you to prevent unnecessary printing, save resources, and quickly resolve printing issues.
Continue reading to learn how to cancel print jobs on other devices and platforms.
Step 1: Open the Print Queue
Before you can cancel a print job on Windows, you need to access the print queue. The print queue is a list of all the print jobs that are waiting to be printed by a specific printer. Here’s how you can open the print queue:
Method 1: Using the Control Panel
- Click on the Windows Start button and open the Control Panel.
- Click on “Hardware and Sound,” then select “Devices and Printers.”
- Locate the printer icon for the printer you want to cancel the print job for and double-click on it.
- The print queue window will open, displaying all the active print jobs.
Method 2: Using the Windows Settings
- Click on the Windows Start button and open the Windows Settings by clicking on the gear icon.
- Click on “Devices” and select “Printers & scanners” from the left-hand menu.
- Scroll down until you find the printer you want to cancel the print job for and click on it.
- In the printer settings, click on the “Open queue” button to access the print queue window.
Once you have successfully opened the print queue, you will be able to see the list of all the print jobs currently in the queue. From here, you can proceed to cancel the specific print job you wish to cancel.
Opening the print queue is the first step to canceling print jobs on Windows. It allows you to view and manage the print jobs, ensuring that you have control over what gets printed and preventing any unnecessary waste of resources.
Step 2: Cancel the Print Job
After opening the print queue on your Windows computer, you can proceed to cancel the specific print job that you no longer want to proceed with. Here’s how you can cancel a print job:
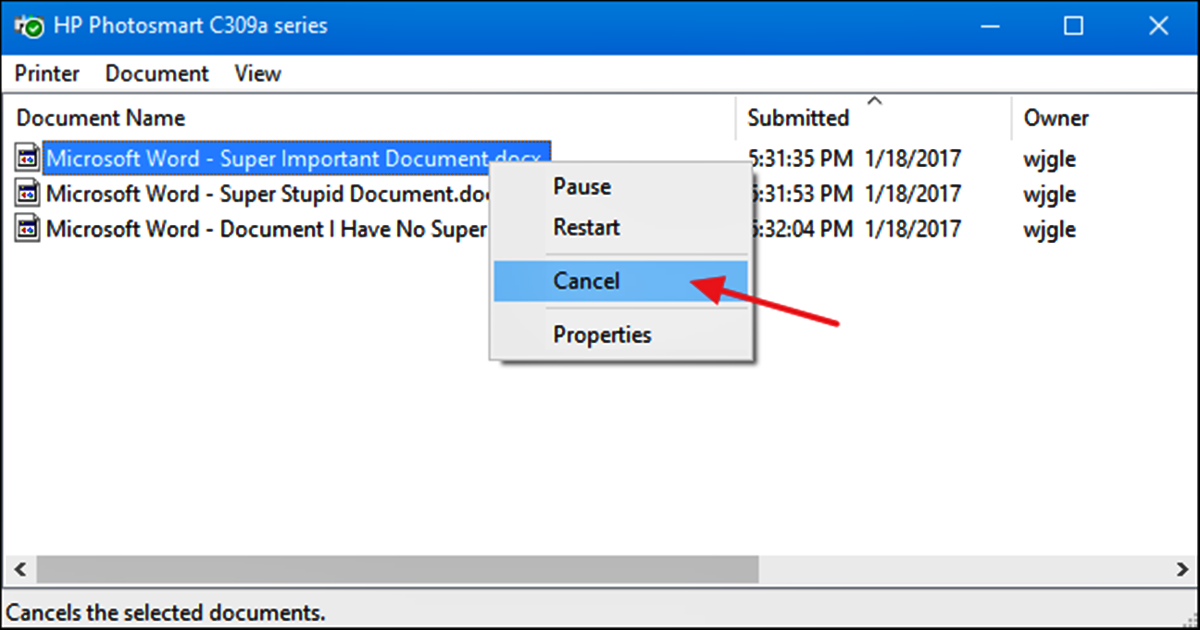
Method 1: Using the Context Menu
- Right-click on the print job that you wish to cancel in the print queue window.
- A context menu will appear with various options. Select “Cancel” from the menu.
Method 2: Using the Toolbar
- Select the print job that you want to cancel by clicking on it.
- In the toolbar at the top of the print queue window, click on the “Cancel” button.
Once you have clicked on the “Cancel” option, Windows will stop processing the print job and remove it from the print queue. The print job will no longer be sent to the printer, preventing it from being printed and wasting resources.
If the print job is currently in progress and cannot be canceled immediately, you may need to wait for it to finish printing before it can be canceled. In such cases, you will see the status of the print job as “Deleting” or “Spooling” until it is successfully cancelled.
By following these simple steps, you can effectively cancel print jobs on your Windows computer. Whether it’s to correct print settings, avoid duplicate copies, or rectify printing errors, canceling print jobs allows you to have better control over your printing tasks.
How to Cancel a Print Job on Mac
If you’re using a Mac computer and need to cancel a print job, you can easily do so by following these steps:
Step 1: Open the Print Queue
- Click on the Apple menu on the top left corner of your screen and select “System Preferences.”
- In the System Preferences window, click on “Printers & Scanners.”
- Select the printer that you want to cancel the print job for from the list on the left-hand side.
- Click on the “Open Print Queue” button to access the print queue for the selected printer.
Step 2: Cancel the Print Job
- In the print queue window, you will see a list of all the active print jobs.
- To cancel a specific print job, select it by clicking on it.
- Click on the “X” button located in the toolbar at the top of the print queue window.
After clicking the “X” button, a confirmation prompt will appear asking if you want to cancel the selected print job. Click “Cancel Job” to confirm the cancellation.
Once you’ve completed these steps, the selected print job will be cancelled, preventing it from being printed and wasting resources.
Canceling print jobs on a Mac is a straightforward process that allows you to have better control over your printing tasks. Whether you need to correct printing settings, cancel multiple copies, or resolve printing errors, following these steps will help you manage your print jobs effectively.
Step 1: Open the Print Queue
In order to cancel a print job on your Mac, you first need to access the Print Queue. The Print Queue is a list of all the print jobs that are currently waiting to be printed by your printer. Follow these steps to open the Print Queue:
- Click on the Apple menu located in the top-left corner of your screen.
- Select “System Preferences” from the drop-down menu.
- In the System Preferences window, click on “Printers & Scanners.”
- A list of printers will appear on the left-hand side of the window. Select the printer for which you want to cancel a print job.
- Click on the “Open Print Queue” button to access the Print Queue for the selected printer.
Once you have followed these steps, the Print Queue window will open, displaying all the print jobs that are currently in the queue for that specific printer. You are now ready to proceed to the next step and cancel the desired print job.
Opening the Print Queue is essential for managing your print jobs effectively. It allows you to view and monitor the print jobs in progress, giving you the ability to cancel any print job that you no longer want to proceed with.
Step 2: Cancel the Print Job
After opening the Print Queue on your Mac, you can proceed to cancel the specific print job that you no longer want to proceed with. Here’s how:
- Locate the print job that you want to cancel in the Print Queue.
- Click on the print job to select it.
- From the menu bar at the top of your screen, click on “Job” and then select “Cancel” from the drop-down menu.
- A confirmation prompt will appear asking if you want to cancel the selected print job. Click on “Yes” or “Cancel Job” to confirm the cancellation.
Alternatively, you can right-click on the print job and select “Cancel” from the context menu that appears.
Once you have canceled the print job, it will be removed from the Print Queue and will no longer be sent to the printer for printing. This helps in preventing wastage of resources such as paper and ink.
If the print job is in progress and cannot be canceled immediately, you may need to wait until it finishes printing before it can be canceled. In such cases, the print job will be marked as “Deleting” or “Stopped” until it is successfully canceled.
By following these simple steps, you can easily cancel print jobs on your Mac. This allows you to have better control over your printing tasks, correct any printing errors, and avoid wasteful printing.
How to Cancel a Print Job on a Network Printer
If you are using a network printer and need to cancel a print job, the process may be slightly different from canceling print jobs on a local printer. Here is how you can cancel a print job on a network printer:
Step 1: Access the Printer’s Web Interface
- Open a web browser on your computer.
- Enter the IP address or hostname of the network printer in the address bar.
- Press Enter to access the printer’s web interface.
Note: The IP address or hostname of the printer can usually be found in the printer’s documentation or by checking the printer settings on your computer.
Step 2: Locate the Print Job and Cancel it
- Once you are logged into the printer’s web interface, navigate to the “Print Jobs” or “Job Queue” section.
- Here, you will see a list of all the print jobs in the queue.
- Locate the print job that you want to cancel and click on the “Cancel” or “Delete” button next to it.
After canceling the print job, it will be removed from the printer’s queue, and it will no longer be printed. This helps to prevent the unnecessary use of resources and allows you to prioritize other print jobs.
Please note that the process of canceling print jobs on a network printer may vary depending on the printer’s make and model. If you are unable to find the “Print Jobs” or “Job Queue” section or having difficulty canceling print jobs, consult the printer’s manual or contact the printer manufacturer for further assistance.
Canceling print jobs on a network printer through its web interface provides you with direct control and flexibility over print job management, allowing you to efficiently manage printing tasks and streamline your workflow.
Step 1: Access the Printer’s Web Interface
To cancel a print job on a network printer, you first need to access the printer’s web interface. The web interface allows you to interact with the printer’s settings and manage print jobs remotely. Here’s how you can access the printer’s web interface:
- Open a web browser on your computer.
- Find the IP address or hostname of the network printer. You can usually find this information in the printer’s documentation or by checking the printer settings on your computer.
- Enter the IP address or hostname of the printer into the address bar of your web browser.
- Press Enter or click Go to access the printer’s web interface.
Once you have completed these steps, the web interface of the network printer should load, providing you with access to various printer settings and management options.
Note that the exact steps to access the printer’s web interface may vary depending on the printer model and its configuration. Some printers may require a username and password to log in, while others may not. Refer to the printer’s manual or contact the printer manufacturer for specific instructions if needed.
By accessing the printer’s web interface, you gain the ability to manage print jobs and perform other printer-related tasks remotely. This allows you to cancel print jobs, monitor printer status, adjust settings, and streamline your printing workflow more effectively.
Step 2: Locate the Print Job and Cancel it
After accessing the web interface of your network printer, you can proceed to locate and cancel the specific print job that you want to remove from the print queue. Follow these steps to complete this process:
- Navigate to the “Print Jobs” or “Job Queue” section in the printer’s web interface.
- In this section, you will find a list of all the print jobs that are currently in the queue, waiting to be processed by the printer.
- Locate the print job that you want to cancel from the list.
- Depending on the printer’s interface, you may have an option to select the print job by clicking on it or by selecting a checkbox next to it.
- Once you have selected the print job, look for a “Cancel” or “Delete” button or option. Click on it to cancel the print job.
After canceling the print job, it will be removed from the print queue of the network printer. The printer will no longer process that print job, ensuring that it does not consume any further resources or material.
Please note that the process of locating and canceling print jobs may vary depending on the make and model of your network printer. If you are having difficulty locating the print job or canceling it, refer to the printer’s manual or contact the printer manufacturer for specific guidance.
By successfully canceling print jobs through the printer’s web interface, you can effectively manage the print queue, prioritize print jobs, and prevent unnecessary printing. This helps in improving productivity and minimizing resource wastage.
How to Cancel a Print Job on a Smartphone or Tablet
If you need to cancel a print job on your smartphone or tablet, you can easily do so using the designated printing app or the device’s print settings. Here’s how you can cancel a print job on a smartphone or tablet:
Step 1: Open the Printer App
- Open the printing app on your smartphone or tablet. This app is usually pre-installed on the device, or you can download it from the app store.
- Navigate to the print queue or print status section within the app. This is where you can view and manage the print jobs that are awaiting printing.
- Locate the specific print job that you want to cancel from the list.
Step 2: Cancel the Print Job
- Select the print job by tapping on it.
- Look for the option to cancel the print job within the app’s interface.
- Tap on the cancel option to cancel the print job.
After canceling the print job, it will be removed from the print queue, and the printer will no longer attempt to print it. This helps to prevent wasting paper and other printing resources.
If you are cancelling a print job through the device’s print settings instead of a dedicated printing app, follow these steps:
Step 1: Access the Print Settings
- Go to the device settings on your smartphone or tablet.
- Find the “Printing” or “Print” option in the settings menu.
- Select the specific printing service or printer that you are using.
Step 2: Cancel the Print Job
- In the print settings, locate the print job that you want to cancel.
- Tap on the print job to select it.
- Look for the option to cancel the print job within the device’s print settings.
- Tap on the cancel option to cancel the print job.
By following these simple steps, you can easily cancel print jobs on your smartphone or tablet. This ensures that you maintain control over your printing tasks, prevent unnecessary printing, and save resources.
Step 1: Open the Printer App
To cancel a print job on your smartphone or tablet, the first step is to open the dedicated printer app. Most devices come with a built-in printing app or offer printing apps that can be downloaded from the app store. Here’s how to open the printer app:
- Unlock your smartphone or tablet and navigate to the home screen.
- Look for the printer app icon. It is usually labeled as “Print” or has the logo of the printer manufacturer.
- Tap on the printer app icon to open it.
If you can’t find a dedicated printer app, you can also check the sharing options within the app from which you want to print. Some apps have built-in print functions that allow you to select a printer or cancel print jobs directly from the app.
Once the printer app is opened, you will usually have access to various printer-related options and settings, including the print queue or print status section.
Note that the steps to open the printer app may vary slightly depending on the operating system and device model. If you are having trouble finding or opening the printer app, refer to the device’s manual or contact the device manufacturer for specific instructions.
By successfully opening the printer app, you are ready to proceed to the next step and cancel the print job that you no longer want to proceed with.
Step 2: Cancel the Print Job
After opening the printer app on your smartphone or tablet, you can proceed to cancel the specific print job that you no longer wish to be printed. Follow these steps to cancel the print job:
- Within the printer app, locate and access the print queue or print status section. This section displays the list of print jobs that are either in progress or waiting to be printed.
- Look for the print job that you want to cancel within the list. Typically, the print jobs are displayed with details such as the document name, number of pages, and status.
- Select the specific print job that you want to cancel by tapping on it.
- Look for the option to cancel or delete the print job within the printer app’s interface. This option is usually represented by an icon or labeled as “Cancel,” “Delete,” or “Stop.”
- Tap on the cancel option to cancel the selected print job.
After canceling the print job, it will be removed from the print queue, and the printer will no longer attempt to print it. This helps to prevent wastage of paper, ink, and other printing resources.
If there is no explicit cancel option within the printer app, you can try tapping on the ellipsis icon (…) or the settings icon to access additional options related to print jobs. From there, you may find the cancel option or the ability to clear the entire print queue.
Note that the steps to cancel a print job may vary based on the specific printer app and device model you are using. If you are having difficulty canceling the print job, refer to the app’s documentation or contact the app developer for further assistance.
By successfully canceling print jobs through the printer app or device’s print settings, you can effectively manage your printing tasks, avoid unnecessary printing, and ensure efficient use of resources.
Troubleshooting Tips for Cancelling Print Jobs
While cancelling print jobs is usually a straightforward process, there may be instances where you encounter difficulties. If you face challenges cancelling print jobs, try these troubleshooting tips to help resolve the issue:
Tip 1: Restart the Printer
If you are unable to cancel print jobs through the usual methods, try restarting the printer. Power off the printer, unplug it from the power source, wait for a few minutes, then plug it back in and power it on. This can often resolve any internal issues that may be preventing the cancellation of print jobs.
Tip 2: Clear the Print Spooler
If the print job remains stuck in the queue and cannot be cancelled, there may be a problem with the print spooler. Access the print spooler settings on your computer, locate the stuck print job, and clear it from the queue. This can be done by right-clicking on the print job and selecting “Cancel” or “Delete.”
Tip 3: Update Printer Drivers
Outdated or corrupted printer drivers can sometimes cause issues with cancelling print jobs. Update the printer drivers on your computer to ensure compatibility and stability. Visit the printer manufacturer’s website or use the device’s automatic driver update feature to download and install the latest drivers.
Tip 4: Seek Technical Support if Necessary
If you have tried the above troubleshooting tips and are still unable to cancel print jobs, it may be necessary to seek technical support. Contact the printer manufacturer’s customer support or consult online forums for assistance. Provide them with specific details about your printer model, operating system, and any error messages you encountered to help expedite the troubleshooting process.
By utilizing these troubleshooting tips, you can overcome potential challenges in cancelling print jobs and ensure smoother printing operations in the future. Remember to try each tip step-by-step and seek assistance if the problem persists.
Tip 1: Restart the Printer
If you are facing difficulties in cancelling print jobs and the usual methods are not working, restarting the printer can often solve the problem. Restarting allows the printer to refresh its settings and clear any temporary glitches that may be hindering the cancellation process. Here’s how you can restart your printer:
- Power off the printer using the power button or the power switch located on the printer itself.
- Unplug the printer from the power source or disconnect it from the power outlet.
- Wait for a few minutes to ensure that the printer is completely powered down.
- Plug the printer back into the power source or reconnect it to the power outlet.
- Turn on the printer by pressing the power button or flipping the power switch.
After the printer has restarted, try cancelling the print job again using the appropriate method for your device (e.g., through the print queue, printer app, or device settings).
Restarting the printer can resolve various issues, including frozen print queues or stalled print jobs. It allows the printer to clear its cache, reset its internal processes, and establish a fresh connection with your device.
If restarting the printer does not resolve the issue, you may need to explore further troubleshooting options or seek technical support from the printer manufacturer.
By following this tip, you can often resolve printing issues and regain control over cancelling print jobs, ensuring a smoother printing experience.
Tip 2: Clear the Print Spooler
If you are unable to cancel print jobs and they continue to remain stuck in the print queue, clearing the print spooler can help resolve the issue. The print spooler is a service that manages the print jobs in the queue, and clearing it can remove any problematic jobs that are preventing cancellation. Follow these steps to clear the print spooler:
- Open the Control Panel on your computer.
- Go to the “Administrative Tools” or “System and Security” section.
- Locate and open the “Services” or “Services and Applications” option.
- Scroll down and find the “Print Spooler” service.
- Right-click on the “Print Spooler” service and select “Stop” from the drop-down menu. This will temporarily stop the print spooler.
- Open File Explorer and navigate to the following directory: C:\Windows\System32\spool\PRINTERS (replace “C” with the appropriate system drive letter if necessary).
- Delete all of the files within the “PRINTERS” folder. These are the print jobs that are waiting to be processed.
- Return to the “Services” window, right-click on the “Print Spooler” service again, and select “Start” to restart the print spooler.
After following these steps, the print spooler will be cleared, and any stuck print jobs should no longer be present. You can then try cancelling print jobs once more using the regular methods.
Please note that clearing the print spooler will remove all the print jobs in the queue, so make sure you only do this if you are certain you want to cancel all pending print jobs.
If clearing the print spooler does not resolve the issue, you may need to explore additional troubleshooting options or seek technical support from the printer manufacturer or your computer’s support resources.
By utilizing this tip, you can effectively clear the print spooler and remove any stuck print jobs that are preventing cancellation, allowing you to regain control over your printing tasks.
Tip 3: Update Printer Drivers
If you are encountering difficulties in cancelling print jobs, outdated or corrupted printer drivers may be the culprit. Updating your printer drivers can help resolve compatibility issues and improve the overall performance of your printer. Follow these steps to update your printer drivers:
Step 1: Identify the Printer Model
Before updating your printer drivers, you need to identify the make and model of your printer. This information can usually be found on the printer itself or in the printer’s manual.
Step 2: Visit the Manufacturer’s Website
Go to the website of your printer’s manufacturer. Most printer manufacturers provide a dedicated support or drivers section on their website.
Step 3: Locate the Driver Downloads
Navigate to the support or drivers section of the manufacturer’s website. Look for the section specifically related to printer drivers.
Step 4: Select the Correct Printer Model
Find your printer model from the options provided. Make sure it matches the make and model of your printer.
Step 5: Download and Install the Latest Driver
Download the latest driver for your printer model. Make sure to select the driver that is compatible with your operating system.
Once the driver is downloaded, follow the installation instructions provided by the manufacturer. Typically, you will need to run the downloaded file and follow the prompts to complete the driver installation.
Updating your printer drivers can address compatibility issues, improve performance, and resolve problems related to cancelling print jobs. Outdated or corrupted drivers can sometimes prevent the cancellation process from functioning properly.
If updating the printer drivers does not resolve the issue, you may need to explore additional troubleshooting options or contact the printer manufacturer for further assistance.
By following this tip and keeping your printer drivers up-to-date, you can ensure smooth printing operations and have better control over cancelling print jobs as needed.
Tip 4: Seek Technical Support if Necessary
If you’ve tried the previous troubleshooting tips and are still unable to cancel print jobs, it may be necessary to seek technical support. Experienced professionals can provide guidance and assistance to help resolve the issue. Here’s what you can do:
1. Contact the Printer Manufacturer
Reach out to the printer manufacturer’s customer support for troubleshooting advice and solutions. Provide them with specific details about your printer model, the issue you’re facing, and the troubleshooting steps you’ve already taken. They may be able to offer additional guidance or suggest specific solutions tailored to your printer.
2. Check Online Support Resources
Visit the printer manufacturer’s website or online support forums to find answers to frequently asked questions or troubleshooting guides. Many manufacturers provide comprehensive support resources, including user manuals, FAQs, and troubleshooting articles that can help you address various printing issues.
3. Seek Assistance from IT Support
If you’re unable to resolve the problem on your own, consider reaching out to your organization’s IT support team if you are using a network printer at work. They may have expertise in troubleshooting printer-related issues or can connect you with someone who can assist you further.
4. Consult Online Communities and Forums
Engage with online communities and forums dedicated to printers or technology in general. Users in these communities often share their experiences and help troubleshoot issues. Describe your problem and provide relevant details. Other users may be able to provide insights, advice, or alternative solutions.
Remember to be patient and provide detailed information to the support personnel or community members. The more information you provide, the better they can understand your issue and offer appropriate solutions.
By seeking technical support when necessary, you can benefit from the expertise of professionals and the collective wisdom of online communities, leading to a greater likelihood of resolving the problem and successfully cancelling print jobs.