
Why Calibrate Your iPhone
Your iPhone is a powerful device packed with advanced sensors that ensure accurate performance and functionality. However, over time, these sensors may become slightly misaligned or inaccurate, affecting the overall user experience. That’s where calibration comes into play. Calibrating your iPhone’s sensors can help to restore their accuracy and ensure that your device is functioning optimally.
Here are a few reasons why you should consider calibrating your iPhone:
- Improved Accuracy: Calibrating your iPhone’s sensors ensures that the data they provide is accurate. For example, calibrating the compass helps in accurate navigation, while calibrating the accelerometer enhances motion sensing and orientation detection.
- Optimized Performance: When your iPhone’s sensors are properly calibrated, apps and features that rely on those sensors work better. This means smoother gaming experiences, precise fitness tracking, and accurate augmented reality interactions.
- Battery Efficiency: Calibrating your iPhone’s battery can help improve its efficiency. By calibrating the battery, your device can accurately determine its remaining charge, leading to more reliable battery percentage readings and better power management.
- Enhanced Display Quality: Are the colors on your iPhone’s display not looking quite right? Calibrating the display can help fine-tune color accuracy and improve overall image quality.
- Improved Audio Experience: Audio calibration ensures that the sound coming from your iPhone’s speakers or headphones is balanced and optimized. This results in a more immersive audio experience, whether you’re listening to music, watching videos, or making voice calls.
Keep in mind that calibration is not something you need to do frequently. It’s typically done when you notice specific issues or after a significant iOS update. However, if you have recently dropped your iPhone or experienced any physical impact, it’s a good idea to consider calibrating the sensors to ensure accurate readings.
In the next sections, we’ll explore how to calibrate different sensors on your iPhone, including the compass, gyroscope, accelerometer, barometer, ambient light sensor, proximity sensor, battery, display, audio output, touchscreen, and GPS.
Remember, calibrating these sensors can significantly improve the performance and accuracy of your iPhone, allowing you to make the most of your device’s features. So, let’s dive into the step-by-step calibration process for each sensor.
Check Your iPhone’s Sensor Accuracy
Before diving into the calibration process, it’s essential to check the accuracy of your iPhone’s sensors. This step will help identify any inconsistencies or inaccuracies that may be affecting your device’s performance. Here’s how you can check your iPhone’s sensor accuracy:
- Compass: Open the Compass app on your iPhone and ensure that it is functioning properly. Rotate your device in a figure-eight motion to confirm that the compass readings are responsive and accurate.
- Gyroscope: Use a reliable gyroscope testing app from the App Store to determine if your iPhone’s gyroscope is functioning correctly. The app will provide real-time readings as you rotate your device around different axes.
- Accelerometer: Similar to the gyroscope, there are apps available to test your iPhone’s accelerometer. They allow you to tilt and move your device, and the app will display the corresponding acceleration readings.
- Barometer: Unfortunately, there is no direct way to test the accuracy of your iPhone’s barometer. However, you can cross-reference the barometric pressure reading on your device with a trusted weather app to see if they align.
- Ambient Light Sensor: Check if your iPhone’s screen brightness adjusts automatically when transitioning between different lighting environments. Make sure that the sensor accurately detects changes in ambient light.
- Proximity Sensor: During a phone call, ensure that the screen turns off when you bring your iPhone close to your ear and turns back on when you move it away. This indicates the proper functioning of the proximity sensor.
- Battery: Monitor your iPhone’s battery performance over a few charging cycles. If you notice significant fluctuations in battery percentage or sudden power drains, it may indicate a calibration issue.
- Display: Observe the colors, contrast, and overall visual quality on your iPhone’s display. If you notice any inconsistencies or color inaccuracies, it could indicate a need for display calibration.
- Audio Output: Listen to different types of audio content, including music, videos, and calls, to ensure that there are no distortions or imbalances in the sound output. Adjust the volume and check for any anomalies.
- Touchscreen: Verify that your iPhone’s touchscreen responds accurately to touch inputs across the entire surface. Check for dead spots, unresponsive areas, or any irregularities in touch sensitivity.
- GPS: Use a GPS-based app or navigation software to confirm that your iPhone’s GPS accurately pinpoints your location and tracks your movements without any delays or erratic behavior.
If you notice any significant discrepancies or issues during the accuracy check, it’s a good indication that calibration may be necessary. The following sections will guide you through the step-by-step process to calibrate each specific sensor on your iPhone.
Remember, calibration is not always required, but it can help optimize your device’s performance and ensure accurate readings. Now, let’s explore how to calibrate each sensor individually.
Calibrate Your iPhone’s Compass
The compass on your iPhone is a valuable tool for navigation and orienting yourself in different directions. However, if you notice that the compass readings are inaccurate or not responding properly, calibrating your iPhone’s compass can help restore its accuracy. Here’s how to calibrate your iPhone’s compass:
- Open the Compass app on your iPhone. If you can’t find it, swipe down from the top-right corner of the screen and type “Compass” in the search bar.
- Hold your iPhone flat in your hand and move it in a figure-eight motion. Make sure to complete several rotations in both clockwise and counterclockwise directions.
- You should see a message that says “Calibration is complete” once the compass is successfully calibrated.
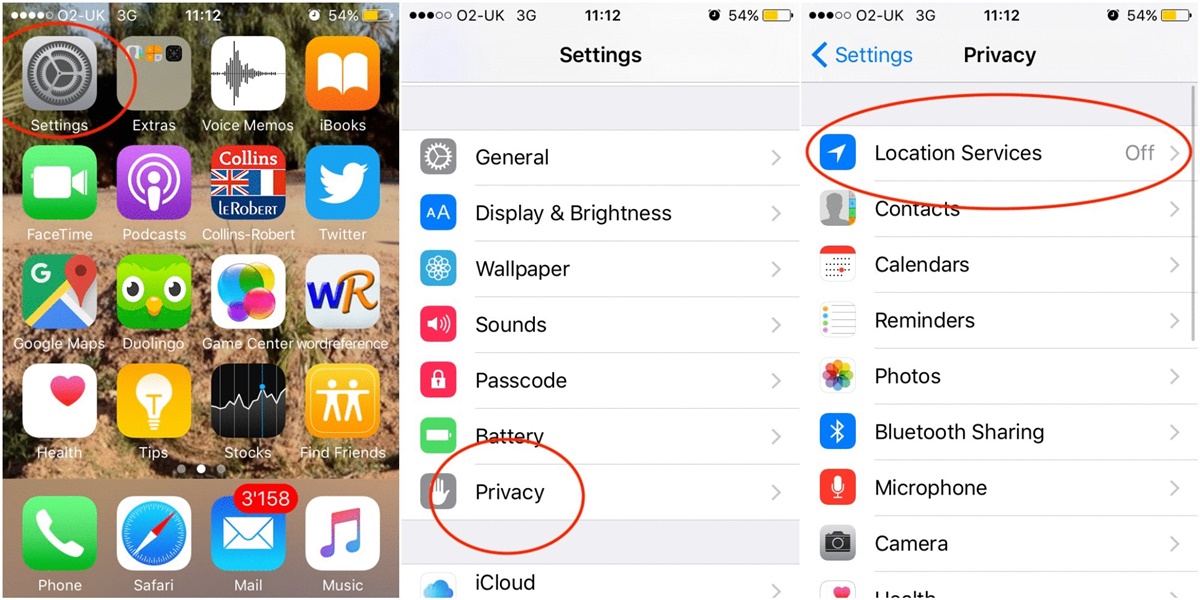
- If you don’t receive the calibration complete message, you can try calibrating the compass manually. To do this, close the Compass app and open the Settings app on your iPhone.
- Scroll down and tap on “Privacy,” then select “Location Services.”
- Scroll down again and tap on “Compass Calibration.”
- Hold your iPhone flat and move it in a smooth, continuous motion until the compass arrow circle fills completely.
- Once the calibration is complete, open the Compass app again to ensure that the compass readings are accurate.
It’s important to note that you may need to perform the compass calibration process occasionally, especially if you travel frequently, experience changes in magnetic fields, or notice persistent inaccuracies in the compass readings. By calibrating your iPhone’s compass, you can ensure that it provides reliable and precise direction information.
Now that you’ve calibrated your iPhone’s compass, you can confidently rely on it for accurate navigation and orientation. In the next sections, we’ll explore how to calibrate other essential sensors on your iPhone, including the gyroscope, accelerometer, barometer, ambient light sensor, proximity sensor, battery, display, audio output, touchscreen, and GPS.
Calibrate Your iPhone’s Gyroscope
The gyroscope in your iPhone is responsible for detecting rotational movement. If you notice that the gyroscope readings are inaccurate or not responding as expected, calibrating your iPhone’s gyroscope can help restore its functionality. Here’s how to calibrate your iPhone’s gyroscope:
- Find a flat and stable surface where you can place your iPhone. It’s important to ensure that the device remains steady during the calibration process.
- Open any app that utilizes the gyroscope, such as a game that relies on motion control or an augmented reality app.
- Hold your iPhone in a neutral position and keep it still for a few seconds to allow the gyroscope to stabilize.
- Slowly rotate your iPhone along all three axes: pitch, roll, and yaw. Perform smooth and deliberate movements to cover a full range of motion.
- Continue rotating your iPhone for about 10 to 15 seconds, ensuring that you cover all possible angles and rotations.
- Once you’ve completed the rotation, exit the app and reopen it to confirm whether the gyroscope readings are now accurate.
By calibrating your iPhone’s gyroscope, you can enhance the accuracy and responsiveness of apps and features that rely on motion control. If you continue to experience issues with the gyroscope readings even after calibration, you may need to contact Apple Support for further assistance.
Now that you’ve successfully calibrated your iPhone’s gyroscope, you can enjoy a more precise and immersive experience when using motion-based apps and games. In the upcoming sections, we’ll explore how to calibrate other crucial sensors on your iPhone, such as the accelerometer, barometer, ambient light sensor, proximity sensor, battery, display, audio output, touchscreen, and GPS.
Calibrate Your iPhone’s Accelerometer
The accelerometer in your iPhone is responsible for detecting motion and orientation changes. If you notice that the accelerometer readings are inaccurate or the device is not responding properly to tilt or shake gestures, calibrating your iPhone’s accelerometer can help restore its functionality. Here’s how to calibrate your iPhone’s accelerometer:
- Ensure that your iPhone is on a flat and stable surface. It’s important to have a steady base for accurate calibration.
- Open the Compass app on your iPhone. If you can’t find it, swipe down from the top-right corner of the screen and type “Compass” in the search bar.
- Swipe left on the Compass screen to access the Level feature.
- You should see a bubble in the center of the screen. If it’s off-center, adjust the position of your iPhone until the bubble is aligned in the middle.
- Keep your iPhone in the same position and tap the “Calibrate” button at the bottom of the screen.
- Follow the on-screen instructions and tilt your iPhone to complete the calibration process.
- Once the calibration is complete, exit the Compass app and open any app or feature that relies on the accelerometer to confirm if the readings are now accurate.
By calibrating your iPhone’s accelerometer, you can ensure that tilt and motion gestures are detected correctly in games, fitness apps, and other motion-based features. If you continue to experience issues with the accelerometer, it’s advisable to contact Apple Support for further troubleshooting.
Now that you’ve successfully calibrated your iPhone’s accelerometer, you can enjoy more accurate motion sensing and orientation detection on your device. In the next sections, we’ll explore how to calibrate other important sensors on your iPhone, including the barometer, ambient light sensor, proximity sensor, battery, display, audio output, touchscreen, and GPS.
Calibrate Your iPhone’s Barometer
The barometer in your iPhone measures air pressure, allowing it to provide altitude information and assist in weather-related features. If you notice inaccuracies in the barometric readings, calibrating your iPhone’s barometer can help improve its accuracy. Here’s how to calibrate your iPhone’s barometer:
- Find a reliable source for accurate barometric pressure readings. This can be a trusted weather website or a dedicated barometric pressure app.
- Open the Weather app on your iPhone to access the current barometric pressure reading provided by Apple’s data. Note down this reading for reference.
- Open the barometric pressure app or website on your iPhone, and compare the reading with the one displayed in the Weather app. If there’s a significant difference, it may indicate a calibration issue.
- If the readings are significantly different, you can try recalibrating the barometer by resetting the location and privacy settings for the Weather app.
- Open the Settings app on your iPhone and navigate to “Privacy” > “Location Services.”
- Scroll down and locate the “Weather” app. Tap on it to access location settings.
- Choose “Never” for the “Allow Location Access” option to disable the Weather app’s access to your location.
- Exit the Settings app and wait for a few minutes. Then, reopen the Weather app and allow it to update the current barometric pressure based on your location.
- After the update, compare the new barometric pressure reading in the Weather app with the one provided by the barometric pressure app or website. If they now align closely, it indicates a successful calibration.
Keep in mind that the barometer in your iPhone is not user-adjustable, and there is no direct calibration process built into the device. However, by comparing the readings with trusted sources and resetting the location settings for the Weather app, you can help ensure more accurate barometric pressure readings on your iPhone.
Now that you’ve learned how to calibrate your iPhone’s barometer, you can rely on more precise altitude and weather-related information. In the following sections, we’ll explore how to calibrate other essential sensors on your iPhone, including the ambient light sensor, proximity sensor, battery, display, audio output, touchscreen, and GPS.
Calibrate Your iPhone’s Ambient Light Sensor
The ambient light sensor in your iPhone is responsible for automatically adjusting the screen brightness based on ambient lighting conditions. If you find that the screen brightness is not adjusting correctly or the sensor is not accurately detecting changes in lighting, calibrating your iPhone’s ambient light sensor can help improve its performance. Here’s how to calibrate your iPhone’s ambient light sensor:
- Find a space with consistent lighting conditions where you can perform the calibration. Avoid areas with harsh or direct sunlight.
- Open the Settings app on your iPhone and navigate to “Display & Brightness.”
- Ensure that the “Auto-Brightness” feature is enabled. This allows your iPhone to optimize screen brightness based on surrounding light levels.
- Tap on “Brightness Level” to access the brightness slider.
- Drag the brightness slider to the middle or a comfortable level that suits your preference.
- Position your iPhone in the space with consistent lighting conditions and let it adapt to the environment for a few minutes.
- After allowing time for adjustment, go into a darker area and then back to the original space with consistent lighting.
- Observe if the screen brightness is adjusting appropriately to the changes in ambient light. It should increase in darker areas and decrease in brighter areas.
By calibrating your iPhone’s ambient light sensor, you can ensure that your device adapts to different lighting conditions accurately. This helps in reducing eye strain, conserving battery life, and enhancing overall usability.
Keep in mind that the ambient light sensor calibrates automatically based on your usage patterns and the surrounding environment. Performing this manual calibration allows you to fine-tune the sensor’s performance and ensure optimal screen brightness adjustments. However, it is not necessary to repeat this calibration frequently unless you notice any significant issues with the sensor’s functionality.
Now that you’ve successfully calibrated your iPhone’s ambient light sensor, you can enjoy a more comfortable viewing experience as your device responds accurately to changes in lighting conditions. In the upcoming sections, we’ll explore how to calibrate other important sensors on your iPhone, such as the proximity sensor, battery, display, audio output, touchscreen, and GPS.
Calibrate Your iPhone’s Proximity Sensor
The proximity sensor on your iPhone is responsible for detecting the presence of objects near the device, specifically your face during phone calls. If you find that the screen doesn’t turn off during a call when the device is brought close to your ear, or if the screen turns off when it shouldn’t, calibrating your iPhone’s proximity sensor can help resolve these issues. Here’s how to calibrate your iPhone’s proximity sensor:
- Open the Phone app on your iPhone and dial any phone number or make a call to a friend or family member.
- Hold your iPhone to your ear as you would during a regular phone call. Ensure that the proximity sensor area near the front-facing camera is not obstructed by a screen protector or debris.
- Wait for a few seconds to see if the screen turns off automatically while the device is touching your ear. This indicates that the proximity sensor is functioning correctly.
- If the screen doesn’t turn off or turns off prematurely, gently clean the front-facing camera and proximity sensor area with a soft, lint-free cloth.
- Restart your iPhone by holding down the Power button until the Slide to Power Off option appears. Slide to power off, wait for a few seconds, and then turn it back on by pressing the Power button again.
- Repeat steps 1 and 2 to test if the proximity sensor is now working as intended.
In most cases, cleaning the proximity sensor area and performing a restart can help resolve any calibration issues with the proximity sensor. However, if you continue to experience problems, it may be necessary to contact Apple Support for further assistance.
By calibrating your iPhone’s proximity sensor, you can ensure that the screen turns off during phone calls when it should and stays on when you need access to the controls. This improves the overall user experience and prevents accidental touches on the screen while on a call.
Now that you’ve successfully calibrated your iPhone’s proximity sensor, you can enjoy hassle-free phone calls without any issues regarding the screen turning on or off inadvertently. In the following sections, we’ll explore how to calibrate other essential sensors on your iPhone, such as the battery, display, audio output, touchscreen, and GPS.
Calibrate Your iPhone’s Battery
Calibrating your iPhone’s battery can help improve its performance and ensure accurate battery percentage readings. Over time, battery calibration can become necessary as the device may start displaying incorrect battery levels or experience unexpected shutdowns. Here’s how to calibrate your iPhone’s battery:
- Start by using your iPhone normally until the battery completely drains and the device turns off automatically.
- Connect your iPhone to a charger and allow it to charge uninterrupted until it reaches 100% battery capacity. Make sure to use an official Apple charger and cable for optimal results.
- Once fully charged, leave your iPhone connected to the charger for an additional two hours to ensure that the battery is fully calibrated.
- After the two-hour period, disconnect your iPhone from the charger.
- Restart your iPhone by holding down the Power button until the Slide to Power Off option appears. Slide to power off, wait for a few seconds, and then turn it back on by pressing the Power button again.
By performing a battery calibration, you help your iPhone accurately measure and display the remaining battery percentage. It can also resolve issues related to unexpected shutdowns, battery drain, or erratic battery level readings.
It’s important to note that battery calibration should only be performed occasionally and when you encounter significant issues with battery performance. Regular use of your iPhone will help maintain its battery health over time.
Now that you’ve successfully calibrated your iPhone’s battery, you can expect more accurate battery percentage readings and optimized battery performance. In the upcoming sections, we’ll explore how to calibrate other essential sensors on your iPhone, such as the display, audio output, touchscreen, and GPS.
Calibrate Your iPhone’s Display
Calibrating your iPhone’s display can help improve color accuracy and overall visual quality. It ensures that the colors on your device’s screen appear vibrant and true to life. Here’s how to calibrate your iPhone’s display:
- Start by adjusting the brightness of your iPhone’s display. Open the Settings app and go to “Display & Brightness.” Use the slider to set the brightness to a level that is comfortable for your eyes.
- Next, navigate to “Accessibility” in the Settings app and select “Display & Text Size.”
- Under the “Display Accommodations” section, enable “True Tone” if your iPhone model supports it. True Tone adjusts the display’s color temperature based on ambient lighting, providing more accurate colors.
- Return to the “Display & Text Size” menu and tap on “Color Filters.”
- Toggle on “Color Filters” and then select the “Color Tint” option.
- Adjust the Intensity and Hue sliders to fine-tune the color calibration according to your preference.
- For advanced color calibration, you can install third-party apps that allow you to further customize the color settings of your iPhone’s display.
By calibrating your iPhone’s display, you can ensure that the colors are accurately represented and visually appealing. This is particularly important for activities like photo editing or graphic design where color accuracy is crucial.
Keep in mind that color perception can vary from person to person, and it’s ultimately a matter of personal preference. Experiment with different settings and find the calibration that suits your visual preferences and needs.
Now that you’ve successfully calibrated your iPhone’s display, you can enjoy more accurate and vibrant colors while using your device. In the upcoming sections, we’ll explore how to calibrate other important sensors on your iPhone, such as the audio output, touchscreen, and GPS.
Calibrate Your iPhone’s Audio Output
Calibrating your iPhone’s audio output can enhance the sound quality and ensure a more immersive listening experience. Whether you’re enjoying music, watching videos, or making phone calls, optimizing the audio settings can make a noticeable difference. Here’s how to calibrate your iPhone’s audio output:
- Start by connecting your iPhone to a pair of high-quality headphones or speakers. Make sure they are properly connected and functioning correctly.
- Play a song or audio clip that covers a wide range of frequencies and has clear audio. Choose a piece of music that you are familiar with and that represents the type of audio you typically listen to.
- Open the Music app or the app you use to play audio on your iPhone.
- Adjust the volume to a comfortable level. It’s essential to find a balance that allows you to hear all the details without distortion.
- Explore the audio settings within the Music app or your preferred audio app. Look for options like equalizer settings, sound enhancements, or audio presets.
- Experiment with different equalizer presets or manually adjust the settings to find the sound profile that suits your preferences. Pay attention to the overall clarity, bass response, and treble balance.
- If your headphones or speakers have their own audio settings or profiles, adjust them accordingly to complement the settings on your iPhone.
- Use a variety of audio sources, including different genres of music, podcasts, or videos, to test if the audio calibration settings work well across various content.
By calibrating your iPhone’s audio output, you can enhance the sound quality and tailor it to your specific preferences. This customization allows you to enjoy a more immersive and satisfying audio experience.
Keep in mind that audio calibration is subjective, and everyone’s preferences may differ. Experiment with different settings and find the audio profile that sounds the best to you.
Now that you’ve successfully calibrated your iPhone’s audio output, you can enjoy high-quality sound whether you’re listening to music, watching videos, or having phone conversations. In the upcoming sections, we’ll explore how to calibrate other essential sensors on your iPhone, such as the touchscreen and GPS.
Calibrate Your iPhone’s Touchscreen
Calibrating your iPhone’s touchscreen can ensure accurate and responsive touch input, making it easier to navigate through apps, browse the web, and type on the virtual keyboard. Here’s how to calibrate your iPhone’s touchscreen:
- Make sure your iPhone’s screen is clean and free from any dirt, dust, or debris that may interfere with touch sensitivity.
- Open the Settings app on your iPhone and go to “General.”
- Scroll down and tap on “Accessibility.”
- Select “Touch” under the Physical and Motor section.
- Toggle on “Touch Accommodations” if it’s not already enabled.
- Tap on “AssistiveTouch” and turn it on.
- A virtual Home button will appear on your screen. Drag it to a position where it doesn’t interfere with your regular touch interactions.
- Choose “Reset” under the AssistiveTouch menu.
- Follow the on-screen instructions to complete the reset process.
- Once the reset is done, disable AssistiveTouch by returning to the “Touch Accommodations” menu and toggling it off.
By calibrating your iPhone’s touchscreen, you can ensure precise touch recognition and smoother navigation on your device. This is particularly helpful if you’ve noticed any unresponsive areas or inaccuracies in touch input.
Keep in mind that the iPhone’s touchscreen is designed to be highly responsive and accurate out of the box. Performing a calibration is typically unnecessary for most users. If you continue to encounter issues with touch sensitivity or responsiveness, it’s advisable to contact Apple Support for further assistance.
Now that you’ve learned how to calibrate your iPhone’s touchscreen, you can enjoy a more seamless and accurate touch experience on your device. In the next section, we’ll explore how to calibrate your iPhone’s GPS for reliable location tracking.
Calibrate Your iPhone’s GPS
Calibrating your iPhone’s GPS can help ensure accurate location tracking and improve the performance of navigation apps, maps, and location-based services. Here’s how to calibrate your iPhone’s GPS:
- Make sure your iPhone has a clear view of the sky to establish a strong GPS signal. Avoid using the GPS calibration process indoors or in areas with high obstructions, such as tall buildings or dense foliage.
- Open the Settings app on your iPhone and go to “Privacy.”
- Scroll down and tap on “Location Services.”
- Ensure that “Location Services” is turned on.
- Scroll further down and tap on “System Services.”
- Find and select “Compass Calibration” from the list of system services.
- Hold your iPhone in your hand and move it in a figure-eight motion until the compass calibration process completes.
- Return to the “Location Services” menu and scroll down to find the app or service for which you want to calibrate GPS.
- Select the app or service and choose the desired location access option, such as “While Using” or “Always.”
By calibrating your iPhone’s GPS, you can ensure reliable and accurate location tracking, making it easier to navigate, discover nearby places, and use location-based features effectively.
Keep in mind that GPS calibration is not something you need to do frequently. It’s typically done automatically by the iPhone itself when needed. If you encounter persistent GPS issues, such as inaccurate location data or difficulty acquiring a GPS signal, it’s recommended to check for iOS updates, restart your iPhone, or reach out to Apple Support for further assistance.
Now that you’ve learned how to calibrate your iPhone’s GPS, you can rely on accurate and precise location tracking on your device. In summary, calibration plays a vital role in optimizing different sensors on your iPhone, improving their accuracy, and enhancing overall performance.
Final Thoughts
Calibrating the various sensors on your iPhone is an effective way to improve its performance, accuracy, and overall user experience. By following the steps outlined in this guide, you can ensure that essential features like the compass, gyroscope, accelerometer, barometer, ambient light sensor, proximity sensor, battery, display, audio output, touchscreen, and GPS are functioning optimally.
Remember that calibration is not always necessary unless you encounter specific issues or after a significant software update. However, it’s a good practice to periodically check the accuracy of these sensors to ensure optimal performance. The calibration process allows you to fine-tune settings, validate sensor accuracy, and customize your iPhone to suit your preferences.
As you calibrate different sensors, it’s important to maintain a balanced approach. Focus on accuracy while ensuring that your iPhone remains responsive to your needs as a user. Experiment with different settings, test various scenarios, and adjust accordingly to find the optimal calibration for your device.
If you encounter persistent issues or experience difficulties during the calibration process, don’t hesitate to seek assistance from Apple Support or consult official documentation for further guidance.
Calibrating your iPhone’s sensors may seem like a technical task, but it can greatly enhance your device’s functionality and user experience. Take the time to perform these calibrations regularly, and you’ll enjoy a more accurate, reliable, and optimized iPhone.
Now that you have a comprehensive understanding of how to calibrate your iPhone’s sensors, you can confidently make the most of your device and unlock its full potential.