
Why Bulk Delete Photos on an iPhone or iPad?
Managing the photos on your iPhone or iPad can become a daunting task, especially when your device is filled with countless pictures. Over time, this accumulation of photos can consume valuable storage space and slow down your device’s performance. That’s where bulk deleting photos comes in handy. This feature allows you to quickly and efficiently remove multiple photos at once, freeing up storage space and keeping your device running smoothly. But beyond just optimizing your device’s performance, there are several other reasons why you might want to consider bulk deleting photos on your iPhone or iPad.
One of the primary reasons to bulk delete photos is to declutter your photo library. As time goes by, we tend to accumulate a large number of photos that may no longer be relevant or meaningful to us. Deleting these unnecessary photos can help streamline your photo collection and make it easier to navigate and find the pictures that matter most to you.
Another reason to bulk delete photos is to protect your privacy and ensure the security of your personal information. Your photos often contain sensitive content, such as personal moments, private documents, or even screenshots of sensitive information. Deleting unwanted photos reduces the risk of accidental leaks or unauthorized access to your personal data.
Bulk deleting photos also allows you to save valuable storage space on your device. High-resolution photos and videos can quickly consume a significant amount of storage capacity. By removing unnecessary photos, you can make room for new memories and ensure that you have ample space for other important files and apps.
Deleting unwanted photos can also help you organize your photo library and make it easier to find specific images. With fewer photos cluttering your library, you can easily navigate and locate the pictures you need, whether it’s for reminiscing or sharing with others.
Additionally, bulk deleting photos can help you improve the backup and syncing process of your device. When you have a large number of photos, it can take longer to upload them to cloud storage or sync them with other devices. Removing unwanted photos can speed up these processes and ensure that your important memories are safely backed up and accessible across multiple devices.
In summary, bulk deleting photos on your iPhone or iPad offers numerous benefits, including decluttering your photo library, protecting your privacy, freeing up storage space, organizing your photos, and optimizing backup and syncing processes. Whether you’re looking to create more room for new memories or simply tidy up your device, taking advantage of this feature is a wise choice to enhance your overall user experience.
Step 1: Use the Photos App
The first step in bulk deleting photos on your iPhone or iPad is to utilize the built-in Photos app. This app provides a convenient and user-friendly interface for managing your photo library. To get started, locate the Photos app on your device’s home screen and tap on it to open it.
Once you’re in the Photos app, you’ll see different tabs at the bottom of the screen, including “Photos,” “For You,” “Albums,” and “Search.” Tap on the “Photos” tab to access all the photos and videos on your device. By default, they will be organized in a chronological order, with the newest photos appearing at the top.
From the Photos view, you can easily navigate through your library and select the photos you want to delete. You can also use various sorting options, such as “Years,” “Months,” or “Days,” to narrow down your selection and locate specific photos more efficiently.
It’s essential to note that the Photos app also provides intelligent suggestions and curated albums under the “For You” tab. These suggestions are based on factors such as memorable moments, people, places, and various other criteria. While these suggestions can be helpful in organizing your photos, they might not always align with your bulk deletion needs. Therefore, it’s recommended to primarily focus on the “Photos” and “Albums” tabs for the purpose of bulk deleting photos.
By utilizing the Photos app, you gain access to a wide range of functions and features that can assist you in managing your photo collection effectively. From organizing photos into albums and creating shared albums to enhancing images with built-in editing tools, the Photos app offers comprehensive capabilities to enhance your photo experience on your iPhone or iPad.
In summary, the Photos app serves as your go-to tool for bulk deleting photos on your iPhone or iPad. With its intuitive interface and powerful features, you can easily navigate through your photo library, select multiple photos, and prepare them for deletion. So, let’s move on to the next step and learn how to select multiple photos for bulk deletion.
Step 2: Select Multiple Photos
After opening the Photos app on your iPhone or iPad, you’re ready to move on to the next step: selecting multiple photos for bulk deletion. Thankfully, the Photos app makes this process quick and straightforward.
To select multiple photos, navigate to the “Photos” or “Albums” tab and scroll through your photo library until you find the first photo you want to delete. Tap on the photo to select it. You will notice that a blue checkmark appears on the selected photo. You can continue scrolling and tapping on other photos to add them to your selection.
If you want to select a range of photos, tap on the first photo, then swipe your finger across the screen to select additional photos. As you swipe, each photo will be highlighted, indicating that it has been selected. You can swipe up or down to quickly select multiple photos in a row, or swipe left or right to select photos from different areas of your library.
To remove a photo from your selection, simply tap on it again, and the blue checkmark will disappear. This flexibility allows you to fine-tune your selection and ensure you’re only deleting the photos you no longer need.
If you prefer a different approach, you can also use the “Select” option at the top-right corner of the screen. Tap on the “Select” button, then tap on each photo you want to delete. The selected photos will be marked with the blue checkmark, and you can easily add or remove photos from your selection as mentioned before.
The ability to select multiple photos at once empowers you to efficiently delete unwanted images without the need to delete them one by one, saving you time and effort.
In summary, the Photos app provides a simple and intuitive method for selecting multiple photos for bulk deletion. Whether you choose to tap on individual photos or use the select option, you have the flexibility to customize your selection according to your specific needs. Once you have selected the photos you want to delete, it’s time to move on to the next step and remove them from your device permanently.
Step 3: Delete Multiple Photos
With your selected photos ready for deletion, you can now proceed to the next step: deleting multiple photos from your iPhone or iPad. The Photos app offers a straightforward method to remove your selected photos permanently.
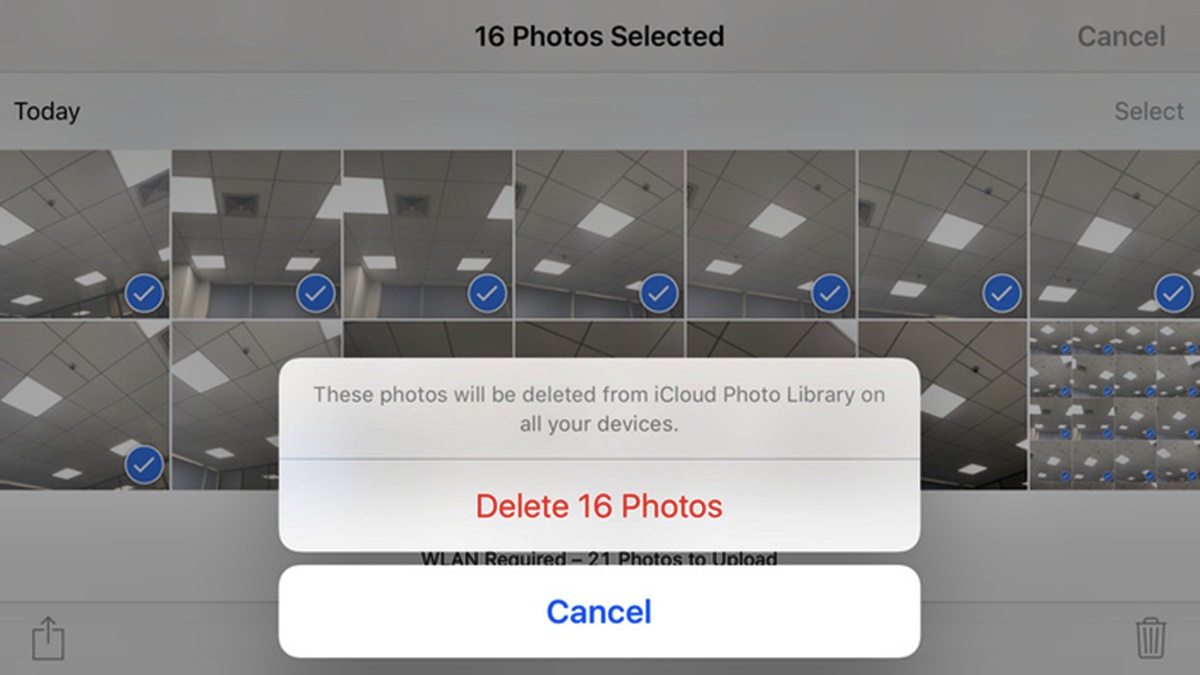
To delete the selected photos, tap on the trash can icon located at the bottom-right corner of the screen. A confirmation message will appear, asking if you want to delete the selected photos. Tap on “Delete [X] Photos” to confirm and proceed with the deletion. Please note that this action cannot be undone, so make sure you have a backup of any important photos before deleting them.
Alternatively, you can also use gestures to delete the selected photos. With the selected photos still highlighted, swipe up on the screen with your finger. The photos will be instantly deleted without the need to confirm through a pop-up message, offering a quicker deletion method.
Once you have deleted the selected photos, they will be moved to the “Recently Deleted” album within the Photos app. These photos will remain in the “Recently Deleted” album for 30 days before being permanently deleted from your device. If you change your mind or accidentally delete a photo, you can recover it from the “Recently Deleted” album within the specified time frame.
To recover a photo from the “Recently Deleted” album, open the Photos app and navigate to the “Albums” tab. Scroll down until you find the “Recently Deleted” album and tap on it. Here, you will see all the photos that you have deleted within the past 30 days. To recover a specific photo, tap on it, then tap on the “Recover” button located at the bottom-right corner of the screen. The photo will be restored to its original location in your photo library.
It’s important to note that after the 30-day period, the photos in the “Recently Deleted” album will be automatically removed from your device, freeing up additional storage space.
In summary, deleting multiple photos from your iPhone or iPad is a simple process using the Photos app. With just a few taps or swipe gestures, you can remove unwanted photos from your device. Remember to double-check your selection, as the deletion process is irreversible. After deleting the photos, they will be temporarily stored in the “Recently Deleted” album, allowing you to recover them if needed. Now that you’ve deleted your selected photos, let’s consider optional steps for recovering deleted photos or using third-party apps for bulk deletion.
Step 4: Recover Deleted Photos (optional)
If you have accidentally deleted photos or changed your mind about deleting certain images, you have the option to recover them. The Photos app provides a feature called the “Recently Deleted” album, where deleted photos are temporarily stored for 30 days before being permanently removed from your device.
To recover deleted photos, open the Photos app and go to the “Albums” tab. Scroll down until you find the “Recently Deleted” album and tap on it. Here, you will see a collection of photos that you have deleted within the past 30 days.
To restore a specific photo, select it from the “Recently Deleted” album and tap on the “Recover” button, located at the bottom-right corner of the screen. The photo will be restored to its original location in your photo library.
If you wish to recover multiple photos simultaneously, tap on “Select” at the top-right corner of the screen. From there, you can choose multiple photos by tapping on each one. Once you have selected all the desired photos, tap on “Recover” to restore them to their original locations.
It’s important to note that if you do not recover the deleted photos within the 30-day time frame, they will be permanently deleted from the “Recently Deleted” album and cannot be recovered. Therefore, it’s crucial to check the “Recently Deleted” album periodically and restore any mistakenly deleted photos in a timely manner.
Keep in mind that recovering deleted photos from the “Recently Deleted” album only restores them to your device. If you have enabled iCloud Photos, the recovered photos will also sync across all your devices linked to the same iCloud account. However, if you have permanently deleted photos from the “Recently Deleted” album or disabled iCloud Photos, recovering them becomes more challenging, and you might need to rely on third-party data recovery solutions.
In summary, the “Recently Deleted” album provides a safety net for recovering accidentally deleted photos within a limited time frame. By utilizing this feature, you can restore photos to their original locations in your photo library, preventing the loss of cherished memories. Remember to act promptly within the 30-day window to ensure successful recovery. Now, let’s move on to optional steps for using third-party apps for bulk deleting photos, if desired.
Step 5: Use Third-Party Apps (optional)
While the built-in Photos app on your iPhone or iPad offers convenient features for bulk deleting photos, you may find that third-party apps provide additional functionalities and flexibility. These apps often offer advanced tools and options to streamline the process of managing and deleting photos in bulk. Here are a few examples of popular third-party apps that you can consider:
1. Google Photos: Google Photos is a powerful app that not only allows you to backup and sync your photos but also provides efficient tools for managing and deleting them. With Google Photos, you can free up storage space by removing unwanted photos and easily search for specific images using tags, faces, or location data.
2. Photo Manager Pro: Photo Manager Pro offers extensive features for organizing and deleting photos in bulk. It allows you to create albums, apply tags and ratings, and perform advanced searches based on various criteria. The app provides a user-friendly interface and efficient tools for quickly selecting and deleting multiple photos.
3. Gallery Doctor: Gallery Doctor is an app specifically designed to help you clean up and organize your photo library. It identifies and suggests photos that you might want to delete based on duplicates, blurry images, and screenshots. With a few taps, you can easily remove these unnecessary photos, decluttering your library and freeing up storage space.
Before downloading and using any third-party app, it’s important to research and read reviews to ensure it’s reliable and meets your specific needs. Additionally, be cautious about granting permissions to access your photos and personal data, and only download apps from trusted sources, such as the App Store or Google Play Store.
Using third-party apps is optional and depends on individual preferences and requirements. While they can offer additional features and convenience, the built-in Photos app can generally suffice for most users’ bulk deletion needs. Take some time to explore and evaluate different apps to find the one that best suits your workflow and enhances your photo management experience.
In summary, third-party apps provide alternative options for managing and deleting photos in bulk on your iPhone or iPad. With advanced features and tools, these apps can offer a more tailored approach to organizing and optimizing your photo library. Consider your specific needs and preferences before opting for third-party apps, and always ensure you choose reputable and secure apps from trusted sources. With these optional steps, you have learned effective methods for bulk deleting photos on your device.