Why Would You Want to Block Websites?
Blocking websites on your Android phone or tablet can be a useful tool for a variety of reasons. Here are a few common scenarios where you might want to block certain websites:
- Protecting Children: As a parent or guardian, you may want to block access to certain websites that contain explicit or inappropriate content. By blocking these websites, you can ensure that your children have a safe browsing experience.
- Improving Productivity: If you find yourself easily distracted by social media or other time-wasting websites, blocking access to them can help improve your productivity. By eliminating these distractions, you can focus on your work or other important tasks.
- Preventing Malware and Phishing Attacks: Some websites may contain harmful content, including malware or phishing scams. Blocking these websites can help protect your device and personal information from potential threats.
- Managing Data Usage: Certain websites consume large amounts of data, which can quickly deplete your mobile data plan. By blocking access to these data-intensive websites, you can effectively manage your data usage and avoid unexpected charges.
- Preserving Bandwidth: In shared network environments, blocking certain websites can help distribute network resources more evenly. This can improve the overall network performance for all users.
These are just a few examples of why you might want to block websites on your Android device. Whether you’re a parent, a student, a professional, or simply someone who wants better control over their browsing experience, blocking websites can be a valuable tool.
Option 1: Use a Built-in Feature
Many Android devices come with a built-in feature that allows you to block websites without the need for any third-party apps. Here’s how you can use this feature:
- Open Settings: Go to the settings menu on your Android phone or tablet. You can usually find it by swiping down from the top of the screen and tapping on the gear icon.
- Select Content & Privacy Restrictions: Depending on your device, this option may be named differently. Look for settings related to content or privacy.
- Enable Website Restrictions: Once you’re in the content or privacy settings, look for an option related to website restrictions or parental controls. Enable this feature to start blocking websites.
- Add Websites to the Blocklist: In the website restrictions or parental control settings, you should find an option to add websites to the blocklist. Enter the URLs of the websites you want to block, and save your changes.
- Enjoy Blocked Websites: Once you’ve added websites to the blocklist, they will be inaccessible on your device. Whenever you or someone else tries to access a blocked website, they will be redirected to a blocked page or receive an error message.
This built-in feature may vary depending on the specific Android device and version of the operating system you’re using. It’s always a good idea to consult your device’s user manual or search online for specific instructions if you’re having trouble finding or using this feature.
Using the built-in website blocking feature is a convenient option as it doesn’t require the installation of additional apps. However, it might have limited customization options compared to third-party apps or DNS settings. If you need more advanced blocking features or want to block specific categories of websites, you may want to explore other options mentioned in this article.
Option 2: Use Third-Party Apps
If your Android device doesn’t have a built-in website blocking feature or if you’re looking for more advanced customization options, you can use third-party apps to block websites. There are several apps available on the Google Play Store that can help you achieve this. Here’s how you can use third-party apps to block websites:
- Search and Install a Website Blocking App: Open the Google Play Store on your Android device and search for “website blocking app.” You will find a variety of options to choose from. Read user reviews and check the app’s ratings to find a reliable and suitable app for your needs. Install the app on your device.
- Launch the App and Grant Necessary Permissions: Once you’ve installed the website blocking app, open it and grant any necessary permissions it requires. These permissions may include access to your device’s accessibility features or VPN capabilities, depending on the functionality of the app.
- Add Websites to the Blocklist: In the app’s settings or main interface, you will find an option to add websites to the blocklist. Enter the URLs of the websites you want to block and save your changes.
- Enable Website Blocking: Activate the website blocking feature within the app. This will ensure that the blocked websites are inaccessible on your device. The app may redirect blocked websites to a custom block page or display an error message.
- Customize Blocking Options: Some website blocking apps offer additional customization options. You may be able to set time-based restrictions, block specific categories of websites, or even create multiple blocklists for different purposes. Explore the app’s settings to make adjustments according to your preferences.
Using third-party apps to block websites provides you with more control and flexibility compared to built-in features. However, keep in mind that some apps may display ads, require in-app purchases for advanced features, or have limitations depending on the app’s design and functionality.
Be sure to choose a reputable app from trusted developers and regularly update it to ensure compatibility with your Android device’s operating system. Taking these precautions will help ensure a smooth blocking experience and enhance your browsing control.
How to Block Websites Using Chrome Browser
If you mainly use the Chrome browser on your Android device, you can utilize its built-in features to block websites. Here’s how you can do it:
- Open Chrome Browser: Launch the Chrome browser on your Android phone or tablet.
- Access Settings: Tap on the three-dot menu icon located in the top-right corner of the browser window. From the drop-down menu, select “Settings.”
- Find Site Settings: In the settings menu, scroll down and look for the “Site settings” option. Tap on it to proceed.
- Select JavaScript: Within the site settings, select the option labeled “JavaScript”.
- Block Websites: On the JavaScript settings page, you’ll find an option to block specific websites. Tap on “Add site exception” or “Blocked” depending on your Android version.
- Enter Website URL: Enter the URL of the website you want to block and tap on the “Add” or “Block” button to confirm.
- Repeat for Additional Websites: If you want to block multiple websites, repeat steps 5 and 6 for each site you wish to block.
- Verify Blocked Websites: After adding the websites to the blocklist, they will be inaccessible in Chrome. When you or someone else tries accessing a blocked website, they will either see an error message or be redirected to a blocked page.
Please note that this method only blocks websites within the Chrome browser and doesn’t apply system-wide blocking. If you use different browsers or apps to access the internet, you may need to use other methods to block websites on those platforms.
Keep in mind that these settings can be modified or reversed at any time. If you want to unblock a website or remove it from the blocklist, simply follow the same steps and, instead of blocking, select the option to unblock or remove the website from the blocked list.
How to Block Websites Using Firefox Browser
If you prefer using the Firefox browser on your Android device, you can utilize its built-in features to block websites. Here’s a step-by-step guide on how to do it:
- Launch Firefox Browser: Open the Firefox browser on your Android phone or tablet.
- Access Options: Tap on the three-dot menu icon located either at the top or bottom of the browser window. From the options menu, select “Settings.”
- Go to Privacy & Security: In the settings menu, scroll down and tap on “Privacy & Security.”
- Select Content Blocking: Within the privacy and security settings, tap on “Content Blocking.”
- Enable Custom Settings: On the content blocking settings page, you’ll find different options for blocking various types of content. Choose the “Custom” option.
- Block Websites: Under the custom settings, you’ll find an option labeled “Block trackers.” Tap on it to access the settings.
- Add Websites to Blocklist: On the trackers blocking settings page, tap on “Add site” or a similar option, depending on your Android version. Enter the URL of the website you want to block and tap on the “Add” or “Block” button to confirm.
- Repeat for Additional Websites: If you want to block multiple websites, repeat steps 6 and 7 for each site you wish to block.
- Verify Blocked Websites: Once you’ve added the websites to the blocklist, Firefox will automatically block them when you visit them. Users will either see an error message or be redirected to a blocked page.
It’s important to note that blocking websites using Firefox is specific to the Firefox browser only. If you use other browsers or apps to access the internet, you will need to use different methods to block websites on those platforms.
If you decide to unblock a website or remove it from the blocklist, simply follow the same steps and, instead of blocking, choose the option to unblock or remove the website from the blocked list.
How to Block Websites Using Opera Browser
If you use the Opera browser on your Android device, you can use its built-in features to block websites. Here’s a step-by-step guide on how to do it:
- Open Opera Browser: Launch the Opera browser on your Android phone or tablet.
- Access Settings: Tap on the O-shaped menu icon located at the bottom of the browser window. From the menu that appears, select “Settings.”
- Go to Privacy & Security: In the settings menu, scroll down and tap on “Privacy & Security.”
- Enable Ad Blocker: Within the privacy and security settings, you’ll find an option to enable the ad blocker. Toggle the switch to turn it on.
- Add Websites to Blocklist: With the ad blocker enabled, you can add specific websites to the blocklist. Tap on the “Block Ads on Site” option and enter the URL of the website you want to block. Tap on the “Add” or “Block” button to confirm.
- Repeat for Additional Websites: To block multiple websites, repeat step 5 for each site you wish to add to the blocklist.
- Verify Blocked Websites: Once you’ve added websites to the blocklist, Opera will block ads and elements from those websites when you visit them. This effectively blocks the websites from functioning properly.
Note that blocking websites using Opera is specific to the Opera browser only. If you use other browsers or apps to access the internet, you’ll need to use alternative methods to block websites on those platforms.
If you ever decide to unblock a website or remove it from the blocklist, simply follow the same steps and, instead of blocking, choose the option to unblock or remove the website from the blocked list.
How to Block Websites Using Samsung Internet Browser
If you prefer using the Samsung Internet browser on your Android device, you can utilize its built-in features to block websites. Here’s a step-by-step guide on how to do it:
- Launch Samsung Internet Browser: Open the Samsung Internet browser on your Android phone or tablet.
- Access Settings: Tap on the three-dot menu icon located at the bottom of the browser window. From the menu that appears, select “Settings.”
- Go to Sites and Downloads: In the settings menu, scroll down and tap on “Sites and Downloads.”
- Enable Block Content: Within the sites and downloads settings, toggle the “Block content” switch to enable it.
- Add Websites to Blocklist: Once the block content feature is enabled, you can add specific websites to the blocklist. Tap on “Block sites” and then tap on the “+” icon to add a website.
- Enter Website URL: Enter the URL of the website you want to block and tap on the “Save” or “Block” button to confirm.
- Repeat for Additional Websites: To block multiple websites, repeat step 5 for each site you wish to add to the blocklist.
- Verify Blocked Websites: Once you’ve added websites to the blocklist, Samsung Internet will prevent you from accessing those websites on your device. Users will either see an error message or be redirected to a blocked page.
It’s important to note that blocking websites using Samsung Internet is specific to the Samsung Internet browser only. If you use other browsers or apps to access the internet, you may need to use alternative methods to block websites on those platforms.
If you ever decide to unblock a website or remove it from the blocklist, simply follow the same steps and, instead of blocking, choose the option to unblock or remove the website from the blocked list.
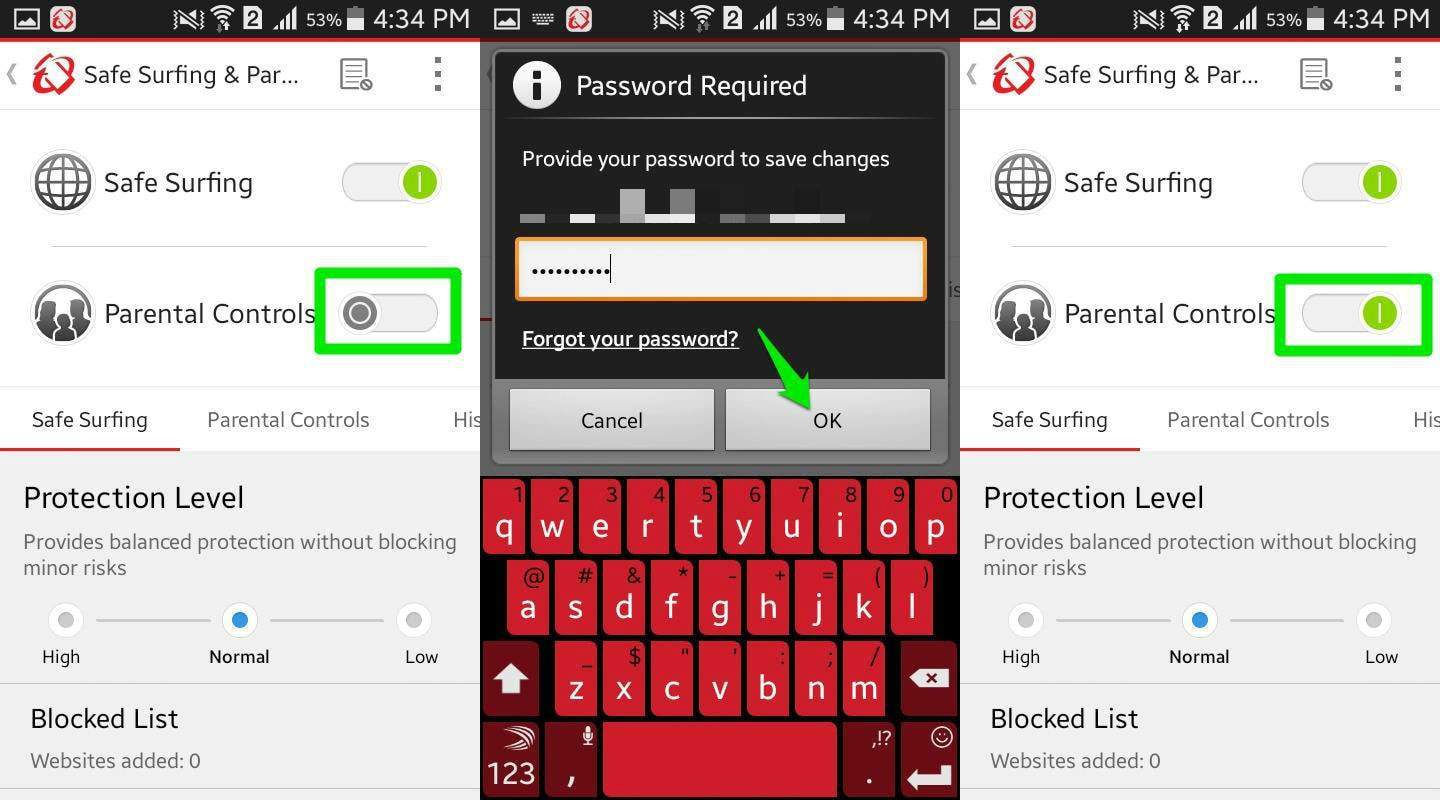
How to Block Websites Using Parental Control Apps
If you are looking for more comprehensive and flexible options to block websites on your Android device, using parental control apps can be an effective solution. Here’s a step-by-step guide on how to block websites using parental control apps:
- Choose a Parental Control App: Search for and download a reputable parental control app from the Google Play Store. Some popular options include Norton Family, Qustodio, and Kaspersky SafeKids.
- Install and Set Up the App: Install the parental control app on your Android device. Follow the instructions provided by the app to complete the setup process, including creating an account and setting up the parental control features.
- Enable Website Blocking: Once the app is set up, navigate to the settings or preferences section of the app. Look for options related to website blocking or filtering, and enable this feature.
- Add Websites to Blocklist: In the parental control app’s settings or dashboard, you’ll find an option to add specific websites to the blocklist. Enter the URLs of the websites you want to block, and save your changes.
- Customize Blocking Options: Depending on the parental control app you are using, you may have additional customization options. Explore the settings to set time restrictions, block specific categories of websites, or create different blocklists for different users or devices.
- Verify Blocked Websites: Once you’ve added websites to the blocklist and customized the settings, the parental control app will block access to those websites. When someone tries to visit a blocked website, they will either receive an error message or be redirected to a blocked page.
Parental control apps offer a wide range of features in addition to website blocking, such as app blocking, screen time management, and content filtering. They provide a comprehensive solution for parents to monitor and control their child’s online activities. However, keep in mind that some parental control apps may include premium features or require a subscription for full functionality.
Remember to regularly update the parental control app and review its settings to ensure it aligns with your preferences and requirements. If you want to unblock a website or remove it from the blocklist, you can do so within the parental control app’s settings or dashboard.
How to Block Websites Using DNS Settings
If you want to block websites at a system-wide level on your Android device, changing the DNS (Domain Name System) settings can be an effective method. Here’s a step-by-step guide on how to block websites using DNS settings:
- Open Settings: Go to the settings menu on your Android phone or tablet. You can usually find it by swiping down from the top of the screen and tapping on the gear icon.
- Select Wi-Fi or Network & Internet: Depending on your device, this option may be named differently. Look for settings related to Wi-Fi or network connectivity.
- Find Your Network Connection: Under the Wi-Fi or network settings, find the network connection you are currently connected to. Tap on it to access the settings for that connection.
- Modify Network: Within the network connection settings, look for an option named “Modify network” or “Advanced settings.” Tap on it to proceed.
- Change IP Settings: Scroll down and look for an option related to IP settings. Tap on it and select “Static” instead of “DHCP” or “Automatic.”
- Enter DNS Server Addresses: After selecting static IP settings, you’ll see options to enter DNS server addresses. Depending on your preference, you can use specific DNS servers that offer website-blocking functionality. Some popular options are OpenDNS (208.67.222.222 and 208.67.220.220) or Google Public DNS (8.8.8.8 and 8.8.4.4).
- Save Changes: After entering the DNS server addresses, save your changes or tap on “Apply” to apply the new settings.
- Verify Blocked Websites: Once the new DNS settings are applied, the websites you want to block will be inaccessible on your Android device. Any attempts to access these blocked websites will result in an error message or a failure to connect.
Changing DNS settings at a system-wide level affects all apps and browsers on your device. Please note that this method requires manual configuration and technical knowledge. As DNS server addresses can vary, it’s a good idea to research and choose well-known and trusted DNS providers.
If you decide to unblock websites or revert to the default DNS settings, simply follow the same steps and select “Automatic” or “DHCP” in the IP settings instead of “Static.”
How to Unblock Websites
If you have blocked a website and now wish to unblock it on your Android device, there are several methods you can use. Here’s a guide on how to unblock websites:
- Remove Website from Built-in Blocking Feature: If you used a built-in feature on your Android device to block the website, you can simply go back to the respective settings and remove the website from the blocklist. This will unblock the website and restore access.
- Disable Third-Party Website Blocking Apps: If you used a third-party app to block the website, you can disable or uninstall the app from your Android device. This will remove the website blocking functionality and allow access to the previously blocked website.
- Change DNS Settings: If you had blocked the website by changing your DNS settings, you can revert back to the default DNS settings. Go to your Android device’s network settings, find the network connection you are using, and switch DNS settings back to “Automatic” or “DHCP.” This will remove the website block and restore access.
- Use a VPN: Another method to unblock websites is by using a virtual private network (VPN). Install a reputable VPN app from the Google Play Store, connect to a VPN server, and browse the internet using the VPN connection. The VPN will encrypt your internet traffic and bypass any website blocks implemented on your device or network.
- Clear Browser Cache and Cookies: Sometimes, a website may appear blocked due to cached data or cookies stored on your device. Clearing the browser cache and cookies can help unblock the website. Go to your browser’s settings, find the option to clear cache and cookies, and confirm the action. Afterward, try accessing the previously blocked website.
- Try a Different Browser: If you are unable to access a website on your current browser, try using a different browser installed on your Android device. It’s possible the website blocking was specific to the browser you were using, and another browser will allow access to the website.
It’s important to note that unblocking websites may depend on the method you used to block them in the first place. Additionally, if the website you’re trying to access is blocked at the network level or restricted by your internet service provider, these methods may not be effective. In such cases, you may need to seek alternative solutions or contact your network administrator for assistance.
Always practice internet safety and ensure that the websites you unblock are safe and trustworthy. Use caution when accessing unfamiliar or suspicious websites to protect your device and personal information from potential threats.