
Why Blocking a Domain is Important
Blocking a domain in Outlook Mail on the Web can be a valuable tool in managing your email communication effectively. Whether you are bombarded with relentless spam emails or want to avoid receiving messages from a specific sender, blocking a domain provides a simple and efficient solution. By preventing emails from specific domains from reaching your inbox, you can enhance your productivity, reduce distractions, and maintain better control over your email correspondence.
One of the most common reasons for blocking a domain is to filter out spam. Spam emails can be not only annoying but also potentially harmful, as they may contain malicious links or attachments. By blocking the domain from which the spam emails originate, you can significantly reduce the amount of unwanted messages cluttering your inbox and improve your overall email security.
Moreover, blocking a specific domain can help you deal with unwanted promotional emails persistently flooding your inbox. If you find yourself constantly deleting or ignoring messages from a particular company or website, blocking their domain can save you time and energy. It ensures that you only receive emails from senders you are truly interested in, thereby keeping your inbox clutter-free and enabling you to focus on important communication.
Blocking a domain also allows you to set boundaries with individuals or organizations from whom you no longer wish to receive emails. Whether it’s a former colleague who keeps sending irrelevant messages or a company that continues to bombard you with unsolicited offers, blocking their domain can provide you with the peace of mind of knowing that their emails will no longer reach your inbox. This can enhance your overall email experience by eliminating unwanted distractions and allowing you to prioritize meaningful communication.
In addition, blocking a domain helps you protect your privacy. If you receive emails from an unknown sender or experience email harassment, blocking the domain can prevent further intrusion into your personal space. It allows you to establish control over the types of emails you receive, safeguarding your privacy and maintaining a sense of security while using your Outlook Mail on the Web account.
Step 1: Sign in to Outlook Mail on the Web
In order to block a domain in Outlook Mail on the Web, you first need to sign in to your account. Follow these steps to get started:
- Open your preferred web browser and navigate to the Outlook Mail on the Web login page.
- Enter your email address and password in the respective fields.
- Click on the “Sign In” button to access your Outlook Mail on the Web account.
If you have enabled two-factor authentication for your account, you may be prompted to enter a verification code sent to your registered phone number or email address. This adds an extra layer of security to your account.
Once you have successfully signed in, you will be directed to your Outlook Mail on the Web inbox, where you can proceed to the next steps to block a specific domain.
It is important to note that Outlook Mail on the Web requires a stable internet connection and a compatible web browser for optimal performance. Make sure you have a reliable internet connection and use the latest versions of popular web browsers, such as Google Chrome, Mozilla Firefox, or Microsoft Edge, to ensure a seamless experience.
By signing in to your Outlook Mail on the Web account, you gain access to a range of features and settings that allow you to customize your email experience. Blocking a domain is just one of the many tools available to you, helping you take control of your inbox and streamline your email communication.
Step 2: Access the Settings Menu
To block a domain in Outlook Mail on the Web, you need to access the settings menu. Follow the steps below to navigate to the settings menu:
- After signing in to your Outlook Mail on the Web account, locate the gear icon in the top-right corner of the screen. This icon represents the settings menu.
- Click on the gear icon to open a drop-down menu of options.
- From the drop-down menu, select “View all Outlook settings” at the bottom of the list. This will open the settings menu in a new window or tab.
Alternatively, you can directly access the settings menu by clicking on your profile picture or initials in the top-right corner of the screen and selecting “Options” from the menu that appears. This will also lead you to the settings menu for your Outlook Mail on the Web account.
Accessing the settings menu is crucial as it allows you to customize various aspects of your email experience, including blocking domains. By navigating to this menu, you can gain control over your inbox and tailor it to suit your needs.
The settings menu in Outlook Mail on the Web is designed to be user-friendly and intuitive, featuring different categories that organize various settings and options. From here, you can manage your email rules, set up automatic replies, customize your email signature, and much more.
By accessing the settings menu, you are one step closer to blocking domains and eliminating unwanted emails from specific senders. This level of customization empowers you to create a more efficient and personalized email experience.
Step 3: Navigate to the “Email” Section
In order to block a domain in Outlook Mail on the Web, you need to navigate to the “Email” section within the settings menu. Follow the steps below to find the “Email” section:
- After accessing the settings menu, you will see a list of categories on the left-hand side of the screen. Scroll down the list until you find the category labeled “Email”.
- Click on the “Email” category to expand it and reveal the options within.
The “Email” section contains various settings related to your email account, including options for organizing your inbox, managing folders, and configuring email rules. It is within this section that you can find the settings to block a specific domain.
Navigating to the “Email” section is critical as it allows you to access the specific settings related to your email account. By exploring this section, you can make changes that will improve your overall email management and enhance your productivity.
The “Email” section in Outlook Mail on the Web provides a centralized location for managing the various aspects of your email account. From organizing your inbox to setting up automatic replies, this section offers a range of options to customize your email experience according to your preferences.
By finding and accessing the “Email” section within the settings menu, you are on the right path to blocking a domain and gaining better control over your inbox. It is an essential step to take in order to proceed with the domain blocking process.
Step 4: Open the “Junk Email” Settings
In order to block a domain in Outlook Mail on the Web, you need to open the “Junk Email” settings. Follow the steps below to access these settings:
- Within the “Email” section of the settings menu, look for the category labeled “Junk Email”.
- Click on the “Junk Email” category to expand it and display the available options.
The “Junk Email” settings in Outlook Mail on the Web are specifically designed to help you manage and filter unwanted or spam emails. By accessing these settings, you can effectively block domains that send undesirable messages to your inbox.
Opening the “Junk Email” settings is a crucial step as it allows you to configure the level of protection you want for your inbox. By customizing these settings, you can ensure that unwanted emails, including those from specific domains, are automatically filtered out and sent to your junk folder.
Within the “Junk Email” settings, you will find options to specify the level of protection you prefer. You can choose to block all email messages from suspicious senders, control the level of junk email filtering based on your preferences, or even establish safe senders and blocked senders lists.
By opening the “Junk Email” settings, you gain the ability to enhance your email security and reduce the clutter caused by unwanted messages. Taking control of your inbox by blocking specific domains helps create a more efficient and organized email experience.
Now that you have accessed the “Junk Email” settings, you are ready to proceed with adding the domain you want to block to the list of blocked senders.
Step 5: Add the Domain to the Blocked Senders List
After opening the “Junk Email” settings, the next step to block a domain in Outlook Mail on the Web is to add the domain to the blocked senders list. Follow the steps below to complete this process:
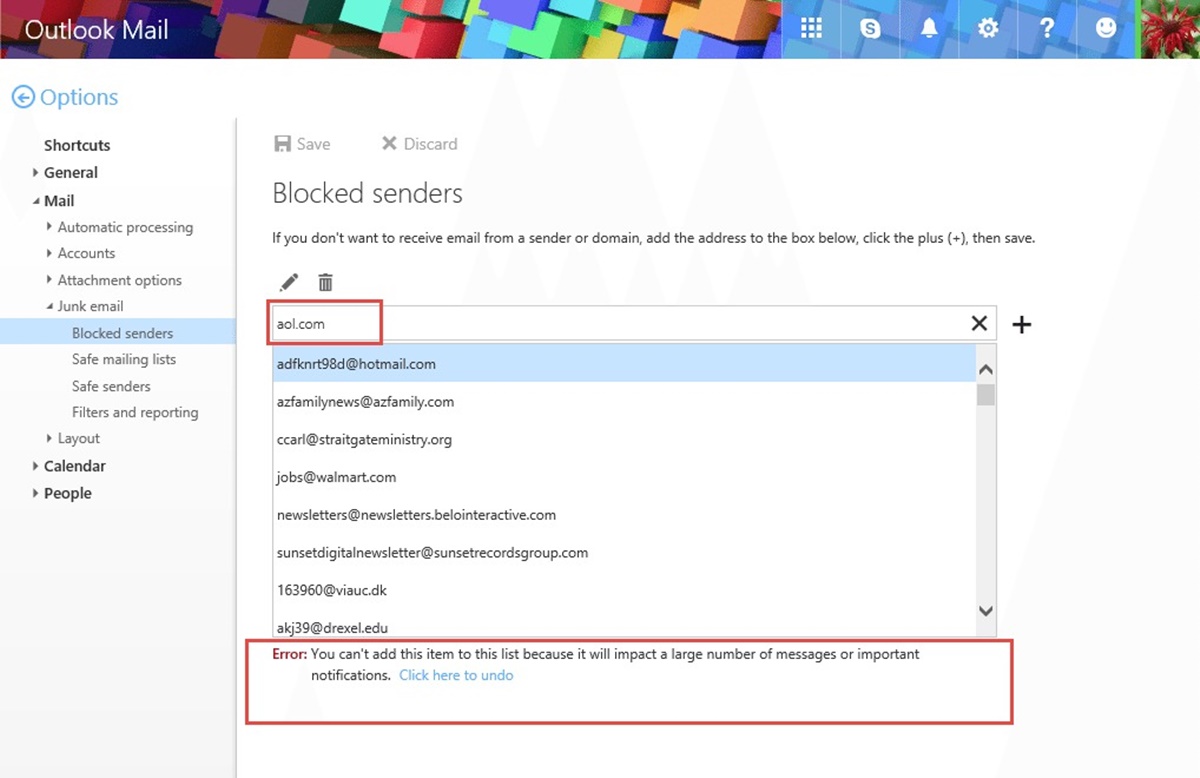
- Within the “Junk Email” settings, scroll down until you find the section titled “Blocked Senders and Domains”.
- In the text box provided, enter the domain you want to block.
- Click on the “plus” or “add” icon to add the domain to the blocked senders list.
After adding the domain to the blocked senders list, Outlook Mail on the Web will automatically filter out any email messages originating from that domain. This ensures that emails from the blocked domain will not clutter your inbox, keeping it clean and organized.
Blocking a domain in the “Blocked Senders and Domains” list is a powerful feature that helps you combat spam emails, unwanted promotions, and messages from specific senders that you no longer wish to receive. By adding the domain to this list, you are effectively preventing any future email communication from reaching your inbox.
It is important to note that the domain you add to the blocked senders list will be blocked for all emails received in your Outlook Mail on the Web account. This means that you will not receive any email messages from that domain, regardless of whether they are legitimate or not.
By actively managing the blocked senders list, you can ensure that unwanted domains are consistently blocked, minimizing disruptions and distractions caused by unwanted emails. This feature puts you in control of your inbox, allowing you to tailor your email experience to suit your needs and preferences.
Now that you have successfully added the domain to the blocked senders list, move on to the next step to save the changes and confirm the domain blocking.
Step 6: Save Changes and Confirm
After adding the domain to the blocked senders list in Outlook Mail on the Web, the next step is to save the changes and confirm the domain blocking. Follow these simple steps to complete this process:
- Look for the “Save” or “Apply” button located at the bottom or top-right corner of the “Junk Email” settings page.
- Click on the “Save” or “Apply” button to save the changes you have made.
By saving the changes, Outlook Mail on the Web will apply the domain blocking settings to your account, ensuring that any email messages coming from the blocked domain are redirected to your junk folder or blocked altogether.
Confirming the domain blocking through the “Save” or “Apply” button is crucial to ensure that the changes you made take effect. It is essential to follow this step to fully implement the domain blocking feature and have full control over your inbox.
It is worth noting that after saving the changes, it may take a short period of time for the domain blocking settings to be applied. During this time, it is possible that some emails from the blocked domain may still appear in your inbox. However, as the settings take effect, these messages will be automatically moved to the junk folder or blocked.
By saving the changes and confirming the domain blocking, you are one step closer to achieving a clutter-free inbox and a more efficient email management system. This process empowers you to eliminate unwanted emails and focus on the messages that matter most to you.
Now that you have saved the changes, the domain you added to the blocked senders list will be effectively blocked, ensuring that you have greater control and peace of mind when it comes to managing your email communication.
Step 7: Check Blocked Senders List
Once you have added a domain to the blocked senders list in Outlook Mail on the Web, it is important to check the list to ensure that the domain has been successfully blocked. Follow these steps to check the blocked senders list:
- Access the settings menu by clicking on the gear icon in the top-right corner of the screen.
- Select the “View all Outlook settings” option from the drop-down menu.
- In the settings menu, navigate to the “Junk Email” section.
- Scroll down to the “Blocked Senders and Domains” section.
In the “Blocked Senders and Domains” section, you will see a list of all the domains you have blocked. Take a moment to review the list and confirm that the domain you added is present. If the domain is listed, it means that it has been successfully added to the blocked senders list.
Checking the blocked senders list is important to ensure that the blocking feature is working as intended. It provides you with peace of mind, knowing that emails from the blocked domain will not reach your inbox.
Additionally, reviewing the blocked senders list allows you to manage and update the list as needed. If you find that you no longer want to block a specific domain, you can easily remove it from the list.
By regularly checking the blocked senders list, you can maintain control over your email communication and make sure that unwanted domains remain blocked. This helps keep your inbox organized and free from distractions caused by unwanted emails.
Now that you have checked the blocked senders list and confirmed that the domain is successfully blocked, you can move forward with confidence, knowing that you have taken steps to manage your email communication effectively.
Step 8: Removing a Domain from the Blocked Senders List
If you have mistakenly blocked a domain or no longer wish to block a specific domain in Outlook Mail on the Web, you can easily remove it from the blocked senders list. Follow these steps to remove a domain from the blocked senders list:
- Access the settings menu by clicking on the gear icon in the top-right corner of the screen.
- Select the “View all Outlook settings” option from the drop-down menu.
- In the settings menu, navigate to the “Junk Email” section.
- Scroll down to the “Blocked Senders and Domains” section.
- Locate the domain you want to remove from the list.
- Click on the “minus” or “remove” icon next to the domain to delete it from the blocked senders list.
- Confirm the removal if prompted by the system.
By removing a domain from the blocked senders list, you allow emails from that domain to once again reach your inbox. This can be useful if you have mistakenly blocked a legitimate sender or if circumstances have changed and you no longer want to block that particular domain.
Regularly reviewing and updating the blocked senders list ensures that you have full control and flexibility over your email communication. It allows you to refine your domain blocking preferences and maintain a customized email experience.
Removing a domain from the blocked senders list is as quick and simple as adding it. By following these steps, you can easily adjust your settings and ensure that you are receiving all the relevant emails that you want.
Remember to carefully review the removal process to make sure you are removing the correct domain from the list. If you accidentally remove a domain, you can always add it back to the blocked senders list if necessary.
Now that you know how to remove a domain from the blocked senders list, you have the flexibility to adjust your domain blocking preferences as needed and maintain effective control over your email communication.
Step 9: Additional Steps for Enhanced Blocking
While blocking a specific domain in Outlook Mail on the Web is an effective way to filter out unwanted emails, there are additional steps you can take to enhance your blocking capabilities. These steps allow for a more comprehensive and refined approach to managing your email communication. Consider the following options to further enhance your blocking preferences:
- Customize Levels of Filtering: Within the “Junk Email” settings, you can adjust the level of filtering based on your preferences. Choose between options such as “Low”, “Standard”, or “High” to fine-tune the level of protection against spam and unwanted emails.
- Create Inbox Rules: Outlook Mail on the Web provides the option to create customized inbox rules. These rules allow you to automatically move emails that meet specific criteria to designated folders or apply other actions. By creating rules, you can further refine your email management and ensure that specific domains or senders are handled as desired.
- Report Phishing and Suspicious Emails: Outlook Mail on the Web offers the ability to report phishing attempts and suspicious emails. If you receive an email that appears to be a phishing scam or is suspicious in nature, use the “Report phishing” or “Report as junk” option to help improve the filtering system and protect yourself and others.
- Use Advanced Email Filters: Outlook Mail on the Web allows you to set up advanced email filters to manage your inbox. By creating specific filters based on criteria such as sender, subject, or keyword, you can further refine your email organization and ensure that emails from specific domains are handled appropriately.
- Enable Third-Party Anti-Spam Add-ons: Consider installing third-party anti-spam add-ons or extensions for your web browser to enhance the effectiveness of your domain blocking. These add-ons often provide additional layers of spam filtering and may offer more advanced blocking options based on user reviews and ratings.
These additional steps provide you with increased control over your email communication and allow for a more tailored approach to managing unwanted emails. By incorporating these options into your blocking preferences, you can ensure a more efficient and streamlined email experience.
While taking these additional steps can enhance your blocking capabilities, it is important to regularly review and adjust your settings to suit your changing needs. By staying proactive and staying on top of your domain blocking preferences, you can maintain an organized and clutter-free inbox.
Now that you are aware of these additional steps, you can explore and implement them to enhance your blocking capabilities and further streamline your email management.