
Why Backing Up Your Photos is Important
Backing up your photos is an essential practice for everyone in the digital age. With smartphones becoming the primary device for capturing memories, we store a significant amount of our lives in the form of digital photos. However, the vulnerability of digital devices to loss, damage, or theft poses a real risk to losing these precious memories forever.
Imagine losing your phone or accidentally deleting all your photos. The thought alone is devastating. This is where backing up your photos comes to the rescue. By creating a secure copy of your photos in a different location, you ensure their safety and provide yourself with peace of mind.
Google Photos is a reliable and user-friendly platform that allows you to back up your photos effortlessly. It provides an automatic backup feature, ensuring that every photo you capture is immediately saved to the cloud. Whether you have a collection of family photos, travel memories, or important documents, Google Photos makes it simple to safeguard them all.
Not only does backing up your photos protect you from device loss or damage, but it also safeguards against accidental deletion. We all make mistakes, and deleting our cherished photos can be a heart-wrenching error. However, with Google Photos, even if you accidentally delete a photo from your device, it will remain accessible through the cloud backup.
Moreover, Google Photos provides unlimited storage for high-quality photos, reducing the need to worry about running out of space on your device. You can free up valuable storage on your phone or computer by safely storing your photos in the cloud. This allows you to continue capturing new memories without the fear of running out of storage and sacrificing the quality of your photos.
Backing up your photos also enables you to access them from anywhere, at any time. With Google Photos, you can view and download your photos on any device with an internet connection. Whether you’re traveling, visiting friends, or simply want to reminisce on past memories, having instant access to your photos adds convenience and flexibility to your life.
In a world where technology is constantly evolving and digital assets are increasingly valuable, backing up your photos is not just a luxury but a necessity. By using a reliable platform like Google Photos, you can ensure the preservation and protection of your precious memories for years to come.
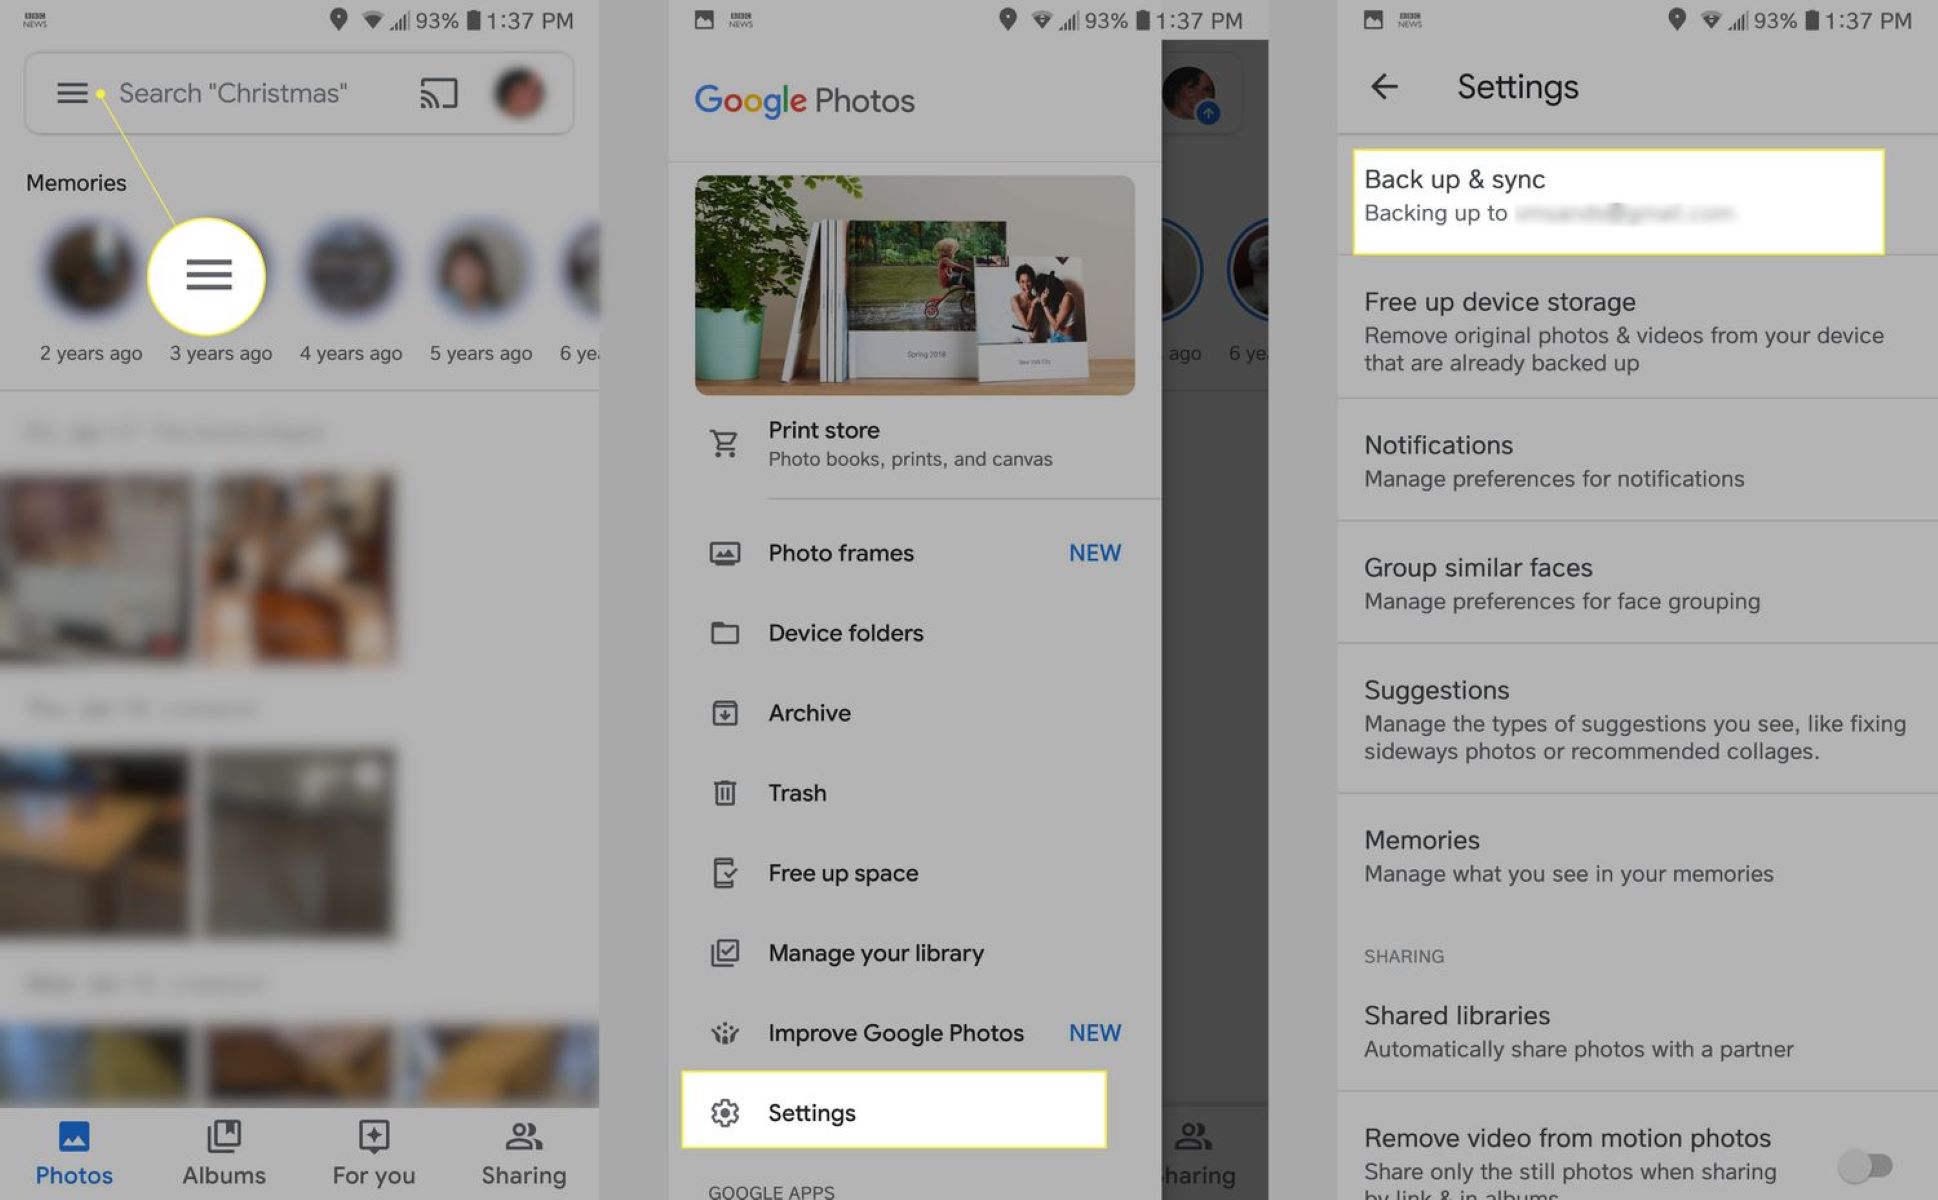
Setting Up Google Photos on Your Phone
If you haven’t already done so, setting up Google Photos on your phone is the first step to seamlessly backing up and organizing your photos. Follow these simple steps to get started:
- Download the Google Photos app from the App Store (iOS) or Play Store (Android) and install it on your phone.
- Open the app and sign in with your Google account. If you don’t have one, you can easily create a new account.
- Grant the necessary permissions for the app to access your photos, camera, and storage. This will enable Google Photos to automatically back up your photos and videos in the background.
- Choose the backup settings that suit your preferences. You can opt to back up photos and videos in original quality or high quality, which offers unlimited free storage.
- Decide if you want Google Photos to sync with your mobile data or only back up when connected to a Wi-Fi network. This is especially important if you have limited data or want to save on your mobile plan.
- You can also enable the “Free Up Space” feature, which removes backed up photos and videos from your device storage to free up space. This is a useful option if you’re running out of storage on your phone.
- Once you’ve completed the setup process, Google Photos will begin scanning your device for any existing photos and videos to back up. This may take some time depending on the size of your gallery.
- Once the initial backup is complete, you can access your backed-up photos by opening the Google Photos app anytime, anywhere. They will be organized by date and easily searchable using Google’s powerful image recognition technology.
Setting up Google Photos on your phone ensures that your photos and videos are automatically saved to the cloud, providing you with a secure backup of your precious memories. It eliminates the risk of losing your photos due to device failure, accidental deletion, or loss.
Now that you have set up Google Photos on your phone, it’s time to explore the various features and functionalities that make this platform so incredibly useful and convenient.
Transferring Photos from Your Phone to Google Photos
Transferring your photos from your phone to Google Photos is a straightforward process that allows you to consolidate and organize your entire photo library in one secure location. Here’s how you can do it:
- Open the Google Photos app on your phone and make sure you are signed in with your Google account.
- Tap on the “Library” tab at the bottom of the screen to access the main menu.
- From the menu, select “Photos” to view all the photos stored on your device.
- Choose the photos you want to transfer by tapping on the checkbox icon located at the top of each photo. You can also select multiple photos by tapping and dragging your finger across the photos.
- Once you’ve made your selection, tap on the “Share” icon usually represented by an arrow pointing upwards. This will open a list of sharing options.
- Look for the “Google Photos” option in the sharing menu and tap on it. This will initiate the transfer process.
- Google Photos will then prompt you to choose whether you want to upload the selected photos in original quality or in high quality with unlimited free storage. Make your selection based on your preferences and tap on the “Save” or “Upload” button.
- The transfer process may take some time, depending on the size and number of photos you are uploading. Make sure you have a stable internet connection to ensure a smooth transfer.
- Once the transfer is complete, you can access your photos through the Google Photos app on any device or through the web browser by signing in to your Google account.
Transferring photos from your phone to Google Photos not only ensures that your photos are securely backed up, but it also allows you to organize them in a more systematic way. Google Photos offers a range of organization features such as automatic sorting by date, facial recognition, and customizable albums, making it easier to find and enjoy your photos.
Additionally, once your photos are uploaded to Google Photos, you can easily share them with others, create collages, animations, and movies, and even order prints if desired. It offers a plethora of creative options to bring your photos to life and share them with your loved ones.
Now that you’ve learned how to transfer your photos to Google Photos, you can start organizing and exploring the various features this powerful platform has to offer.
Uploading Photos from Your Computer to Google Photos
Uploading photos from your computer to Google Photos is a convenient way to transfer and access your entire photo library from any device. Whether you have taken photos with a digital camera or have a collection of images saved on your computer, here’s how you can upload them to Google Photos:
- Visit the Google Photos website by typing photos.google.com into your web browser.
- Sign in to your Google account. If you don’t have one, you can easily create a new account.
- In the top right corner of the Google Photos web page, click on the “Upload” button, which is represented by an upward arrow within a cloud icon.
- A file explorer window will open, allowing you to navigate to the location on your computer where the photos are saved.
- Select the photos you want to upload by clicking on them, or use the shift key to select multiple photos at once.
- Once you’ve made your selection, click on the “Open” button to start the upload process. Google Photos will display the progress of the upload, and you can continue with other tasks while it completes.
- Google Photos will automatically organize your uploaded photos by date. You can also create new albums to further categorize your photos and make them easier to find.
- If you have a large number of photos to upload, you can use the Google Photos desktop uploader. To access it, go to the Google Photos website and click on the “Settings” icon (represented by three horizontal lines) in the top left corner. From the dropdown menu, select “Upload from Drive” to install the desktop uploader.
Uploading photos from your computer to Google Photos provides a centralized and secure backup of your entire photo collection. It allows you to access your photos from any device with an internet connection, eliminating the need to carry around external storage devices or worry about losing your photos due to computer failure.
Furthermore, once your photos are stored in Google Photos, you can take advantage of its powerful search and organization features. The platform uses advanced image recognition technology to identify people, objects, and even specific locations in your photos, making it easier than ever to find and relive your favorite moments.
Now that you know how to upload photos from your computer to Google Photos, you can start enjoying the convenience and accessibility of having your entire photo library at your fingertips.
Organizing Your Photos with Google Photos
Google Photos offers powerful organizational features that allow you to efficiently manage and find your photos. With the ability to automatically sort and label your photos, creating albums, and using facial recognition technology, organizing your photos has never been easier. Here are some ways you can organize your photos with Google Photos:
- Automatic organization: Google Photos uses machine learning algorithms to automatically organize your photos by date. This makes it easy to navigate through your collection and find specific photos based on when they were taken.
- Facial recognition: Google Photos can also recognize faces in your photos, making it simple to find all the photos of a particular person. Just search for their name, and Google Photos will display all the photos containing that face.
- Creating albums: You can manually create albums to group related photos together. For example, you can create albums for specific events, trips, or even by theme. To create an album, select the photos you want to include, click on the “+” symbol, and choose “Create album”.
- Adding captions: Add captions to your photos to provide context or enhance the storytelling aspect. Simply select a photo, click on the “i” icon, and add a description or caption.
- Using tags and descriptions: Tags and descriptions help in organizing and searching for photos. You can add tags or descriptions to individual photos or entire albums to make them more discoverable.
- Search functionality: Google Photos has a robust search feature that allows you to find specific photos based on people, places, or objects. You can simply type in keywords in the search bar to filter your photos accordingly.
- Assistant suggestions: Google Photos’ Assistant feature offers smart suggestions for organizing your photos. It can create collages, animations, and movies automatically, or suggest grouping similar photos together.
By taking advantage of these organizational features, you can make the most out of your Google Photos experience. Whether you want to quickly locate a specific photo or create a personalized album to share with friends and family, Google Photos provides a user-friendly platform to help you stay organized.
Remember, organizing your photos not only helps you find them easily but also enhances the overall browsing and sharing experience. So, take some time to organize and curate your photo collection with Google Photos and enjoy a more streamlined and enjoyable photo management experience.
Managing Storage Space on Google Photos
Google Photos offers unlimited storage for high-quality photos, which is a fantastic feature. However, if you choose to store your photos in their original quality, it may consume your Google account’s storage space. To effectively manage your storage space on Google Photos, consider the following tips:
- Manage backup settings: Review your backup settings in the Google Photos app to optimize storage usage. You can choose to upload your photos in high quality, which provides unlimited storage, or in their original quality, which counts towards your Google account storage limit.
- Free up space on your phone: Use the “Free Up Space” feature in the Google Photos app to remove backed-up photos and videos from your device. This helps free up valuable storage space on your phone while still having access to your photos through the app.
- Delete unnecessary photos: Regularly go through your photo library and delete any duplicate, blurry, or unwanted photos. This not only helps declutter your Google Photos account but also saves storage space.
- Use the archive feature: The archive feature allows you to remove photos from the main view without deleting them. Archived photos are hidden from the main library but can still be searched and accessed later if needed.
- Consider upgrading storage: If you find yourself running out of storage space on your Google account, you may consider upgrading to a paid plan. Google offers various storage plans at affordable prices, providing you with additional space to store your photos and other files.
- Download and delete: If you want to move your photos to another storage medium or simply want to have a local backup, you can download your photos from Google Photos and delete them from your account. However, make sure to have a backup in place before deleting anything.
- Review third-party app access: Check the third-party apps that have access to your Google Photos and revoke access for any unnecessary or unused apps. This helps ensure that your storage space is not being consumed by redundant apps.
By following these storage management tips, you can make the most of your storage space on Google Photos and avoid any storage limitations. Regularly reviewing and organizing your photos will not only help optimize your storage but also make it easier to find and enjoy your cherished memories.
Remember, while Google Photos offers generous storage options, it’s always a good practice to have additional backups of your important photos and files to ensure their safety and accessibility.
Editing and Enhancing Your Photos with Google Photos
Google Photos provides powerful editing tools and features that allow you to enhance and transform your photos with just a few taps. Whether you want to adjust the lighting, apply filters, or add special effects, here’s how you can edit and enhance your photos with Google Photos:
- Basic adjustments: Start by tapping on a photo to open it and then click on the editing icon (represented by a pencil or sliders). From there, you can make basic adjustments such as cropping, rotating, and straightening your photo.
- Lighting and color: Google Photos offers options to adjust brightness, contrast, shadows, highlights, and saturation. You can fine-tune these settings to make your photos more vibrant and visually appealing.
- Filters: Apply filters to add creative effects to your photos. Google Photos offers a variety of filters to choose from, each with its own unique style and mood. Simply scroll through the available filters and select the one that best suits your photo.
- Automatic enhancements: If you prefer a quick and easy way to enhance your photos, you can rely on Google Photos’ automatic enhancement feature. It uses intelligent algorithms to analyze your photo and apply automatic adjustments to enhance its overall appearance.
- Special effects: Google Photos also offers a range of special effects, such as vignette, focus blur, and color pop. These effects can add a professional touch or create an artistic look to your photos.
- Portrait editing: If you have portrait photos with depth information, Google Photos allows you to adjust the depth and apply bokeh effects to blur the background and create a stunning depth-of-field effect.
- Undo and compare: Don’t worry if you’re not satisfied with the changes you’ve made. Google Photos allows you to undo any edits or compare your edited photo with the original version to see the differences.
Editing and enhancing your photos with Google Photos enables you to unleash your creativity and bring out the best in your images. Whether you’re a beginner or a more experienced photographer, these editing tools provide you with a wide range of options to enhance your photos and express your artistic vision.
Once you’re satisfied with your edits, Google Photos saves the edited version while preserving the original photo. This way, you can always go back to the original or re-edit your photos whenever you want.
Now that you know how to edit and enhance your photos with Google Photos, you can unlock the full potential of your images and create stunning visual experiences.
Sharing and Collaborating with Others on Google Photos
Google Photos makes it easy to share your photos with friends, family, and even collaborate with others on albums and collections. Whether you want to share a single photo or create a collaborative album, here’s how you can share and collaborate with others on Google Photos:
- Sharing individual photos: Open the Google Photos app and select the photo you want to share. Tap on the share icon, represented by an arrow pointing outwards. From there, you can choose to share the photo via various platforms such as messaging apps, email, or social media.
- Creating and sharing albums: To create an album, select the photos you want to include and tap on the “+” icon, then choose “Create Album”. Give your album a title and tap on “Create”. You can then share the album by tapping on the share icon and selecting the desired sharing method.
- Collaborating on albums: Google Photos allows you to collaborate with others on albums, so multiple people can add and contribute photos to the same album. To enable collaboration, create an album and select the “Share” option. Choose the people you want to collaborate with and grant them editing access. They can then add photos to the album, comment on individual photos, and even rearrange the order of the photos.
- Sharing links: You can also generate a shareable link to a photo or album. This allows you to share the link with anyone, even if they don’t have a Google account. Simply tap on the share icon, select “Get Link”, and choose the desired privacy settings for the link.
- Collaborating on a shared library: With the “Shared Libraries” feature, you can automatically share your photos with selected individuals. You can choose to share your entire library or specific photos based on criteria like faces or date ranges. This allows friends or family members to view, save, and add photos to the shared library.
- Control privacy settings: Google Photos provides a range of privacy settings for shared photos and albums. You can specify who has access to view, comment, and edit the shared content. Additionally, you can always revoke access or change the privacy settings if needed.
Sharing and collaborating with others on Google Photos is a fantastic way to preserve memories and create shared experiences. Whether it’s sharing a single photo with a friend or collaborating on a group album, Google Photos provides a seamless and convenient platform for effortless photo sharing and collaboration.
Now that you know how to share and collaborate on Google Photos, you can start connecting with others and creating meaningful photo experiences together.
Viewing and Downloading Your Photos from Google Photos
Google Photos offers a user-friendly interface that allows you to easily view and access your photos from various devices. Whether you want to reminisce on past memories or download your photos for offline use, here’s how you can view and download your photos from Google Photos:
- Viewing photos: Open the Google Photos app on your phone or visit the Google Photos website on your computer. Your photos will be automatically organized by date, making it easy to browse through your collection. Scroll up or down to view more photos, and tap on a photo to open it in full screen.
- Searching for photos: Google Photos offers a powerful search feature that allows you to find specific photos based on people, places, or objects. Simply type in keywords in the search bar, and Google Photos will display relevant photos. You can also use filters to narrow down your search results.
- Viewing albums: If you have created albums in Google Photos, you can access them by tapping on the “Albums” tab in the app or navigating to the “Albums” section on the website. This allows you to view specific collections of photos organized based on your preferences.
- Creating slideshows: Google Photos lets you create dynamic slideshows of your photos. Simply select the photos you want to include, tap on the “+”, and choose “Slideshow”. This will automatically play a continuous slideshow of your selected photos.
- Downloading photos: To download a single photo, open the photo and tap on the three-dot menu icon. From the options menu, select “Download” to save the photo to your device. To download multiple photos, open the “Albums” tab, select the album, tap on the three-dot menu icon, and choose “Download All”.
- Exporting photos: Google Photos also allows you to export your photos to other platforms or storage devices. You can select the photos you want to export, tap on the share icon, and choose the desired export method, such as email or cloud storage apps.
- Ordering prints: If you want physical copies of your photos, Google Photos offers an option to order prints. Simply select the photos you want to print, tap on the “+” icon, and choose “Print”. You can then customize the print options, such as size, quantity, and delivery method.
With Google Photos, you have the flexibility to view and access your photos whenever and wherever you want. Whether you’re on your phone, tablet, or computer, Google Photos provides a seamless and intuitive experience for managing and enjoying your photo collection.
Now that you know how to view and download your photos from Google Photos, you can relive your favorite moments and preserve your precious memories in the format that works best for you.