
Check your iCloud settings
In order to successfully back up your iCloud contacts and calendar data, it is crucial to first ensure that your iCloud settings are properly configured. Follow the steps below to check and adjust your iCloud settings:
1. Open the “Settings” app on your iOS device.
2. Tap on your name at the top of the screen to access your Apple ID settings.
3. Select “iCloud” from the list of options.
4. Make sure that the “Contacts” toggle switch is turned on. This will ensure that your contacts are synced with your iCloud account.
5. Scroll down to the “Calendars” section and ensure that the toggle switch is also turned on. This will enable the synchronization of your calendar events with iCloud.
6. Additionally, ensure that you are signed in to iCloud using the correct Apple ID. This is important to ensure that all your data is properly backed up to your iCloud account.
By verifying and adjusting these settings, you can ensure a seamless and successful backup process for your iCloud contacts and calendar data. Take a moment to double-check that everything is configured correctly before proceeding to the next steps.
Export your contacts from iCloud
Exporting your contacts from iCloud is a straightforward process that allows you to create a backup file of your valuable contact information. Follow the steps below to export your contacts from iCloud:
1. Open a web browser on your computer and go to the iCloud website (https://www.icloud.com).
2. Sign in to your iCloud account using your Apple ID and password.
3. Once you are logged in, click on the “Contacts” icon on the iCloud homepage.
4. Select the contacts you want to export. You can choose individual contacts by holding down the Command (⌘) key on a Mac or the Ctrl key on a PC and clicking on each contact. Alternatively, you can select all contacts by pressing Command+A (Mac) or Ctrl+A (PC).
5. After selecting the contacts, click on the settings icon (a gear symbol) at the bottom left corner of the screen.
6. From the dropdown menu, choose “Export vCard”. This will download a VCF (Virtual Contact File) containing all the selected contacts.
7. Save the VCF file in a secure location on your computer or an external storage device.
You have successfully exported your contacts from iCloud. This backup file can be easily imported into various email clients, address books, or another iCloud account if needed. It is recommended to regularly export your contacts to ensure you have an up-to-date backup of your valuable contact information.
Export your calendar data from iCloud
Exporting your calendar data from iCloud allows you to create a backup file of your important events and appointments. Follow the steps below to export your calendar data:
1. On your computer, open a web browser and navigate to the iCloud website (https://www.icloud.com).
2. Sign in to your iCloud account using your Apple ID and password.
3. Once logged in, click on the “Calendars” icon on the iCloud homepage.
4. You will see a list of all your calendars. Select the calendar you want to export by clicking on its name.
5. In the top-right corner of the window, click on the settings icon (a gear symbol).
6. From the dropdown menu, choose “Export Calendar”.
7. A file with the .ics extension will be downloaded to your computer. This file contains all the events and appointments from the selected calendar.
8. Save the .ics file in a secure location on your computer or an external storage device.
By following these steps, you have successfully exported your calendar data from iCloud. This backup file can be imported into various calendar applications, ensuring that you have a copy of your important events even if they are accidentally deleted or lost from your iCloud account. Remember to regularly export your calendar data to stay prepared for any unexpected data loss situations.
Import contacts into a backup file
Importing contacts into a backup file is a crucial step in preserving your valuable contact information. The process may vary depending on the email client or address book you are using. Follow the general steps below to import contacts from your backup file:
1. Open the email client or address book application that you want to import the contacts into.
2. Look for the option to import contacts. This may be found under the settings, tools, or preferences menu, depending on the application.
3. Choose the import method that suits your backup file format. Most applications support common formats like vCard (VCF) or CSV.
4. Select the backup file that contains your contacts. Navigate to the location where you saved the backup file and choose it.
5. Follow the on-screen instructions to complete the import process. You may be asked to map fields or match columns from the backup file to the corresponding fields in the application’s contact format.
6. Review the imported contacts to ensure that all the information is properly transferred. Make any necessary adjustments or edits if needed.
7. Once the import is complete, your contacts should be available in your email client or address book application. Take some time to verify that all the contacts have been successfully imported.
By following these steps, you can easily import contacts from your backup file and ensure that your valuable contact information is safely stored in your chosen application. Regularly backing up and importing your contacts will provide peace of mind, knowing that you have a secure copy of your important contacts.
Import calendar data into a backup file
Importing calendar data from a backup file is essential to restore your important events and appointments. The process may vary depending on the calendar application you are using. Follow the general steps below to import calendar data from your backup file:
1. Open the calendar application that you want to import the data into.
2. Look for the option to import calendar data. This may be located in the settings, preferences, or file menu, depending on the application.
3. Choose the import method and file format that matches your backup file. Common formats include .ics (iCalendar) and .csv (Comma Separated Values).
4. Select the backup file containing your calendar data. Navigate to the location where you saved the backup file and choose it.
5. Follow the instructions provided by the application to complete the import process. This may include mapping fields or matching columns from the backup file to the corresponding fields in the application’s calendar format.
6. Review the imported calendar events and appointments to ensure that they are correctly displayed in the application. Make any necessary adjustments or edits if needed.
7. Once the import is complete, your calendar data should be available in the application. Take a moment to verify that all your important events and appointments have been successfully imported.
By following these steps, you can easily import calendar data from your backup file and ensure that your crucial events and appointments are restored. Regularly backing up and importing your calendar data will provide you with peace of mind, knowing that your important schedules are securely stored and accessible in your chosen calendar application.
Use the Finder app to back up your data on a Mac
Backing up your data is crucial to ensure the safety and availability of your important files. On a Mac, you can use the Finder app to create backups of your data. Follow the steps below to back up your data on a Mac:
1. Connect an external storage device, such as a USB drive or external hard drive, to your Mac.
2. Open a new Finder window by clicking on the Finder icon in the Dock or using the Command + N keyboard shortcut.
3. In the Finder window, locate the files or folders that you want to back up.
4. Click and drag the selected files or folders to the external storage device listed under the “Devices” section in the left sidebar of the Finder window. Alternatively, you can right-click on the files or folders and choose “Copy” from the context menu, then navigate to the external storage device and right-click again to choose “Paste Item”.
5. Monitor the progress of the file transfer, which is displayed as a progress bar. Make sure not to disconnect the external storage device until the transfer is complete.
6. Once the transfer is finished, safely eject the external storage device by right-clicking on its icon and selecting “Eject” from the context menu. This will ensure that no data corruption occurs.
By following these steps, you can use the Finder app on your Mac to easily back up your important data. Regularly backing up your files and folders will allow you to recover them in case of accidental deletion, hardware failure, or other data loss situations. Remember to keep your backup device in a safe place to protect it from potential damages or losses.
Use the iCloud website to back up your data on a PC
If you’re using a PC, you can still back up your data using the iCloud website. By following the steps below, you can easily create backups of your important files:
1. Open a web browser on your PC and navigate to the iCloud website (https://www.icloud.com).
2. Sign in to iCloud using your Apple ID and password.
3. Once logged in, you will see a collection of icons representing various iCloud services. Click on the desired service to access its files. For example, click on “Photos” to back up your photos or “iCloud Drive” to back up your documents.
4. In the selected iCloud service, navigate to the files or folders that you want to back up.
5. Select the files or folders by clicking on them. Hold down the Ctrl key while clicking to select multiple items.
6. After selecting the files or folders, click on the download icon (a cloud with a down arrow) to initiate the download process. This will create a backup file of the selected items on your PC.
7. Choose a location on your PC where you want to save the backup file. It is recommended to create a dedicated folder for your iCloud backups to keep them organized.
8. Monitor the progress of the download, and make sure not to close the browser or interrupt the download process until it is complete.
9. Once the download is finished, you have successfully backed up your files from iCloud to your PC.
By utilizing the iCloud website on your PC, you can easily create backups of your important files. This ensures that your data is safe and easily accessible, even if you do not have a Mac or iOS device. Regularly backing up your files is crucial for safeguarding them against accidental deletion, device failure, or other unforeseen events.
Use third-party apps to back up your iCloud data
While iCloud provides built-in tools for backing up your data, there are also third-party apps available that offer additional features and flexibility. These apps can help you create comprehensive backups of your iCloud data. Here’s how you can use third-party apps to back up your iCloud data:
1. Research and choose a trusted third-party app that specializes in iCloud backups. Look for apps with positive reviews and a solid reputation.
2. Download and install the selected app onto your device from the respective app store or website.
3. Launch the app and follow the provided instructions to set it up with your iCloud account. This usually involves signing in with your Apple ID and granting necessary permissions.
4. Once the app is configured, explore its features to choose the specific iCloud data you want to back up. Most apps allow you to select and customize the types of data to include, such as contacts, photos, calendars, and more.
5. Configure the backup settings according to your preferences. This may include specifying the frequency of backups, choosing the backup location, and enabling encryption for added security.
6. Initiate the backup process by selecting the “Backup” or “Start Backup” option in the app. The app will then communicate with your iCloud account and begin copying your selected data to the designated backup location.
7. Monitor the progress of the backup process, and ensure a stable internet connection to avoid interruptions.
8. Once the backup is complete, verify that all your iCloud data is successfully backed up using the third-party app’s interface or tools.
By utilizing third-party apps, you can have more control and flexibility in backing up your iCloud data. These apps often offer additional features like selective data backups, encryption options, and advanced customization. Remember to regularly update the app for the latest security patches and features to ensure the continued smooth functioning of your iCloud backup process.
Create a local backup using iTunes
If you prefer to have a local backup of your iCloud data on your computer, you can use iTunes to create a comprehensive backup. Follow the steps below to create a local backup using iTunes:
1. Ensure that you have the latest version of iTunes installed on your computer. If not, visit the Apple website and download the latest version.
2. Connect your iOS device to your computer using a USB cable. Launch iTunes, and if prompted, enter your device passcode and trust the computer.
3. In iTunes, click on the device icon located at the top-left corner of the iTunes window. This will take you to the Summary page of your device.
4. Under the “Backups” section, select the option “This computer” to specify that you want to create a local backup.
5. Optionally, enable the “Encrypt iPhone backup” option if you want to include sensitive information like passwords and health data in the backup. Set a strong password that you will remember.
6. Click on the “Back Up Now” button to initiate the backup process. iTunes will start creating a complete backup of your device, including your iCloud data.
7. Wait for the backup process to complete. The time taken to complete the backup depends on the amount of data on your device. Ensure that your computer stays connected to a power source and that your device remains connected to the computer until the process is finished.
8. Once the backup is complete, you can confirm its success by checking the “Latest Backups” section under the “Backups” section. The backup should be listed there with the date and time.
By creating a local backup using iTunes, you have an offline copy of your iCloud data stored on your computer. This backup allows you to easily restore your data in case of any data loss or when setting up a new device. Remember to regularly create updated backups to ensure that your data is always protected.
Use iCloud backup to save all your data
iCloud backup is a convenient and reliable option for saving all your data in one secure location. By enabling iCloud backup on your iOS device, you can ensure that your photos, videos, app data, settings, and more are automatically backed up and easily accessible. Follow the steps below to use iCloud backup:
1. Ensure that your iOS device is connected to a Wi-Fi network. iCloud backups require a stable internet connection.
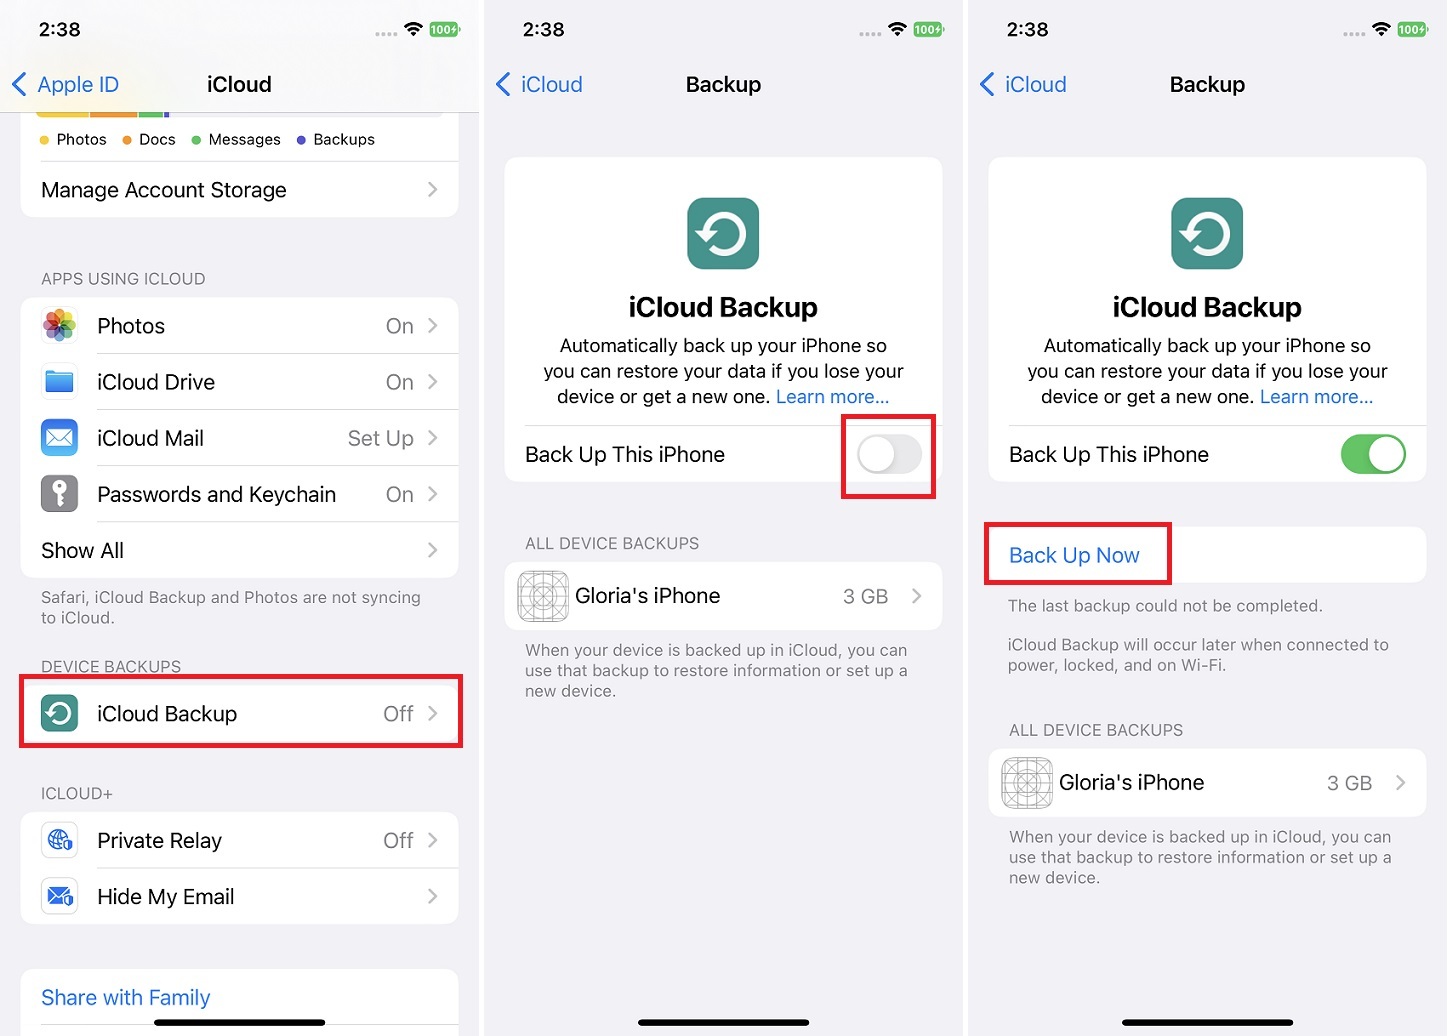
2. On your iOS device, go to “Settings” and tap on your name at the top of the screen to access your Apple ID settings.
3. Tap on “iCloud” and then on “iCloud Backup”.
4. Enable the “iCloud Backup” toggle switch if it’s not already turned on. You may be prompted to enter your Apple ID password.
5. Tap on “Back Up Now” to start the backup process. Keep your device connected to the Wi-Fi network and ensure it remains powered on until the backup is complete.
6. iCloud will now back up your device automatically when it is connected to Wi-Fi, locked, and charging. It will create incremental backups, so only the changes made since the last backup will be saved, reducing the backup time for subsequent backups.
7. To check the status of your iCloud backup, go to “Settings,” tap your name, then “iCloud,” “iCloud Backup,” and you will see the date and time of your last backup.
By using iCloud backup, all your important data is securely stored in the cloud. This ensures that even if you lose or upgrade your device, you can easily restore your data during setup. It is recommended to regularly check your iCloud storage to ensure it has enough space for backups and consider upgrading if needed. iCloud backup is a reliable and convenient solution to safeguard your data and provide you with peace of mind.