
Reasons Pop-ups May Be Blocked
Pop-ups are commonly blocked by web browsers to enhance user experience and protect against potential security threats. There are several reasons why pop-ups may be blocked on your Mac. Understanding these reasons can help you troubleshoot and resolve any issues you may encounter when trying to allow pop-ups.
One of the primary reasons pop-ups are blocked is due to their reputation for being intrusive and disruptive to the browsing experience. Pop-ups often appear unexpectedly and cover the main content of a website, causing frustration for users. To combat this, web browsers implement pop-up blockers by default.
Another reason pop-ups are blocked is to prevent malicious activities. Pop-up ads can sometimes contain harmful content, such as malware or phishing attempts. These pop-ups can infect your computer or steal your personal information. By blocking pop-ups, web browsers provide an additional layer of security against these threats.
Furthermore, pop-ups can be used by unscrupulous websites for deceptive purposes. Some pop-ups may mimic system notifications or display fake error messages, tricking users into taking unwanted actions like downloading unwanted software or providing sensitive information. Blocking pop-ups helps protect users from falling victim to these deceptive tactics.
Additionally, many users find pop-ups to be disruptive, especially when they are browsing on mobile devices or have a slow internet connection. Pop-ups often slow down the loading time of websites and can be difficult to close, causing frustration for users. By blocking pop-ups, browsers aim to provide a smoother and more enjoyable browsing experience.
It’s important to note that while pop-ups may be blocked by default, you can still choose to allow them on your Mac if necessary. This gives you the flexibility to access legitimate pop-ups from trusted sources or websites that require pop-ups for certain functionalities.
Now that you understand the reasons behind pop-up blocking, let’s explore how you can allow pop-ups on different web browsers installed on your Mac.
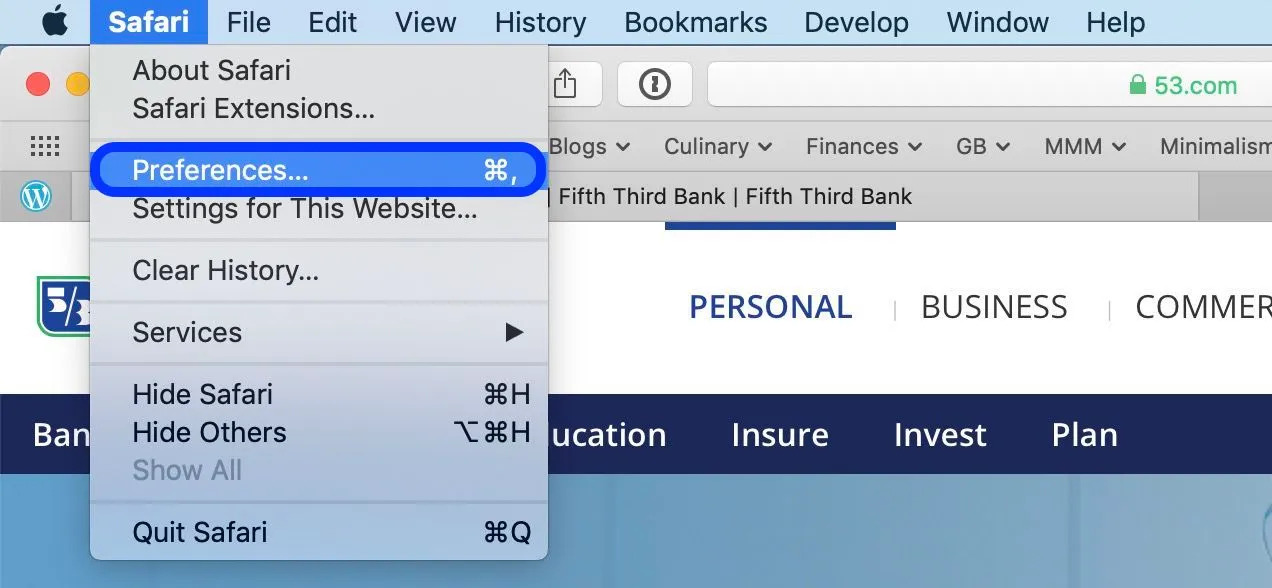
How to Allow Pop-ups on Safari
Safari is the default web browser on Mac devices, and it includes a built-in pop-up blocker to protect users from intrusive or malicious pop-ups. However, if you need to allow pop-ups for certain websites or functionalities, follow these steps to adjust the settings:
- Open Safari on your Mac.
- In the top menu, click on “Safari” and select “Preferences” from the drop-down menu.
- A new window will open. Navigate to the “Websites” tab.
- On the left sidebar, you’ll see a section called “General.” Click on “Pop-up Windows.”
- In the main window, you’ll see a list of websites that have been blocked or allowed to display pop-ups.
- To enable pop-ups for a specific website, simply select it from the list and choose “Allow” from the drop-down menu.
- If you want to allow pop-ups for all websites, you can toggle the switch next to “When visiting other websites” to “Allow” position.
Once you have made your changes, close the Safari preferences window. Safari will now allow pop-ups as per your settings. If you encounter any issues with certain websites, make sure they are not being blocked by other security software or by your internet service provider.
It’s important to exercise caution when allowing pop-ups, as not all pop-ups are safe. Ensure that you only allow pop-ups from trusted websites and sources. If you notice any suspicious behavior after enabling pop-ups, consider disabling them again or running a full system scan using reliable antivirus software.
Remember, allowing pop-ups should be done judiciously to maintain a secure and enjoyable browsing experience on Safari.
How to Allow Pop-ups on Firefox
Firefox is a popular web browser known for its customizable features and strong privacy protections. By default, Firefox blocks pop-ups to provide a seamless browsing experience. However, if you need to allow pop-ups for specific websites or functionalities, you can make the necessary adjustments using the following steps:
- Launch Firefox on your Mac.
- In the top menu, click on “Firefox” and select “Preferences” from the drop-down menu.
- A new window will appear. Scroll down and click on “Privacy & Security” in the left sidebar.
- Under the “Permissions” section, locate the “Block pop-up windows” option.
- Click on the “Exceptions…” button next to it.
- A dialog box will open, allowing you to add specific websites to the exceptions list.
- Enter the URL of the website for which you want to allow pop-ups and click “Allow.”
- Repeat the previous step for all the websites you wish to allow pop-ups.
Once you have added the necessary exceptions, click “Save Changes” to apply the settings.
If you want to allow pop-ups for all websites in Firefox, without adding individual exceptions, you can disable the pop-up blocker altogether by unchecking the “Block pop-up windows” option mentioned in step 4. However, it is recommended to use caution when taking this approach, as it may leave your browser vulnerable to malicious pop-ups.
Remember to regularly review and update your list of exceptions based on your browsing needs. This will ensure that you only allow pop-ups from trusted sources and maintain a secure browsing environment.
If you encounter any issues or unexpected behavior after enabling pop-ups, consider running a thorough scan using reliable antivirus software to ensure your system is free from any malware or unwanted programs.
With these steps, you can easily configure Firefox to allow pop-ups on your Mac, providing you with greater flexibility when accessing certain websites or features.
How to Allow Pop-ups on Chrome
Google Chrome is a widely used web browser known for its speed and user-friendly interface. By default, Chrome blocks pop-ups to enhance the browsing experience and provide protection against potentially harmful content. However, if you need to allow pop-ups for specific websites or functionalities, you can adjust the settings using the following steps:
- Open Google Chrome on your Mac.
- In the top-right corner of the browser, click on the three vertical dots to open the Chrome menu.
- From the menu, select “Settings.”
- Scroll down and click on “Privacy and security” in the left sidebar.
- Under the “Privacy and security” section, click on “Site settings.”
- Scroll down and click on “Pop-ups and redirects.”
- Toggle the switch next to “Blocked (recommended)” to disable the pop-up blocker.
- Add specific websites to the allow list by clicking on “Add” under the “Allow” section.
- Enter the URL of the website and click “Add” to save the changes.
You can repeat steps 8 and 9 for each website you want to allow pop-ups from.
If you want to allow pop-ups for all websites in Chrome, without adding individual exceptions, you can disable the pop-up blocker globally by toggling the switch next to “Blocked (recommended)” mentioned in step 6.
It’s important to exercise caution when enabling pop-ups, as they can potentially contain malicious or unwanted content. Ensure that you only allow pop-ups from trusted websites and sources to maintain a secure browsing experience.
If you encounter any issues or unexpected behavior after enabling pop-ups, consider clearing your browser cache and cookies, as well as running a reliable antivirus scan to ensure your system is free from any malware.
By following these steps, you can easily configure Chrome to allow pop-ups on your Mac, giving you greater control over your browsing experience.
How to Allow Pop-ups on Opera
Opera is a popular web browser known for its speed and versatility. By default, Opera includes a built-in pop-up blocker to provide a smoother browsing experience. However, if you need to allow pop-ups for specific websites or functionalities, you can easily adjust the settings using the following steps:
- Launch the Opera browser on your Mac.
- In the top menu, click on “Opera” and select “Preferences” or “Settings” (depending on your version of Opera) from the drop-down menu.
- A new tab or window will open with the settings menu.
- In the left sidebar, click on “Websites.”
- Scroll down until you see the “Pop-ups” section.
- Toggle the switch next to “Block pop-ups” to disable the pop-up blocker.
- Add specific websites to the allow list by clicking on “Manage exceptions.”
- In the “Exceptions” dialog box, enter the URL of the website you want to allow pop-ups from and click “Allow.”
- Repeat step 8 for each website you want to add to the exceptions list.
Once you have made the necessary changes, close the settings tab or window. Opera will now allow pop-ups from the websites you added to the exceptions list.
It’s important to exercise caution when enabling pop-ups, as they can be used for malicious purposes. Only allow pop-ups from trusted websites and sources to ensure a safe browsing experience.
If you encounter any issues or unexpected behavior after allowing pop-ups, consider updating your browser to the latest version or clearing your browser cache and cookies. Additionally, running a reputable antivirus scan can help identify and remove any potential malware.
By following these steps, you can easily configure Opera to allow pop-ups on your Mac, giving you more control over your browsing experience.
How to Manage Pop-up Settings on Safari
Safari, the default web browser on Mac devices, offers various options to manage pop-up settings according to your preferences. Whether you want to allow or block pop-ups, Safari provides a flexible way to customize your browsing experience. Follow these steps to manage pop-up settings on Safari:
- Launch Safari on your Mac.
- In the top menu, click on “Safari” and select “Preferences.”
- A new window will open. Navigate to the “Websites” tab.
- On the left sidebar, click on “Pop-up Windows.”
- In the main window, you can choose to allow or block pop-ups globally by selecting the appropriate option.
- If you want to allow pop-ups for specific websites, you can add those URLs to the exceptions list by clicking on “Add Website” and entering the desired website’s address.
- To remove a website from the exceptions list, select it and click on the “-” (minus) button.
- You can also adjust the behavior for each website listed in the exceptions by selecting the appropriate option from the drop-down menu.
- Once you have made the desired changes, close the Safari preferences window.
By managing the pop-up settings in Safari, you can strike a balance between flexibility and security based on your browsing needs. Remember to exercise caution when allowing pop-ups and only permit them from trusted websites to avoid potential security risks.
If you encounter any issues with pop-ups after adjusting the settings, ensure that no other security software or extensions are blocking or interfering with pop-up functionality. Additionally, keep your Safari browser up to date to benefit from the latest security features and enhancements.
With Safari’s robust set of options for managing pop-up settings, you can customize your browsing experience to align with your preferences and requirements on your Mac.
How to Manage Pop-up Settings on Firefox
Firefox provides users with various options to manage pop-up settings and customize their browsing experience. Whether you want to allow, block, or selectively enable pop-ups, Firefox offers flexible controls to meet your needs. Here’s how you can manage pop-up settings on Firefox:
- Open Firefox on your Mac.
- In the top menu, click on “Firefox” and select “Preferences.”
- A new window will appear. Scroll down and click on “Privacy & Security” in the left sidebar.
- Under the “Permissions” section, locate the “Block pop-up windows” option.
- To block all pop-ups, leave the “Block pop-up windows” option checked.
- If you want to allow pop-ups for all websites, uncheck the “Block pop-up windows” option.
- To allow pop-ups selectively, click on the “Exceptions…” button next to the “Block pop-up windows” option.
- In the “Exceptions” dialog box, you can enter the URLs of specific websites for which you want to allow pop-ups. Click “Save Changes” to apply the settings.
- If you wish to remove a website from the exceptions list, select it and click on the “Remove Website” button.
By managing the pop-up settings in Firefox, you can strike a balance between convenience and security while browsing. Remember to exercise caution when allowing pop-ups and only permit them from trusted websites to avoid potential security risks.
If you encounter any issues with pop-ups after adjusting the settings, ensure that no other security software or extensions are interfering with pop-up functionality. Additionally, make sure you have the latest version of Firefox installed to benefit from the latest bug fixes and security enhancements.
With Firefox’s flexible pop-up settings, you have full control over which websites can display pop-ups, allowing you to tailor your browsing experience according to your preferences on your Mac.
How to Manage Pop-up Settings on Chrome
Managing pop-up settings in Google Chrome allows you to customize your browsing experience to fit your preferences and enhance security. Whether you want to allow or block pop-ups, Chrome offers simple and effective controls. Here’s how you can manage pop-up settings on Chrome:
- Open Google Chrome on your Mac.
- In the top-right corner of the browser, click on the three vertical dots to open the Chrome menu.
- From the menu, select “Settings.”
- In the settings page, scroll down and click on “Privacy and security” in the left sidebar.
- Under the “Privacy and security” section, click on “Site settings.”
- Scroll down and click on “Pop-ups and redirects.”
- To block all pop-ups, ensure the “Blocked (recommended)” option is selected.
- If you want to allow pop-ups for specific websites, click on “Add” under the “Allow” section.
- Enter the URL of the website you want to allow pop-ups from and click “Add” to save the changes.
- To remove a website from the allow list, click on the three vertical dots next to it and select “Remove.”
By managing pop-up settings in Chrome, you can strike a balance between convenience and security while browsing. It is important to exercise caution when enabling pop-ups and only allow them from trusted websites to mitigate potential security risks.
If you encounter any issues with pop-ups after adjusting the settings, ensure that no other browser extensions or security software are interfering with pop-up functionality. Additionally, installing updates for Google Chrome regularly will ensure that you have the latest security patches and enhancements.
With Chrome’s flexible pop-up management options, you have the power to decide which websites can display pop-ups, enabling you to tailor your browsing experience according to your preferences on your Mac.
How to Manage Pop-up Settings on Opera
Opera provides users with a range of options to manage pop-up settings and customize their browsing experience. Whether you want to allow, block, or selectively enable pop-ups, Opera offers flexible controls to meet your needs. Here’s how you can manage pop-up settings on Opera:
- Launch the Opera browser on your Mac.
- In the top menu, click on “Opera” and select “Preferences” or “Settings” (depending on your version of Opera) from the drop-down menu.
- A new tab or window will open with the settings menu.
- In the left sidebar, click on “Websites.”
- Scroll down until you see the “Pop-ups” section.
- To block all pop-ups, ensure the “Do not allow any site to show pop-ups (recommended)” option is selected.
- If you want to allow pop-ups for specific websites, click on “Manage exceptions.”
- In the “Exceptions” dialog box, you can enter the URLs of specific websites for which you want to allow pop-ups. Click “Done” to save the changes.
- To remove a website from the exceptions list, select it and click on the “X” (close) button.
By managing the pop-up settings in Opera, you can tailor your browsing experience according to your preferences and needs. Take care to enable pop-ups only for trusted websites to ensure a secure browsing environment.
If you encounter any issues with pop-ups after adjusting the settings, ensure that no other extensions or security software are interfering with pop-up functionality. Additionally, keeping Opera updated to the latest version will ensure that you have access to the latest performance improvements and security enhancements.
With Opera’s versatile pop-up management options, you have the freedom to control which websites can display pop-ups, enabling you to personalize your browsing experience on your Mac.
Best Practices for Allowing Pop-ups Safely on a Mac
While allowing pop-ups on your Mac can provide access to certain website functionality, it’s important to do so safely to protect against potential security risks. Here are some best practices to follow when allowing pop-ups on your Mac:
- Allow pop-ups only from trusted sources: Be cautious when enabling pop-ups and ensure that you only allow them from reputable websites. Avoid clicking on pop-ups from unfamiliar or suspicious sources, as they may contain malicious content.
- Keep your browser up-to-date: Regularly update your web browser, such as Safari, Firefox, Chrome, or Opera, to the latest version. Updates often include security patches that protect against newly discovered vulnerabilities.
- Enable pop-up blockers by default: Keep the pop-up blocker enabled and disable it only for specific websites that you trust and require pop-ups for essential functionality.
- Use antivirus software: Install and regularly update reliable antivirus software on your Mac. This software can provide an additional layer of protection against malware, including any potential threats that may be delivered through pop-ups.
- Be cautious when sharing personal information: Avoid entering personal or sensitive information into pop-up windows. Legitimate websites typically do not ask for sensitive information through pop-ups. Always verify the legitimacy and security of the website before providing any personal details.
- Regularly clear cache and cookies: Clearing your browser’s cache and cookies helps remove stored data that may contribute to unwanted pop-ups. This can improve your browsing experience and reduce the chance of encountering intrusive pop-ups.
- Educate yourself about common pop-up scams: Stay informed about common pop-up scams, such as fake virus alerts or misleading offers. Knowing how these scams work can help you recognize and avoid them.
- Use reputable ad-blockers: Consider using reputable ad-blocker extensions or plugins to enhance your browsing experience and block unwanted pop-ups. However, make sure to whitelist trusted websites that you want to support.
- Regularly scan your system for malware: Perform regular scans of your Mac using trusted antivirus software to detect and remove any potential malware that may have been downloaded through pop-ups or other sources.
By following these best practices, you can allow pop-ups safely and minimize the chances of encountering malicious or intrusive content. Remember to exercise caution and always prioritize your online security when dealing with pop-ups on your Mac.