
Method 1: Using System Preferences
One of the easiest and most straightforward ways to add startup items to your Mac is by using the System Preferences feature. Here’s how you can accomplish this:
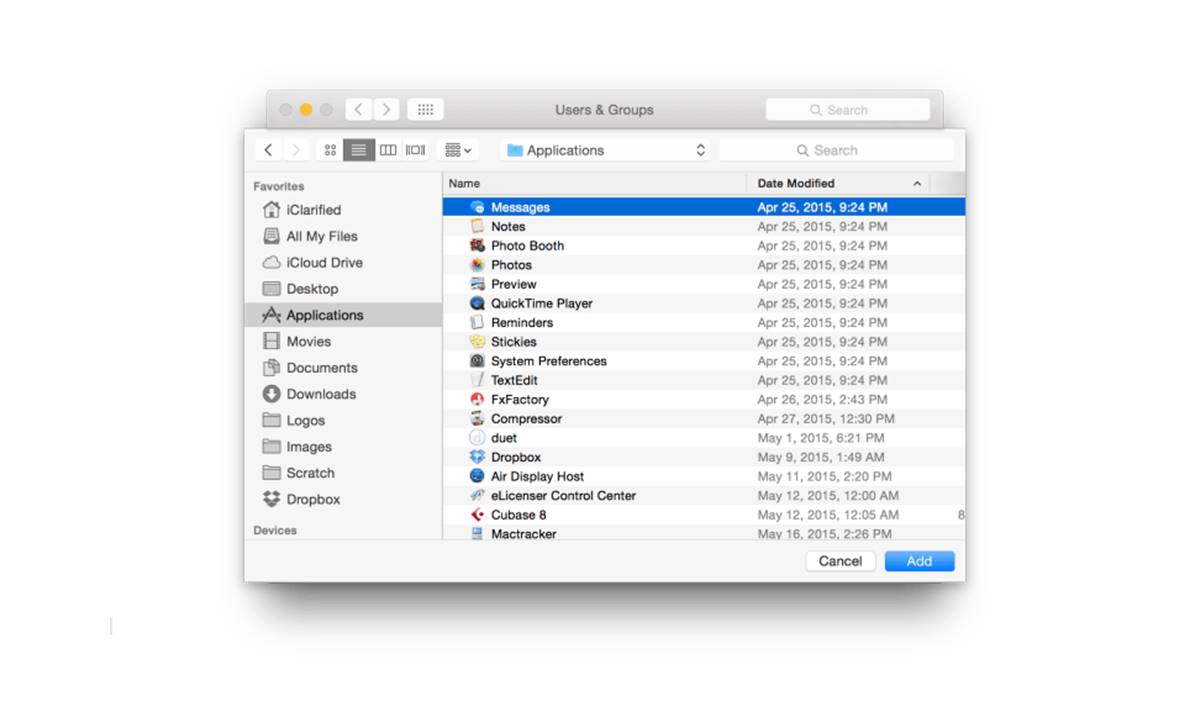
- Step 1: Go to the Apple menu located at the top-left corner of your screen and select “System Preferences”.
- Step 2: In the System Preferences window, click on “Users & Groups”.
- Step 3: Select your username from the list on the left-hand side.
- Step 4: Switch to the “Login Items” tab, which will display a list of applications that open automatically when you log in.
- Step 5: To add an application, click on the “+” button located below the list.
- Step 6: Navigate to the application you wish to add and click “Add”.
- Step 7: If you want to remove an application from the list, simply select it and click on the “-” button.
- Step 8: You can also rearrange the order by dragging and dropping the applications.
By following these steps, you can easily add or remove startup items through the System Preferences on your Mac. It’s a user-friendly method, allowing you to maintain control over the applications that load automatically when you log in to your computer.
However, please note that this method requires you to be logged in to your account to access the System Preferences feature. If you want to add startup items globally, i.e., for all users on the Mac, you may need to use an alternative method.
Method 2: Using the Application
Another way to add startup items to your Mac is by utilizing the application itself. Many applications offer the option to automatically launch when you start up your computer. Here’s how you can do it:
- Step 1: Launch the application that you want to add as a startup item.
- Step 2: Look for the application’s preferences or settings menu, usually located in the menu bar at the top of the screen or under the application’s name.
- Step 3: In the preferences or settings menu, search for an option related to startup or auto-launch.
- Step 4: Enable the option to automatically launch the application at startup.
- Step 5: Save the changes, and the next time you restart your Mac, the application will automatically open.
Using the application’s built-in startup feature allows you to have more control over which applications start when you boot up your Mac. However, keep in mind that not all applications offer this functionality, so you may need to explore the specific settings menu of the application you want to add as a startup item.
It’s essential to be mindful of the number of applications you choose to launch at startup, as having too many can impact your Mac’s performance. It’s advisable to only add the necessary applications to avoid unnecessary resource consumption.
Remember that you can always remove applications from the startup list by revisiting the application’s preferences or settings menu and disabling the auto-launch option.
By utilizing the application’s startup settings, you can ensure that your most frequently used applications are ready and waiting for you when you start up your Mac, enhancing your productivity and efficiency.
Method 3: Using LaunchAgents Directory
For more advanced users, an alternative method to add startup items on your Mac is by using the LaunchAgents directory. LaunchAgents is a folder that contains scripts or plists that specify certain tasks to launch during startup. Here’s how you can utilize this method:
- Step 1: Open Finder on your Mac.
- Step 2: From the menu bar at the top of the screen, select “Go”.
- Step 3: In the drop-down menu, press and hold the “Option” key to reveal the “Library” option. Click on it.
- Step 4: Once you’re in the Library folder, navigate to “LaunchAgents”.
- Step 5: In the LaunchAgents folder, look for a plist file that represents the item you want to add as a startup item.
- Step 6: If you have a plist file, you can simply copy and paste it into the LaunchAgents folder. If you don’t have a plist file, you can create one using a text editor like TextEdit.
- Step 7: Open the newly copied or created plist file with a text editor and modify it as needed to specify the startup task.
- Step 8: Save the changes and restart your Mac for the new startup item to take effect.
Keep in mind that modifying the LaunchAgents folder requires an understanding of plist files and how to configure them correctly. It’s recommended for advanced users or individuals who are comfortable with editing system files.
Using the LaunchAgents directory provides you with more control over the startup process and allows you to add custom scripts or tasks to run during startup. However, exercise caution when modifying system files to avoid unintended consequences or system errors.
Remember that you can remove startup items from the LaunchAgents folder by deleting the corresponding plist file. Also, it’s essential to periodically review and clean up the LaunchAgents folder to ensure optimal performance and prevent unnecessary clutter.
By utilizing the LaunchAgents directory, you can customize your Mac’s startup process and have specific tasks or scripts automatically launch when you boot up your computer, tailoring it to your specific needs and preferences.
Method 4: Using Login Items
One of the most straightforward methods to add startup items on your Mac is by using the Login Items feature. Login Items allow you to specify applications, documents, or custom items that will automatically open when you log in to your user account. Here’s how you can utilize this method:
- Step 1: Go to Apple menu and select “System Preferences”.
- Step 2: In the System Preferences window, click on “Users & Groups”.
- Step 3: Select your username from the list on the left-hand side.
- Step 4: Switch to the “Login Items” tab, which will display a list of items that open automatically when you log in.
- Step 5: To add an item, click on the “+” button located below the list.
- Step 6: Navigate to the item you wish to add, such as an application or document, and click “Add”.
- Step 7: If you want to remove an item from the list, select it and click on the “-” button.
- Step 8: You can also rearrange the order of the items by dragging and dropping them.
Using the Login Items feature provides a simple and effective way to customize your Mac’s startup process and ensure that essential applications or files are readily available when you log in to your user account.
It’s important to note that the Login Items feature is specific to each user account. Adding an item to your Login Items will only affect your account and won’t impact other user accounts on the Mac.
Additionally, be mindful of the number of items you add to the Login Items list, as having too many can prolong the startup process. It’s advisable to only include the most frequently used and essential items to maintain optimal performance.
By utilizing the Login Items feature, you can streamline your workflow and have your preferred applications or documents automatically open when you log in to your Mac, saving you time and effort in accessing them manually.
Method 5: Using Terminal
For users who are comfortable with command-line interfaces, adding startup items on your Mac can be accomplished using the Terminal application. The Terminal allows you to execute commands to interact with your Mac’s operating system. Here’s how you can use Terminal to add startup items:
- Step 1: Launch Terminal on your Mac. You can find it in the Utilities folder within the Applications folder.
- Step 2: In the Terminal window, type the following command:
sudo nano /etc/rc.local - Step 3: Press Enter and enter your administrator password when prompted.
- Step 4: This command will open the rc.local file in the nano text editor. Here, you can add the commands or scripts that you want to run during startup.
- Step 5: Use the nano text editor to add the desired commands or scripts. Ensure that each command is on a separate line.
- Step 6: Press Ctrl + O to save the changes and then press Ctrl + X to exit the nano text editor.
It’s important to note that modifying system files using Terminal requires caution and a clear understanding of the commands you are executing. Any mistakes or incorrect commands can have adverse effects on your Mac’s performance or functionality. Hence, it’s recommended for advanced users who are familiar with the command line interface.
Using Terminal provides you with flexibility and allows you to add custom commands or scripts to the startup process. However, exercise caution when modifying system files to avoid unintended consequences or system errors.
Remember, to remove items added with Terminal, simply open the rc.local file again using the same command, remove the corresponding commands or scripts, and save the changes.
By utilizing Terminal, you have the ability to customize and automate your Mac’s startup process according to your specific requirements, providing a powerful tool for advanced users seeking more control over their system.
Method 6: Using Third-Party Applications
An alternative approach to adding startup items on your Mac is by utilizing third-party applications specifically designed for managing startup items. These applications offer a user-friendly interface and additional features to help you customize and control the items that launch during startup. Here’s how you can use third-party applications:
- Step 1: Research and choose a reliable third-party application that suits your needs. Some popular options include “Startupizer”, “CleanMyMac X”, and “AppCleaner”.
- Step 2: Download and install the chosen application from a trusted source.
- Step 3: Launch the application and navigate to its startup management feature or settings.
- Step 4: Follow the instructions provided by the application to add or remove startup items.
- Step 5: Customize other settings or preferences according to your preferences.
- Step 6: Save the changes and restart your Mac for the new startup items to take effect.
Using third-party applications can simplify the process of managing startup items by providing a visually appealing and intuitive interface. These applications often offer additional features such as the ability to delay certain startup items or specify certain conditions for when items should launch.
However, it’s crucial to select reputable third-party applications from trusted sources to ensure the security and stability of your Mac. Always read reviews and research the application before downloading and installing it.
Keep in mind that using third-party applications may come at a cost, as some applications may have a paid version or offer in-app purchases for advanced features. Evaluate the features offered by the application and determine if it aligns with your needs before making a purchase or commitment.
By utilizing third-party applications, you can streamline the management of startup items on your Mac and have greater control over the apps that launch during startup. These applications provide a user-friendly interface and additional features to enhance your startup customization experience.
Method 7: Troubleshooting Startup Items
Sometimes, startup items can cause issues with your Mac’s performance or prevent it from starting up properly. If you encounter any problems with your startup items, you can follow these troubleshooting steps to resolve the issue:
- Step 1: Restart your Mac in Safe Mode by holding down the Shift key while it boots up. This will disable the automatic launch of startup items.
- Step 2: Once your Mac has booted up in Safe Mode, go to the Apple menu and select “System Preferences”, then “Users & Groups”.
- Step 3: Select your username from the list on the left-hand side and switch to the “Login Items” tab.
- Step 4: Remove all the items from the list by selecting them and clicking on the “-” button.
- Step 5: Restart your Mac normally and check if the issue persists.
- Step 6: If the problem is resolved, you can add the startup items back one by one to determine which one is causing the issue.
- Step 7: To add startup items back, follow the methods outlined in the previous sections or use third-party applications.
- Step 8: After adding each startup item, restart your Mac and check if the problem reoccurs. If it does, remove the problematic item.
Troubleshooting startup items can help resolve issues such as slow startup, freezing, or crashing. By isolating and identifying the problematic startup item, you can ensure a smoother and more stable startup process.
In some cases, you may encounter startup items that cannot be removed through the methods mentioned above. In such situations, it’s advisable to seek support from the application’s developer or consult online forums for assistance.
Remember to regularly review and update your startup items to maintain optimal performance. Disable or remove any unnecessary startup items to reduce the load on your Mac and improve its overall speed and efficiency.
By troubleshooting startup items, you can resolve any issues and ensure a seamless and trouble-free startup experience on your Mac.