
Uber Multiple Stops: How to Add Multiple Stops on Your Ride
Uber, the popular ride-sharing service, has made it even more convenient for riders to make multiple stops during their journey. Whether you need to pick up a friend, drop off a package, or run a quick errand, adding multiple stops on your Uber ride is now a breeze. In this article, we’ll show you step-by-step how to add multiple stops on the Uber app, so you can make the most of your trip.
Adding multiple stops on Uber is a simple process that can be done right from your smartphone. By following these easy steps, you’ll be able to customize your ride and save time without the hassle of requesting multiple trips.
To add multiple stops on the Uber app, start by opening the app and inputting your destination as you normally would. Once you’ve entered your first stop, tap on the ‘+’ sign located beneath the destination field. This will allow you to add additional stops along the way. You can add as many stops as you need, ensuring that your Uber driver knows exactly where you need to go.
After adding your desired stops, you can rearrange the order by pressing and dragging the stops up or down. This feature is especially useful if you have a preferred route or want to optimize your trip to minimize travel time.
Once you’re satisfied with the stops and their order, confirm your ride request. Remember to communicate with your driver about the stops so they are aware of the additional destinations and any specific instructions you may have. Clear communication will help ensure a smooth and efficient journey for everyone involved.
If you need to add more stops during your trip, you can easily do so using the Uber app. Just follow these steps:
- Open the Uber app and tap on the currently active ride at the bottom of the screen.
- Select “Add a Stop” and input the desired destination.
- Confirm the additional stop by tapping “Done”.
The Uber app will update your route in real-time, allowing your driver to navigate to the new stop seamlessly. This feature is perfect for those unexpected errands or last-minute changes to your itinerary.
Managing a route with multiple stops can be made even easier with a few simple tips:
- Communicate clearly with your driver about the stops and any specific instructions.
- Plan your stops in advance to ensure a smooth and efficient trip.
- Consider adding extra time for each stop to account for potential delays.
- Be respectful of your driver’s time and try to keep your stops brief.
Choosing Multiple Stops on Uber
When it comes to choosing multiple stops on Uber, riders have the flexibility to customize their journey to fit their needs. Whether you’re running errands, picking up friends, or dropping off items, Uber allows you to add multiple destinations to your trip. This feature is not only convenient but also helps save time and make your ride more efficient.
Adding multiple stops on Uber is a great option for riders who want to make quick detours without having to request multiple rides. By planning your route in advance, you can avoid the hassle of making multiple separate trips and enjoy the convenience of getting to all your destinations in one go.
When choosing multiple stops on Uber, it’s important to consider the order of your destinations. Think about the most logical and efficient order for your stops to minimize travel time and maximize efficiency. By planning your stops strategically, you can ensure a smooth and seamless ride experience.
Additionally, when selecting multiple stops on Uber, it’s crucial to communicate with your driver. Let your driver know about the additional destinations and any specific instructions you may have. Clear communication will help them navigate the route and ensure a smooth and stress-free journey for both you and the driver.
Another aspect to consider when choosing multiple stops on Uber is timing. It’s important to allow enough time for each stop to avoid feeling rushed and ensure that you complete your tasks or pickups without any stress. By factoring in additional time for each stop, you can maintain a relaxed and comfortable pace throughout your trip.
Choosing multiple stops on Uber also provides a cost-effective solution. Instead of requesting multiple rides for each stop, adding multiple destinations to your trip allows you to save on the cost of additional rides. This is especially beneficial if you have multiple stops to make in a relatively short distance.
Overall, choosing multiple stops on Uber provides riders with the flexibility, convenience, and cost-effectiveness they need for their day-to-day activities. By using this feature wisely and planning your stops in advance, you can make the most of your Uber ride and streamline your tasks in a hassle-free manner.
How to Add Multiple Stops on the Uber App
The Uber app makes it incredibly easy to add multiple stops to your ride, allowing you to accomplish multiple tasks in a single trip. Whether you need to make a quick stop at the grocery store, pick up a friend, or drop off a package, here’s a step-by-step guide on how to add multiple stops on the Uber app.
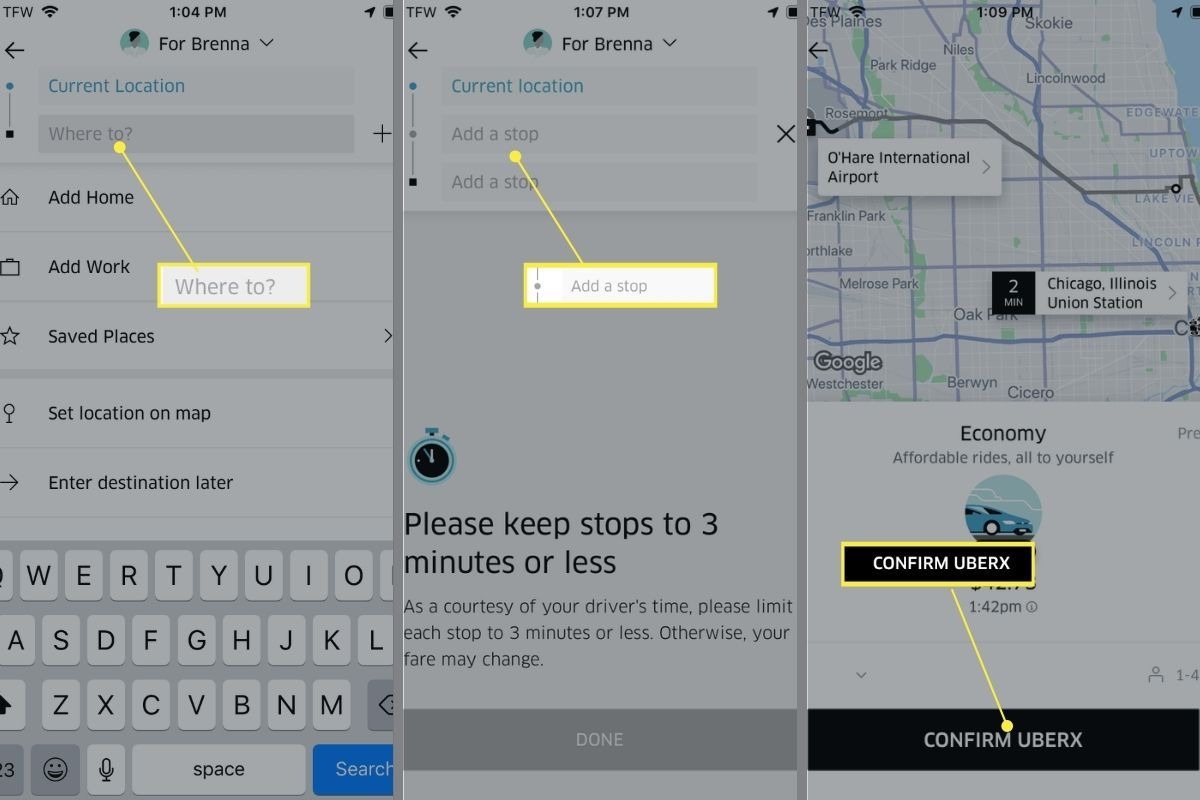
Step 1: Open the Uber app on your smartphone and enter your destination in the “Where to?” field, just like you would for a regular Uber ride.
Step 2: After entering your first destination, tap on the ‘+’ sign located below the destination field. This will prompt a new text box to appear where you can input additional stops.
Step 3: Enter the address or name of your second stop in the new text box. You can add as many stops as you need by tapping the ‘+’ sign again and entering the relevant information.
Step 4: Once you’ve added all the desired stops, you can rearrange their order by pressing and holding on the three lines icon next to each stop. Drag and drop the stops to arrange them in the order you prefer.
Step 5: Confirm your ride request by tapping on the “Confirm” button. This will send your request with the multiple stops to available drivers in your area.
Step 6: When your Uber driver arrives, communicate with them about the stops you’ve added. This can help ensure they are aware of each destination and can plan their route accordingly.
Step 7: During the trip, the app will display the current stop on the driver’s view, allowing them to navigate to each destination without any confusion.
By following these simple steps, you can easily add multiple stops on the Uber app and optimize your ride to fit your specific needs. Whether you’re running errands or making multiple pickups, this feature simplifies your travel plans and saves you time and effort along the way.
Note that some Uber rides may have a limit on the number of stops you can add, so it’s always a good idea to check the app or contact Uber support for any questions or clarifications.
Step-by-Step Guide to Adding Multiple Stops
Adding multiple stops to your Uber ride is a convenient way to accomplish various tasks in a single trip. Whether you need to make a few quick stops or have multiple pickups along the way, here’s a step-by-step guide on how to add multiple stops to your Uber ride.
Step 1: Open the Uber app on your smartphone and enter your destination in the “Where to?” field, just as you would for a regular Uber ride.
Step 2: After entering your first destination, tap on the ‘+’ sign located below the destination field. This will bring up a new text box where you can input additional stops.
Step 3: Enter the address or name of your second stop in the new text box. If you have more stops to add, tap the ‘+’ sign again and enter the necessary information.
Step 4: Once you’ve added all the stops, you can rearrange their order by pressing and holding on the three lines icon next to each stop. Drag and drop the stops to arrange them in the desired sequence.
Step 5: Confirm your ride request by tapping on the “Confirm” button. This will send your request with the multiple stops to available drivers in your area.
Step 6: When your Uber driver arrives, communicate with them about the stops you’ve added. It’s helpful to provide clear instructions and any specific details about each destination.
Step 7: During the trip, the app will display the current stop on the driver’s screen, making it easy for them to navigate to each destination without confusion.
Step 8: If you need to add another stop during your trip, open the Uber app and tap on the active ride at the bottom of the screen. Select “Add a Stop” and input the additional destination. Confirm the stop, and the app will update the route in real-time.
By following these step-by-step instructions, you can seamlessly add multiple stops to your Uber ride. This feature allows you to be more efficient with your time and accomplish everything you need without the hassle of requesting multiple rides. Just remember to communicate with your driver and plan your stops strategically to ensure a smooth and convenient experience.
Adding Additional Stops During Your Trip
During an Uber trip, there may be instances where you need to add additional stops along the way. Whether you forgot to mention a stop beforehand or have a last-minute change of plans, Uber makes it easy to add and update stops during your journey. Here’s what you need to know about adding additional stops during your Uber trip.
If you find that you need to make an additional stop after your ride has already started, don’t worry – you can easily add it using the Uber app. Here’s how:
Step 1: Open the Uber app on your smartphone. You will see an active ride at the bottom of the screen.
Step 2: Tap on the active ride to access the ride details and options.
Step 3: Look for the “Add a Stop” option and tap on it.
Step 4: Enter the address or name of the additional stop in the provided field.
Step 5: Once you’ve entered the stop, confirm it by tapping “Done”.
Once you’ve added the additional stop, the Uber app will update the route in real-time, and your driver will be notified of the new destination. This allows your driver to navigate to the additional stop seamlessly, ensuring a smooth and convenient experience for both you and the driver.
It’s important to note that adding additional stops during your trip may affect the overall fare and duration of your ride. The app will provide you with an updated estimate to reflect the changes in distance and time. Be sure to review the updated fare and duration before confirming the additional stop, so you are aware of any adjustments to the ride cost.
When adding an additional stop, it’s recommended to communicate with your driver about the change. Let them know about the new destination and any specific instructions you may have to ensure a seamless transition. Effective communication plays a crucial role in ensuring a smooth and hassle-free experience for both you and your driver.
By utilizing the option to add additional stops during your Uber trip, you have the flexibility to make unexpected detours or accommodate changes in your itinerary. It allows you to make the most of your ride and ensures that you can conveniently reach all your desired destinations in a single trip.
Managing Your Route with Multiple Stops
When you have multiple stops on your Uber ride, managing your route efficiently becomes crucial to ensure a seamless and convenient experience. By following a few key tips, you can effectively manage your route with multiple stops and optimize your trip for maximum efficiency. Here’s how:
1. Plan your stops in advance: Before starting your Uber ride, take a few moments to plan the order of your stops. Consider the most logical and efficient sequence to minimize travel time and avoid unnecessary backtracking. By planning your stops in advance, you can make your trip more time-efficient.
2. Communicate with your driver: When you have multiple stops, clear communication with your Uber driver is essential. Inform them about each stop, including the order and any specific instructions or details they need to know. This will help your driver navigate the route smoothly and reduce any confusion along the way.
3. Consider timing for each stop: Allocate enough time for each stop to ensure you have ample time to complete your tasks or pickups. Account for factors like potential delays, traffic, or waiting time at each stop. Being realistic about timing will help you stay on schedule and make the most of your trip.
4. Be efficient during stops: When making your stops, try to keep the duration as brief as possible. Respect your driver’s time and strive to complete your tasks efficiently. If you anticipate spending more time at one particular stop, communicate this with your driver beforehand to manage expectations and avoid any inconvenience.
5. Optimize your route: If you have a preferred route or want to avoid certain areas or road conditions, communicate this with your driver. They can take your preferences into account and adjust the route accordingly, ensuring a more comfortable and convenient travel experience for you.
6. Be mindful of the fare: Adding multiple stops may impact the overall fare of your Uber ride. The app calculates the fare based on distance, time, and any additional stops. Be aware of the updated fare estimate when adding or changing stops to ensure you are informed about any adjustments in the cost.
By effectively managing your route with multiple stops, you can ensure a smooth and efficient Uber ride experience. Careful planning, clear communication, and mindful time management will help you make the most of your trip and achieve your objectives without any unnecessary delays or inconvenience.
Tips for Using Multiple Stops on Uber
Using multiple stops on Uber can be a convenient and efficient way to accomplish various tasks during your ride. To make the most of this feature, here are some essential tips to keep in mind:
1. Plan your stops in advance: Before requesting your Uber ride, plan out the order and locations of your stops. This will help you optimize the route and minimize travel time.
2. Communicate with your driver: Inform your driver about the multiple stops you intend to make. Clear communication ensures they are aware of your desired destinations and can plan the journey accordingly.
3. Be considerate of time: Keep in mind that adding multiple stops may increase the duration of your ride. Factor in extra time for each stop, considering potential delays, traffic, and the time needed to complete your tasks or pickups.
4. Keep stops brief: Try to keep each stop as short as possible. Respect your driver’s time and try to complete your tasks efficiently to avoid unnecessary delays.
5. Optimize your route: Communicate any preferences you have for the route to your driver. If you have a preferred way to reach your stops or want to avoid specific road conditions, let your driver know in advance.
6. Be mindful of the fare: Adding multiple stops may affect the overall cost of your Uber ride. Take note of the updated fare estimate and be aware of any adjustments made for additional stops. This will help you plan and budget accordingly.
7. Plan for contingencies: Consider potential changes or additions to your stops during the ride. If new stops arise, use the app to add them in real-time, keeping your driver informed along the way.
8. Express gratitude: Show appreciation to your driver for accommodating your multiple stops. A simple thank you can go a long way in fostering a positive and mutually respectful ride experience.
By following these tips, you can optimize your experience when using multiple stops on Uber. Efficient planning, clear communication, and consideration for both your time and the driver’s time will ensure a smooth and convenient ride for everyone involved.
Frequently Asked Questions (FAQs)
1. Can I add multiple stops to my Uber ride after I’ve already requested it?
Yes, you can add more stops during your Uber ride. Simply open the Uber app, tap on the active ride at the bottom of the screen, select “Add a Stop,” and input the additional destination.
2. Is there a limit to the number of stops I can add on Uber?
While there isn’t a specific limit mentioned by Uber, it’s always a good idea to check the app or contact Uber support for any restrictions or guidelines regarding the number of stops you can add to your ride.
3. Does adding multiple stops on Uber affect the fare?
Yes, adding additional stops may impact the overall fare of your Uber ride. The app calculates the fare based on distance, time, and any additional stops. Be mindful of the updated fare estimate displayed on the app when adding or changing stops.
4. Can I change the order of my stops after I’ve added them on Uber?
Yes, you can easily change the order of your stops. Tap and hold the three lines icon next to each stop and drag it to the desired position to rearrange the order of your stops.
5. How does my driver know about the multiple stops I’ve added on Uber?
When you add multiple stops on Uber, the app displays the current stop on the driver’s screen during the trip. This allows them to navigate to each destination seamlessly, ensuring a smooth and efficient experience.
6. Should I tip my driver for accommodating multiple stops?
Tipping is not required, but it is a gesture of appreciation that is always welcome. If your driver went above and beyond to accommodate your multiple stops, consider showing your gratitude through a tip.
7. Can I add multiple stops if I’m using a specific type of Uber service (e.g., UberX, Uber Black)?
The ability to add multiple stops is a feature available across various Uber services. However, it’s always a good idea to double-check the availability of this feature when selecting a specific type of Uber service.
8. What happens if I add a stop and my driver refuses to go there?
If your driver refuses to go to one of your stops, it’s recommended to contact Uber support through the app or website for assistance. They can help resolve any issues or concerns you may have regarding your ride.
Remember to check the Uber app or contact Uber support for any additional questions or clarifications regarding adding multiple stops to your Uber ride. They will be able to provide you with the most accurate and up-to-date information based on your location and the specific Uber services available to you.