
Why Add Line Numbers in MS Word
Line numbers can be a useful addition to your Microsoft Word documents, especially when working on longer texts or collaborating with others. They provide a convenient reference point for various purposes, such as discussing specific parts of the document, citing sources, or referencing specific line numbers in legal or academic texts. Here are a few reasons why you might consider adding line numbers to your MS Word document:
1. Easy Document Navigation: Line numbers make it quick and straightforward to navigate through your document. Instead of scrolling through multiple pages to locate a specific paragraph or passage, you can simply refer to the line number. This can significantly improve productivity, especially when reviewing, editing, or proofreading large documents.
2. Effective Collaboration: When collaborating with colleagues or clients, line numbers can help streamline the feedback and revision process. Instead of referring to page numbers, which can vary depending on formatting or layout changes, line numbers provide a consistent reference point. This makes it easier for everyone involved to pinpoint and discuss specific sections of the document.
3. Legal and Academic Documents: In legal or academic settings, line numbers are often required for citations and references. It’s common practice to cite specific line numbers when quoting or referring to specific sections of a legal document or academic paper. By adding line numbers to your document, you can ensure accurate and precise citations, making it easier for readers or reviewers to locate the referenced content.
4. Accessibility: Line numbers can also enhance the accessibility of your documents. For individuals with visual impairments or those using assistive technologies, such as screen readers, line numbers can serve as a helpful reference point. They can facilitate easier navigation and enable users to locate specific sections more efficiently.
5. Consistency and Accuracy: When you’re working on a document with multiple sections, and different contributors, line numbers can help ensure consistency and accuracy. They provide a standardized way of referring to specific paragraphs or passages, reducing the chance of misunderstandings or confusion.
These are just a few of the reasons why adding line numbers to your MS Word documents can be beneficial. Whether you’re working on a lengthy novel, a legal document, or an academic paper, line numbers can improve navigation, collaboration, and overall document clarity. Now that we understand the advantages, let’s explore various methods of adding line numbers to your MS Word document.
How to Add Line Numbers in MS Word
Microsoft Word provides several methods to add line numbers to your documents. Whether you want to add line numbers to the entire document or only specific sections, here are three different approaches you can take:
Method 1: Adding Line Numbers from the Page Layout Tab
The easiest way to add line numbers to your MS Word document is by utilizing the Line Numbers feature in the Page Layout tab. To do this:
- Open your document in MS Word.
- Go to the Page Layout tab in the ribbon at the top of the Word window.
- Click on the Line Numbers dropdown menu.
- Select the desired position for your line numbers, such as “Continuous,” “Restart Each Section,” or “Restart Each Page.”
- Choose the specific line numbering options, such as the starting number or increments.
- Click on “Line Numbering Options” for more advanced customization, such as changing the line numbering style, adding a prefix or suffix, or excluding line numbers from specific sections of the document.
- Click “OK” to apply the line numbers to your document.
Your document will now display line numbers according to the options you selected. You can adjust these settings at any time by accessing the Line Numbers dropdown menu again.
Method 2: Using the Page Numbering Feature
If the Line Numbers feature in the Page Layout tab does not meet your specific requirements, you can also add line numbers using the Page Numbering feature. To do this:
- Open your document in MS Word.
- Go to the Insert tab in the ribbon.
- Click on “Page Number” and select “Page Margins.”
- Choose the desired position of your line numbers, such as “Top of Page” or “Bottom of Page.”
- Customize the format and appearance of your line numbers using the “Format Page Numbers…” option.
- Click “OK” to apply the line numbers to your document.
The line numbers will now appear on each page of your document, providing a consistent reference point for navigation.
Method 3: Manually Adding Line Numbers
If you prefer a more hands-on approach, you can manually add line numbers to your MS Word document. Here’s how:
- Open your document in MS Word.
- Place the cursor at the beginning of the line or paragraph where you want to start the line numbers.
- Go to the “Page Layout” tab, click on “Breaks,” and select “Line Numbers.”
- In the “Page Setup” dialog box, choose the desired line numbering options, such as the starting number and increments.
- Click “OK” to apply the manual line numbers to your document.
You can repeat these steps for each line or paragraph where you want to add line numbers manually.
Now that you know how to add line numbers using different methods, you can choose the most suitable approach for your specific document. Keep in mind that you can always adjust the line numbering options to fit your preferences or needs.
Method 1: Adding Line Numbers from the Page Layout Tab
One of the simplest ways to add line numbers to your Microsoft Word document is by using the Line Numbers feature available in the Page Layout tab. This method allows you to add line numbers to the entire document or specific sections with just a few clicks. Here’s how you can do it:
- Open your MS Word document that you want to add line numbers to.
- Click on the “Page Layout” tab located in the ribbon at the top of the Word window.
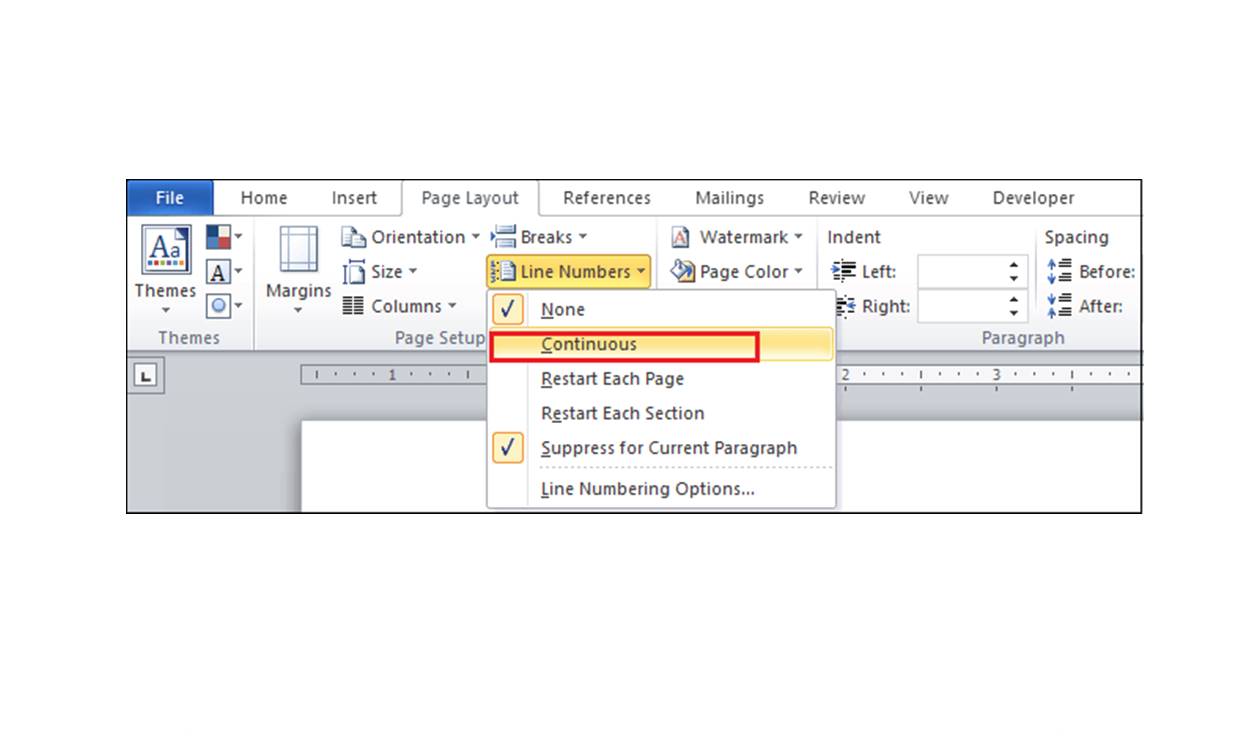
- In the “Page Setup” section, you’ll find the “Line Numbers” button. Click on it.
- A drop-down menu will appear with various line numbering options. Select the option that best suits your needs.
- If you want to add line numbers to the entire document, select the “Continuous” option.
- If you prefer line numbers to restart at each section or page, choose the respective options.
- You can further customize the line numbering options by clicking on “Line Numbering Options” at the bottom of the drop-down menu.
- Within the “Line Numbering” dialog box, you can specify additional settings like how the numbers should appear, the starting number, the increments, and more.
- Once you’ve adjusted the line numbering options, click “OK” to apply the changes.
- Your document will now display line numbers according to the chosen settings.
This method provides a quick and efficient way to add line numbers to your MS Word document. It offers flexibility when it comes to customizing the line numbering options, allowing you to tailor the appearance and behavior of the line numbers to your specific requirements. Whether you’re working on a lengthy document or need to reference specific sections, the Line Numbers feature in the Page Layout tab simplifies the process.
Remember that you can always revisit the Line Numbers menu to modify the line numbering options or remove line numbers from your document if necessary. This method gives you control over the placement and formatting of line numbers, making it a versatile tool for enhancing document readability and navigation.
Method 2: Using the Page Numbering Feature
If the Line Numbers feature in the Page Layout tab doesn’t meet your specific needs, you can also add line numbers to your MS Word document using the Page Numbering feature. This method allows you to place line numbers on each page of your document, providing a consistent reference point for navigation. Here’s how you can do it:
- Open your MS Word document in which you want to add line numbers.
- Navigate to the “Insert” tab located in the ribbon at the top of the Word window.
- In the “Header & Footer” section, click on “Page Number” and select “Page Margins.”
- A drop-down menu will appear with various options for placing page numbers. Choose either “Top of Page” or “Bottom of Page,” depending on your preference.
- Once you’ve selected the desired position, MS Word will automatically add page numbers to each page of your document.
- If you want to customize the format and appearance of the line numbers, click on “Format Page Numbers…” from the drop-down menu.
- A dialog box will appear with different formatting options for page numbers. Here, you can select the number format, starting number, and even include chapter or section numbers if needed.
- After customizing the page number format, click “OK” to apply the changes.
By following these steps, you can easily add line numbers to your MS Word document using the Page Numbering feature. This method is particularly useful when you want line numbers to appear consistently on every page, regardless of section breaks or formatting changes. It provides a standardized reference point, facilitating navigation and making it easier to locate specific sections within the document.
Remember, you can always revisit the Page Numbering options to modify the format, position, or other settings for line numbers. This flexibility allows you to adapt the line numbering feature to your specific document requirements.
The Page Numbering feature in MS Word is a powerful tool that not only adds line numbers but also offers various formatting options. By utilizing this method, you can enhance the readability and accessibility of your document, making it easier for readers to track their progress and refer to specific pages or sections.
Method 3: Manually Adding Line Numbers
If you prefer a more hands-on approach, you can manually add line numbers to your Microsoft Word document. This method allows you to have complete control over where the line numbers appear within your document. Here’s how you can do it:
- Open the MS Word document in which you want to add line numbers.
- Place your cursor at the beginning of the line or paragraph where you want the line numbers to start.
- Switch to the “Page Layout” tab in the ribbon at the top of the Word window.
- In the “Page Setup” section, click on the “Breaks” button.
- From the drop-down menu, select “Line Numbers.”
- A “Page Setup” dialog box will appear with various line numbering options.
- Within the dialog box, you can specify the starting number, increments, and other settings for the line numbers.
- Click “OK” to apply the line numbers to your document.
Repeat these steps for each line or paragraph where you want to add line numbers manually. This method allows you to have full control over the placement of line numbers within your document, making it suitable for situations where you only want certain sections to contain line numbers.
Keep in mind that if you make any changes to the document that affect the layout, such as inserting or deleting text, the manually added line numbers will not adjust automatically. You will need to update the line numbers manually if any changes occur.
By manually adding line numbers, you have the flexibility to customize the appearance and behavior of line numbers within your MS Word document. This method is especially useful when dealing with complex documents with distinct sections or when you want to add line numbers to specific paragraphs or sections for referencing purposes.
Remember, if you decide to remove line numbers from your document or adjust their positions, you can always revisit the “Page Setup” dialog box and modify the line numbering options accordingly.
Overall, the manual addition of line numbers provides you with precise control over the positioning and customization of line numbers within your MS Word document.
Adjusting the Line Numbering Options
Once you have added line numbers to your Microsoft Word document using one of the available methods, you may want to adjust the line numbering options to suit your specific needs. MS Word provides various customization settings that allow you to control the appearance, placement, and behavior of the line numbers. Here’s how you can adjust the line numbering options:
- Select the line numbers that you have added to your document by clicking on one of the line numbers.
- Right-click on the selected line numbers to open a context menu.
- In the context menu, click on “Line Numbering Options.”
- A “Line Numbering” dialog box will appear, presenting you with several customization options.
- Within the dialog box, you can choose the line numbering format, such as continuous line numbers or restarting at each page or section.
- You can also specify the starting number, increments, and the interval at which line numbers should restart.
- Additionally, you have the option to include line numbers for text boxes, footnotes, endnotes, headers, or footers.
- The “Line Numbering” dialog box also provides the flexibility to add a prefix or suffix to the line numbers or exclude line numbers from specific sections.
- Once you have adjusted the line numbering options according to your preferences, click “OK” to apply the changes.
By adjusting the line numbering options, you can customize the line numbers to align with your document’s style or specific requirements. Whether you need to restart line numbers at each section or include line numbers in certain sections only, MS Word offers the flexibility to cater to your needs.
Remember, you can revisit the “Line Numbering” dialog box at any time to modify the line numbering options further. The changes you make will be quickly applied to your document, providing you with the ability to fine-tune the line numbers as needed.
With the option to adjust line numbering options, MS Word allows you to tailor the line numbers precisely to your document’s structure and purpose. This customization further enhances the readability and usability of your document, ensuring that the line numbers serve their intended purpose efficiently.
Removing Line Numbers from the MS Word Document
If you no longer need line numbers in your Microsoft Word document, you can easily remove them using a few simple steps. Here’s how you can remove line numbers from your document:
- Open the MS Word document that contains the line numbers you want to remove.
- Navigate to the “Page Layout” tab located in the ribbon at the top of the Word window.
- In the “Page Setup” section, you’ll find the “Line Numbers” button. Click on it.
- A drop-down menu will appear with various line numbering options.
- To remove line numbers from the entire document, click on the “None” option.
- If you only want to remove line numbers from specific sections, select the “None” option for those sections individually.
- Once you have selected the appropriate option, the line numbers will be removed from your document.
Alternatively, you can also remove line numbers from specific sections of your document by following these steps:
- Select the section from which you want to remove the line numbers.
- Right-click on the selected section to open the context menu.
- In the context menu, hover over “Paragraph” and click on “Line Numbers.”
- In the resulting dialog box, select the “None” option.
- Click “OK” to remove the line numbers from the selected section.
By following these steps, you can easily remove line numbers from your MS Word document. Whether you want to remove line numbers from the entire document or specific sections, MS Word provides the flexibility to modify or remove line numbers as needed.
Removing line numbers can be useful when you have finished reviewing or editing the document, or when you no longer require them for referencing or collaboration purposes. It allows you to revert your document to its original format or remove any visual distractions that the line numbers may have caused.
Remember to save your document after removing the line numbers to apply the changes permanently and ensure that the line numbers do not reappear when you reopen the document in the future.
Common Issues and TroubleshootingWhile adding line numbers to your Microsoft Word document is usually a straightforward process, there can be some common issues that you may encounter. Here are a few common issues and troubleshooting tips to help you resolve them:
1. Line Numbers Not Updating: Sometimes, line numbers may not update automatically when you make changes to the document, such as inserting or deleting text. To resolve this issue, try selecting all the text in your document and updating the line numbers manually by going to the “Page Layout” tab, clicking on the “Line Numbers” button, and selecting the desired line numbering options.
2. Line Numbers Appearing in Wrong Location: If the line numbers appear in an unexpected location, it could be due to formatting or section breaks in your document. Check for section breaks and ensure they are properly placed. You can also adjust the line numbering options by right-clicking on the line numbers and selecting “Line Numbering Options” to modify the positioning and behavior of the line numbers.
3. Line Numbers Disappearing when Printing or Saving as PDF: In some cases, line numbers may not appear when printing or saving the document as a PDF. This issue can occur if the line numbering options are not set to print or if there is any compatibility issue. To resolve this, go to the “Line Numbers” options and ensure that “Include line numbers” or a similar setting is selected. You can also try saving the document in a different file format or adjusting the printing settings to include line numbers.
4. Line Numbers Overlapping with Text: If the line numbers overlap with the text in your document, it can make the content difficult to read. Adjust the line numbering options in the “Line Numbering” dialog box to increase the spacing between the line numbers and the text. Alternatively, consider changing the font size or formatting to create more room for the line numbers.
5. Line Numbers Not Displaying in Sections: If line numbers are not appearing in specific sections of your document, ensure that those sections have not been configured to exclude line numbers. Right-click on the section, select “Paragraph,” and navigate to the “Line Numbers” tab within the dialog box. Check if line numbering has been disabled for that particular section and enable it if needed.
These are just a few common issues that you may encounter when working with line numbers in Microsoft Word. By troubleshooting these problems and adjusting the line numbering options accordingly, you can ensure that line numbers function as intended and enhance the usability of your document.