
What is Roku?
Roku is a popular streaming media player that allows you to access a wide range of online content on your TV. With Roku, you can stream movies, TV shows, music, and even play games, all from the comfort of your living room. It offers a convenient and affordable way to transform your television into a smart TV.
Roku devices are compact and user-friendly, making them a popular choice for cord-cutters who want to enjoy their favorite entertainment without the need for a separate cable or satellite subscription. The streaming player connects to your TV via an HDMI cable and uses your home’s Wi-Fi network to connect to the internet.
One of the key features of Roku is the Roku Channel Store, which houses thousands of channels that you can add to your device. Channels include popular streaming services like Netflix, Hulu, Amazon Prime Video, and YouTube, as well as niche channels that cater to specific interests such as cooking, fitness, and travel.
Roku devices come in various models, catering to different needs and budgets. From the entry-level Roku Express to the high-end Roku Ultra, there is a Roku device for everyone. You can choose a device based on factors like 4K compatibility, voice control functionality, and storage capacity.
Setting up a Roku device is straightforward. All you need to do is connect it to your TV, follow the on-screen prompts to connect to your Wi-Fi network, and create or link your Roku account. Once your account is set up, you can start adding channels and streaming your favorite content.
How to Set Up Your Roku Device
Setting up a Roku device is a simple process that can be completed in just a few steps. Follow the instructions below to get your Roku up and running:
- Connect the Roku player to your TV: Start by connecting the Roku player to your TV using an HDMI cable. Plug one end of the cable into the HDMI port on the back of the Roku player and the other end into an available HDMI input on your TV.
- Power up the Roku player: Connect the power adapter to the Roku player and plug it into a power outlet. Turn on your TV and select the correct HDMI input using your TV remote.
- Set your display type: Once the Roku player is powered on and connected to your TV, you will be prompted to select the display type. Follow the on-screen instructions to choose the correct display type, whether it’s 720p, 1080p, or 4K.
- Connect to your Wi-Fi network: After selecting the display type, the Roku player will scan for available Wi-Fi networks. Choose your home Wi-Fi network from the list and enter your Wi-Fi password if prompted. Wait for the Roku player to connect to your network.
- Create or link your Roku account: Next, you will need to create a Roku account or link an existing one. Follow the on-screen instructions to complete this step. You will need to provide a valid email address and create a secure password for your account.
- Update your Roku software: Once your account is set up, the Roku player will check for any software updates. It’s essential to keep your Roku device up to date to ensure optimal performance and access to the latest features. Allow the device to download and install any available updates.
- Add channels to your Roku: With the setup complete, you can now start adding channels to your Roku device. We will cover this process in more detail in the following sections.
That’s it! Your Roku device is now set up and ready to use. You can enjoy a wide variety of streaming content from popular channels and apps directly on your TV.
How to Access the Roku Channel Store
The Roku Channel Store is where you can find and add a wide range of channels to your Roku device. Whether you’re looking for free channels, subscription-based channels, or even private channels, the Channel Store has you covered. Here’s how you can access it:
- Go to the Roku home screen: Start by turning on your TV and Roku device. Navigate to the Roku home screen by pressing the home button on your Roku remote.
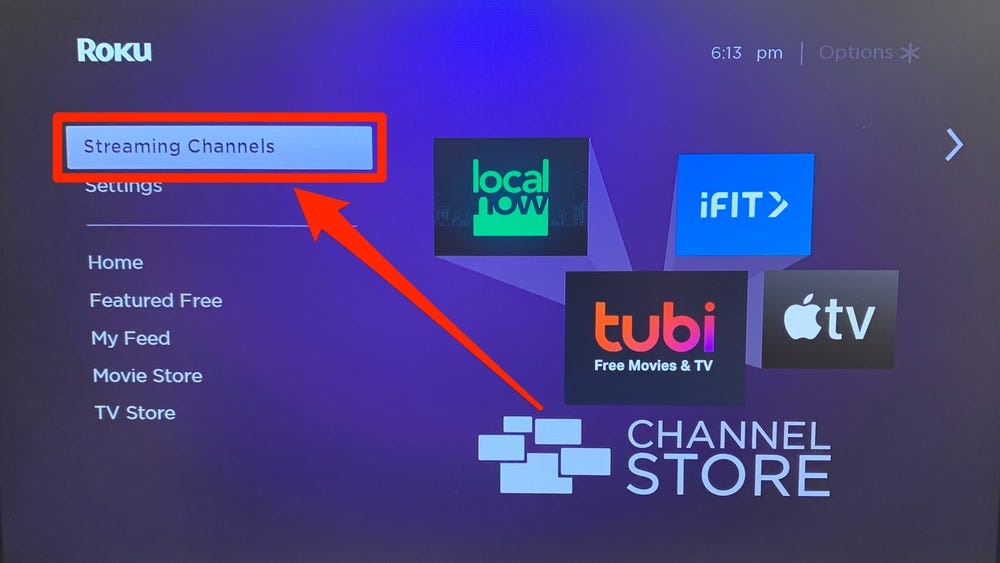
- Select the Channel Store: Once you’re on the home screen, use the arrow keys on your Roku remote to navigate to the left side of the screen. Select “Streaming Channels” and press the OK button.
- Browse or search for channels: In the Channel Store, you have the option to browse through different channel categories or search for specific channels. You can explore categories such as Movies & TV, News & Weather, Sports, Kids & Family, and more. If you know the name of the channel you want to add, you can use the search function to find it quickly.
- Select a channel: Once you find a channel you want to add, highlight it and press the OK button on your Roku remote. This will take you to the channel’s details page.
- Add the channel: On the channel’s details page, you will see an option to “Add Channel” or “Subscribe”. Select this option and confirm your selection when prompted. The channel will then be added to your Roku device.
- Wait for the channel to install: After adding a channel, it will take a moment for it to install on your Roku device. You will see a progress bar on the screen indicating the installation progress.
- Find your newly added channel: Once the channel is installed, you can find it on your Roku home screen. Channels are typically added to the right side of the home screen. If you have many channels, you may need to scroll right to find the newly added channel.
That’s it! You can now access the Roku Channel Store and add a variety of channels to enhance your streaming experience. Explore the vast selection of channels available and enjoy the content on your Roku device.
How to Navigate the Channel Store
Navigating the Roku Channel Store is a breeze, and allows you to explore and discover new channels to add to your Roku device. Here are the steps to effectively navigate the Channel Store:
- Access the Channel Store: Start by turning on your TV and Roku device. From the Roku home screen, select “Streaming Channels” and press the OK button on your Roku remote. This will take you to the Channel Store.
- Browse channels by category: In the Channel Store, you can browse channels based on different categories. Use the arrow keys on your Roku remote to navigate through the categories, such as Movies & TV, News & Weather, Sports, Kids & Family, and many more. Highlight a category and press the OK button to see the channels available in that category.
- Search for specific channels: If you have a specific channel in mind, you can use the search function to find it quickly. On the Channel Store screen, press the Up or Down arrow key to highlight the search bar. Use the on-screen keyboard to enter the name of the channel, and press the OK button to initiate the search. The results will display the matching channels.
- View channel details: When you find a channel you’re interested in, highlight it and press the OK button on your Roku remote. This will take you to the channel’s details page. Here, you can find information about the channel, including a brief description, content ratings, and user reviews.
- Preview channel content: On the channel’s details page, you may have the option to preview the channel’s content before adding it. Some channels offer free trial periods or provide limited access to their content. Look for the “Preview” or “Try it for Free” option to explore what the channel has to offer.
- Add the channel: If you decide to add a channel, select the “Add Channel” or “Subscribe” button on the channel’s details page. Confirm your selection when prompted. The channel will then be added to your Roku device, and you can start enjoying its content.
- Manage your installed channels: To view all the channels you have installed on your Roku device, navigate to the Roku home screen. Scroll left or right until you find the “My Channels” section. Here, you will see a grid of all the channels you have added. Use the arrow keys on your Roku remote to highlight a channel and press the OK button to launch it.
By following these steps, you can easily navigate and explore the Roku Channel Store to find and add the channels that interest you. Take your time to browse through the categories, search for specific channels, and discover new content to enhance your entertainment experience.
How to Search for Channels
Searching for channels on Roku allows you to find specific channels quickly and easily. Whether you’re looking for a popular streaming service or a niche channel, Roku’s search function makes it simple to discover the content you want. Here’s how you can search for channels:
- Go to the Roku home screen: Turn on your TV and Roku device. Use the home button on your Roku remote to navigate to the Roku home screen.
- Access the Roku Channel Store: From the Roku home screen, move the cursor to the left side of the screen using the arrow keys on your Roku remote. Select “Streaming Channels” and press the OK button.
- Navigate to the search function: On the Channel Store screen, use the arrow keys to move up or down and highlight the search bar. Press the OK button to activate the search function.
- Enter the channel name or keyword: Use the on-screen keyboard or your Roku remote’s directional buttons to enter the name of the channel or a relevant keyword. As you type, suggestions may appear if there are popular channels related to your search.
- View search results: After entering your search term, press the OK button to initiate the search. The search results page will display matching channels based on your search query. Browse through the results to find the channel you’re looking for.
- Select the desired channel: Highlight the channel you want to add and press the OK button on your Roku remote. This will take you to the channel’s details page, where you can find more information about the channel.
- Add the channel: On the channel’s details page, select the “Add Channel” or “Subscribe” button. Follow any additional instructions or prompts to complete the channel installation process. Once added, the channel will appear on your Roku home screen.
- Access the newly added channel: Return to the Roku home screen by pressing the home button on your remote. Scroll through the channels until you find the newly added channel. Use the arrow keys to highlight and press the OK button to launch the channel.
By following these steps, you can easily search for and add channels on your Roku device. Whether you know the specific channel name or want to explore content based on keywords, Roku’s search function simplifies the process and helps you find the channels that align with your preferences.
How to Add Free Channels
Roku offers a wide selection of free channels, providing access to a plethora of content without any subscription fees. Adding free channels to your Roku device is a straightforward process. Here’s how you can do it:
- Go to the Roku home screen: Start by turning on your TV and Roku device. Use the home button on your Roku remote to navigate to the Roku home screen.
- Access the Roku Channel Store: From the Roku home screen, move to the left side of the screen using the arrow keys on your Roku remote. Select “Streaming Channels” and press the OK button to open the Roku Channel Store.
- Browse or search for a free channel: In the Channel Store, you can either explore different categories to find free channels or use the search function to search for a specific free channel by name. Highlight the desired free channel and press the OK button to open its details page.
- Add the free channel: On the channel’s details page, select the “Add Channel” or “Subscribe” button. Follow any additional instructions or prompts, if any, to complete the installation process. The channel will be added to your Roku device.
- Access the newly added free channel: Return to the Roku home screen by pressing the home button on your remote. Scroll through the channels until you find the newly added free channel. Use the arrow keys to highlight it and press the OK button to launch the channel.
- Explore the free channel’s content: Once you’ve opened the free channel, you can browse and enjoy its content. Free channels offer a variety of shows, movies, music, and other entertainment options to cater to different interests.
- Organize your channels: If you have multiple channels, including free channels, you can organize them on your Roku home screen. Use the home button on your remote to go back to the Roku home screen. Scroll to the desired location and press the star button on your remote to enter the options menu. From there, you can move, rename, or hide channels to customize your Roku experience.
By following these steps, you can easily add free channels to your Roku device and start enjoying a wide range of content without any additional cost. Take advantage of the extensive selection of free channels available on Roku to enhance your entertainment experience.
How to Add Paid Channels
Roku provides access to various paid channels that offer premium content and services for a fee. Adding paid channels to your Roku device is a straightforward process. Here’s how you can do it:
- Go to the Roku home screen: Turn on your TV and Roku device. Navigate to the Roku home screen using the home button on your Roku remote.
- Access the Roku Channel Store: Move to the left side of the screen on the Roku home screen using the arrow keys on your remote. Select “Streaming Channels” and press the OK button to open the Roku Channel Store.
- Browse or search for a paid channel: In the Channel Store, you can explore different categories to find paid channels or use the search function to search for a specific paid channel by name. Highlight the desired paid channel and press the OK button to open its details page.
- Subscribe or purchase the paid channel: On the channel’s details page, you will find information about the channel and pricing options. Select the “Subscribe”, “Buy”, or similar option to proceed with the purchase process. Follow the on-screen instructions and provide any necessary payment information to complete the transaction.
- Install the paid channel: After purchasing the paid channel, it will automatically be installed on your Roku device. Depending on the channel, installation may start immediately or require additional steps, such as linking an account or entering an activation code.
- Access the newly added paid channel: Return to the Roku home screen using the home button on your remote. Scroll through your channels until you find the newly added paid channel. Use the arrow keys to highlight it and press the OK button to launch the channel.
- Enjoy the premium content: Once you’ve opened the paid channel, you can start exploring and enjoying its premium content. Paid channels often offer exclusive shows, movies, live sports, and other premium features that provide an enhanced entertainment experience.
- Manage your subscriptions: To manage your paid channel subscriptions, go to the Roku home screen and scroll to the “Settings” option. Navigate to “My Subscriptions” in the settings menu to view and manage your active subscriptions. From there, you can cancel or modify your subscriptions as needed.
- Organize your channels: If you have multiple channels, including paid channels, you can organize them on your Roku home screen. Press the star button on your remote while on the Roku home screen to enter the options menu. From there, you can move, rename, or hide channels to customize your Roku experience.
By following these steps, you can easily add paid channels to your Roku device and access premium content and services. Take advantage of the variety of paid channels available on Roku to elevate your entertainment experience and enjoy your favorite shows, movies, and more.
How to Remove Channels
Removing channels from your Roku device is a simple process that allows you to declutter your channel lineup and free up space for new channels. Here’s how you can remove channels from your Roku device:
- Go to the Roku home screen: Turn on your TV and Roku device. Use the home button on your Roku remote to navigate to the Roku home screen.
- Locate the channel you want to remove: Scroll through your channels on the Roku home screen until you find the channel you want to remove. Use the arrow keys on your remote to highlight the channel.
- Press the star button on your remote: While the channel is highlighted, press the star button on your Roku remote. This will open the options menu for that channel.
- Select the “Remove Channel” option: In the options menu, select the “Remove Channel” option and press the OK button on your remote. A confirmation message will appear on the screen.
- Confirm the channel removal: To confirm the removal of the channel, highlight the “Remove” option in the confirmation message and press the OK button. The channel will then be removed from your Roku device.
- Repeat for additional channels: If you want to remove multiple channels, repeat steps 2 to 5 for each channel you wish to remove. This allows you to remove multiple channels in a single session.
- Verify the channel removal: Return to the Roku home screen and confirm that the removed channels are no longer visible. The channel lineup will reflect the changes, and you will no longer have access to the removed channels.
- Reinstall a removed channel: If you decide to reinstall a channel you previously removed, you can do so by accessing the Roku Channel Store, searching for the channel, and selecting the “Add Channel” or “Subscribe” option. This will reinstall the channel on your Roku device.
By following these steps, you can easily remove channels from your Roku device and keep your channel lineup organized. Removing channels that you no longer use or need allows you to have a streamlined experience and access the channels that matter most to you.
How to Organize Your Channels
Organizing your channels on your Roku device allows you to customize your home screen and easily access your favorite channels. Here’s how you can organize your channels:
- Go to the Roku home screen: Turn on your TV and Roku device. Use the home button on your Roku remote to navigate to the Roku home screen.
- Select a channel: Scroll through your channels on the Roku home screen using the arrow keys on your remote. Highlight the channel you want to move or organize.
- Press the star button on your remote: While the channel is highlighted, press the star button (*) on your Roku remote. This will open the options menu for that channel.
- Move the channel: In the options menu, select the “Move Channel” option and press the OK button on your remote. Use the arrow keys to move the channel to the desired location on your home screen.
- Organize channels in folders: To create a folder for organizing channels, highlight the channel you want to move and press the star button on your remote. In the options menu, select the “Move to Folder” option and press the OK button. Follow the on-screen instructions to create a new folder or select an existing folder for the channel.
- Rename a channel or folder: If you want to change the name of a channel or folder, highlight it and press the star button on your remote. In the options menu, select the “Rename” option and press the OK button. Use the on-screen keyboard to enter the new name and confirm the changes.
- Hide channels: If you have channels that you rarely use or want to hide from your home screen, you can do so by highlighting the channel and pressing the star button on your remote. In the options menu, select the “Remove Channel” option and press the OK button. The channel will be hidden from your home screen, but you can still access it through the “My Channels” section.
- Customize your home screen: Arrange your channels and folders on the Roku home screen to your preference. Move channels and folders to create a personalized layout that suits your entertainment needs.
By following these steps, you can easily organize your channels on your Roku device and create a customized home screen. Take advantage of these features to arrange your channels in a way that makes accessing your favorite content quick and convenient.
How to Update Channels
Updating channels on your Roku device ensures that you have the latest features, improvements, and bug fixes for your favorite apps. Here’s how you can update channels on your Roku:
- Go to the Roku home screen: Turn on your TV and Roku device. Use the home button on your Roku remote to navigate to the Roku home screen.
- Access the Roku Channel Store: From the Roku home screen, move to the left side of the screen using the arrow keys on your remote. Select “Streaming Channels” and press the OK button to open the Roku Channel Store.
- Go to “My Channels”: Scroll through the Channel Store until you find the “My Channels” section. This section contains all the channels that you have installed on your Roku device.
- Select the channel to update: Navigate through the “My Channels” section using the arrow keys on your remote. Highlight the channel that you want to update.
- Check for updates: While the channel is highlighted, press the star button (*) on your Roku remote. In the options menu, select “Check for Updates” and press the OK button.
- Start the update: If an update is available for the selected channel, a prompt will appear on the screen. Follow the on-screen instructions to initiate the update process.
- Wait for the update to complete: The Roku device will automatically download and install the latest update for the channel. The update progress will be displayed on the screen, and it may take a few moments to complete, depending on the size of the update and your internet connection speed.
- Launch the updated channel: Once the update is completed, you can launch the updated channel from the “My Channels” section. Navigate to the channel and press the OK button on your remote to open and enjoy the updated content.
- Enable automatic updates: To ensure that your channels are always up to date, you can enable automatic updates on your Roku device. Go to the Roku home screen and navigate to “Settings”. Select “System” and then “System Update”. Choose “Automatic Software Updates” and ensure it is set to “On”. This will enable automatic updates for your Roku channels.
By following these steps, you can easily update channels on your Roku device, ensuring that you have the latest features and improvements for your favorite apps. Keeping your channels up to date enhances your streaming experience and ensures that you can enjoy the best possible performance from your Roku device.
Troubleshooting Common Issues When Adding Channels
While adding channels to your Roku device is generally a smooth process, you may encounter some common issues. Here are some troubleshooting steps to help you resolve these issues:
- Check your internet connection: Ensure that your Roku device is connected to a stable internet connection. If you’re experiencing network issues, try restarting your router or connecting to a different Wi-Fi network.
- Restart your Roku device: Sometimes, a simple restart can resolve many issues. Go to the Roku home screen, select “Settings”, then “System”, and choose “System Restart”. Wait for your Roku device to restart and try adding the channel again.
- Clear your Roku device cache: An overloaded cache can cause issues when adding channels. To clear the cache, go to the Roku home screen, select “Settings”, then “System”, and choose “Advanced System Settings”. Select “Restart Player” or “Clear Cache” and confirm your choice. After the restart, try adding the channel again.
- Check for Roku software updates: Outdated software can sometimes interfere with adding channels. Go to the Roku home screen, select “Settings”, then “System”, and choose “System Update”. Select “Check Now” to see if there are any available updates. If updates are found, allow the system to download and install them before trying to add the channel again.
- Ensure your Roku device is supported: Not all channels are available on every Roku device model. Ensure that the channel you are trying to add is compatible with your specific Roku device. Refer to the Roku website or contact customer support for a list of supported channels for your device.
- Verify your Roku account payment information: If you’re trying to add a paid channel, ensure that your Roku account has valid payment information and sufficient funds. Update your payment information if necessary and try adding the channel again.
- Reset your Roku PIN: If you’re prompted for a Roku PIN during the channel addition process and you can’t recall it, you can reset it through the Roku website. Sign in to your Roku account, go to “PIN preferences”, and follow the instructions to create a new PIN. Use the new PIN when prompted during the channel addition process.
- Contact Roku support: If you’ve tried all the troubleshooting steps and still can’t add the channel, reach out to Roku customer support. They can provide further assistance and guide you through any specific issues you may be encountering.
By following these troubleshooting steps, you can often resolve common issues when adding channels to your Roku device. If the problem persists, don’t hesitate to seek additional support from Roku customer service for a prompt and efficient resolution.
Frequently Asked Questions about Adding Channels to Roku
Here are answers to some common questions regarding adding channels to a Roku device:
- Can I add channels to my Roku device for free?
Yes, Roku offers a wide range of free channels that you can add to your device. These channels offer various types of content, including movies, TV shows, news, sports, and more. Simply browse the Channel Store and select the free channels you want to add. - How do I find new Roku channels to add?
To discover new channels on Roku, you can browse through different categories in the Channel Store or use the search function to search for specific channels by name. Roku also provides recommendations based on your viewing preferences, and you can explore curated collections to find popular and trending channels. - Can I add subscription-based channels on Roku?
Yes, Roku offers a variety of subscription-based channels, such as Netflix, Hulu, and HBO Max, which require a separate subscription to access their content. You can easily add these channels to your Roku device and log in with your subscription credentials to start streaming. - Can I remove channels from my Roku device?
Yes, you can remove channels from your Roku device. To do so, go to the Roku home screen, highlight the channel you want to remove, press the star button on your remote, select “Remove Channel,” and confirm the removal. The channel will then be removed from your Roku device, but you can always add it back in the future if desired. - Can I rearrange the order of my channels on the Roku home screen?
Yes, you can rearrange the order of your channels on the Roku home screen. To do this, go to the Roku home screen, highlight the channel you want to move, press the star button on your remote, select “Move Channel,” and use the arrow keys to place the channel in your desired position on the home screen. - Do I need to update my channels?
It is recommended to keep your channels updated to ensure you have the latest features, bug fixes, and security patches. Roku devices typically check for channel updates automatically, but you can manually check for updates by going to the Roku home screen, selecting the channel, pressing the star button, and choosing “Check for Updates.” - Can I add channels to Roku using the mobile app?
Yes, you can add channels to Roku using the Roku mobile app. Simply open the app, navigate to the Channel Store, browse or search for the desired channel, and follow the prompts to add it to your Roku device. - What should I do if I’m having trouble adding channels to my Roku?
If you encounter difficulties when adding channels to your Roku device, ensure that your internet connection is stable, restart your Roku device, check for system updates, and verify that your Roku account information is up to date. If the problem persists, consult Roku’s customer support for further assistance.
These frequently asked questions address some common concerns about adding channels to a Roku device. If you have a specific question that is not covered here, reach out to Roku’s support team or refer to the Roku website for more information.