
Why would you want to add another Face ID on your iPhone?
Adding another Face ID on your iPhone can bring a multitude of benefits and convenience to your daily life. While the primary reason for using Face ID is to unlock your device securely and effortlessly, there are several scenarios where having multiple Face IDs can be advantageous. Here are some compelling reasons why you might want to consider adding another Face ID on your iPhone:
- Shared Device: If you share your iPhone with a family member, roommate, or colleague, having multiple Face IDs allows each person to have their own unique access to the device.
- Privacy: Adding an additional Face ID can be helpful if you value your privacy and prefer to keep certain apps or information exclusive to yourself. You can use one Face ID for personal use and set up another for accessing work-related apps or sensitive data.
- Varying Lighting Conditions: Sometimes, lighting conditions can affect Face ID performance. By setting up a second Face ID, you can ensure that your device can recognize your face even in low-light situations or when wearing different makeup or accessories.
- Backup Option: It’s always a good idea to have a backup plan. Adding an extra Face ID provides you with an alternative authentication method if one Face ID fails to unlock your device for any reason.
- Facial Changes: Our faces can change over time due to factors such as aging, weight loss or gain, or even hairstyles. By having multiple Face IDs, you can adjust and update them accordingly to ensure reliable facial recognition as your appearance evolves.
- Convenience: Having more than one Face ID can make it quicker and easier to unlock your iPhone from different angles or orientations. This convenience is especially beneficial if you frequently use your device in landscape mode or have it mounted in a car holder.
Considering these reasons, it becomes evident that adding another Face ID on your iPhone opens up a world of possibilities and customization. Whether it’s for sharing your device, maintaining privacy, adapting to various circumstances, or simply enhancing convenience, having multiple Face IDs can significantly improve your iPhone experience.
Step 1: Ensure your iPhone model supports multiple Face IDs
Before attempting to add another Face ID on your iPhone, it’s essential to verify whether your device model supports this feature. Multiple Face ID support was introduced with certain iPhone models, so it’s crucial to ensure compatibility. Follow these steps to determine if your iPhone supports multiple Face IDs:
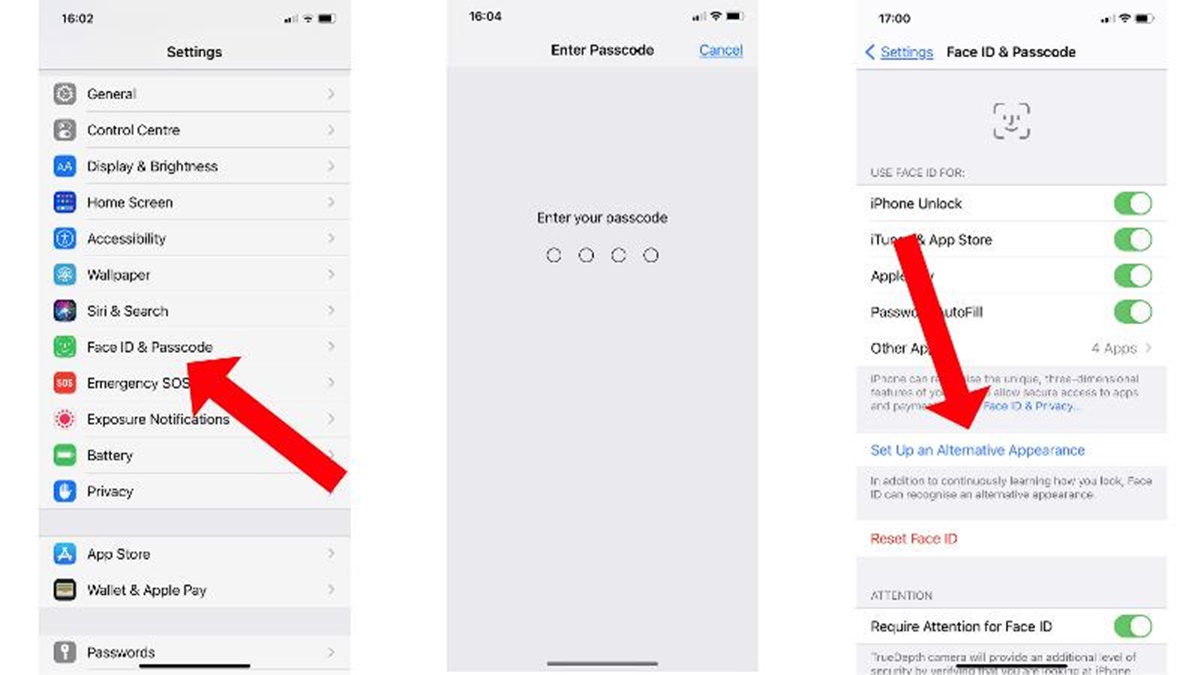
- Check the iPhone model: Open the Settings app on your iPhone and navigate to the “Face ID & Passcode” or “Touch ID & Passcode” section, depending on your device model. If you see the option to “Set Up an Alternate Appearance” or “Add a Face ID,” it means your iPhone model supports multiple Face IDs.
- Consult the Apple website: If you’re unsure which iPhone model you have or are unable to find the options mentioned above, you can visit the Apple website or consult their support documentation. Apple provides detailed information on the supported features and compatibility of each iPhone model.
- Reach out to Apple support: If you’re still uncertain about whether your iPhone supports multiple Face IDs, you can contact Apple support directly. Their knowledgeable representatives will be able to assist you and provide accurate information based on your specific iPhone model.
It’s essential to confirm the compatibility of your iPhone model before proceeding with the steps to add another Face ID. By doing so, you can ensure that you have the necessary features and settings to successfully set up multiple Face IDs on your device.
Step 2: Add a new Face ID on your iPhone
Once you have confirmed that your iPhone model supports multiple Face IDs, you can proceed to add a new Face ID. Follow these simple steps to add a new Face ID on your iPhone:
- Open the Settings app: Locate the Settings app on your iPhone’s home screen and tap on it to open.
- Navigate to the Face ID & Passcode section: Scroll down and select the “Face ID & Passcode” or “Touch ID & Passcode” option, depending on your device model. You may need to enter your passcode to proceed.
- Choose the “Set Up an Alternate Appearance” or “Add a Face ID” option: Look for the option to set up an additional Face ID and tap on it.
- Position your face in the camera frame: Follow the on-screen instructions to position your face within the camera frame. Make sure your face is well-lit and aligned properly for accurate recognition.
- Move your head in a circular motion: Slowly move your head in a circular motion to allow the camera to capture your face from different angles. This helps the iPhone build a comprehensive facial recognition profile.
- Complete the process: Once the iPhone has captured enough data and successfully recognized your face, the setup process will be complete. You can repeat these steps to add additional Face IDs if desired.
Adding a new Face ID on your iPhone is a straightforward process that enhances security and convenience. By following these steps, you can easily set up an additional face for Face ID recognition on your device.
Step 3: Set up the additional Face ID
After adding a new Face ID on your iPhone, the next step is to set it up and customize its settings. Follow these steps to complete the setup process for your additional Face ID:
- Open the Settings app: Launch the Settings app on your iPhone and navigate to the “Face ID & Passcode” or “Touch ID & Passcode” section, depending on your device model.
- Authenticate with your current Face ID: If prompted, enter your current Face ID or device passcode to access the Face ID settings.
- Select the “Set Up an Alternate Appearance” or “Add a Face ID” option: Look for the option that corresponds to adding a new Face ID and tap on it.
- Position your face in the camera frame: Follow the on-screen instructions to position your face within the camera frame. Ensure proper alignment and good lighting for optimal recognition.
- Adjust Face ID settings (optional): Depending on your preferences, you can choose to enable or disable features such as attention detection, which requires eye contact for Face ID to unlock your device.
- Continue with the setup: Once you have adjusted the desired settings, continue with the setup process by following the on-screen instructions.
- Repeat the process if desired: If you wish to add additional Face IDs, you can repeat these steps to set up multiple alternate appearances.
Setting up the additional Face ID on your iPhone allows you to personalize the recognition process and tailor it to your preferences. By completing these steps, you ensure that your new face is properly registered and configured for seamless authentication on your device.
Step 4: Test the newly added Face ID
After setting up the additional Face ID on your iPhone, it is important to test its functionality to ensure it works correctly. By following these steps, you can verify that the newly added Face ID is recognized and unlocks your device as intended:
- Lock your iPhone: Press the sleep/wake button or allow your iPhone to automatically lock to activate the lock screen.
- Position your face in front of the front-facing camera: Hold your iPhone in front of you and align your face with the front-facing camera. Make sure your face is well-illuminated and within the camera frame.
- Await Face ID recognition: The TrueDepth camera system will analyze your face and attempt to identify it based on the registered Face ID biometrics.
- Observe the unlocking process: If the newly added Face ID is recognized successfully, your iPhone will unlock, granting you access to the home screen. If it does not unlock, double-check that your face is correctly positioned and try again.
- Repeat the testing process: To ensure accuracy and reliability, it is advisable to test the newly added Face ID in various lighting conditions and from different angles. This will help verify its effectiveness in different scenarios.
By testing the newly added Face ID, you can determine its functionality and ensure that it properly authenticates your identity. It is important to perform these tests to guarantee a seamless unlocking experience and enhance the security of your device.
Tips for using multiple Face IDs
Once you have successfully added and set up multiple Face IDs on your iPhone, here are some helpful tips to make the most out of this feature:
- Assign each Face ID a distinct name: To easily differentiate between the different Face IDs, consider giving each one a unique and easily recognizable name. This can help you quickly select the appropriate Face ID when needed.
- Regularly update your Face IDs: Facial features can change over time due to factors like haircuts, facial hair, or even plastic surgery. To ensure reliable recognition, periodically update your Face IDs to incorporate any changes in your appearance.
- Choose appropriate attention detection settings: Consider enabling or disabling attention detection based on your preferences. Attention detection requires eye contact for Face ID to unlock your device, adding an extra layer of security but potentially impacting convenience.
- Practice proper Face ID positioning: When using multiple Face IDs, it’s important to position your face in the camera frame accurately. Ensure good lighting conditions and align your face properly to enhance recognition accuracy.
- Test Face ID recognition in different scenarios: To build confidence in the reliability of your Face IDs, experiment with testing them in various lighting conditions, different orientations, and angles. By doing so, you can be confident that your iPhone will unlock consistently.
- Regularly review and manage your Face IDs: Periodically review the Face IDs registered on your device. If any Face IDs are no longer needed or if you want to add or replace them, utilize the settings to manage them efficiently.
- Consider the device orientation: Keep in mind that Face ID works in both portrait and landscape orientations. If you frequently use your iPhone in landscape mode, register your Face IDs while holding the device in that orientation for better recognition.
By following these tips, you can optimize your experience with multiple Face IDs on your iPhone. Remember, the goal is to enhance convenience and security while ensuring seamless authentication in various situations.