
Why Add a Profile on Netflix?
Netflix is a popular streaming platform that offers a wide range of TV shows, movies, documentaries, and original content. One of the features that sets Netflix apart is the ability to create multiple profiles within a single account. Adding a profile on Netflix provides several advantages and enhances your overall streaming experience. Here are a few reasons why you should consider adding a profile:
- Personalization: By creating separate profiles, each user can have their own personalized Netflix experience. This means that individual profiles can have their own recommendations, watch history, and preferences tailored specifically to their tastes. Whether you’re into romantic comedies or action-packed thrillers, creating a profile ensures you get content recommendations that truly resonate with you.
- Privacy: Adding profiles on Netflix allows you to maintain privacy within a shared account. Each profile is password-protected, ensuring that only the intended user can access their personal viewing history and continue watching list. This is especially useful if you share your account with family members or roommates, as it prevents any accidental mix-ups or interference with your own viewing progress.
- Parental Control: Adding individual profiles enables you to set specific parental controls for each user. If you have young children, you can create a separate profile for them and restrict the content they can access based on their age or maturity level. This ensures a safer and age-appropriate viewing experience, giving you peace of mind.
- Multiple Simultaneous Streams: By adding profiles, each user can stream content on their own devices simultaneously without interrupting others. This means that you can enjoy your favorite shows and movies without worrying about someone else in your household utilizing the account. From watching a gripping drama series to binge-watching an entire season of a comedy, everyone can stream their preferred content without any conflicts.
- Discover New Content: Creating individual profiles on Netflix allows each user to explore and discover new content that aligns with their unique interests. The platform’s algorithm takes into account your viewing history and preferences to provide recommendations based on your profile. This ensures that you are exposed to a wider variety of shows and movies, helping you discover hidden gems you may have otherwise missed.
With all these benefits, it’s clear why adding a profile on Netflix is advantageous. Whether you want to personalize your viewing experience, maintain privacy, or create a safe environment for children, Netflix profiles offer a seamless way to make the most out of your streaming subscription.
Step 1: Open Netflix
The first step to adding a profile on Netflix is to open the Netflix website or launch the Netflix app on your preferred device. Netflix is compatible with a wide range of devices, including smartphones, tablets, smart TVs, gaming consoles, and computers. Simply locate and click on the Netflix app icon or navigate to the Netflix website to get started.
If you are using the Netflix app on a mobile device, you can find the app on your home screen or in your app drawer. Tap on the app to open it. If you are using a web browser on your computer, type “www.netflix.com” into the address bar and press Enter to access the Netflix website.
Once the Netflix app or website is open, you will be prompted to sign in to your Netflix account. Enter your email address and password associated with your Netflix account, and then click on the “Sign In” button. If you haven’t created an account yet, you’ll need to sign up for a Netflix account before proceeding.
After successfully signing in to your Netflix account, you will be redirected to the Netflix homepage, where you can browse through the extensive library of TV shows and movies available for streaming. This is where you’ll begin the process of adding a new profile to your account.
It’s important to note that in order to add a profile, you must have an active Netflix subscription. If you haven’t subscribed yet, you’ll need to select a plan and complete the payment process before you can proceed with adding a profile.
Now that you have successfully opened Netflix, it’s time to move on to the next step and access your account settings to add a new profile.
Step 2: Go to your “Account”
After signing in to your Netflix account, the next step is to navigate to your account settings. This is where you can manage various aspects of your Netflix subscription, including adding a new profile. To access your account settings, look for the account icon or your profile icon on the Netflix homepage.
On the Netflix homepage, you may find the account icon located in the upper right corner of the screen. It is usually represented by a small silhouette or an icon with your profile picture or initials. Click on this icon to open a dropdown menu of options.
If you are using the Netflix app on a mobile device, the profile icon is typically located at the bottom navigation bar. Tap on the profile icon to open the menu.
Within the dropdown menu or the screen that appears when you tap on the profile icon, you will see various options related to your Netflix account. Look for an option that says “Account” or something similar. This option will take you to your account settings page.
Click on the “Account” option, and it will redirect you to a new page specifically designed for managing your Netflix account details. On this page, you will find a list of sections that allow you to customize different aspects of your account, such as your plan, payment information, and profile settings.
Now that you have successfully navigated to your Netflix account settings page, you’re ready to move on to the next step, which is specifically focused on managing your profiles.
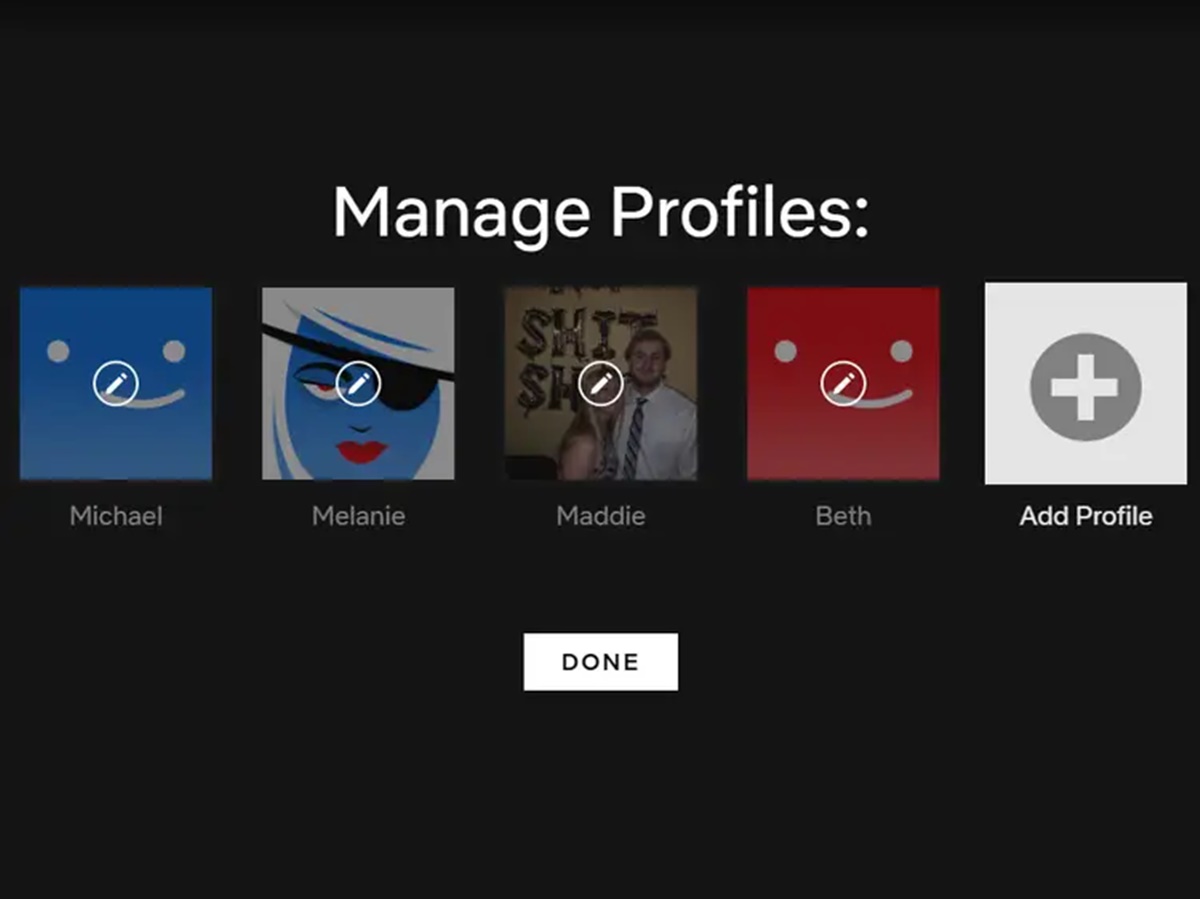
Step 3: Click on “Manage Profiles”
Once you are on the account settings page, the next step in adding a profile on Netflix is to locate and click on the option that says “Manage Profiles.” This option allows you to create, edit, and customize the profiles associated with your Netflix account.
Scroll down the account settings page until you find the section labeled “Profile & Parental Controls” or something similar. Within this section, there should be a link or button that says “Manage Profiles.” Click on this link or button to proceed.
By clicking on “Manage Profiles,” you will be taken to a new page where you can view all the existing profiles on your Netflix account. Each profile is represented by its name and a corresponding profile picture or avatar, if one has been assigned.
If you don’t have any profiles created yet, this page will be empty, indicating that you are about to add a brand new profile. Don’t worry, the process of adding a profile is simple and straightforward.
Take a moment to familiarize yourself with the information presented on this page. You will see the names and avatars of the existing profiles, as well as options to edit or delete them if necessary. This page also provides access to various profile settings, such as language and maturity level restrictions.
Now that you have clicked on “Manage Profiles,” you are now ready to proceed with the actual creation of a new profile. The following steps will guide you through the process of adding a profile on Netflix.
Step 4: Select “Add Profile”
Once you are on the “Manage Profiles” page, the next step to add a profile on Netflix is to select the option that says “Add Profile”. This option allows you to create a new profile and customize it according to your preferences.
On the “Manage Profiles” page, scan through the list of existing profiles to locate the button or link that says “Add Profile”. It is usually located near the bottom or on the right-hand side of the page. Click on this button or link to proceed with adding a new profile.
By selecting “Add Profile”, you will be prompted to enter the necessary details to create a new profile. This includes providing a name for the profile, selecting an avatar or profile picture, and optionally setting the maturity level for the profile.
The name you choose for the profile can be anything you prefer. It could be your own name, a family member’s name, or any other identifier that helps distinguish the profile. Remember that each profile provides a personalized experience, so choosing a name that reflects the primary user or their preferences can be helpful.
When it comes to selecting an avatar or profile picture, Netflix offers a variety of options to choose from. You can pick a pre-set avatar or upload your own image. This visual representation adds a personal touch to the profile, making it easily identifiable among other profiles.
Optionally, you can set the maturity level for the profile. This feature allows you to restrict the content that can be accessed through the profile, making it suitable for specific audiences, such as children or teenagers. By adjusting the maturity level, you can ensure that inappropriate content is filtered out.
After filling in the necessary details, click on the “Continue” button to proceed to the next step. This will take you to a page where you can further customize the profile settings, if desired. The following steps will guide you through the customization options and finalizing the creation of the new profile.
Step 5: Enter the Profile Name
After selecting “Add Profile”, the next step in adding a profile on Netflix is to enter the profile name. The profile name is a unique identifier that helps differentiate it from other profiles on your Netflix account.
On the profile creation page, you will see a text field where you can type in the desired profile name. Take a moment to think about a name that represents the user of the profile or their preferences. It could be their own name, a nickname, or something that reflects their interests.
When choosing a profile name, keep in mind that it should be easy to remember and distinguish from other profiles. This is especially important if you have multiple profiles within your Netflix account. A clear and distinct name ensures that each user can access their personalized recommendations and continue watching list without any confusion.
Also, consider the privacy aspect of the profile name. If you share your Netflix account with others, it’s a good idea to avoid using personal information as the profile name. Instead, opt for something generic or a nickname that doesn’t reveal personal details.
Once you have entered the desired profile name, double-check it for any typos or errors. Ensure that the name accurately represents the user and is spelled correctly. Taking a moment to review the profile name can save you the hassle of making changes later on.
After confirming the profile name, proceed to the next step to customize the profile further by selecting an avatar or profile picture. The avatar adds a visual representation to the profile, making it easily identifiable among other profiles on your Netflix account.
Now that you have entered the profile name, you’re one step closer to completing the profile creation process on Netflix.
Step 6: Choose an Avatar (Optional)
After entering the profile name in the previous step, the next optional step in adding a profile on Netflix is to choose an avatar or profile picture. The avatar serves as a visual representation of the profile and helps differentiate it from other profiles on your Netflix account.
On the profile creation page, you will have the option to select an avatar from a range of pre-set options provided by Netflix. These avatars can range from generic icons to characters from popular TV shows, movies, or animated series.
To choose an avatar, simply browse through the available options and click on the one that best represents the user or aligns with their interests. The selected avatar will then be associated with the profile and displayed whenever the user signs in or selects their profile.
If you prefer a more personalized touch, Netflix also allows you to upload your own profile picture as an avatar. This can be a photo or image that represents the profile user. Keep in mind that the picture should adhere to Netflix’s guidelines and policies, avoiding any explicit or inappropriate content.
Choosing an avatar or profile picture is optional, but it adds a personalized touch to the profile and helps make it easily recognizable and distinguishable from other profiles. Having a unique avatar can make it easier for users to select their specific profile, especially if there are multiple profiles on the Netflix account.
Remember to consider the preferences and interests of the profile user when selecting the avatar. Whether it’s their favorite character, an icon that represents their hobbies, or a simple image they resonate with, the avatar should reflect the user’s personality to enhance their Netflix experience.
Once you have chosen an avatar or profile picture, you can proceed to the next step to set the maturity level for the profile, allowing you to control the type of content accessible through the profile.
Now that you have the option to personalize the profile with an avatar, take a moment to choose the perfect representation for the user.
Step 7: Set the Maturity Level (Optional)
After choosing an avatar, the next optional step in adding a profile on Netflix is to set the maturity level for the profile. This feature allows you to control the type of content that can be accessed through the profile, ensuring a safe and age-appropriate viewing experience.
When setting the maturity level, Netflix offers various options based on different age groups or content ratings. These options allow you to customize the profile’s content restrictions to align with the user’s age or personal preferences.
To set the maturity level, you will be presented with a list of options, such as “Little Kids Only,” “Older Kids and Below,” “Teens and Below,” or “All Maturity Levels”. Choose the option that suits the profile user’s age or maturity level.
If you have young children using the profile, selecting a more restricted maturity level ensures that they are only exposed to content that is suitable for their age. On the other hand, if the profile is for a teenager or an adult, you may opt for a less restricted maturity level to access a wider range of content.
Keep in mind that setting the maturity level is optional. If you don’t want any content restrictions for the profile, you can choose the “All Maturity Levels” option. However, it’s essential to exercise caution and select an appropriate maturity level, particularly if the profile is for a child or a user who prefers limited exposure to certain types of content.
The maturity level setting on Netflix helps you maintain control over the content accessed through each profile, giving you peace of mind when multiple users or family members utilize the same Netflix account.
Once you have set the maturity level or opted for no restrictions, you can proceed to the next step, which is to click on the “Continue” button to finalize the profile creation process.
Now that you have the option to customize the maturity level, take a moment to select the appropriate setting that aligns with the profile user’s age or preferences.
Step 8: Click on “CONTINUE”
After completing the optional steps of choosing an avatar and setting the maturity level, the next step in adding a profile on Netflix is to click on the “CONTINUE” button. This button allows you to proceed with the profile creation process and save all the changes you have made.
Located at the bottom or on the right-hand side of the profile creation page, the “CONTINUE” button is usually prominently displayed, ensuring easy access for users finalizing their profile setup.
Before clicking on “CONTINUE,” take a moment to review the profile details you have entered so far. Double-check the profile name, avatar, and maturity level to ensure everything is set up according to your preferences.
If you need to make any adjustments, you can go back to the previous steps by clicking on the appropriate buttons or links provided on the profile creation page. This allows you to edit the profile name, change the avatar, or modify the maturity level if desired.
Once you are satisfied with the profile details, simply click on the “CONTINUE” button to save the changes and finalize the profile creation process.
By clicking on “CONTINUE,” the newly created profile will be added to your existing Netflix account, and you will be redirected to the Netflix homepage or the “Manage Profiles” page for further actions.
Now that you have completed the necessary steps and clicked on “CONTINUE,” the profile creation process on Netflix is nearly complete. The next steps will guide you through any additional customization options and using the newly created profile for streaming your favorite shows and movies.
Step 9: Customize Profile Settings (Optional)
After clicking on “CONTINUE” and finalizing the profile creation process, the next optional step in adding a profile on Netflix is to customize the profile settings. This allows you to further personalize the profile and tailor it to your specific preferences.
Once you are redirected to the Netflix homepage or the “Manage Profiles” page, locate the newly created profile and click on the profile name or icon. This will open a dropdown menu or a separate page dedicated to customizing the profile settings.
Within the profile settings, you may find a variety of options that you can adjust according to your preferences. Some of the common profile settings include:
- Language: Choose the preferred language for the profile’s user interface and display.
- Playback Settings: Adjust the quality of video playback based on your internet connection speed and data usage preferences.
- Autoplay Controls: Enable or disable the autoplay feature for the profile, which automatically plays the next episode or suggested content.
- Notifications: Set your preference for receiving notifications from Netflix, such as new releases or recommendations.
- Kids Experience: Activate the Kids experience for child-friendly content and additional parental control features.
Take some time to explore and customize these settings based on your preferences. You can select and modify each setting according to your personal needs, ensuring the profile offers the optimal streaming experience for the user.
Keep in mind that these settings are optional, and you are not required to make any changes if you are satisfied with the default settings. However, adjusting the profile settings can enhance your Netflix experience and tailor it to your specific requirements.
Once you have customized the profile settings, you can save the changes and start enjoying your personalized streaming experience on Netflix.
Now that the profile settings are in place, you’re almost ready to stream your favorite TV shows and movies. The final step is to click on “SAVE” to save the profile settings and ensure they are applied.
Step 10: Click on “SAVE”
After customizing the profile settings to your preferences, the next step in adding a profile on Netflix is to click on the “SAVE” button. By clicking on “SAVE”, you ensure that all the changes you have made to the profile settings are applied and saved for future use.
Located at the bottom or on the right-hand side of the profile settings page, the “SAVE” button is usually easily visible and accessible. It may be accompanied by a confirmation message indicating that the changes have been successfully saved.
Before clicking on “SAVE”, take a moment to double-check the profile settings you have modified. Ensure that they align with your preferences and provide the desired streaming experience for the profile user.
If you need to make any last-minute adjustments, you can do so by navigating back to the specific settings options and modifying them as needed. This allows you to fine-tune the profile settings until you are satisfied.
Once you are confident with the profile settings, click on the “SAVE” button to apply and save all the changes. This ensures that the customized settings remain in place whenever you or the profile user access the Netflix account.
By clicking on “SAVE”, not only do you preserve the modified profile settings, but you also complete the entire process of adding a profile on Netflix. The profile is now ready to be used and accessed by the designated user, providing them with a personalized streaming experience.
You can now begin exploring the vast library of TV shows, movies, documentaries, and other content available on Netflix within the newly created profile.
Congratulations! You have successfully added a profile on Netflix and customized its settings. Enjoy your personalized streaming experience!
Step 11: Sign Out and Sign Back In
Once you have completed the profile creation process and saved the customized settings, the next step in adding a profile on Netflix is to sign out of your account and sign back in. This step ensures that all the changes you made to the profile are applied and reflected in your Netflix experience.
To sign out of your Netflix account, locate the account icon or profile icon on the Netflix homepage or the main navigation bar. This icon is usually represented by a small silhouette or an icon with your profile picture or initials. Click on this icon to open a dropdown menu or a list of options.
Within the dropdown menu or the list of options, look for the “Sign Out” or “Log Out” option. By clicking on this option, you will be logged out of your Netflix account on the current device or browser.
After signing out, wait for a few seconds, and then sign back in to your Netflix account using the same email address and password as before. This step ensures that all the changes you made to the profile, as well as any other account settings, are properly synchronized and applied.
Once you have signed back in, you will be able to access the Netflix homepage or the “Manage Profiles” page, where you can see the newly created profile among the existing profiles. Click on the profile name or icon to select and use the profile for your streaming activities.
By signing out and signing back in, you ensure that all the changes you made to the profile settings, such as the profile name, avatar, maturity level, and customization options, are fully active and accessible.
Now that you have signed out and signed back in, you are ready to enjoy your personalized Netflix experience within the newly added profile. Stream your favorite shows, movies, and documentaries while benefiting from recommendations and settings tailored to your preferences.
Step 12: Switch Profiles
Once you have added multiple profiles on Netflix, the next step is to learn how to switch between profiles. Switching profiles allows different users to access their personalized recommendations, watch history, and settings within the same Netflix account.
To switch profiles, start by opening the Netflix app or website and signing in to your Netflix account using your email address and password. You will be taken to the Netflix homepage or the “Manage Profiles” page, where you can see all the profiles associated with the account.
Look for the profile icon or name, usually located in the top or bottom navigation bar on the Netflix app or website. Click or tap on the icon or name to open the profile selection menu.
In the profile selection menu, you will see a list of all the profiles added to your Netflix account. Each profile is represented by its name and avatar or profile picture. Simply select the profile you want to switch to by clicking or tapping on it.
After selecting a profile, you will be redirected to the Netflix homepage or the profile-specific page, depending on the platform you are using. The content recommendations, watch history, and settings will now be tailored to the selected profile.
Switching profiles allows each user to have a personalized Netflix experience and access their preferred content easily. Whether it’s your own profile or a profile for a family member or friend, switching profiles ensures that everyone can enjoy their customized streaming experience.
If you want to switch profiles on different devices, ensure that you are using the same Netflix account credentials for each device. This way, any changes or updates made to the profiles will be synchronized across all devices.
Now that you know how to switch profiles, you can easily access and enjoy your personalized Netflix experience within the profile of your choice. Switch between profiles effortlessly and explore the vast library of TV shows, movies, and other content that Netflix has to offer.
Step 13: Edit or Delete Profiles (Optional)
After adding profiles on Netflix, you have the option to edit or delete profiles as needed. This step allows you to make changes to profile details or remove profiles that are no longer necessary.
To edit or delete profiles, start by opening the Netflix app or website and signing in to your Netflix account using your email address and password. You will be taken to the Netflix homepage or the “Manage Profiles” page, where you can see all the profiles associated with the account.
To edit a profile, locate the profile name or icon that you want to modify. Click or tap on the profile, and a dropdown menu or a separate page will appear with options for editing that specific profile.
Within the profile editing options, you can change the profile name, select a different avatar or profile picture, adjust the maturity level, or modify other settings based on your preferences. Make the desired changes and save them by clicking or tapping on the appropriate buttons.
If you no longer need a profile and want to remove it from your Netflix account, look for the option to delete or remove the profile. This option is usually found in the profile editing menu or on the “Manage Profiles” page. Click or tap on the delete or remove option and confirm your decision when prompted.
By deleting a profile, all the preferences, watch history, and settings specific to that profile will be permanently removed. Make sure to back up any important information before deleting a profile.
Editing or deleting profiles is entirely optional and depends on your needs. It allows you to manage the profiles on your Netflix account and maintain an organized and personalized streaming experience.
Remember that the primary profile (the one created when you signed up for the Netflix account) cannot be deleted. However, you can edit and customize the primary profile settings just like any other profile.
Now that you know how to edit and delete profiles on Netflix, you can easily make changes to profile details or remove unnecessary profiles. Personalize your Netflix account to suit your preferences, and enjoy a streamlined streaming experience.