
Choose a profile picture for Google Meet
When using Google Meet for video meetings, having a profile picture adds a personal touch and helps others recognize you easily. Your profile picture is the first impression you give to your colleagues and clients, so it is important to choose an appropriate, professional, and visually appealing picture. In this section, I will guide you through the process of selecting the perfect profile picture for Google Meet.
1. Reflect your professional identity: Your profile picture should represent you in a professional manner. Choose a picture where you are dressed appropriately for work and exude confidence. Avoid using pictures where you are in a casual setting or engaging in leisure activities.
2. Use a high-resolution image: It is crucial to use a high-quality image that is clear and sharp. Avoid blurry or pixelated pictures, as they can create a negative impression. Select a photo that highlights your facial features and ensures visibility even in small thumbnail sizes.
3. Maintain a friendly and approachable demeanor: Smile! A warm and friendly smile can go a long way in building rapport with your colleagues. Choose a picture where you appear approachable and inviting, making it easier for others to connect with you during Google Meet sessions.
4. Keep it simple and clutter-free: Opt for a simple and clean background that doesn’t distract from your face. A cluttered or busy background can make it difficult for others to focus on you during the video call. Ensure that the picture showcases you as the main subject.
5. Be mindful of your online presence: Remember that your profile picture represents you not only on Google Meet but also in other professional contexts. Avoid using pictures that may be inappropriate or controversial. Maintain a professional image across your online platforms.
Choosing the right profile picture for Google Meet is an opportunity to showcase your professionalism and personality. It is important to remember that first impressions matter, and your profile picture can leave a lasting impression on your colleagues and clients. Take the time to select a picture that aligns with your professional identity and creates a positive professional image. With these tips in mind, you are now ready to move on to the next step of adding a profile picture to your Google Meet account.
Locate the Google Meet settings
Before you can add or change your profile picture on Google Meet, you need to locate the settings section. Follow the steps below to find the Google Meet settings:
1. Open your web browser: Launch your preferred web browser on your desktop or laptop computer. Ensure you are connected to the internet for a seamless experience.
2. Access Google Meet: Type “meet.google.com” in the address bar of your browser and press Enter. You will be directed to the Google Meet homepage.
3. Sign in to your Google account: If you are not already signed in, click on the “Sign In” button at the top right corner of the screen. Enter your Google account credentials to log in to your account.
4. Navigate to the settings: Once you are signed in, you will see a gear icon at the top right corner of the Google Meet page. Click on the gear icon to open the settings menu.
5. Explore the settings menu: A drop-down menu will appear with various options. Look for the “Settings” option and click on it to access the Google Meet settings page.
6. Familiarize yourself with the settings: On the settings page, you will find different tabs and options related to your Google Meet account. Take a moment to explore the available settings to customize your Google Meet experience to your liking.
7. Proceed to the profile picture settings: Locate the “Profile Picture” or “Profile” section within the settings menu. This is where you can add, change, or remove your profile picture on Google Meet.
By following these steps, you will easily locate the Google Meet settings on your account. Once you have accessed the settings, you can proceed to the next step of adding or changing your profile picture. Remember to refer back to this section if you ever need to access the Google Meet settings again in the future.
Access the profile picture feature
After locating the Google Meet settings, you can now proceed to access the profile picture feature. Follow the steps below to access the profile picture feature in Google Meet:
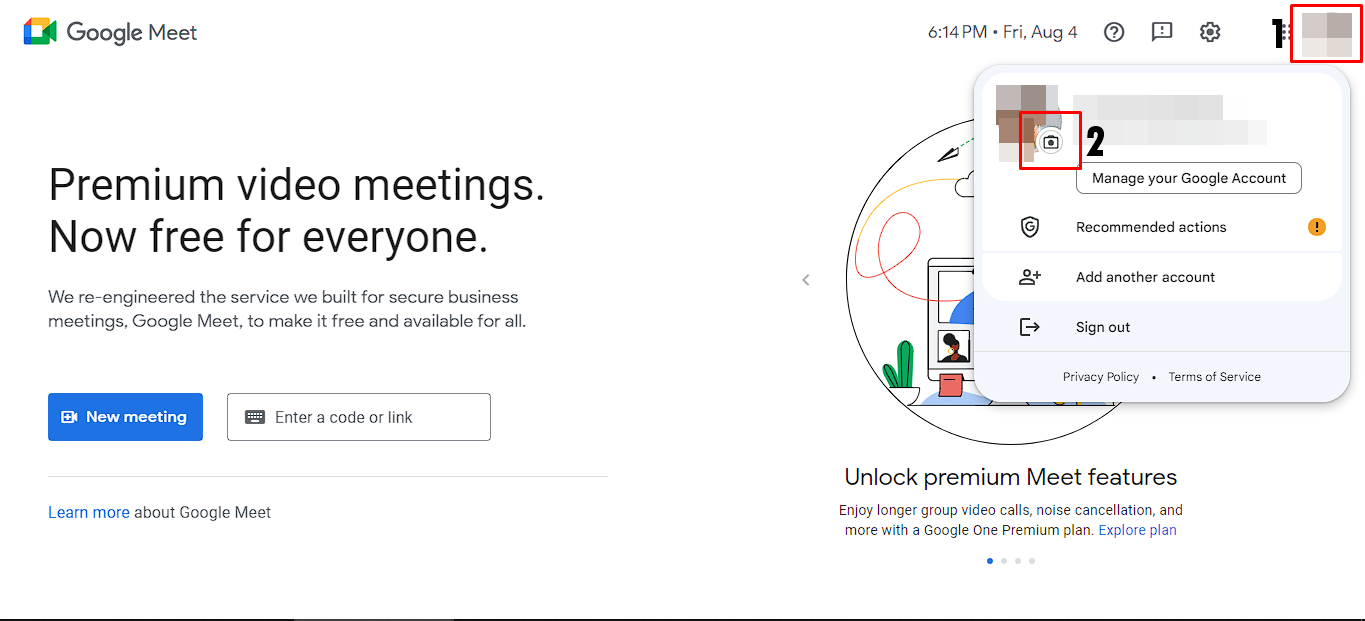
1. Open the profile settings: Within the Google Meet settings, look for the “Profile Picture” or “Profile” section. Click on it to open the profile settings.
2. Choose the profile picture option: Once you are in the profile settings, you will see different options related to your profile picture. Look for the option that allows you to add or change your profile picture. It may be labeled as “Change picture” or “Upload picture”. Click on this option to access the profile picture feature.
3. Confirm your action: Depending on the platform or device you are using, you may be prompted to confirm the action. This step ensures that you are intentional about changing your profile picture. Confirm your selection and proceed to the next step.
4. Select an image source: After confirming, you will be presented with different options to choose your profile picture source. These options commonly include uploading a picture from your computer or taking a picture using your device’s camera. Choose the appropriate option that suits your needs.
5. Follow the on-screen instructions: Once you have selected your desired image source, follow the on-screen instructions to complete the process. If you are uploading a picture, you will be prompted to select the file from your computer. If you are taking a picture, your device’s camera will open, allowing you to capture an image.
6. Crop and adjust the picture: After selecting or capturing your picture, you may have the option to crop and adjust it. Use the provided tools to crop the image and make any necessary adjustments to ensure it looks the way you want it to.
7. Save and set your profile picture: Once you are satisfied with your profile picture selection and adjustments, save the changes. The system will then set your new profile picture, and it will be visible on your Google Meet account.
By following these steps, you can easily access the profile picture feature in Google Meet. Whether you choose to upload an image from your computer or take a picture with your device’s camera, you can personalize your profile and enhance your presence during video meetings.
Upload a picture from your computer
If you have a suitable profile picture saved on your computer, you can easily upload it to your Google Meet account. Follow the steps below to upload a picture from your computer:
1. Access the profile picture feature: Locate the profile picture section within the Google Meet settings, as mentioned in the previous section. Click on the option that allows you to add or change your profile picture.
2. Choose the upload option: Upon accessing the profile picture feature, you will be presented with different options for selecting your image source. Look for the option to “Upload picture” or a similar phrase. Click on this option to proceed.
3. Select your profile picture: A file selection window will appear on your screen. Navigate to the folder on your computer where you have saved your desired profile picture. Click on the picture file to select it.
4. Confirm and save your selection: After selecting the picture file, you may be prompted to confirm your action. This step ensures that you are intentional about changing your profile picture. Confirm your selection and proceed to the next step.
5. Crop and adjust the picture (if necessary): Depending on the dimensions and resolution of your selected picture, you may need to crop or make adjustments. Google Meet may provide you with tools to crop the image or make other edits to ensure it fits the profile picture frame adequately. Follow the on-screen instructions to complete this step.
6. Save and set your profile picture: Once you are satisfied with your chosen profile picture and any necessary adjustments, save the changes. Your new profile picture will be uploaded and set as the display picture on your Google Meet account.
Uploading a picture from your computer allows you to have more control over your profile picture selection. You can choose an image that best represents your professional identity and helps others recognize you easily during video meetings. Remember to select a high-resolution image that is clear, visually appealing, and appropriate for your professional context.
Take a picture with your device’s camera
If you don’t have a suitable profile picture saved on your computer, you can use your device’s camera to take a picture directly for your Google Meet profile. Follow the steps below to take a picture with your device’s camera:
1. Access the profile picture feature: In the Google Meet settings, locate the section that allows you to add or change your profile picture. Click on this option to access the profile picture feature.
2. Choose the camera option: Once you are in the profile picture feature, look for the option to “Take a picture” or a similar phrase. Click on this option to proceed.
3. grant camera access: Since this option requires permission to access your device’s camera, a pop-up window may appear requesting camera access. Grant permission by clicking on the “Allow” or “OK” button, depending on the options presented.
4. Position yourself properly: Ensure you are in a well-lit environment and position yourself in front of your device’s camera. Adjust the angle and distance to frame your face properly within the camera view.
5. Capture the picture: Once you are ready, click on the button provided to capture the picture. Some platforms may have a button labeled “Snap,” “Take photo,” or a similar phrase. Clicking the button will activate your device’s camera and capture the image.
6. Review and retake (if necessary): After taking the picture, you may have the option to review it before setting it as your profile picture. If you are satisfied with the captured image, proceed to the next step. If not, look for an option to retake the picture and repeat steps 4 and 5 until you are pleased with the results.
7. Confirm and save your selection: Once you have taken a picture and are satisfied with the result, confirm your selection to set it as your Google Meet profile picture. Depending on the platform, you may need to click on a “Save” or “Set as profile picture” button to finalize the process.
Using your device’s camera to take a picture for your Google Meet profile gives you the flexibility to capture a current image on the spot. Make sure to position yourself properly, pay attention to lighting, and maintain a professional appearance in the captured picture. This method allows you to personalize your profile with a fresh and up-to-date image.
Crop and adjust the picture
Once you have selected or captured a picture for your Google Meet profile, you may have the option to crop and adjust the image to ensure it looks its best. Follow the steps below to crop and adjust your profile picture:
1. Access the editing tools: After selecting or capturing a picture, look for the editing options provided by Google Meet. These options may include tools for cropping, rotating, resizing, and making other adjustments to enhance the appearance of your profile picture.
2. Crop the image: If your profile picture contains any unnecessary elements or if the framing is not optimal, use the cropping tool to remove unwanted areas. Adjust the cropping frame by dragging its edges or corners, ensuring that the focus is on your face and important details.
3. Resize the picture: Depending on the dimensions of the image, you may need to resize it to fit within the profile picture frame on Google Meet. Drag the resizing handles or enter specific dimensions to adjust the size of the picture accordingly.
4. Rotate or flip the image (if needed): If your picture appears rotated or flipped, use the designated options to rotate it clockwise or counterclockwise, or to flip it horizontally or vertically. Ensure that the image is correctly oriented before saving it.
5. Adjust brightness and contrast: If your picture appears too dark or too bright, you can make adjustments to the brightness and contrast levels. Experiment with the settings until the image looks clear and well-balanced without losing important details.
6. Apply filters or effects (optional): Some platforms may offer additional features, such as filters or effects, to enhance your profile picture. Use them sparingly and opt for simple adjustments that enhance the overall appearance without distorting your image.
7. Preview the changes: Before saving your edits, take a moment to preview the modified picture. Ensure that the crop, adjustments, and any added effects are aligned with your preferences and the desired professional look you want to achieve.
8. Save the changes: Once you are satisfied with the final result, save the edited profile picture. Click on the designated button to confirm and apply the changes to your Google Meet profile.
Cropping and adjusting your profile picture can significantly improve its visual impact and professionalism. Take the time to fine-tune the image to create a polished and appealing representation of yourself for your colleagues and clients to see during Google Meet sessions.
Save and set your profile picture
After you have chosen or edited your profile picture for Google Meet, it’s time to save and set it as your display picture. Follow the steps below to save and set your profile picture:
1. Review the final image: Before saving and setting your profile picture, take a moment to review the image. Ensure that the cropping, adjustments, and any applied filters or effects align with your desired representation.
2. Confirm your selection: Once you are satisfied with the final picture, look for a button or option to confirm your selection. Clicking on this button will save your profile picture changes.
3. Set as your profile picture: After confirming your selection, Google Meet will prompt you to set the saved image as your profile picture. Look for a “Set as profile picture” or similar option, and click on it to apply the changes.
4. Wait for the update: After setting the profile picture, give Google Meet a moment to update and reflect the changes across your account. Depending on your internet connection and the platform, it may take a few seconds to load the new profile picture.
5. Verify the update: Once the update is complete, navigate to your Google Meet account or refresh the page to verify that your profile picture has been successfully updated. Check the display picture in the corner of your screen to ensure it matches the selected image.
6. Enjoy your new profile picture: You have successfully saved and set your profile picture on Google Meet! Your new picture will now be visible to others during video meetings, helping them recognize you easily and adding a personal touch to your interactions.
Should you wish to make any changes to your profile picture in the future, you can revisit the Google Meet settings and follow the same process outlined in the previous sections. Keep in mind that maintaining a professional and appropriate profile picture is essential for presenting yourself in a positive and respectful manner during virtual meetings.
Change or remove your profile picture
If you need to make changes to your profile picture on Google Meet or remove it altogether, follow the steps below:
1. Locate the profile picture feature: Access the settings section in Google Meet where you originally uploaded or set your profile picture. This can usually be found under the “Profile Picture” or “Profile” section of the settings menu.
2. Choose the change or remove option: Within the profile picture settings, look for an option that allows you to change or remove your current profile picture. The wording may vary, but it will typically say “change picture” or “remove picture.” Click on this option to proceed.
3. Select a new picture or remove current picture: If you want to change your profile picture, follow the steps outlined in the previous sections to upload a picture from your computer or take a picture with your device’s camera. If you prefer to remove your profile picture entirely, find the option to “Remove picture” or similar phrasing and click on it.
4. Confirm your selection: Depending on the platform, you may be prompted to confirm your action. If you are changing your profile picture, confirm the selection of your new picture. If you are removing your profile picture, confirm the removal. Review your choice before proceeding.
5. Save and set the changes: After confirming your selection, save the changes to your Google Meet account. If you have changed your profile picture, it will be updated with the new image. If you have removed your profile picture, it will revert to the default avatar or be blank, depending on the platform.
6. Verify the changes: Navigate to your Google Meet account or refresh the page to ensure that the changes have been successfully implemented. Check the display picture area to see the updated profile picture or the absence of a picture if you chose to remove it.
By following these steps, you can easily change or remove your profile picture on Google Meet. Remember that selecting an appropriate picture is essential for maintaining a professional online presence, so carefully consider your options before making any changes.