
What is Unity?
Unity is a powerful and versatile game development engine that has gained widespread popularity among developers around the world. It provides a comprehensive set of tools and features to create immersive and interactive experiences for various platforms including desktop, mobile devices, and virtual reality headsets like the HTC Vive.
With Unity, developers can unleash their creativity and bring their ideas to life by designing and developing stunning visuals, realistic physics, and dynamic gameplay. Whether you’re an indie developer or part of a large studio, Unity offers a user-friendly interface and a vast library of assets, as well as a robust scripting API, making it accessible to developers of all skill levels.
With Unity, you can build 2D and 3D games, simulations, architectural visualizations, and more. It supports a wide range of programming languages, including C# and UnityScript, allowing developers to choose their preferred language for coding their projects.
One of the key strengths of Unity is its cross-platform capabilities. It enables developers to create content for multiple platforms, such as Windows, macOS, iOS, Android, and even gaming consoles like Xbox and PlayStation, without having to rewrite the entire codebase.
Moreover, Unity provides a robust ecosystem with a dedicated asset store, a vibrant community of developers, and extensive documentation and tutorials. These resources empower developers to enhance their projects with pre-built assets, collaborate with other developers, and solve technical challenges efficiently.
Whether you’re an aspiring game developer, a professional in the gaming industry, or an enthusiast looking to create your own virtual reality experiences, Unity is an indispensable tool that offers a solid foundation for turning your creative visions into reality.
What is the HTC Vive SteamVR Triggers?
The HTC Vive SteamVR Triggers are an essential component of the HTC Vive virtual reality (VR) system. These triggers are buttons located on the VR controllers that allow users to interact with the virtual environment in a natural and intuitive way.
Designed to mimic the functionality of the index finger, the HTC Vive SteamVR Triggers offer users a seamless and immersive experience by providing a tactile input method. By pressing or squeezing the triggers, users can perform actions such as grabbing objects, shooting weapons, or activating in-game mechanics.
One of the standout features of the HTC Vive SteamVR Triggers is their sensitivity and precision. These triggers are equipped with advanced sensors that can detect subtle changes in pressure, allowing for nuanced interactions within the virtual world. Whether it’s gently applying pressure to pick up a fragile object or exerting more force for a powerful action, the triggers can accurately translate the user’s intent.
Furthermore, the HTC Vive SteamVR Triggers are ergonomically designed to provide comfort during extended VR sessions. With their intuitive placement and responsive feedback, users can navigate and interact with virtual environments for extended periods without experiencing discomfort or fatigue.
The integration of the HTC Vive SteamVR Triggers with Unity, the popular game development engine, enables developers to leverage this input method to create immersive and interactive experiences. By mapping functions and actions to the triggers, developers can provide users with a natural and engaging way to control their virtual reality applications.
Whether you’re playing a thrilling action game, solving puzzles, or exploring virtual worlds, the HTC Vive SteamVR Triggers are a crucial element that enhances the overall immersion and interactivity of the HTC Vive VR system.
Why are SteamVR Triggers important in Unity?
The SteamVR Triggers play a vital role in Unity game development for the HTC Vive virtual reality (VR) system. These triggers provide a seamless and intuitive way for users to interact with virtual environments, adding a new level of immersion and interactivity to the VR experience.
First and foremost, the SteamVR Triggers offer precise and responsive input. Their advanced sensors can detect subtle changes in pressure, allowing for accurate and fine-grained control in Unity applications. This level of sensitivity empowers developers to create intricate interactions, whether it’s grabbing objects with varying levels of force or executing precise gestures.
In Unity, the SteamVR Triggers open up a plethora of possibilities for gameplay mechanics and interactions. With the triggers, developers can enable users to interact with objects in a natural and intuitive manner, enhancing the sense of presence and realism in VR environments. Users can pick up and manipulate objects, shoot weapons, activate switches, or perform any action that requires finger-like interaction – all accomplished by pressing or releasing the triggers.
Furthermore, the inclusion of SteamVR Triggers in Unity helps to streamline the development process. Unity provides a robust and user-friendly framework for integrating VR experiences, and the SteamVR Triggers are a crucial component of this framework. Developers can easily access input data from the triggers and map them to specific functions or actions in their Unity projects, saving time and effort in the development cycle.
Another advantage of utilizing the SteamVR Triggers in Unity is the ability to create immersive and interactive user interfaces. With the triggers, developers can implement virtual buttons, sliders, or any other UI element that requires finger-like manipulation. This enables users to interact with menus, adjust settings, or navigate through virtual environments seamlessly.
Moreover, the integration of SteamVR Triggers with Unity ensures compatibility and consistent user experiences across different VR platforms. Unity’s cross-platform capabilities allow developers to build VR applications for various devices beyond the HTC Vive, such as Oculus Rift or Windows Mixed Reality headsets. By utilizing the SteamVR Triggers in Unity, developers can ensure that their VR experiences provide a cohesive and intuitive interaction method across different hardware.
How does Unity label HTC Vive SteamVR Triggers?
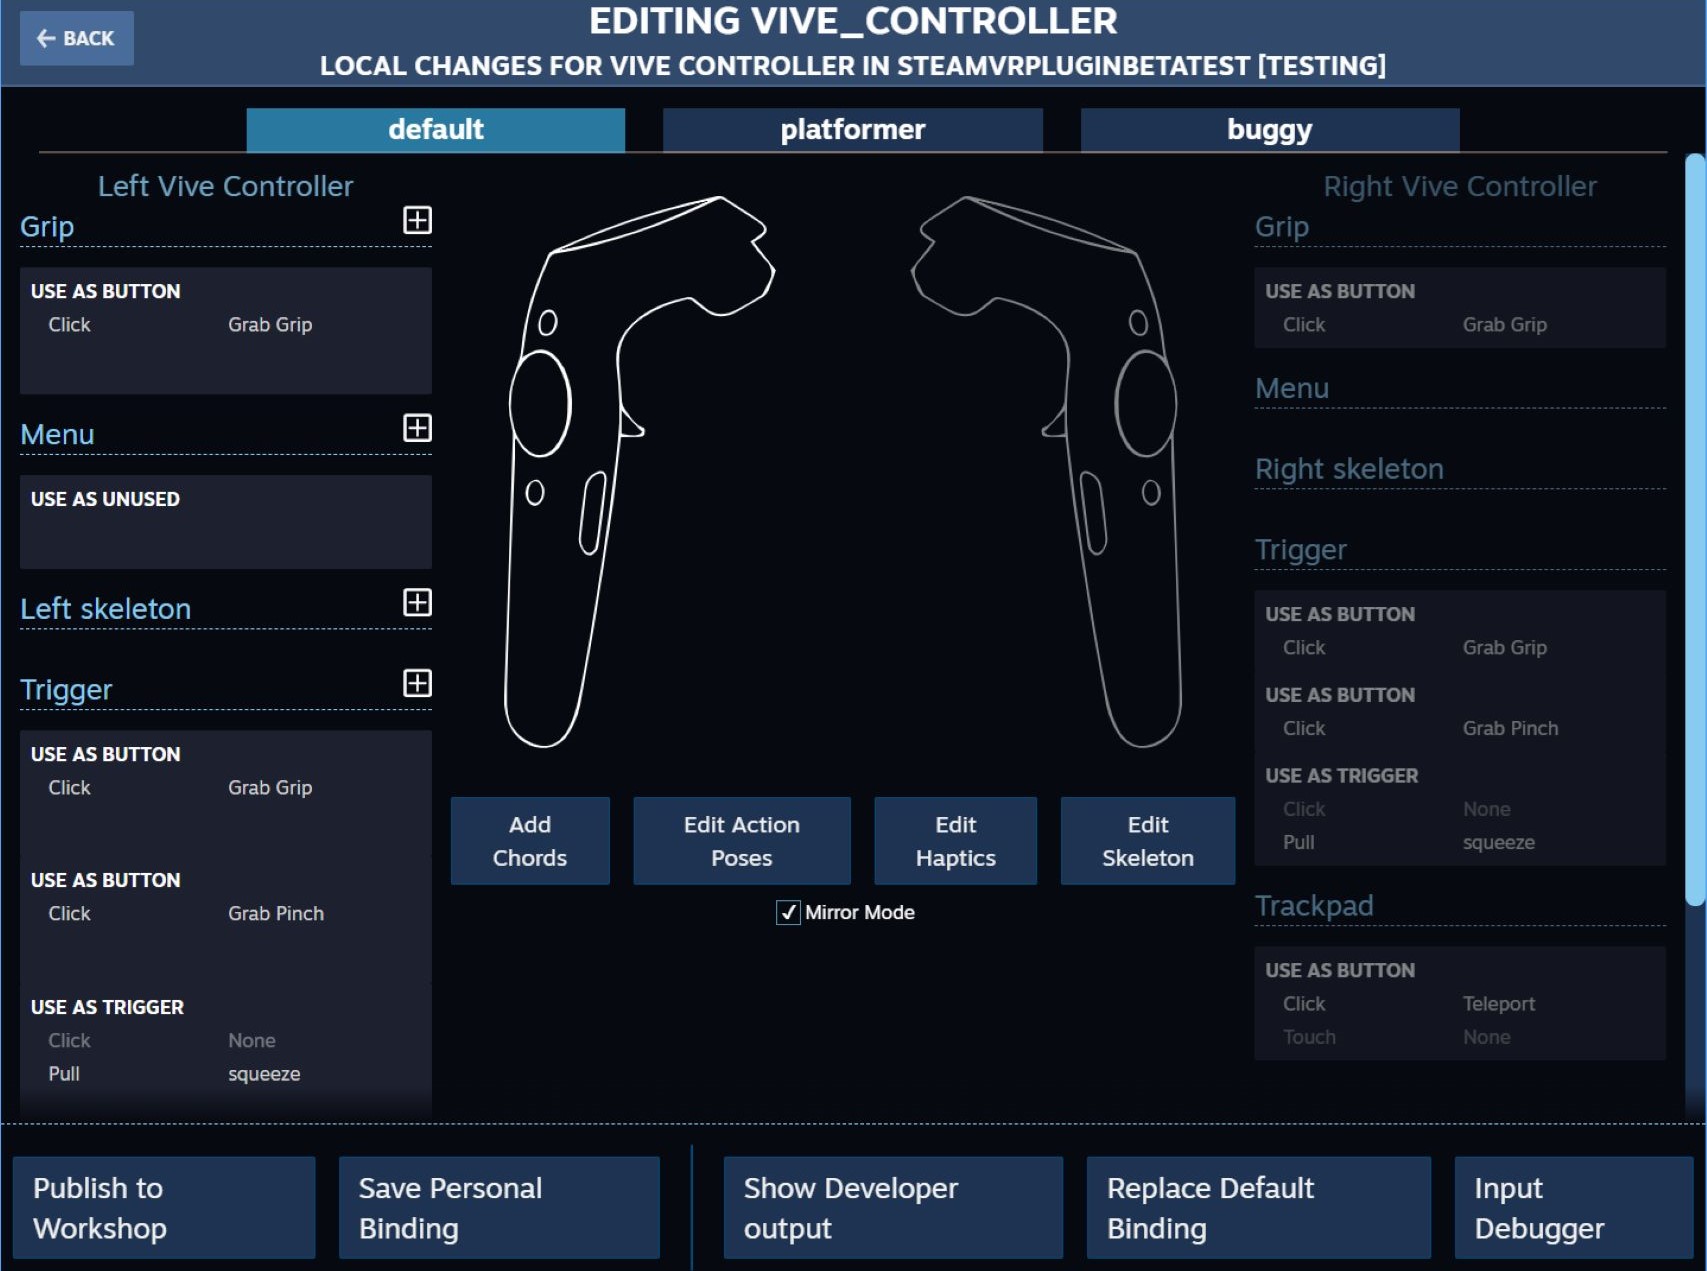
In Unity, labeling the HTC Vive SteamVR Triggers is a process that involves assigning user-friendly names or labels to each trigger. These labels help developers and users identify the specific triggering elements in the virtual reality (VR) environment and facilitate the mapping of functions or actions to these triggers.
Unity provides a convenient way to label HTC Vive SteamVR Triggers through its Input System. The Input System allows developers to define and manage input actions, including the HTC Vive SteamVR Triggers, in a unified and organized manner.
By accessing the Input System settings in Unity, developers can navigate to the HTC Vive SteamVR Triggers section and assign custom labels to the triggers. These labels can be descriptive names that reflect the intended functionality of each trigger, making it easier for developers to understand their purpose.
For example, if a game requires the player to shoot a gun by squeezing the trigger, the developer can assign a label such as “Shoot” or “Fire” to that particular trigger. This labeling practice helps developers maintain clarity and consistency in their VR projects.
Furthermore, the labeling of HTC Vive SteamVR Triggers extends to the user interface (UI) elements. Unity allows developers to create interactive UI elements that respond to the HTC Vive SteamVR Triggers. By assigning corresponding labels to these UI elements, developers can ensure that the triggers and UI elements are correctly mapped and provide a seamless user experience.
It is important to note that labels for HTC Vive SteamVR Triggers should be chosen carefully to avoid confusion and enhance user understanding. They should accurately represent the intended interaction or action associated with each trigger in the VR application.
The process of labeling HTC Vive SteamVR Triggers in Unity enhances the usability and accessibility of VR experiences. By assigning informative and meaningful labels, both developers and users can easily identify the specific triggers and understand their functionality within the virtual environment.
Using Unity’s Input System to detect HTC Vive SteamVR Triggers
When developing virtual reality (VR) experiences for the HTC Vive in Unity, it is crucial to have a reliable method to detect and respond to the user’s interaction with the SteamVR Triggers. Fortunately, Unity provides an Input System that facilitates the detection and mapping of HTC Vive SteamVR Triggers to specific actions or functions within the VR application.
The Unity Input System simplifies the process of handling input from various devices, including the HTC Vive SteamVR Triggers. With this system, developers can define input actions and trigger events based on specific conditions, such as pressing or releasing the triggers.
To detect HTC Vive SteamVR Triggers in Unity, developers can follow these steps:
- First, ensure that the SteamVR plugin is installed and correctly set up in the Unity project. The plugin provides the necessary components and scripts to interface with the HTC Vive and its input system.
- In the Unity Editor, open the Input Manager window by navigating to “Edit” > “Project Settings” > “Input”.
- Create a new input action by clicking on the “+” button in the Input Manager window. Assign a descriptive name to the action, such as “TriggerPress” or “TriggerRelease”.
- Specify the type of input the action represents. In this case, select the appropriate HTC Vive SteamVR Trigger axis, typically “VR Trigger” for detecting pressing or releasing the triggers.
- Define the required button threshold for the action. This threshold determines the minimum value required for the trigger input to register as a press or release event.
- Map the input action to the desired function or action within the VR application. This can be done through script logic or by using Unity’s event system to trigger specific events or invoke functions.
- Finally, attach the appropriate input action to the specific game object or script that handles the HTC Vive SteamVR Trigger input, ensuring that it receives the necessary input events.
By utilizing Unity’s Input System and following these steps, developers can easily detect and respond to HTC Vive SteamVR Triggers within their VR applications. This allows for precise and accurate interaction, enabling users to perform various actions, manipulate objects, or trigger specific events based on their interactions with the SteamVR Triggers.
Whether it’s shooting a weapon, grabbing objects, or activating in-game mechanics, Unity’s Input System provides a streamlined approach to detecting HTC Vive SteamVR Triggers and integrating them into immersive VR experiences.
How to map functions to HTC Vive SteamVR Triggers in Unity
Mapping functions to HTC Vive SteamVR Triggers in Unity is a fundamental step in creating immersive and interactive virtual reality (VR) experiences. By assigning specific actions or functions to the triggers, developers can enable users to perform various in-game actions or interact with objects in a natural and intuitive way.
In Unity, mapping functions to HTC Vive SteamVR Triggers can be achieved by following these steps:
- Ensure that the SteamVR plugin is correctly integrated into the Unity project and that the HTC Vive is properly set up and recognized by the system.
- Create the necessary script or identify the existing script where the function mapping will take place. This script should handle the desired actions triggered by the HTC Vive SteamVR Triggers.
- In the script, define the functions that correspond to the actions you want to map to the SteamVR Triggers. For example, if you want the trigger press to simulate a gunshot, you would create a function called “Shoot” that contains the logic for firing the virtual gun.
- In Unity’s Input Manager, open the Input Manager window by navigating to “Edit” > “Project Settings” > “Input”.
- Create a new input action by clicking on the “+” button. Give the action a descriptive name that represents the action it will trigger, such as “TriggerPress” or “TriggerRelease”.
- Map the input action to the corresponding function in the script. This can be done either by referencing the function directly or by using Unity’s event system to invoke functions or trigger events.
- Specify the input keys for the action. In this case, select the appropriate HTC Vive SteamVR Trigger axis, such as “VR Trigger” for detecting trigger presses or releases.
- Adjust the necessary thresholds or sensitivity to fine-tune the input detection for the SteamVR Triggers as per the requirements of the VR experience.
- Attach the script to the game object(s) that will handle the HTC Vive SteamVR Trigger input, ensuring that it is active and able to receive input events.
By mapping functions to the HTC Vive SteamVR Triggers in Unity, developers can create seamless and immersive interactions that enhance the user’s VR experience. Whether it’s shooting projectiles, picking up and manipulating objects, or activating in-game mechanics, mapping functions to the SteamVR Triggers allows for natural and intuitive user interactions within the virtual environment.
It is important to consider the context and purpose of the VR experience when mapping functions. By carefully assigning appropriate actions to the triggers, developers can ensure that the VR application provides a satisfying and engaging user experience.
Customizing HTC Vive SteamVR Trigger labels in Unity
In Unity, developers have the flexibility to customize the labels of HTC Vive SteamVR Triggers in order to create a more intuitive and tailored virtual reality (VR) experience. Customizing the trigger labels allows developers to provide clear instructions and information to users, enhancing the usability and immersion of the VR application.
To customize HTC Vive SteamVR Trigger labels in Unity, developers can follow these steps:
- Ensure that the SteamVR plugin is integrated into the Unity project and that the HTC Vive is properly set up.
- Open the Input Manager window in Unity by navigating to “Edit” > “Project Settings” > “Input”.
- Identify the HTC Vive SteamVR Trigger for which you wish to customize the label.
- Click on the corresponding input action that represents the trigger, or create a new input action if it doesn’t already exist.
- In the Inspector window, locate the “Name” field and enter the desired custom label for the HTC Vive SteamVR Trigger. Make sure the label accurately reflects the intended function or action associated with the trigger.
- Repeat the process for any other HTC Vive SteamVR Triggers that require custom labels.
- Save the changes and ensure that the assigned custom labels are correctly reflected in the VR application.
By customizing the HTC Vive SteamVR Trigger labels, developers can create a more intuitive and user-friendly VR experience. Clear and descriptive labels help users understand the purpose and function of each trigger, making it easier for them to interact with the virtual environment.
It is important to consider the context of the VR application when customizing the trigger labels. The labels should accurately convey the action or interaction associated with each trigger, ensuring that users can navigate and engage with the VR experience without confusion or frustration.
Customizing HTC Vive SteamVR Trigger labels in Unity allows developers to enhance the user interface and overall usability of their VR applications, providing a more immersive and intuitive experience for users.
Best practices for labeling HTC Vive SteamVR Triggers in Unity
When it comes to labeling HTC Vive SteamVR Triggers in Unity, following best practices can greatly improve the user experience and ensure clarity for both developers and users. Thoughtful and effective labeling enhances the usability, intuitiveness, and overall immersion of virtual reality (VR) applications. Here are some best practices to consider:
- Keep it concise: Use short and descriptive labels that convey the function or action associated with each HTC Vive SteamVR Trigger. Clear and concise labels help users quickly understand the purpose of each trigger without confusion.
- Be consistent: Maintain consistency in the labeling scheme across the VR application. Use a standardized format or naming convention for the labels to ensure a cohesive and intuitive experience. This consistency facilitates user understanding and reduces the learning curve.
- Focus on user experience: Align the trigger labels with the intended user actions or interactions. Labels should reflect the most intuitive and natural interpretation of a specific trigger’s function. This ensures that users can easily grasp the intended actions and engage with the VR environment without confusion.
- Consider user preferences: Provide options for customization or personalized labeling whenever possible. Allowing users to adjust the labels to fit their preferences can enhance the comfort and engagement of the VR experience.
- Test and iterate: Test the effectiveness of the trigger labels with a diverse group of users. Gather feedback and iterate on the labels to ensure they are understandable and align with user expectations. Regular testing and iteration can help refine the labeling approach and improve overall user satisfaction.
- Document the labels: Maintain clear documentation for the trigger labels, especially when working in a team setting or when designing complex VR experiences. Documenting the labels ensures consistency and helps onboard new team members, reducing confusion and errors during development.
- Consider localization: If your VR application targets a global audience, make provisions for localization. Ensure that the trigger labels can be easily translated into different languages, allowing users from various regions to have a seamless and immersive experience.
By following these best practices for labeling HTC Vive SteamVR Triggers in Unity, developers can optimize user understanding, improve usability, and create a more enjoyable VR experience. Well-designed and clear trigger labels contribute to the overall success and accessibility of the VR application.
Common issues when labeling HTC Vive SteamVR Triggers in Unity
While labeling HTC Vive SteamVR Triggers in Unity is crucial for clarity and user experience, there are some common issues that developers may encounter. Being aware of these issues can help developers anticipate and address them effectively. Here are some common issues when labeling HTC Vive SteamVR Triggers in Unity:
- Unclear or ambiguous labeling: If the labels assigned to HTC Vive SteamVR Triggers are unclear or ambiguous, it can lead to confusion for users. Labels should accurately represent the intended function or action associated with each trigger to ensure a clear understanding.
- Inconsistent labeling: Inconsistency in labeling across different HTC Vive SteamVR Triggers can cause confusion for users. It is essential to maintain consistency in naming conventions, formatting, and terminology to ensure a seamless and intuitive experience across the VR application.
- Labeling that doesn’t align with user expectations: In some cases, the assigned labels may not align with what users expect or are familiar with. It is important to consider user expectations and common conventions to ensure that the labels accurately convey the intended actions and interactions associated with the HTC Vive SteamVR Triggers.
- Overlapping labels: If multiple HTC Vive SteamVR Triggers have similar or overlapping labels, it can make it difficult for users to distinguish between them. Each label should be distinct, helping users easily identify and understand the specific function or action associated with each trigger.
- Lack of localization considerations: If the VR application aims to reach a global audience, it is important to consider localization early in the labeling process. Some labels may not translate well or may have different cultural interpretations, so it is crucial to plan for localization and ensure that labels can be easily translated without losing their intended meaning.
- Insufficient testing and user feedback: Failing to gather user feedback or test the effectiveness of the trigger labels can lead to missed opportunities for improvement. Involve users in the testing process to understand their comprehension, identify any labeling issues, and iterate on the labels to enhance the overall user experience.
By being mindful of these common issues when labeling HTC Vive SteamVR Triggers in Unity, developers can avoid potential pitfalls and create a more user-friendly and intuitive VR experience. Clear and effective labeling enhances the usability and immersion of the VR application, ensuring that users can easily understand and engage with the HTC Vive SteamVR Triggers.
Testing and troubleshooting HTC Vive SteamVR Triggers in Unity
Testing and troubleshooting HTC Vive SteamVR Triggers in Unity is an essential part of developing a robust and reliable virtual reality (VR) experience. Effective testing ensures that the triggers function as intended and provides an optimal user interaction within the VR environment. Here are some key considerations for testing and troubleshooting HTC Vive SteamVR Triggers in Unity:
- Hardware and setup: Ensure that the HTC Vive hardware is properly set up and calibrated. Verify that all components, including the SteamVR Triggers, are connected correctly and functioning as expected. This step is crucial to eliminate any hardware-related issues that could affect the trigger’s performance.
- Input detection: Test the input detection of the HTC Vive SteamVR Triggers in Unity. Verify that the triggers are correctly recognized by Unity and can trigger the desired actions or functions in the VR application. Debug and monitor the input events to ensure proper detection and response.
- Functional mapping: Test the mapping of functions or actions to the HTC Vive SteamVR Triggers. Verify that the assigned functions are triggered accurately and perform the expected actions within the VR experience. Debug and adjust the mapping if any discrepancies or unexpected behaviors are discovered.
- Sensitivity and thresholds: Experiment with the sensitivity and threshold settings for the HTC Vive SteamVR Triggers. Test different pressure levels and verify that the triggers respond appropriately without being too sensitive or unresponsive. Consider user comfort and natural interaction when fine-tuning these settings.
- User experience and feedback: Involve users or a test group to gather feedback on the HTC Vive SteamVR Triggers. Observe their interactions and solicit feedback on the intuitiveness, comfort, and effectiveness of the trigger mappings. This user-centric approach allows for iterative improvements based on real user experiences.
- Edge cases and error handling: Test the HTC Vive SteamVR Triggers in various scenarios, including edge cases and error conditions. Stress-test the triggers by simulating different user interactions or unexpected scenarios to ensure the VR application can handle them gracefully. Implement appropriate error handling and fallback mechanisms if necessary.
- Debugging and troubleshooting: Utilize Unity’s debugging tools and error messages to identify and resolve any issues with the HTC Vive SteamVR Triggers. Monitor the console and error logs to diagnose any errors or warnings related to the triggers, and apply appropriate fixes or adjustments to resolve them.
Thorough testing and effective troubleshooting of HTC Vive SteamVR Triggers in Unity are crucial to ensure a smooth and immersive VR experience. By following these guidelines and addressing any detected issues, developers can create a more reliable and user-friendly VR application that maximizes the potential of the HTC Vive SteamVR Triggers.