
How to Change an Apple Watch Band
Changing the band on your Apple Watch is a simple and straightforward process. Whether you’re looking to switch up your style or replace a worn-out band, here’s a step-by-step guide on how to change an Apple Watch band.
Gather the necessary tools: Before you begin, make sure you have the following tools on hand: your Apple Watch, the new band you want to install, and a flat, clean surface to work on.
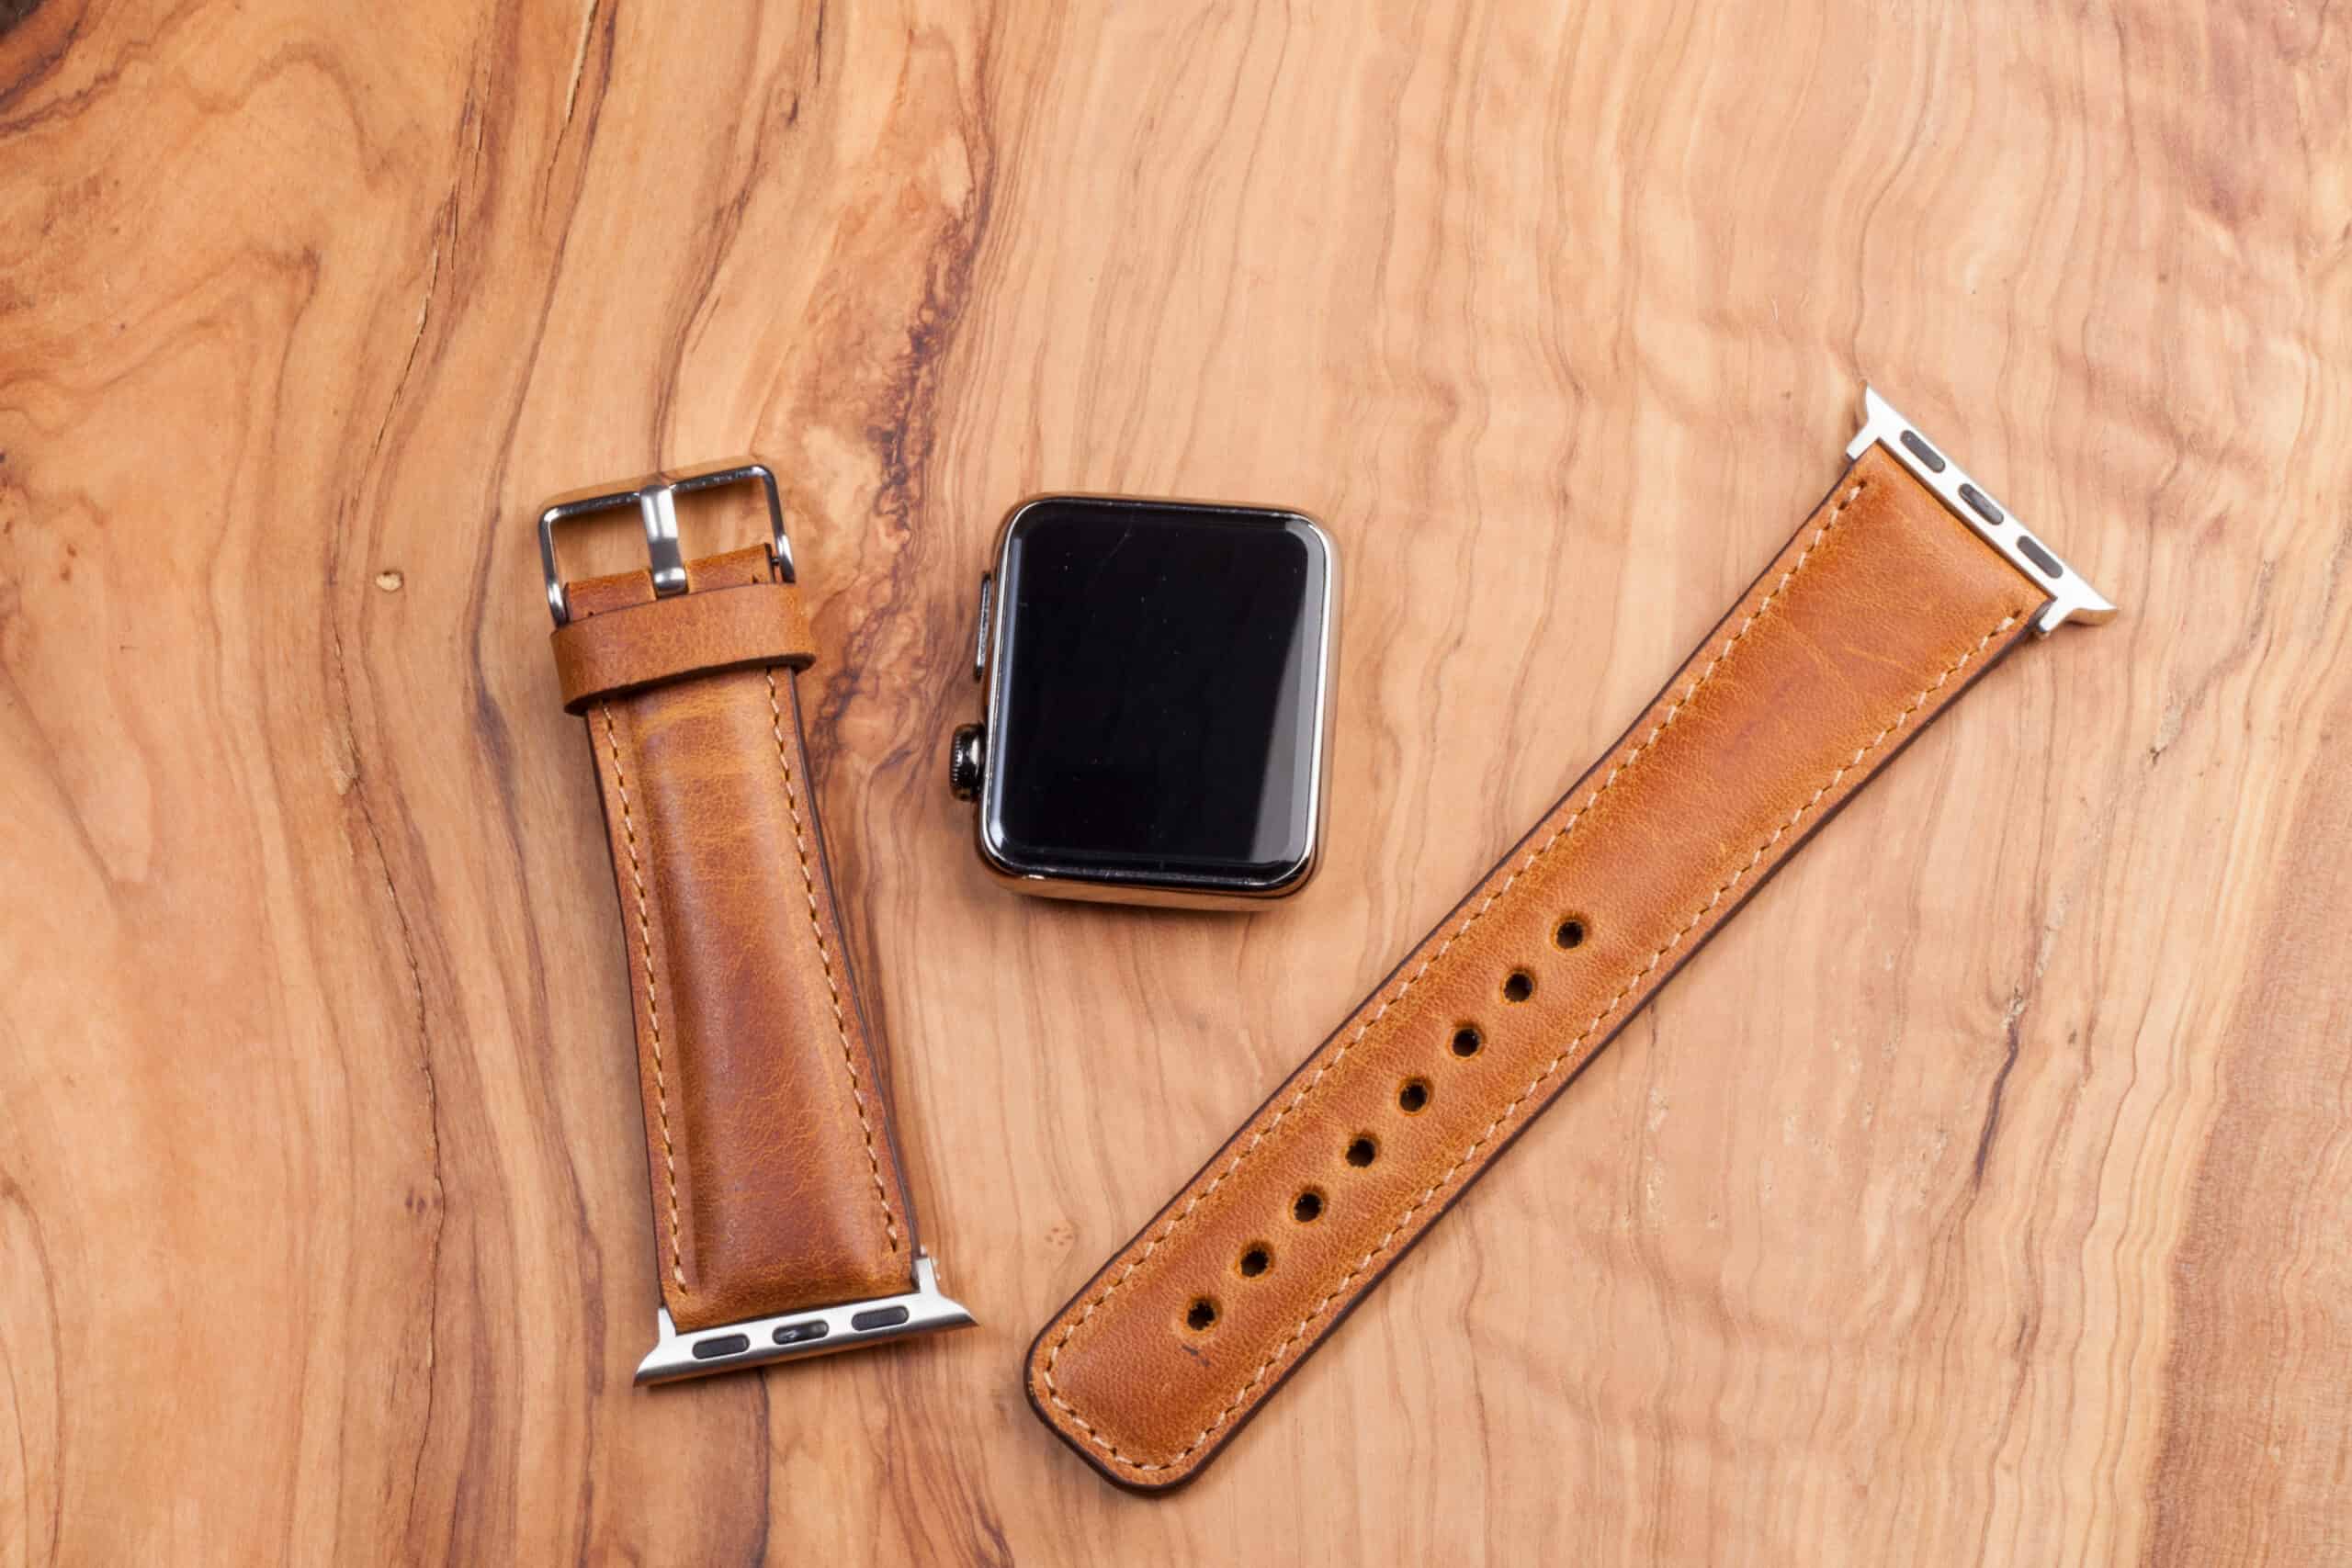
Choose a new band that fits your Apple Watch model and size: Apple Watch bands come in various sizes and styles. Ensure that the new band you select is compatible with your specific Apple Watch model and size.
Remove the current band: Flip your Apple Watch over and locate the band release buttons on both sides of the watch. Press and hold one of the buttons while sliding the band towards the center of the watch to release it. Repeat this process for the other side.
Attach the new band: Take your new band and slide one end into the empty slot on the watch. Make sure it clicks into place securely. Repeat this step for the other side of the watch.
Slide the new band into the watch: Holding your Apple Watch with the display facing upward, slide the new band into the channel on the back of the watch until it clicks into place. Ensure that both sides of the band are securely attached.
Adjust the fit of the new band: Put on your Apple Watch and check if the new band is comfortable and the appropriate length. If necessary, adjust the fit by repositioning the band or using the sizing holes provided.
Clean and maintain your Apple Watch bands: To keep your bands looking their best, clean them regularly with a soft, lint-free cloth and mild soap if needed. Avoid using harsh chemicals or abrasive materials that could damage the band’s material.
Explore different types of bands and styles: Once you’ve mastered the art of changing Apple Watch bands, you can have fun exploring the wide range of options available. From sporty to elegant, there’s a band out there to suit every occasion and personal style.
With these simple steps, you can easily change the band on your Apple Watch and give it a fresh new look. So go ahead, experiment with different bands, and make your Apple Watch truly your own!
Gather the necessary tools
Before you begin the process of changing your Apple Watch band, it’s essential to gather the necessary tools. Having everything ready will make the process smoother and more efficient. Here are the tools you’ll need:
1. Your Apple Watch: This is the centerpiece of the operation. Make sure your Apple Watch is fully charged and functioning properly before you dive into changing the band.
2. The new band: Choose a band that suits your style and preferences. Whether you prefer a leather band, a sporty silicone band, or a fashionable metal band, make sure to select one that is compatible with your Apple Watch model and size.
3. A clean, flat surface: Find a well-lit and clutter-free area to work in. A clean desk or table will ensure that you can see all the small components and prevent any accidental damage to your Apple Watch.
4. A soft cloth or microfiber cloth: Keep a soft, lint-free cloth or microfiber cloth nearby to wipe down your Apple Watch and remove any dust or smudges. This will help maintain its pristine condition during the band-changing process.
5. Optional tools: Depending on the type of band you’re changing, you may need additional tools. For example, if you’re replacing a link bracelet or metal band, you may require a small pin tool or a special screwdriver to remove the links.
Taking the time to gather these tools beforehand will ensure that you have everything you need to successfully change your Apple Watch band. It will also prevent any potential frustration or interruptions during the process.
Now that you have all the necessary tools, you’re ready to move on to the next step: choosing a new band that fits your Apple Watch model and size.
Choose a new band that fits your Apple Watch model and size
Selecting the right band for your Apple Watch is crucial to ensure a proper fit and compatibility. With a wide range of bands available, you can personalize your watch and match it to your style. Here’s how to choose a new band that fits your Apple Watch model and size:
1. Determine your Apple Watch model: Check the back of your Apple Watch or go to the settings on your device to find the model number. It may also be helpful to know the size of your Apple Watch, which is typically 38mm, 40mm, 42mm, or 44mm.
2. Research band compatibility: Different Apple Watch models have specific band compatibility. Consult the official Apple website or trusted sources to find out which bands are compatible with your Apple Watch model and size.
3. Explore the band options: Apple offers a wide range of band options, including sport bands, leather bands, stainless steel bands, woven nylon bands, and more. Consider your lifestyle, fashion preferences, and functionality needs when browsing through the available options.
4. Consider the band size: Bands come in various sizes, ranging from small to large. Ensure that you choose a band size that fits your wrist comfortably. Some bands offer adjustable sizing options to provide a more customized fit.
5. Check reviews and ratings: Read reviews and ratings from other users to get an idea of the quality, durability, and comfort of the bands you’re interested in. This will help you make an informed decision before purchasing.
6. Visit an Apple Store or authorized retailer: If possible, visit an Apple Store or an authorized retailer to try on different bands and see how they look and feel on your wrist. This hands-on experience can help you make a confident choice.
7. Order or purchase the band: Once you have identified the perfect band for your Apple Watch, you can either order it online through the Apple website or purchase it from an authorized retailer. Ensure that you select the correct size and model compatibility when making your purchase.
By following these steps, you’ll be able to select a new band that not only complements your Apple Watch but also fits comfortably on your wrist. Now that you’ve chosen your new band, it’s time to move on to the next step: removing the current band from your Apple Watch.
Remove the current band
Before you can attach a new band to your Apple Watch, you’ll first need to remove the current band. Follow these simple steps to remove the existing band:
1. Flip your Apple Watch over: Turn your Apple Watch over so that the backside is facing up. This will expose the band release buttons located on both sides of the watch.
2. Locate the band release buttons: Identify the two small buttons located near the top and bottom of the backside of the watch. These buttons are used to release the current band.
3. Press and hold one of the buttons: Choose either the top or bottom button and press and hold it down. Keep it pressed until the band is released.
4. Slide the band towards the center of the watch: While holding down the band release button, slide the current band towards the center of the watch. This will detach the band from the watch case.
5. Repeat the process for the other side: Release the first band completely and then repeat the steps for the other side of the watch. Press and hold the band release button and slide the band towards the center to remove it.
Note: Some bands may have a different release mechanism, such as a button or a buckle. For these types of bands, follow the specific instructions provided by the manufacturer.
With both sides of the band successfully removed, you can now proceed to the next step of attaching the new band to your Apple Watch. Remember to keep the existing band in a safe place in case you want to switch back to it in the future or in case you need it for any warranty or repair purposes.
Slide the band release button
Once the current band is removed from your Apple Watch, it’s time to slide the band release button in order to prepare the watch for the new band. Here’s how to slide the band release button:
1. Orient your Apple Watch: Turn your Apple Watch so that the face is facing upward, and you can see the backside of the watch where the band release buttons are located.
2. Locate the band release button: Identify the band release button on one side of the watch. This button is typically a small rectangular or circular-shaped button located near the connection point of the band.
3. Press and hold the band release button: Using your finger or a small tool, press and hold the band release button down. Maintain pressure on the button while proceeding to the next step.
4. Slide the band into the release position: While continuing to hold down the band release button, gently slide the band towards the center of the watch. You should see the band release mechanism engage and the connection point opening up.
5. Repeat the process for the other side: Once you have released one side of the band, repeat the steps for the other side. Locate the band release button on the opposite side of the watch and press and hold it down. Slide the band towards the center of the watch to open the connection point.
Note: The band release buttons may require a firm press, but be cautious not to apply excessive force that could damage your Apple Watch. If you’re having trouble sliding the band, double-check to ensure that you are pressing the correct button and that you have a good grip on both the band and the watch.
With the band release buttons engaged and the connection points open, your Apple Watch is now ready to have the new band attached. The next section will guide you through the process of sliding the new band into your Apple Watch.
Slide the band out from the watch
Now that the band release buttons on your Apple Watch are engaged, it’s time to slide the current band out from the watch. Follow these steps to safely remove the band:
1. Hold your Apple Watch securely: Make sure you have a firm grip on your Apple Watch with one hand, ensuring that the watch face is facing up and the backside is visible.
2. Identify the band connection point: Locate the open connection point on one side of the watch where the band is inserted. It will appear as a small rectangular or circular-shaped slot just above the band release button.
3. Slide the band out of the connection point: With the connection point visible, gently but firmly slide the band out from the watch. Apply consistent and even pressure to ensure a smooth removal without bending or damaging the band or the watch.
4. Repeat the process for the other side: Once you have successfully removed one side of the band, repeat the steps for the other side. Locate the open connection point and slide the band out in the same gentle but firm manner.
Note: Some bands may have a different release mechanism, such as a button or a buckle. For these types of bands, follow the specific instructions provided by the manufacturer to safely remove the band from your Apple Watch.
By sliding the band out from the watch, you have now successfully removed the current band and are ready to attach the new band. In the next section, we will guide you through the process of attaching the new band to your Apple Watch.
Attach the new band
Now that you have removed the current band from your Apple Watch, it’s time to attach the new band. Follow these straightforward steps to securely attach the new band:
1. Orient your Apple Watch: Ensure that your Apple Watch is facing upward, with the backside visible and the band release buttons engaged.
2. Align the new band: Take the new band and align it with the connection points on the watch. Make sure that the band is positioned correctly and that the connector is aligned with the slot on the watch.
3. Slide one end of the new band into the slot: Hold the Apple Watch and gently slide one end of the new band into the open connection point slot. Apply slight pressure until you hear or feel a satisfying click, indicating that the band is securely attached.
4. Repeat the process for the other side: Once one end of the new band is securely attached, repeat the previous step for the other side. Align the second end of the band with the open connection point slot on the opposite side of the watch and slide it in until it clicks into place.
5. Ensure the band is securely attached: After attaching both ends of the new band, check that they are firmly in place. Gently tug on the band to verify that it is securely attached without any wiggling or movement. This will ensure that the band stays in place during everyday wear.
Note: Some bands may have a different attachment mechanism, such as a clasp or a buckle. For these types of bands, follow the specific instructions provided by the manufacturer to properly secure the new band onto your Apple Watch.
Once the new band is securely attached, you can now move on to the next step: sliding the new band into the watch and ensuring its fit. This will be discussed in the following section.
Slide the new band into the watch
With the new band securely attached to your Apple Watch, the next step is to slide the band into the watch itself. Follow these steps to ensure a proper fit:
1. Hold your Apple Watch: Ensure that your Apple Watch is oriented with the front-facing up and the backside visible, where the connection points are located.
2. Identify the slot on the back of the watch: Look for the slot or channel on the backside of the watch, just above where the band is attached. This slot is where the new band will be inserted.
3. Hold the watch securely: Place one hand firmly on the watch face while gently holding the new band with your other hand. This will ensure stability as you slide the band into the watch.
4. Slide one end of the band into the channel: With the watch held securely, align one end of the new band with the slot on the back of the watch. Slide the end of the band into the channel, applying gentle but steady pressure.
5. Repeat for the other side: With one end of the band inserted into the watch, repeat the previous step for the other side. Align the second end of the band with the slot on the backside of the watch and slide it in until it’s fully inserted.
6. Ensure both sides are securely attached: After sliding both ends of the new band into the watch, check that they are snugly and securely attached. Gently tug on the band to ensure it has properly clicked into place and doesn’t feel loose.
Note: The band should slide smoothly into the channel without any excessive force. If you encounter resistance or difficulty, double-check that the band is correctly aligned and make sure to avoid forcing it.
Once the new band is securely inserted into the watch, you can proceed to the next step of adjusting the fit of the new band. This will ensure a comfortable and custom fit for your Apple Watch.
Ensure the band is securely attached
After sliding the new band into your Apple Watch, it’s important to double-check that it is securely attached. Ensuring a tight and secure fit will prevent any accidental detachment during everyday use. Follow these steps to ensure that your band is securely attached:
1. Inspect the connection points: Take a close look at the connection points where the band attaches to the watch. Make sure that the band is fully inserted into the channels and that there are no visible gaps or looseness.
2. Feel the stability of the band: Gently run your finger along the edges of the band where it connects to the watch. It should feel smooth and flush without any noticeable movement or gaps between the band and the watch case.
3. Give the band a gentle tug: With the watch securely on your wrist, lightly tug on the band to test its stability. The band should not easily come off or slide around on the watch. It should feel snug and secure against your wrist.
4. Check for any twisting or misalignment: Examine the band to ensure that it is not twisted or misaligned. Straighten out any twists and ensure that the band lays flat against your wrist for optimal comfort and style.
5. Test the band’s flexibility: Move your wrist in different directions and check if the band flexes and moves with your movements. A securely attached band should provide flexibility without feeling too loose or tight.
6. Repeat the checks on both sides: Perform these checks on both sides of the watch to ensure that the new band is securely attached on both ends.
If at any point you encounter issues with the band not being securely attached or if you feel that it is loose, readjust the band by repeating the previous steps to ensure a proper connection. It’s important to have a secure band attachment to prevent accidental slipping or loss of the Apple Watch during wear.
With the new band securely attached, you can now confidently wear your Apple Watch and enjoy its refreshed look and feel. However, before you start using it, make sure to adjust the fit of the new band to ensure optimal comfort, which will be covered in the next section.
Repeat the process for the other side of the watch
After ensuring that one side of the new band is securely attached to your Apple Watch, it’s important to repeat the process for the other side. This ensures a balanced and proper fit and guarantees that both ends of the band are securely fastened. Follow these steps to successfully attach the new band on the other side:
1. Hold your Apple Watch securely: Ensure that you have a firm grip on your Apple Watch, with one hand holding the watch face and the other hand holding the new band.
2. Align the other end of the band: Take the second end of the new band and align it with the open connection point on the opposite side of the watch.
3. Slide the band into the slot: With the end of the band aligned with the slot, gently slide it into the connection point. Apply slight pressure until you hear or feel a click, indicating that the band is securely attached.
4. Ensure a snug fit: Verify that both ends of the new band are snugly and evenly attached to the watch. Check for any gaps or looseness by running your finger along the edges where the band connects to the watch.
5. Perform a tug test: Give the band a gentle tug to confirm that it remains securely in place. The band should not easily come off or slide around on the watch. It should feel secure against your wrist.
6. Repeat these steps if necessary: If you encounter any issues or if the band doesn’t feel securely attached, repeat the steps above to ensure that both ends of the band are properly connected to the watch.
By repeating the process for the other side, you are ensuring a balanced and stable fit for your new band. This will enhance the overall comfort and reliability of your Apple Watch, allowing you to wear it with confidence.
Once both sides of the new band are securely attached, you can move on to the next step: adjusting the fit of the band to ensure optimal comfort. This will be covered in the following section.
Adjust the fit of the new band
With the new band securely attached to your Apple Watch, it’s important to adjust the fit to ensure optimal comfort and a perfect fit on your wrist. Here are the steps to adjust the fit of your new band:
1. Put on your Apple Watch: Wear your Apple Watch as you normally would, ensuring that the band is positioned correctly on your wrist.
2. Check the fit: Pay attention to how the band feels on your wrist. Does it feel too tight or too loose? Take note of any discomfort or the need for adjustment.
3. Adjust the band: If the band feels too tight, find the sizing holes on the band and open the clasp or buckle to loosen it. If the band feels too loose, tighten it by moving the clasp or buckle to a tighter setting.
4. Test the adjustment: After making the adjustment, wear your Apple Watch for a few moments to test the fit. Ensure that it feels secure without being overly tight or loose, allowing for a comfortable and snug fit on your wrist.
5. Repeat the adjustment if necessary: If the initial adjustment doesn’t provide the desired fit, make additional adjustments until you achieve the perfect balance of comfort and security.
Note: Some bands may offer additional adjustment options, such as removable links or different sizing options. Refer to the specific instructions provided by the band manufacturer to make any further adjustments as needed.
Remember that the fit of your Apple Watch band may vary depending on factors such as temperature and wrist swelling. It’s advisable to periodically check and readjust the band to maintain the best fit throughout the day.
By adjusting the fit of your new band, you can ensure that your Apple Watch remains comfortably and securely in place on your wrist, allowing you to enjoy all its features and functions with ease.
Now that you have successfully adjusted the fit of your new band, you’re ready to start using and enjoying your Apple Watch. However, don’t forget to regularly clean and maintain your bands to keep them in top condition, which we will discuss in the next section.
Clean and maintain your Apple Watch bands
To keep your Apple Watch bands looking their best and in good condition, regular cleaning and maintenance are essential. Follow these tips to clean and maintain your Apple Watch bands:
1. Determine the material of your band: Different bands may require different cleaning methods. Determine the material of your band (e.g., silicone, leather, stainless steel) to ensure you use the appropriate cleaning technique.
2. Remove the band from the watch: If possible, remove the band from your Apple Watch before cleaning. This will allow for a more thorough cleaning and prevent any damage to the watch itself.
3. Follow the manufacturer’s instructions: Check the care instructions provided by the band manufacturer. They may have specific recommendations for cleaning and maintaining the band based on its material.
4. Clean with mild soap and water: For most bands, a gentle cleaning with mild soap and water is sufficient. Use a soft cloth or sponge to gently scrub away dirt and grime. Avoid submerging the band in water unless recommended by the manufacturer.
5. Avoid harsh chemicals and abrasives: Harsh chemicals, solvents, and abrasive materials can damage the band’s material. Avoid using them during the cleaning process. Stick to mild soap and water or consider purchasing specialized cleaning products for your specific band material.
6. Dry the band thoroughly: After cleaning, make sure to dry the band thoroughly with a soft, lint-free cloth. Moisture trapped between the band and your wrist can cause discomfort and potentially damage the band.
7. Rotate usage of bands: If you have multiple bands, consider rotating their usage. This will allow each band to have a break from constant wear and help prolong their lifespan.
8. Store bands appropriately: When not in use, store your bands in a clean and dry place. Avoid exposure to direct sunlight or high temperatures, as this can cause damage or discoloration.
9. Check for wear and tear: Regularly inspect your bands for any signs of wear and tear, such as fraying, loose stitching, or cracks. If you notice any damage, consider replacing the band to ensure proper functionality and appearance.
By following these cleaning and maintenance tips, you can keep your Apple Watch bands in great shape for a long time. Remember, the longevity and appearance of the bands are dependent on how well you take care of them.
Now that you know how to clean and maintain your Apple Watch bands, you can confidently wear your watch and enjoy its stylish and functional features for many more years to come.
Explore different types of bands and styles
One of the best things about owning an Apple Watch is the ability to personalize it with different bands and styles. Whether you’re looking for a sporty, casual, or elegant look, there are numerous options to suit your taste. Here are some ways to explore and discover different types of bands and styles for your Apple Watch:
1. Official Apple bands: Start by exploring the official Apple bands available directly from Apple. They offer a wide range of bands, including sport bands, Milanese loops, leather bands, and more. These bands are designed with high-quality craftsmanship and are often compatible with multiple Apple Watch models.
2. Third-party bands: Look beyond the official Apple bands and explore third-party options. There are various manufacturers and brands that offer bands at different price points and in a wide array of styles and materials. Look for reputable third-party providers with positive reviews and a focus on quality.
3. Material options: Consider different materials for your band, such as silicone, leather, stainless steel, nylon, or even woven fabrics. Each material offers a unique look and feel, so think about how the band’s material will align with your personal style and comfort preferences.
4. Color and pattern choices: Bands come in a plethora of colors and patterns to match your personal style, outfit, or occasion. Whether you prefer vibrant solid colors, subtle earth tones, or eye-catching patterns, there is a band out there to help you express your individuality.
5. Band size and compatibility: Ensure that the bands you explore are available in the size and compatibility that matches your Apple Watch model. Pay attention to band sizes (e.g., 38mm, 42mm, 40mm, 44mm) and compatibility with specific Apple Watch generations, as these factors vary depending on the band.
6. Try before you buy: If possible, visit an Apple Store or an authorized retailer to try on different bands and see how they look and feel on your wrist. This hands-on experience can give you a better sense of the band’s quality, comfort, and overall aesthetic appeal.
7. Mix and match: Don’t be afraid to mix and match different bands to create your own unique style. Consider pairing a leather band with a stainless steel watch, or a sport band with an aluminum watch, to experiment with different combinations.
8. Stay updated with new releases: Keep an eye on Apple’s website and other reputable sources for updates on new band releases. Apple often introduces new band options with special editions or seasonal collections, giving you even more opportunities to find the perfect band for your Apple Watch.
By exploring different types of bands and styles, you can continually refresh the look of your Apple Watch and elevate your personal style. Experiment with different bands to match specific occasions or simply to express your unique personality through your watch.
Now that you’re equipped with various ways to explore different bands and styles, go ahead and have fun finding the perfect bands to suit your Apple Watch and reflect your own personal style!