
Checking 4G Coverage
Before enabling 4G on your iPhone 11, it's crucial to ensure that your location has adequate 4G coverage. This step is essential because the availability and strength of 4G signals can significantly impact your network experience. Here's how you can check the 4G coverage in your area:
-
Consult Your Carrier's Coverage Map: Most major carriers provide detailed coverage maps on their websites or through dedicated mobile apps. By entering your location or ZIP code, you can quickly determine the extent of 4G coverage in your area. These maps often use color-coding to indicate signal strength, allowing you to identify areas with robust 4G connectivity.
-
Use Network Coverage Apps: Several third-party apps, such as OpenSignal and RootMetrics, offer real-time coverage maps and crowd-sourced data on network performance. These apps can provide valuable insights into the quality of 4G coverage in your vicinity, including signal strength, download/upload speeds, and network reliability.
-
Check Signal Bars: On your iPhone 11, the number of signal bars displayed in the status bar can offer a basic indication of the 4G signal strength. While this method is less precise than using coverage maps or apps, it can give you a quick visual cue about the availability of 4G signals in your current location.
-
Perform Speed Tests: Utilize speed test apps like Ookla's Speedtest or Fast.com to measure the actual download and upload speeds of your current network connection. If the results indicate high speeds, it's likely that you are connected to a 4G network.
By verifying the 4G coverage in your area through these methods, you can make an informed decision about enabling 4G on your iPhone 11. This proactive approach can help you avoid potential connectivity issues and ensure a seamless 4G experience on your device.
Accessing Network Settings
Accessing the network settings on your iPhone 11 is a straightforward process that allows you to configure various aspects of your device's connectivity. Whether you're looking to enable 4G, manage Wi-Fi connections, or adjust cellular data settings, accessing the network settings provides you with the flexibility to tailor your iPhone's network behavior to your specific needs.
To access the network settings on your iPhone 11, follow these simple steps:
-
Open the Settings App: Begin by locating and tapping the "Settings" app on your device's home screen. The Settings app is represented by a gear icon and serves as the central hub for customizing your iPhone's configuration.
-
Navigate to "Cellular" or "Mobile Data": Within the Settings app, scroll down and look for the "Cellular" or "Mobile Data" option. This section allows you to manage your cellular data settings, including enabling 4G and controlling data usage for individual apps.
-
Select "Cellular Data Options": Once you've accessed the "Cellular" or "Mobile Data" section, tap on "Cellular Data Options" to delve into more advanced settings related to your device's cellular connectivity.
-
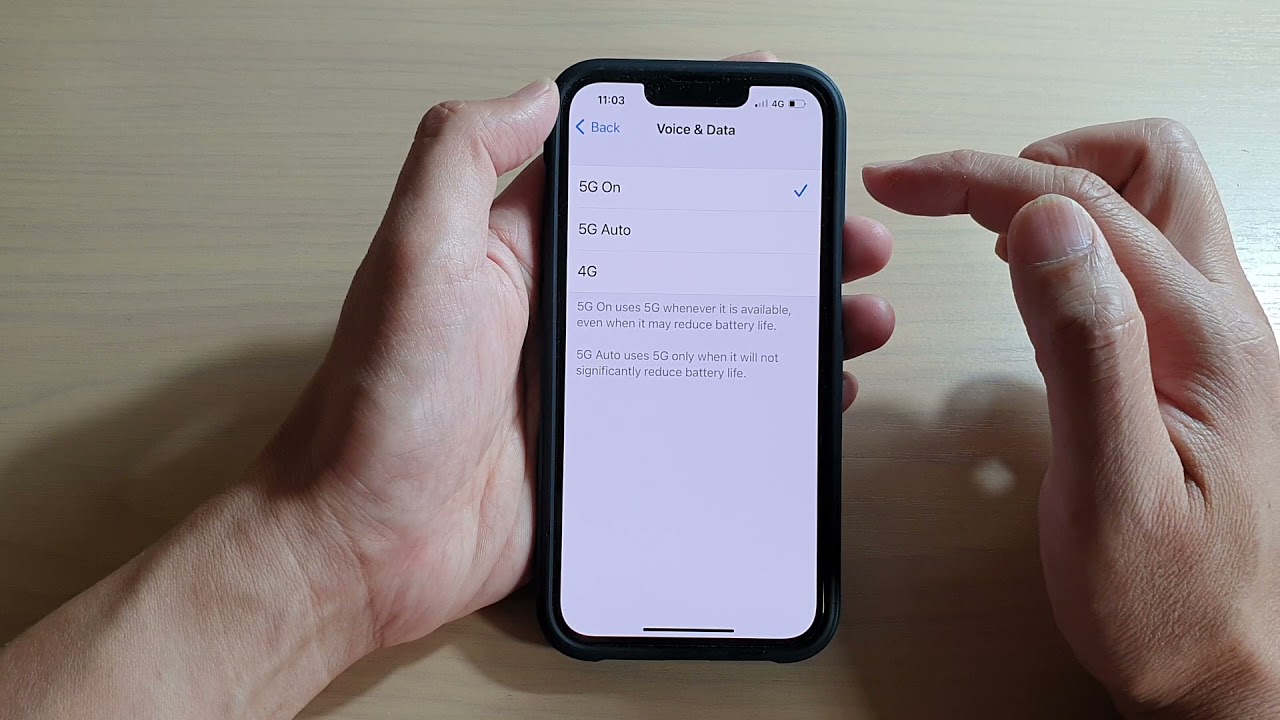
Choose "Voice & Data": Within the "Cellular Data Options" menu, you'll find the "Voice & Data" setting, which governs the preferred network mode for your iPhone. Tapping on this option presents you with a selection of network modes, including 2G, 3G, and 4G.
-
Select "LTE" or "4G": To enable 4G on your iPhone 11, choose the "LTE" or "4G" option from the available network modes. This selection ensures that your device prioritizes 4G connectivity for data transmission, delivering faster speeds and enhanced network performance.
By following these steps, you can seamlessly access the network settings on your iPhone 11 and configure the device to utilize 4G for optimal network performance. This level of control empowers you to harness the full potential of 4G technology, enabling faster downloads, smoother streaming, and improved overall connectivity on your iPhone 11.
Selecting 4G Network Mode
Selecting the 4G network mode on your iPhone 11 is a pivotal step in optimizing your device for high-speed data connectivity. By choosing the 4G network mode, you empower your iPhone 11 to leverage the advanced capabilities of 4G technology, unlocking faster data transfer speeds, lower latency, and enhanced network performance. Here's a detailed exploration of the process involved in selecting the 4G network mode on your iPhone 11:
Navigating to Network Settings
To initiate the process, begin by accessing the "Settings" app on your iPhone 11. This central hub for device customization allows you to delve into various configuration options, including those related to network connectivity.
Accessing Cellular Data Options
Within the "Settings" app, navigate to the "Cellular" or "Mobile Data" section. This is where you can manage your device's cellular data settings, providing you with the flexibility to tailor your network preferences to suit your specific requirements.
Exploring Cellular Data Options
Once you've accessed the "Cellular" or "Mobile Data" section, tap on "Cellular Data Options" to delve into more advanced settings related to your device's cellular connectivity. This is where you can fine-tune the network mode selection to align with your desired performance parameters.
Choosing the Preferred Network Mode
Within the "Cellular Data Options" menu, locate the "Voice & Data" setting. Tapping on this option presents you with a selection of network modes, including 2G, 3G, and 4G. It's at this juncture that you can exert control over your device's network behavior, steering it towards the high-speed capabilities of 4G technology.
Selecting LTE or 4G
To enable 4G on your iPhone 11, opt for the "LTE" or "4G" option from the available network modes. By making this selection, you instruct your device to prioritize 4G connectivity for data transmission, thereby harnessing the full potential of 4G technology.
By following these steps, you can seamlessly navigate through the network settings on your iPhone 11 and select the 4G network mode. This strategic configuration empowers your device to capitalize on the numerous benefits offered by 4G technology, including accelerated data speeds, enhanced network reliability, and an overall superior mobile connectivity experience.
Restarting the iPhone
Restarting your iPhone 11 can serve as a simple yet effective troubleshooting step to address various network-related issues and ensure optimal performance. This process involves powering off the device and then turning it back on, which can help resolve temporary software glitches, refresh network connections, and restore the device to a stable state. Here's a detailed exploration of the steps involved in restarting your iPhone 11:
Initiating the Restart Process
To commence the restart procedure, begin by pressing and holding the side button along with either volume button until the power off slider appears on the screen. The side button is located on the right side of the device, while the volume buttons are positioned on the left. Once the power off slider materializes, slide it from left to right to power off the iPhone.
Powering On the iPhone
After the device has been powered off, press and hold the side button again until the Apple logo appears on the screen. This signifies that the iPhone is booting up and initializing its operating system. As the device completes the startup sequence, it re-establishes network connections and undergoes a fresh initialization process, potentially resolving any transient network issues that may have been affecting its performance.
Verifying Network Connectivity
Upon the iPhone's reboot, it's advisable to verify the network connectivity to ensure that the device has successfully re-established its connections. This can be accomplished by checking the signal bars in the status bar, attempting to browse the web, or initiating a test call. By confirming that the network functions are operational post-restart, you can ascertain the effectiveness of the restart process in addressing any underlying network-related irregularities.
Resolving Network-Related Issues
In scenarios where the iPhone was experiencing network-related issues, such as slow data speeds, intermittent connectivity, or unresponsive network features, the act of restarting the device can often serve as a remedy. By initiating a restart, you provide the device with an opportunity to reset its network configurations, clear temporary software hiccups, and re-establish stable connections with cellular towers and Wi-Fi networks.
By following these steps, you can effectively restart your iPhone 11, leveraging this straightforward yet impactful approach to troubleshoot network issues and optimize the device's overall performance. This proactive measure can help maintain a seamless and reliable network experience on your iPhone 11, ensuring that you can fully harness the capabilities of 4G technology without encountering persistent connectivity challenges.
Troubleshooting Connection Issues
When encountering connectivity issues on your iPhone 11, it's essential to employ effective troubleshooting strategies to identify and resolve the underlying causes. By systematically addressing potential network-related challenges, you can restore seamless connectivity and optimize the performance of your device. Here's a comprehensive guide to troubleshooting connection issues on your iPhone 11:
1. Check Signal Strength:
Begin by assessing the signal strength indicator on your device. If the signal bars are low or fluctuating, it may indicate poor network reception. In such instances, consider moving to a different location with better signal coverage to improve connectivity.
2. Enable Airplane Mode:
Activating Airplane Mode and then disabling it can trigger a reconnection to the network. This simple action can help resolve temporary network disruptions and re-establish stable connections with cellular towers and Wi-Fi networks.
3. Reset Network Settings:
Navigate to the "Settings" app, select "General," and then tap on "Reset." Choose "Reset Network Settings" to clear all network-related configurations and restore the device's network settings to their default state. This can resolve persistent connectivity issues stemming from corrupted network settings.
4. Update Carrier Settings:
Ensure that your iPhone 11 has the latest carrier settings installed. To check for updates, go to "Settings," select "General," and tap on "About." If a carrier settings update is available, you will be prompted to install it. Keeping the carrier settings up to date can address compatibility issues and enhance network performance.
5. Verify Data Roaming Settings:
If you are experiencing connectivity problems while traveling, verify that data roaming is enabled in the "Cellular" settings. Enabling data roaming allows your device to connect to partner networks when outside your carrier's coverage area, ensuring continuous network access.
6. Update iOS:
Regularly updating your iPhone's operating system to the latest iOS version can address software bugs and compatibility issues that may affect network connectivity. Check for available updates by navigating to "Settings," selecting "General," and tapping on "Software Update."
7. Contact Your Carrier:
If persistent connectivity issues persist, reaching out to your carrier's customer support can provide valuable insights and assistance. They can perform remote diagnostics, verify network coverage in your area, and offer tailored solutions to address specific network challenges.
By systematically applying these troubleshooting measures, you can effectively address connection issues on your iPhone 11 and ensure a reliable and seamless network experience. These proactive steps empower you to leverage the full potential of 4G technology, enabling you to enjoy fast data speeds, consistent connectivity, and enhanced network performance on your device.