
Setting up your email account on iPhone 11
Setting up your email account on your iPhone 11 is a straightforward process that allows you to conveniently access your emails on the go. Whether you use a personal email or a work-related one, having it configured on your iPhone 11 ensures that you stay connected and informed at all times.
To begin, unlock your iPhone 11 and navigate to the "Settings" app, which is represented by a gear icon. Once you've located the "Settings" app, tap on it to open the settings menu.
Next, scroll down the settings menu until you find the "Mail" option. The "Mail" option is represented by an envelope icon and is usually located in the fifth group of settings. Tap on "Mail" to access the email settings.
Within the "Mail" settings, you will see an option labeled "Accounts." Tap on "Accounts" to proceed with setting up your email account on your iPhone 11.
Under the "Accounts" section, tap on "Add Account." This action will prompt a list of popular email service providers to appear, such as Google, Yahoo, Outlook, and others. Select your email service provider from the list. If your email service provider is not listed, tap on "Other" to manually enter your email account details.
After selecting your email service provider or choosing "Other," you will be prompted to enter your email address and password. Once you've entered this information, tap "Next" to proceed.
Your iPhone 11 will then verify your email account details and establish a secure connection with your email server. This process may take a few moments, depending on your internet connection speed and the email service provider's server response time.
Upon successful verification, you will be presented with additional settings to customize your email account, such as enabling the synchronization of emails, contacts, calendars, and notes. You can choose to enable or disable these options based on your preferences.
Once you've configured these settings according to your preferences, tap "Save" to complete the setup process. Your email account is now successfully configured on your iPhone 11, and you can access it by tapping on the "Mail" app from your home screen.
By following these simple steps, you can effortlessly set up your email account on your iPhone 11, ensuring that you never miss an important email while you're on the move.
Accessing your email inbox on iPhone 11
Accessing your email inbox on your iPhone 11 is a fundamental aspect of staying connected and informed while on the go. With the seamless integration of email accounts on the iPhone 11, you can conveniently access and manage your emails with just a few taps.
To access your email inbox on your iPhone 11, start by unlocking your device and navigating to the home screen. Look for the "Mail" app, which is represented by an envelope icon, and tap on it to open the application. Upon opening the Mail app, you will be directed to the "Mailboxes" screen, where you can view all your email accounts and folders.
At the top left corner of the "Mailboxes" screen, you will find the "Mailboxes" button, which allows you to navigate back to the main screen from any subfolder or email view. Tap on the "Mailboxes" button to access a list of your email accounts and their respective inboxes.
Once you've accessed the list of email accounts, tap on the specific email account for which you want to view the inbox. This action will open the selected email account, displaying the inbox with all the received emails. You can scroll through the list of emails to view their subjects, senders, and preview snippets.
If you have multiple email accounts configured on your iPhone 11, you can easily switch between inboxes by tapping on the "Mailboxes" button and selecting a different email account. This seamless navigation allows you to stay organized and manage emails from various accounts with ease.
Upon accessing your email inbox, you can perform various actions such as reading, replying, forwarding, or deleting emails directly from your iPhone 11. Additionally, you can utilize the search functionality to quickly find specific emails by entering keywords or sender names in the search bar located at the top of the inbox screen.
Furthermore, the iPhone 11's Mail app offers features such as flagging emails, marking them as unread, moving them to different folders, and managing attachments. These capabilities empower you to efficiently handle your emails while on the move, ensuring that you stay on top of your communication tasks.
In summary, accessing your email inbox on your iPhone 11 is a user-friendly and intuitive process that enables you to stay connected and manage your emails with ease. Whether it's personal correspondence or work-related communication, the Mail app on the iPhone 11 provides a seamless platform for efficient email management on the go.
Selecting multiple emails for deletion
Managing a cluttered inbox can be a daunting task, especially when it comes to deleting multiple emails on your iPhone 11. However, the Mail app on the iPhone 11 offers a straightforward method for selecting multiple emails for deletion, allowing you to efficiently declutter your inbox and streamline your email management process.
To begin the process of selecting multiple emails for deletion, open the Mail app on your iPhone 11 and navigate to the inbox or folder containing the emails you wish to delete. Once you're in the desired email view, follow these simple steps to select multiple emails for deletion:
-
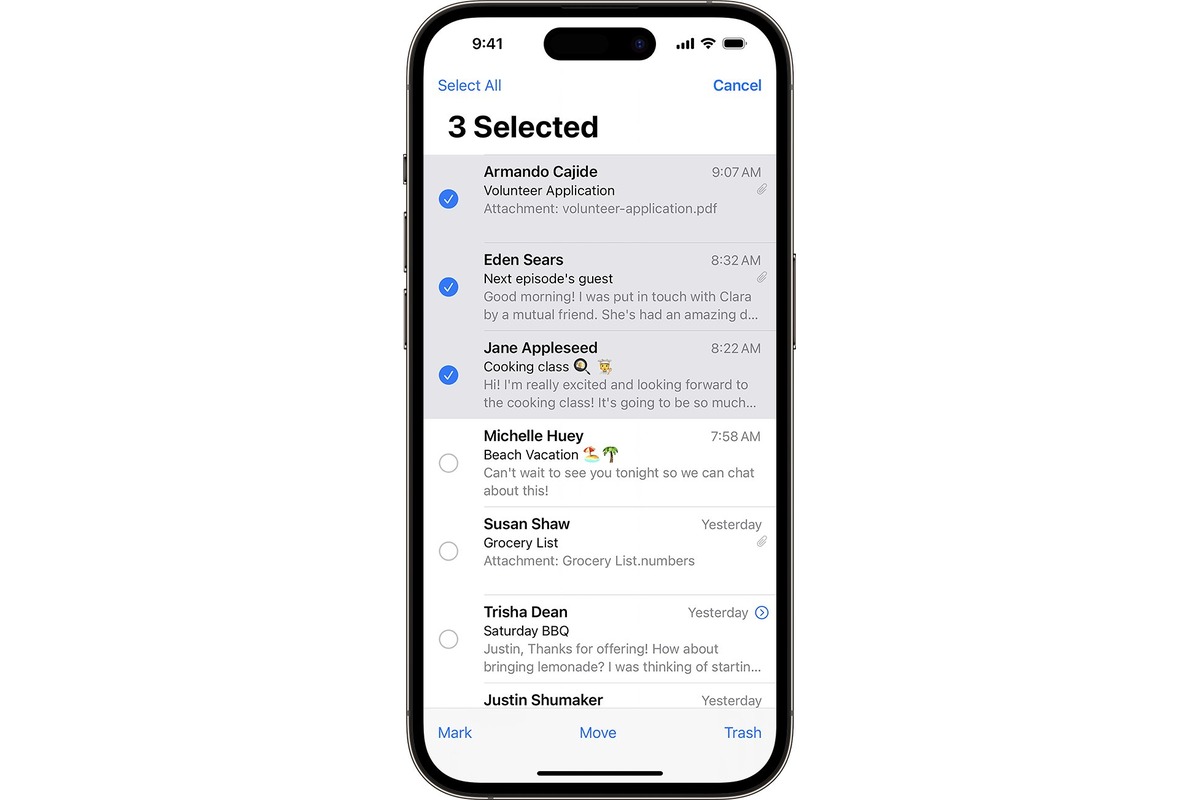
Tap and Hold: Press and hold your finger on any email in the list. This action will activate the selection mode, and you will notice that checkboxes appear next to each email in the list.
-
Selecting Individual Emails: While in the selection mode, you can tap on the checkboxes next to individual emails to select them for deletion. As you tap on the checkboxes, the selected emails will be highlighted, indicating that they are marked for deletion.
-
Selecting Multiple Emails at Once: If you want to select multiple emails at once for deletion, simply slide your finger up or down the screen while still holding the initial email. This gesture allows you to effortlessly select multiple emails in a single motion, streamlining the process of marking multiple emails for deletion.
-
Reviewing the Selection: Once you have selected the desired emails for deletion, take a moment to review the highlighted emails and ensure that you have included all the emails you wish to delete. This step helps prevent accidental deletion of important emails.
By following these steps, you can effectively select multiple emails for deletion within the Mail app on your iPhone 11. This streamlined process empowers you to declutter your inbox efficiently, making it easier to manage and prioritize your incoming emails.
With the ability to select multiple emails for deletion, you can maintain a well-organized inbox and ensure that irrelevant or outdated emails are promptly removed, allowing you to focus on the essential aspects of your communication and productivity.
In summary, the Mail app on the iPhone 11 provides a user-friendly method for selecting multiple emails for deletion, enabling you to maintain a clutter-free inbox and optimize your email management experience on the go.
Deleting multiple emails at once
Deleting multiple emails at once on your iPhone 11 is a time-saving and efficient way to declutter your inbox and manage your email flow. The Mail app on the iPhone 11 offers a straightforward method for deleting multiple emails simultaneously, streamlining the process and allowing you to maintain a well-organized email environment.
Once you have selected the desired emails for deletion using the method outlined in the previous section, the next step is to delete them all at once. Follow these simple steps to delete multiple emails at once on your iPhone 11:
-
Tap the Delete Button: After selecting the emails you wish to delete, look for the delete button, which is represented by a trash can icon. Tap on the delete button to initiate the deletion process. This action will prompt a confirmation dialog to appear, ensuring that you intend to delete the selected emails.
-
Confirm Deletion: Upon tapping the delete button, a confirmation dialog will appear, asking if you want to move the selected emails to the trash. Confirm the deletion by tapping on the "Trash" option within the dialog. This action will immediately move the selected emails to the trash folder, removing them from your inbox or designated email folder.
-
Review Deleted Emails: Once the selected emails have been moved to the trash folder, you can review the deleted emails to ensure that the correct messages have been removed. This step allows you to verify the deletion and recover any emails that may have been deleted accidentally.
By following these steps, you can efficiently delete multiple emails at once on your iPhone 11, simplifying the process of managing your inbox and maintaining a clutter-free email environment. This streamlined approach empowers you to stay organized and focused on essential communication tasks, ensuring that your email management experience is optimized for productivity and efficiency.
Deleting multiple emails at once is a valuable feature that enables you to declutter your inbox with ease, allowing you to prioritize important emails and maintain a streamlined communication workflow. With the intuitive functionality of the Mail app on the iPhone 11, managing your email correspondence becomes a seamless and efficient process, enhancing your overall productivity and communication experience.
Managing deleted emails in the trash folder
Once you have deleted emails and moved them to the trash folder on your iPhone 11, it's essential to understand how to manage these deleted emails effectively. The trash folder serves as a temporary holding space for deleted emails, providing an opportunity to review, recover, or permanently remove them from your email account.
Upon moving emails to the trash folder, it's important to periodically review its contents to ensure that no important messages have been inadvertently deleted. To manage deleted emails in the trash folder on your iPhone 11, follow these steps:
-
Accessing the Trash Folder: Open the Mail app on your iPhone 11 and navigate to the list of mailboxes. Locate the trash folder, which contains the deleted emails, and tap on it to access the contents.
-
Reviewing Deleted Emails: Once in the trash folder, you can review the deleted emails to verify their contents and assess whether any messages need to be recovered or permanently deleted. This step allows you to ensure that no critical emails have been mistakenly moved to the trash.
-
Recovering Deleted Emails: If you discover that certain emails were deleted in error or need to be retrieved, you can select them and choose the "Move" option to transfer them back to the desired email folder. This action effectively restores the selected emails to their original location, ensuring that important messages are not lost.
-
Permanently Deleting Emails: For emails that are no longer needed and can be permanently removed from your email account, you can select them and choose the "Delete" option within the trash folder. This action permanently removes the selected emails from the trash, freeing up storage space and decluttering your email environment.
-
Emptying the Trash Folder: Periodically emptying the trash folder is a good practice to free up storage space on your iPhone 11. To do this, tap on the "Edit" button in the trash folder, select the emails you want to permanently delete, and then tap on the "Delete All" option to remove them permanently.
By effectively managing deleted emails in the trash folder on your iPhone 11, you can maintain a well-organized email environment and ensure that important messages are handled appropriately. This proactive approach to managing deleted emails empowers you to stay in control of your email correspondence and maintain a streamlined communication workflow.