
Understanding Email Storage on iPhone 10
When it comes to managing emails on your iPhone 10, understanding how email storage works is crucial. The iPhone 10, like many other smartphones, utilizes the device's internal storage to store emails. This means that the more emails you keep, the more storage space they consume on your device.
Emails, especially those with attachments, can quickly accumulate and take up a significant portion of your iPhone's storage capacity. It's important to be mindful of this, as a full storage can lead to performance issues and limit the space available for other essential apps and data.
Additionally, the way emails are synchronized with your iPhone 10 can impact storage. For instance, if you have your email account set to sync all emails from the server, it means that every email in your account will be downloaded and stored on your device. This can lead to a substantial amount of storage being used, especially if you have a large volume of emails.
Understanding the implications of email storage on your iPhone 10 can help you make informed decisions about managing your emails effectively. By being mindful of the storage impact of your email usage, you can optimize your device's storage capacity and ensure that it is utilized efficiently.
In the following sections, we will explore how to set up email deletion preferences, delete individual emails, delete multiple emails at once, and manage deleted emails in the trash folder on your iPhone 10. These strategies will not only help you free up storage space but also streamline your email management process for a more organized and efficient experience.
Setting Up Email Deletion Preferences
Setting up email deletion preferences on your iPhone 10 is a proactive approach to managing your email storage efficiently. By configuring deletion settings, you can streamline the process of removing unnecessary emails and prevent your device from becoming cluttered with outdated or irrelevant messages.
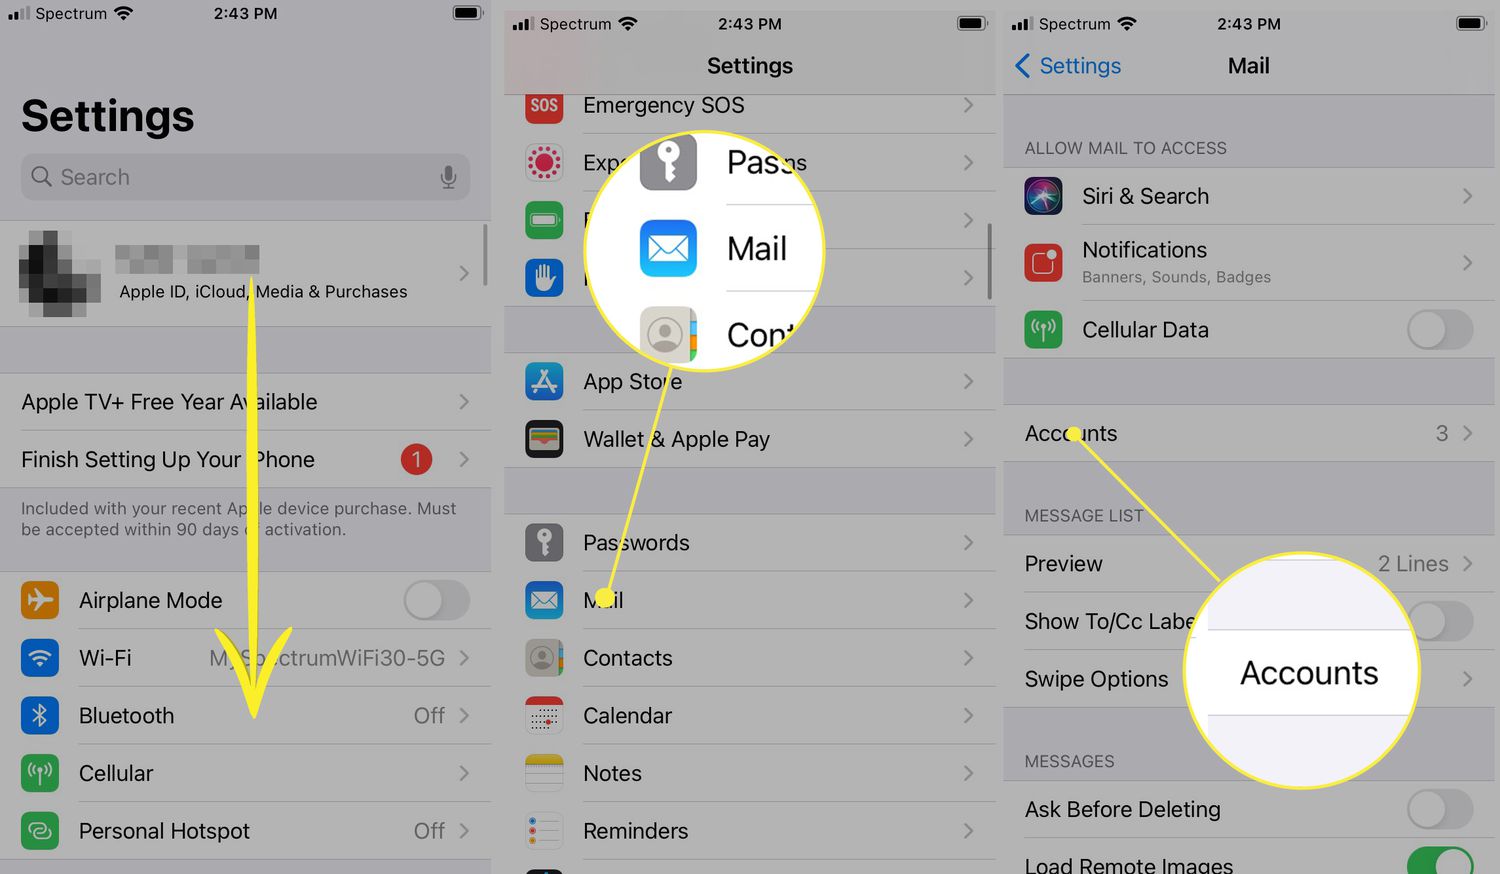
1. Adjusting Email Sync Settings
One of the fundamental aspects of setting up email deletion preferences is to adjust the email sync settings on your iPhone 10. By customizing the sync settings for your email account, you can control how far back in time your device will download and store emails. This allows you to limit the number of emails stored on your device, thereby optimizing storage usage.
2. Configuring Deletion Options
Your iPhone 10 provides various options for managing deleted emails. You can choose to either archive messages, which removes them from the inbox but retains them in a separate folder, or delete them permanently. Configuring these deletion options according to your preference ensures that you can efficiently remove unwanted emails from your device without the risk of inadvertently losing important messages.
3. Enabling Auto-Deletion
Enabling auto-deletion settings can be a convenient way to keep your inbox clutter-free. By setting up rules to automatically delete emails based on specific criteria, such as age or sender, you can ensure that your inbox remains organized and only contains relevant and recent messages. This proactive approach to email management can significantly reduce the accumulation of unnecessary emails on your device.
4. Utilizing Email Filters
Utilizing email filters allows you to categorize and prioritize incoming messages, making it easier to identify and delete emails that are no longer needed. By creating filters based on sender, subject, or keywords, you can streamline the process of identifying and deleting emails that do not require further attention, thereby optimizing your email storage and decluttering your inbox.
By implementing these email deletion preferences on your iPhone 10, you can take proactive steps to manage your email storage effectively. These settings not only help optimize your device's storage capacity but also contribute to a more streamlined and organized email management experience. With a well-configured email deletion setup, you can ensure that your inbox remains clutter-free and that your device's storage is utilized efficiently.
Deleting Individual Emails
Deleting individual emails on your iPhone 10 is a straightforward process that allows you to efficiently remove specific messages from your inbox, thereby freeing up storage space and decluttering your email interface. Whether you want to eliminate outdated communications, irrelevant newsletters, or unimportant notifications, the ability to delete individual emails provides you with the flexibility to curate your inbox according to your preferences.
To delete an individual email on your iPhone 10, start by opening the Mail app and navigating to the inbox or folder where the email is located. Once you have located the email you wish to delete, follow these simple steps:
-
Swipe to Delete: Swipe left on the email you want to delete, and a red "Trash" button will appear. Tap on the "Trash" button to move the email to the trash folder. This intuitive gesture-based method allows for quick deletion of individual emails without the need for multiple taps or complex navigation.
-
Select and Delete: Alternatively, you can tap on the email to open it and then look for the trash can icon or the "Delete" option, usually located at the bottom of the email interface. Tapping on this icon or option will prompt a confirmation dialog to ensure that you intend to delete the email. Once confirmed, the email will be moved to the trash folder.
-
Utilize 3D Touch: If your iPhone 10 supports 3D Touch, you can press firmly on the email you want to delete to reveal a preview. From the preview, you can then swipe up to reveal the "Trash" option and proceed to delete the email. This method provides a convenient way to delete individual emails using the pressure-sensitive 3D Touch feature.
It's important to note that deleting individual emails moves them to the trash folder, where they are retained until you take further action. This means that deleted emails are not permanently removed from your device immediately, allowing for the opportunity to recover them if needed. However, to free up storage space and ensure that deleted emails do not accumulate, it's essential to periodically empty the trash folder by permanently deleting its contents.
By leveraging the simple yet effective methods for deleting individual emails on your iPhone 10, you can maintain a well-organized inbox and optimize your device's storage capacity. This streamlined approach to email management empowers you to curate your email interface according to your preferences, ensuring that your inbox remains clutter-free and only contains relevant and essential communications.
Deleting Multiple Emails at Once
Managing a large volume of emails on your iPhone 10 often necessitates the need to delete multiple emails simultaneously. This efficient approach allows you to declutter your inbox and free up valuable storage space with minimal effort. Fortunately, the Mail app on your iPhone 10 provides intuitive methods for selecting and deleting multiple emails at once, streamlining the email management process.
To delete multiple emails at once, follow these simple steps:
-
Selecting Multiple Emails: Begin by launching the Mail app and navigating to the inbox or folder containing the emails you wish to delete. Tap the "Edit" button located at the top-right corner of the screen. This action enables the selection mode, allowing you to choose multiple emails by tapping on the circular checkboxes next to each message.
-
Bulk Deletion: Once you have selected the desired emails, tap the "Trash" icon or the "Delete" option, typically located at the bottom of the screen. This action moves all the selected emails to the trash folder simultaneously, streamlining the process of removing multiple messages from your inbox.
-
Utilizing Swipe Gestures: Alternatively, you can use swipe gestures to select multiple emails for deletion. In the edit mode, swipe left or right on individual emails to reveal the selection options, then tap on the checkboxes to choose multiple messages. Once selected, proceed to delete the emails using the designated action, such as the "Trash" icon.
By leveraging these methods, you can efficiently delete multiple emails at once, significantly reducing inbox clutter and optimizing your device's storage capacity. This streamlined approach to email management empowers you to maintain a well-organized inbox while ensuring that your iPhone 10's storage is utilized efficiently.
In addition to freeing up storage space, deleting multiple emails at once allows you to declutter your inbox, enhance productivity, and ensure that your email interface remains focused on essential communications. This proactive approach to email management contributes to a more streamlined and efficient email experience on your iPhone 10.
Managing Deleted Emails in the Trash Folder
Once emails are deleted on your iPhone 10, they are moved to the trash folder, where they await further action. Effectively managing the contents of the trash folder is essential for optimizing storage space and ensuring that deleted emails do not linger unnecessarily on your device. By implementing proactive strategies for managing deleted emails in the trash folder, you can streamline your email management process and maintain a clutter-free inbox.
1. Regular Trash Folder Review
Regularly reviewing the contents of the trash folder is a fundamental aspect of managing deleted emails. By periodically assessing the emails stored in the trash folder, you can identify and remove unnecessary messages, thereby preventing the accumulation of deleted emails that consume storage space. This proactive approach ensures that the trash folder remains streamlined and only contains emails that are truly disposable.
2. Permanent Deletion
While deleted emails are initially moved to the trash folder, they continue to occupy storage space until they are permanently deleted. Taking the initiative to permanently remove emails from the trash folder is crucial for optimizing storage capacity on your iPhone 10. By emptying the trash folder at regular intervals, you can free up valuable storage space and prevent deleted emails from lingering indefinitely on your device.
3. Recovery Considerations
Before permanently deleting emails from the trash folder, it's important to consider the potential need for email recovery. While the primary purpose of the trash folder is to store deleted emails temporarily, there may be instances where you need to retrieve a deleted message. Prior to emptying the trash folder, ensure that any emails requiring retention or further review are appropriately archived or moved to designated folders to facilitate easy retrieval if necessary.
4. Automated Trash Folder Management
Utilizing automated tools or settings to manage the contents of the trash folder can streamline the process of maintaining a clutter-free email interface. Some email applications offer features that automatically empty the trash folder after a specified period, ensuring that deleted emails are not retained indefinitely. By leveraging these automated capabilities, you can optimize your email management process and ensure that the trash folder remains efficiently managed.
By implementing these strategies for managing deleted emails in the trash folder, you can optimize storage space, maintain a well-organized email interface, and ensure that your iPhone 10's storage capacity is utilized efficiently. This proactive approach to trash folder management contributes to a streamlined and efficient email management experience, allowing you to focus on essential communications while keeping unnecessary clutter at bay.