
Setting up Email Accounts on iPhone 10
Setting up email accounts on your iPhone 10 is a straightforward process that allows you to access your emails on the go. Whether you use a personal email, work email, or both, the iPhone 10 provides a user-friendly interface for managing multiple email accounts in one place. Here's a step-by-step guide to help you seamlessly set up your email accounts on your iPhone 10:
-
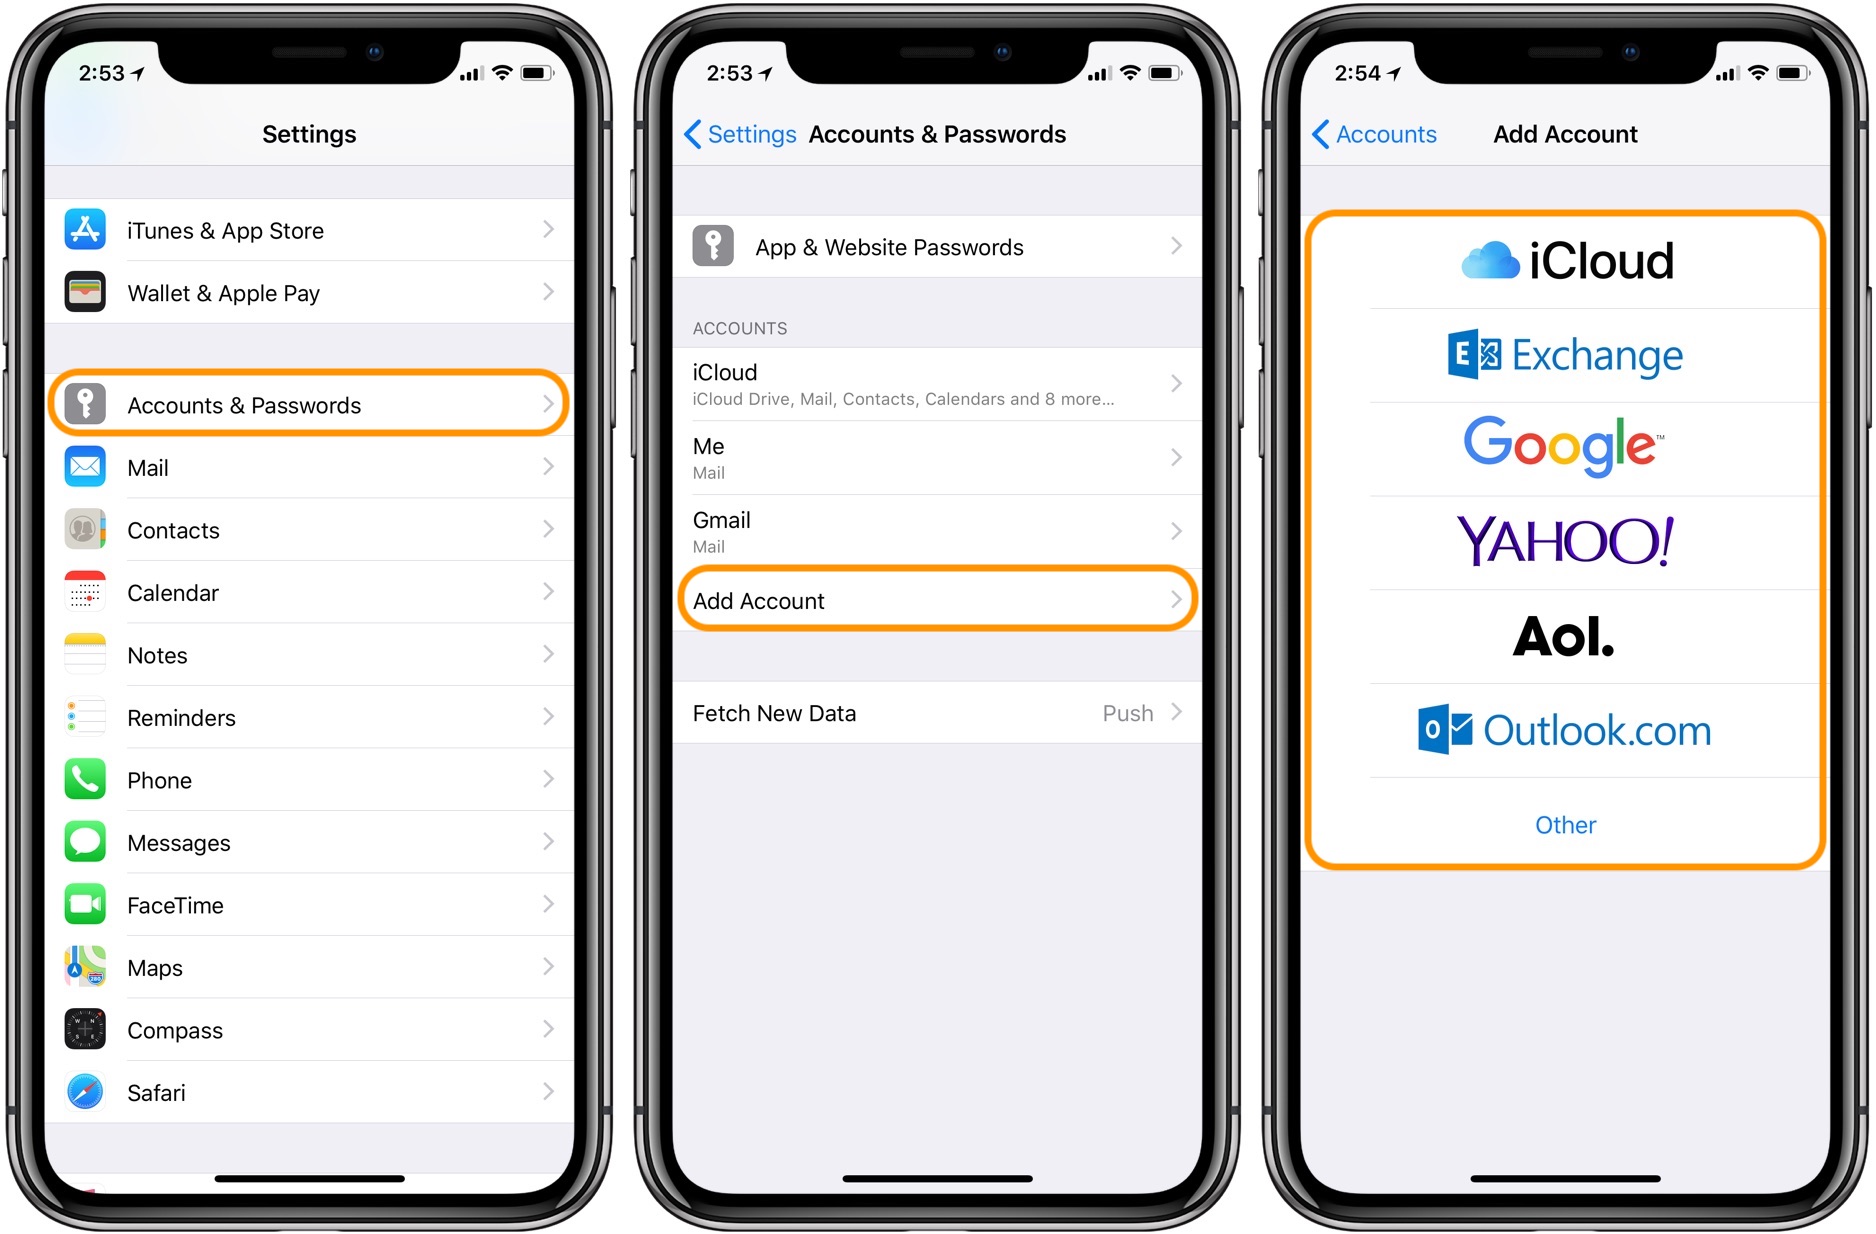
Open the Mail App: Begin by locating the Mail app on your iPhone 10's home screen. The Mail app icon features a white envelope against a blue background. Tap on the icon to launch the app.
-
Add New Account: Once the Mail app is open, tap on "Accounts" or "Add Account" to initiate the setup process. You will be presented with a list of popular email providers such as Gmail, Yahoo, Outlook, and others. If your email provider is listed, select it and proceed to the next step. If not, choose "Other" to manually configure your email account.
-
Enter Account Details: After selecting your email provider or choosing "Other," you will be prompted to enter your email address and password. Ensure that you have the correct login credentials at hand. Once entered, tap "Next" to proceed.
-
Account Verification: The Mail app will attempt to verify your email account settings. This process may take a few moments, depending on your internet connection and email provider. If the verification is successful, you will be directed to the next screen. If not, double-check your email address and password for accuracy.
-
Customize Settings: Upon successful verification, you may have the option to customize additional settings such as enabling Mail, Contacts, Calendars, and Notes for synchronization. You can also choose the time interval for fetching new emails and whether to sync other data associated with your email account.
-
Completion: Once you have customized the settings according to your preferences, tap "Save" or "Done" to complete the setup process. Your email account is now successfully added to the Mail app on your iPhone 10.
By following these steps, you can effortlessly set up your email accounts on the iPhone 10, ensuring seamless access to your emails while on the move. Whether it's personal correspondence or work-related communication, having your email accounts configured on your iPhone 10 allows you to stay connected and informed at all times.
Managing Email Notifications and Alerts
Managing email notifications and alerts on your iPhone 10 is essential for staying informed about incoming emails without being overwhelmed by constant interruptions. By customizing notification settings, you can strike a balance between staying updated and maintaining uninterrupted focus when needed. Here's how you can effectively manage email notifications and alerts on your iPhone 10:
Customizing Notification Settings
-
Accessing Notification Settings: To begin, navigate to the "Settings" app on your iPhone 10 and scroll down to find "Mail." Tap on "Mail" to access the email notification settings.
-
Enabling Notifications: Within the Mail settings, locate the "Notifications" option and ensure that it is enabled. This allows the Mail app to display notifications for incoming emails.
-
Customizing Notification Style: You can choose the notification style that best suits your preferences, such as banners, alerts, or none. Banners appear briefly at the top of the screen, while alerts require manual dismissal.
-
Sound and Vibration Settings: Customize the sound and vibration patterns for email notifications to distinguish them from other alerts on your iPhone 10. This allows you to recognize incoming emails based on the unique notification cues.
Managing Email Alerts
-
Priority Inbox: Consider enabling the priority inbox feature within your email account settings. This feature automatically categorizes important emails, ensuring that you receive alerts for crucial messages while minimizing notifications for less urgent correspondence.
-
VIP List: Utilize the VIP list feature to designate specific contacts whose emails warrant immediate attention. By adding contacts to the VIP list, you can ensure that you receive alerts for emails from important senders.
-
Do Not Disturb: Take advantage of the "Do Not Disturb" mode to temporarily silence all email notifications and alerts. This feature is particularly useful during meetings, focused work sessions, or when you simply need uninterrupted time.
Fine-Tuning Notification Preferences
-
Scheduling Quiet Hours: Consider scheduling specific quiet hours during which email notifications are muted. This allows you to establish dedicated periods for focused work or relaxation without being disturbed by email alerts.
-
App-Specific Settings: Explore the option to customize notification settings for individual email accounts. This allows you to tailor the notification preferences based on the importance of each email account.
By implementing these strategies, you can effectively manage email notifications and alerts on your iPhone 10, ensuring that you stay informed about important emails while maintaining control over interruptions. Customizing notification settings empowers you to strike a harmonious balance between staying connected and preserving uninterrupted focus as needed.
Organizing Emails with Folders and Labels
Organizing emails with folders and labels is a fundamental aspect of efficient email management, allowing you to categorize and prioritize your messages for streamlined access and retrieval. On your iPhone 10, the native Mail app provides robust features for creating folders and applying labels to your emails, empowering you to maintain a well-structured and easily navigable inbox.
Creating Folders
Creating folders within the Mail app enables you to systematically arrange your emails based on specific criteria, such as project-related correspondence, personal communication, or administrative messages. To create a new folder, follow these steps:
-
Access Mail Settings: Open the Mail app and navigate to the mailbox or email account for which you wish to create a new folder.
-
Tap Edit: In the mailbox view, tap "Edit" located in the upper-right corner of the screen.
-
Add New Folder: After tapping "Edit," a "New Mailbox" option will appear. Tap on it to create a new folder and provide a descriptive name that reflects the content it will contain.
Applying Labels
Labels serve as visual markers that help categorize and distinguish emails based on specific attributes or topics. While the Mail app on iPhone 10 does not have a native labeling feature, you can achieve similar functionality by utilizing the flagging and color-coding options:
-
Flagging Important Emails: Flagging emails that require special attention allows you to mark them as significant. This can be done by swiping an email to the right in the inbox view and tapping the flag icon.
-
Color-Coding Emails: Utilize the color categories feature to visually differentiate emails based on their significance or category. By assigning different colors to emails, you can quickly identify and prioritize them within your inbox.
Benefits of Organizing with Folders and Labels
Organizing emails with folders and labels offers several benefits, including:
-
Efficient Retrieval: Categorizing emails into folders and applying labels makes it easier to locate specific messages when needed, saving time and effort.
-
Enhanced Prioritization: By assigning labels or flags to emails, you can prioritize important messages and ensure they receive prompt attention.
-
Reduced Clutter: Organizing emails into folders helps declutter your inbox, creating a more organized and visually appealing email environment.
-
Improved Productivity: With a well-organized inbox, you can focus on relevant emails without being distracted by unnecessary clutter, leading to improved productivity and task management.
By leveraging the folder creation and email labeling features within the Mail app on your iPhone 10, you can effectively organize your emails, streamline your workflow, and maintain a structured inbox that supports efficient communication and task management.
Using Email Filters and Rules
Email filters and rules are powerful tools that enable you to automate the organization and management of incoming emails, thereby enhancing efficiency and productivity within the Mail app on your iPhone 10. By setting up filters and rules, you can establish predefined criteria for sorting, prioritizing, and handling incoming messages, ultimately streamlining your email workflow. Here's a detailed exploration of how you can leverage email filters and rules to optimize your email management experience:
Creating Email Filters
-
Accessing Filter Settings: To begin, navigate to the settings or preferences section of your email account within the Mail app. Look for the option to create filters or rules, often found under the "Mail Settings" or "Filters" menu.
-
Defining Filter Criteria: When creating a new filter, specify the criteria that incoming emails must meet to trigger the filter. This can include sender's email address, subject keywords, specific recipients, or other attributes.
-
Setting Filter Actions: Once the filter criteria are established, define the actions that the filter should perform when a matching email is detected. Common actions include moving the email to a designated folder, marking it as important, flagging it, or applying a specific label.
Implementing Email Rules
-
Understanding Rule Logic: Email rules operate based on conditional logic, allowing you to define if-then scenarios for automated email handling. For example, if an email is from a certain sender, then apply a specific action.
-
Creating Rule Conditions: When setting up rules, articulate the conditions that must be met for the rule to be triggered. This can encompass various parameters such as sender, recipient, subject line keywords, or email content.
-
Specifying Rule Actions: Similar to filters, you can specify the actions that should be executed when an incoming email satisfies the conditions defined in the rule. This may involve moving the email to a designated folder, forwarding it to another address, or marking it as read/unread.
Benefits of Email Filters and Rules
-
Automated Organization: By utilizing filters and rules, you can automate the categorization and sorting of incoming emails, ensuring that they are directed to the appropriate folders or receive specific designations based on predefined criteria.
-
Enhanced Prioritization: Filters and rules enable you to prioritize important emails by automatically flagging, labeling, or moving them to dedicated folders, allowing you to focus on critical messages without being inundated by less urgent correspondence.
-
Time Savings: With email management tasks automated through filters and rules, you can save time and effort that would otherwise be spent manually sorting and organizing incoming messages, thereby boosting overall productivity.
By harnessing the capabilities of email filters and rules within the Mail app on your iPhone 10, you can establish a refined email management system that optimizes efficiency, supports effective communication, and empowers you to stay organized amidst the influx of incoming messages.
Troubleshooting Email Access Issues
Encountering email access issues on your iPhone 10 can be a frustrating experience, disrupting your ability to stay connected and informed. However, with a systematic approach to troubleshooting common email access issues, you can swiftly identify and resolve the underlying causes, restoring seamless functionality to your email accounts. Here's a comprehensive guide to troubleshooting email access issues on your iPhone 10:
Check Network Connectivity
The first step in troubleshooting email access issues is to verify the status of your network connectivity. Ensure that your iPhone 10 is connected to a stable Wi-Fi network or has a reliable cellular data connection. If the network connection is unstable or unavailable, it can impede the retrieval and sending of emails.
Verify Server Settings
Confirm that the server settings for your email accounts are accurate and up to date. Check the incoming and outgoing server configurations, including the server addresses, port numbers, and security protocols (such as SSL or TLS). Incorrect server settings can prevent the Mail app from accessing your email accounts.
Restart the Mail App
If you encounter email access issues, restarting the Mail app can often resolve temporary glitches or performance hiccups. Close the Mail app completely and relaunch it to see if the problem persists. This simple step can refresh the app's functionality and address minor software-related issues.
Re-enter Account Credentials
Occasionally, email access issues may arise due to authentication errors or outdated login credentials. Navigate to the Mail settings on your iPhone 10, locate the problematic email account, and re-enter the correct username and password. This can rectify login authentication issues and restore access to your emails.
Clear Mail App Cache
The accumulation of temporary data and cache within the Mail app can lead to performance issues and hinder email access. Clearing the app's cache can help resolve such issues. To clear the Mail app cache, go to the iPhone 10's settings, select "Mail," and choose the option to clear the app's cache or temporary data.
Update iOS Software
Ensure that your iPhone 10 is running the latest version of iOS. Software updates often include bug fixes and enhancements that can address underlying issues affecting the Mail app's performance and email access. Check for available iOS updates in the Settings app to ensure your device is up to date.
Contact Email Service Provider
If persistent email access issues persist despite troubleshooting steps, it may be beneficial to reach out to your email service provider's support team. They can offer insights into server-side issues, account-specific configurations, or any ongoing service disruptions that may be impacting email access on your iPhone 10.
By systematically addressing potential causes and implementing troubleshooting steps, you can effectively resolve email access issues on your iPhone 10, ensuring uninterrupted access to your email accounts and seamless communication on the go.