
Prerequisites
Before you begin the process of creating a bootable macOS Sierra installer on a USB flash drive, there are a few things you’ll need to gather:
- A Mac computer with macOS Sierra or later installed
- A USB flash drive with a minimum capacity of 8GB
- The macOS Sierra installer file from the App Store
Make sure your Mac meets the system requirements for macOS Sierra and ensure that you have a stable internet connection to download the installer from the App Store. It’s crucial to have enough free space on your Mac’s hard drive to download and create the installer.
Additionally, it’s important to note that creating a bootable macOS Sierra installer will erase all the data on the USB flash drive. So, it’s recommended to back up any important files on the drive before proceeding.
Once you have all the necessary prerequisites in place, you’re ready to move on to the next step of downloading the macOS Sierra installer.
Step 1: Download macOS Sierra Installer
The first step in creating a bootable macOS Sierra installer is to download the installer file from the Mac App Store. Follow these steps to download macOS Sierra:
- Open the App Store on your Mac. You can find it in the Applications folder or by using Spotlight.
- Search for “macOS Sierra” in the search bar at the top right corner of the App Store window.
- Click on the macOS Sierra listing in the search results to open the product page.
- Click the “Download” button to start the download. The installer file will be saved to your Applications folder by default.
The download size of the macOS Sierra installer can vary, so make sure you have a stable internet connection and enough free space on your Mac’s hard drive to accommodate the download. The download process may take some time, depending on your internet speed.
Once the download is complete, you can move on to the next step of preparing the USB flash drive.
Step 2: Prepare the USB Flash Drive
In order to create a bootable macOS Sierra installer, you need to prepare your USB flash drive by following these steps:
- Connect the USB flash drive to your Mac. Ensure that it is properly recognized and mounted.
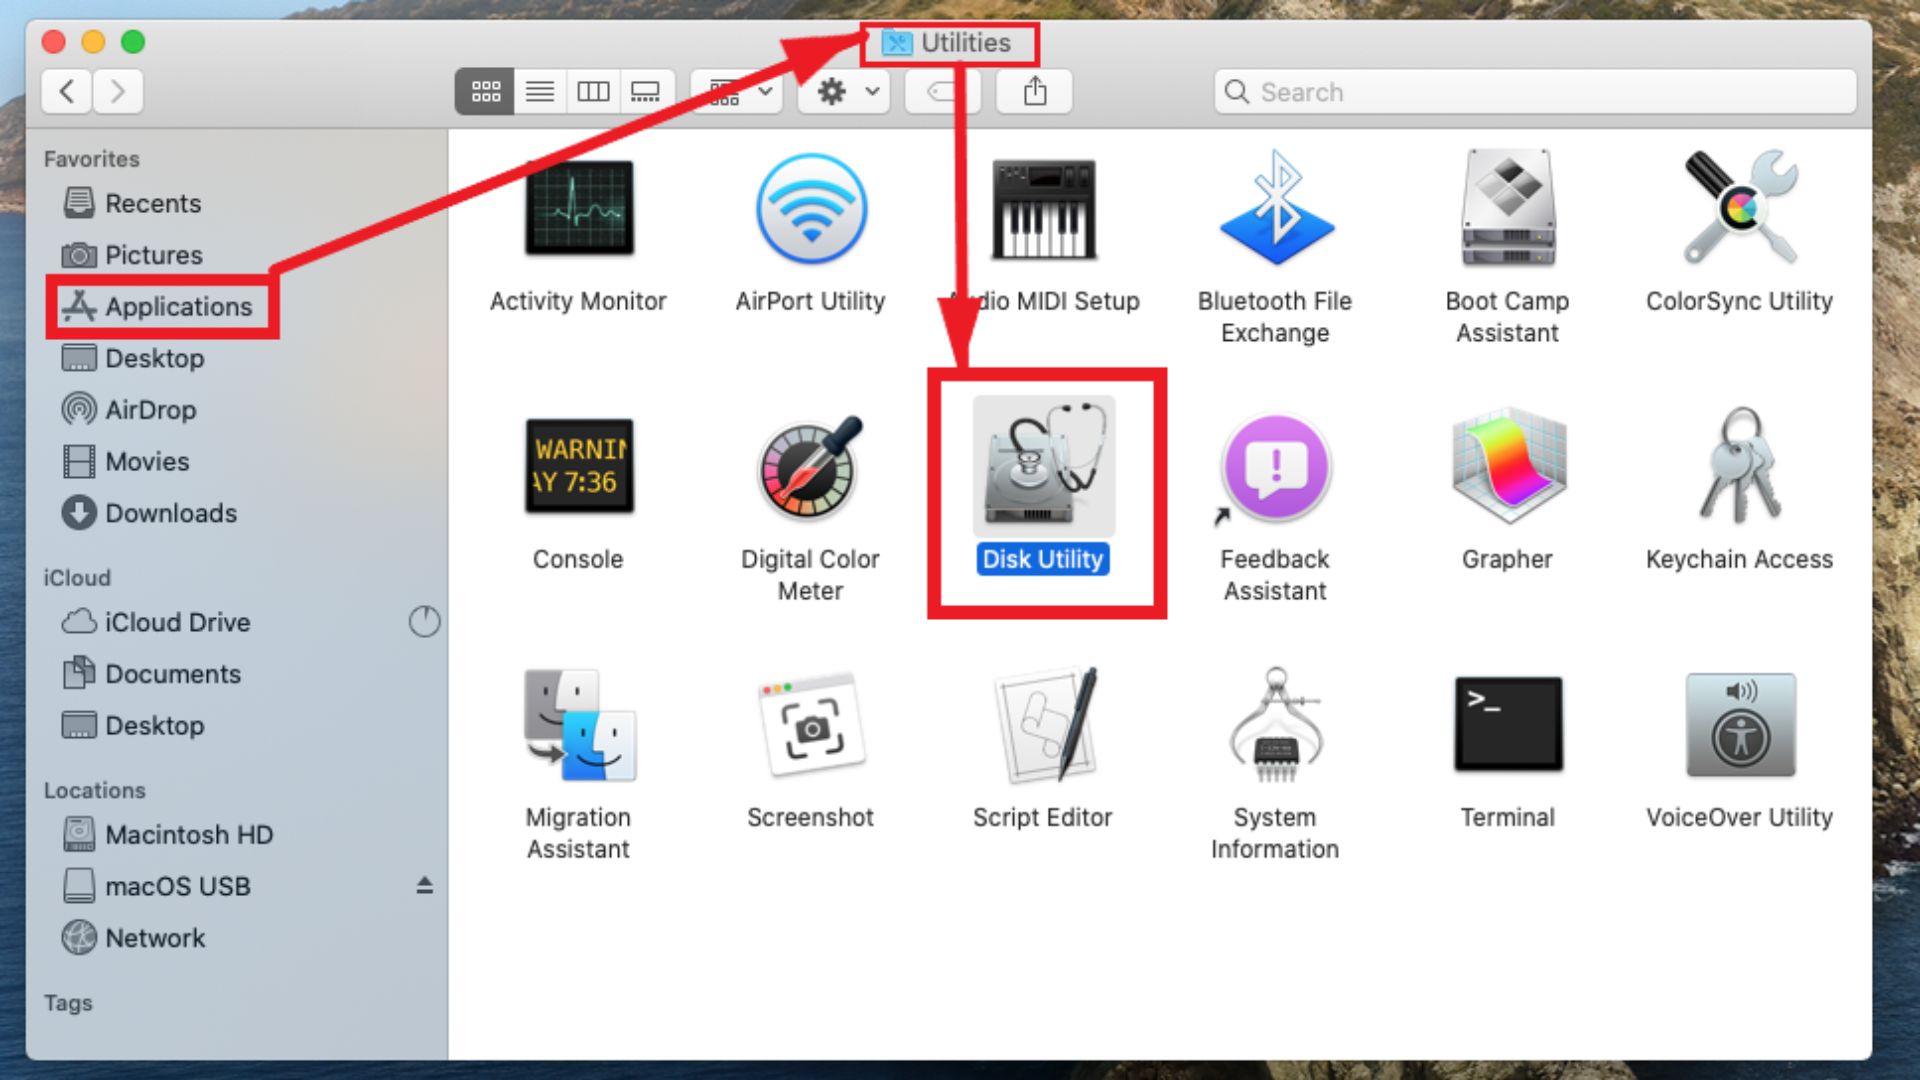
- Open the Disk Utility application. You can find it in the Utilities folder under Applications or by using Spotlight.
- In the Disk Utility window, select the USB flash drive from the list of available drives and volumes.
- Click on the “Erase” button in the toolbar at the top of the window.
- In the dialog box that appears, give the drive a name (e.g., “macOS Sierra Installer”) and select the appropriate format. For macOS Sierra, choose “Mac OS Extended (Journaled)”.
- Click on the “Erase” button to format the USB flash drive. This will erase all existing data on the drive, so make sure you have backed up any important files.
Once the formatting process is complete, your USB flash drive is ready to be turned into a bootable macOS Sierra installer. Take note of the name you assigned to the drive, as you will need it in the subsequent steps.
Now that your USB flash drive is prepared, let’s move on to the next step of formatting the drive.
Step 3: Format the USB Flash Drive
Formatting the USB flash drive is an important step in creating a bootable macOS Sierra installer. Follow these steps to format the drive:
- Connect the USB flash drive to your Mac if it isn’t already.
- Open the Disk Utility application. You can find it in the Utilities folder under Applications or by using Spotlight.
- In the Disk Utility window, locate the USB flash drive in the sidebar on the left.
- Select the USB flash drive by clicking on its name.
- Click on the “Erase” button in the toolbar at the top of the window.
- In the dialog box that appears, enter a name for the drive (e.g., “macOS Sierra Installer”) and select “Mac OS Extended (Journaled)” as the format.
- Choose “GUID Partition Map” as the scheme.
- Click on the “Erase” button to start the formatting process. This will erase all data on the drive, so make sure you have backed up any important files.
Once the formatting is complete, your USB flash drive will be ready for the next step of creating the macOS Sierra installer. Remember to keep the drive connected to your Mac as you proceed to the next steps.
Now that your USB flash drive is formatted, let’s move on to creating the macOS Sierra installer, the next step in the process.
Step 4: Create the macOS Sierra Installer
Creating the macOS Sierra installer involves using Terminal, a built-in application on your Mac. Follow these steps to create the installer:
- Open Finder and navigate to the “Applications” folder.
- Find the “Install macOS Sierra” file that you downloaded from the App Store. It should be located in the Applications folder.
- Right-click on the “Install macOS Sierra” file and select “Show Package Contents” from the dropdown menu.
- In the window that appears, navigate to the “Contents/Resources” folder.
- Locate the file named “createinstallmedia” and drag it to the Terminal window.
- Type a space after the drag-and-drop action in the Terminal window.
- Now, go back to Finder and drag the USB flash drive that you formatted earlier to the Terminal window.
- Press the “Enter” key on your keyboard to start the creation process.
- Enter your administrator password, if prompted, and press “Enter” again.
- Wait for the Terminal to complete the creation process. This may take some time.
Once the macOS Sierra installer creation process finishes, you will have a bootable USB flash drive with macOS Sierra. Remember to keep the drive connected to your Mac as you proceed to the next steps.
Now that you have successfully created the macOS Sierra installer, it’s time to copy it to the USB flash drive in the next step.
Step 5: Copy macOS Sierra Installer to the USB Flash Drive
Now that you have created the macOS Sierra installer, the next step is to copy it to the USB flash drive. Follow these steps to complete this process:
- Connect the USB flash drive to your Mac, if it isn’t already.
- Open Finder and navigate to the “Applications” folder.
- Locate the “Install macOS Sierra” file that you downloaded from the App Store.
- Right-click on the file and select “Copy” from the dropdown menu.
- In Finder, navigate to the plugged-in USB flash drive.
- Right-click on an empty area in the USB flash drive folder and select “Paste” from the dropdown menu.
- Wait for the copying process to complete. This may take a few minutes depending on the speed of your USB flash drive.
- Once the copying is done, you will have successfully copied the macOS Sierra installer to the USB flash drive.
Make sure not to disconnect the USB flash drive during the copying process to avoid any data loss or corruption. It’s essential to keep the drive connected for the remaining steps of the installation process.
Now that the macOS Sierra installer is on the USB flash drive, you can proceed to the next step of preparing your Mac for installation.
Step 6: Prepare Your Mac for Installation
Before you can install macOS Sierra from the USB flash drive, it’s important to prepare your Mac for the installation. Follow these steps:
- Save any important files and close any open applications.
- Ensure that your Mac is connected to a power source to prevent any interruptions during the installation process.
- If you have any external devices or accessories connected to your Mac, such as printers or scanners, disconnect them for now.
- Restart your Mac by clicking on the Apple menu and selecting “Restart.”
- Hold down the “Option” key on your keyboard immediately after your Mac restarts.
- You will see the Startup Manager window. Use the arrow keys on your keyboard to select the USB flash drive with the macOS Sierra installer.
- Once you have selected the USB flash drive, press the “Return” key or click on the “Enter” button to proceed.
Your Mac will now boot from the USB flash drive and the macOS Sierra installer will load. You can now proceed with the installation process as guided by the installer on your screen.
It’s important to follow the on-screen instructions carefully and make any necessary selections, such as choosing the destination drive for the installation. Be mindful that all data on the selected drive will be erased during the installation process.
After completing these preparation steps, you are now ready to install macOS Sierra from the USB flash drive. Let’s move on to the final step!
Step 7: Install macOS Sierra from the USB Flash Drive
Now that you have prepared your Mac and booted from the USB flash drive, it’s time to install macOS Sierra. Follow these steps to complete the installation:
- In the macOS Sierra installer window, select your preferred language and click on the “Continue” button.
- Read and agree to the terms and conditions by clicking on the “Agree” button.
- Next, click on the “Install” button and follow the on-screen instructions.
- Choose the destination drive where you want to install macOS Sierra. Make sure to select the appropriate drive and click on the “Install” button.
- The installation process will now begin. This may take some time, so be patient and do not interrupt the process.
- Once the installation is complete, your Mac will automatically restart.
- After the restart, your Mac will boot into macOS Sierra, and you will be guided through the setup process.
- Follow the on-screen prompts to set up your Mac, including signing in with your Apple ID, creating a user account, and setting up preferences.
- Once the setup process is complete, you can start enjoying the new features and improvements of macOS Sierra.
Remember to reconnect any external devices or accessories that you disconnected earlier and restore any backed-up files to your Mac.
Congratulations! You have successfully installed macOS Sierra from the USB flash drive. Enjoy exploring all the new capabilities of macOS Sierra on your Mac!