
Considerations before upgrading computer memory
Upgrading the memory in your computer can significantly improve its performance, allowing it to handle more demanding tasks smoothly. However, before you rush into buying new memory modules, there are a few important considerations to keep in mind.
Firstly, you need to determine if your computer is even capable of having its memory upgraded. Some ultra-thin laptops, for example, have memory soldered directly onto the motherboard, making it impossible to upgrade. Checking the specifications of your computer model or consulting the manufacturer’s website will provide this information.
Once you know your computer is upgradable, the next step is to identify the type of memory it requires. Different computers use different memory standards, such as DDR3, DDR4, or even the newer DDR5. It’s crucial to buy memory modules that are compatible with your system to ensure they will work properly. Refer to the manufacturer’s documentation or utilize online resources to determine the specific type and capacity of memory your computer supports.
Consider the memory speed as well. Higher speed memory modules can provide a slight performance boost, especially for tasks like gaming or video editing. However, keep in mind that if your computer’s motherboard does not support higher memory speeds, the modules will operate at the maximum supported speed.
Another essential factor to consider is the maximum memory capacity your computer can handle. While some older systems have limitations that prevent them from utilizing large amounts of memory, newer computers often have higher capacities. It’s vital to check the maximum supported memory capacity to avoid purchasing more memory than your computer can use.
Finally, consider your budget. Upgrading computer memory can range in price depending on the type, brand, and capacity you choose. It’s worth researching different options to find a balance between performance and cost that suits your needs.
By carefully considering these factors before upgrading your computer memory, you’ll be able to make an informed purchasing decision. This will ensure that the memory you invest in is compatible with your system and provides the performance boost you desire.
How to determine memory compatibility
Before upgrading your computer memory, it’s important to ensure compatibility with your system. Determining memory compatibility involves a few simple steps:
- Check your computer’s specifications: The first step is to gather information about your computer’s make and model. This can usually be found on the computer itself or in the user manual. Alternatively, you can check the manufacturer’s website to obtain the necessary details.
- Identify the type of memory: Once you have the computer’s specifications, determine the type of memory it requires. This information can typically be found in the documentation or on the manufacturer’s website. Common memory types include DDR3, DDR4, and DDR5.
- Determine the maximum memory capacity: It’s essential to know the maximum amount of memory your computer can support. This information can help you avoid purchasing more memory than your system can utilize. Check the manufacturer’s specifications for this information.
- Consider the memory speed: While not as critical as compatibility, the memory speed can impact performance. Determine the maximum memory speed supported by your computer’s motherboard. Keep in mind that if your motherboard does not support higher speeds, the memory modules will operate at the maximum supported speed.
- Research reputable memory manufacturers: Look for memory modules from reputable manufacturers that adhere to industry standards. Reading reviews and seeking recommendations from trusted sources can help you identify reliable brands.
- Ensure proper installation: When installing the new memory modules, make sure to follow the manufacturer’s instructions carefully. Improper installation can lead to compatibility issues and system errors.
By following these steps, you can determine the memory compatibility for your computer. Doing so will ensure that you purchase the right type and capacity of memory and experience a smooth upgrade process without any compatibility issues.
Different types of computer memory
Computer memory comes in various types, each serving a specific purpose in storing and accessing data. Understanding the different types of computer memory can help you make informed decisions when upgrading your system. Here are the most common types of computer memory:
- Random Access Memory (RAM): RAM is the primary memory in a computer and is used to temporarily store data that the processor needs to access quickly. It is volatile memory, meaning that data is lost when power is turned off. Two popular types of RAM are DDR (Double Data Rate) and its subsequent generations, such as DDR3, DDR4, and DDR5.
- Read-Only Memory (ROM): ROM is non-volatile memory that stores firmware or software instructions permanently. It contains the bootloader, which initializes the computer’s hardware when it is powered on. Examples of ROM include Basic Input/Output System (BIOS) and Unified Extensible Firmware Interface (UEFI).
- Cache memory: Cache memory is a small, high-speed storage located on the CPU or close to it. It stores frequently accessed data to reduce the time it takes for the processor to retrieve information from slower memory. There are different levels of cache memory, including L1, L2, and L3 caches.
- Virtual memory: Virtual memory is an extension of the physical RAM and is used when the available physical memory is insufficient to handle the workload. It uses a portion of the hard drive to temporarily store data that exceeds the available RAM capacity.
- Flash memory: Flash memory is non-volatile memory commonly used in solid-state drives (SSDs), USB drives, and memory cards. It stores data electronically and can be erased and rewritten multiple times. Flash memory offers faster access times compared to traditional hard drives.
- Hard disk drive (HDD): HDD is mechanical storage that uses rotating disks to store and retrieve data. It provides high-capacity storage at a lower cost but is slower than flash memory or SSDs.
Each type of computer memory plays a crucial role in the overall functionality and performance of your system. Understanding the purpose and characteristics of these memory types can help you make informed decisions about memory upgrades and optimize your computer’s performance for your specific needs.
How much memory do you need?
Determining the amount of memory you need for your computer depends on several factors, including your computing tasks, software requirements, and future scalability. Here are some considerations to help you assess your memory needs:
Compute-intensive tasks: If you frequently engage in resource-intensive activities such as video editing, 3D rendering, or gaming, you will benefit from having more memory. These tasks require large amounts of memory to store and process data, so having sufficient memory will ensure smoother performance and prevent system slowdowns.
Multitasking: If you often have multiple applications running simultaneously, such as a web browser, a document editor, and a music player, more memory can improve your multitasking experience. It allows your computer to keep more data readily accessible, reducing the need to constantly swap data between the memory and the hard drive.
Operating system requirements: Different operating systems have varying memory requirements. Review the recommended system specifications for your operating system to determine the baseline amount of memory needed for optimal performance. Keep in mind that newer versions of operating systems may require additional memory to function smoothly.
Software requirements: Some software applications, especially resource-intensive ones like graphic design tools or virtualization software, have specific memory requirements. Check the software documentation or consult the manufacturer’s website to determine the recommended or minimum memory requirements.
Future scalability: It’s wise to plan for the future when considering memory upgrades. While your current needs may be sufficient with a certain amount of memory, consider how your computing needs may evolve over time. Adding more memory than what is currently required allows for future expansion and ensures that your computer remains capable of handling increasing demands.
Consult hardware specifications: Refer to your computer’s hardware specifications to understand the maximum memory capacity it supports. Ensure that the memory modules you purchase fall within this range to avoid compatibility issues.
Keep in mind that memory requirements can be subjective and vary from person to person based on their specific usage patterns and requirements. It’s always advisable to err on the side of having more memory, as it can significantly improve overall system performance and responsiveness.
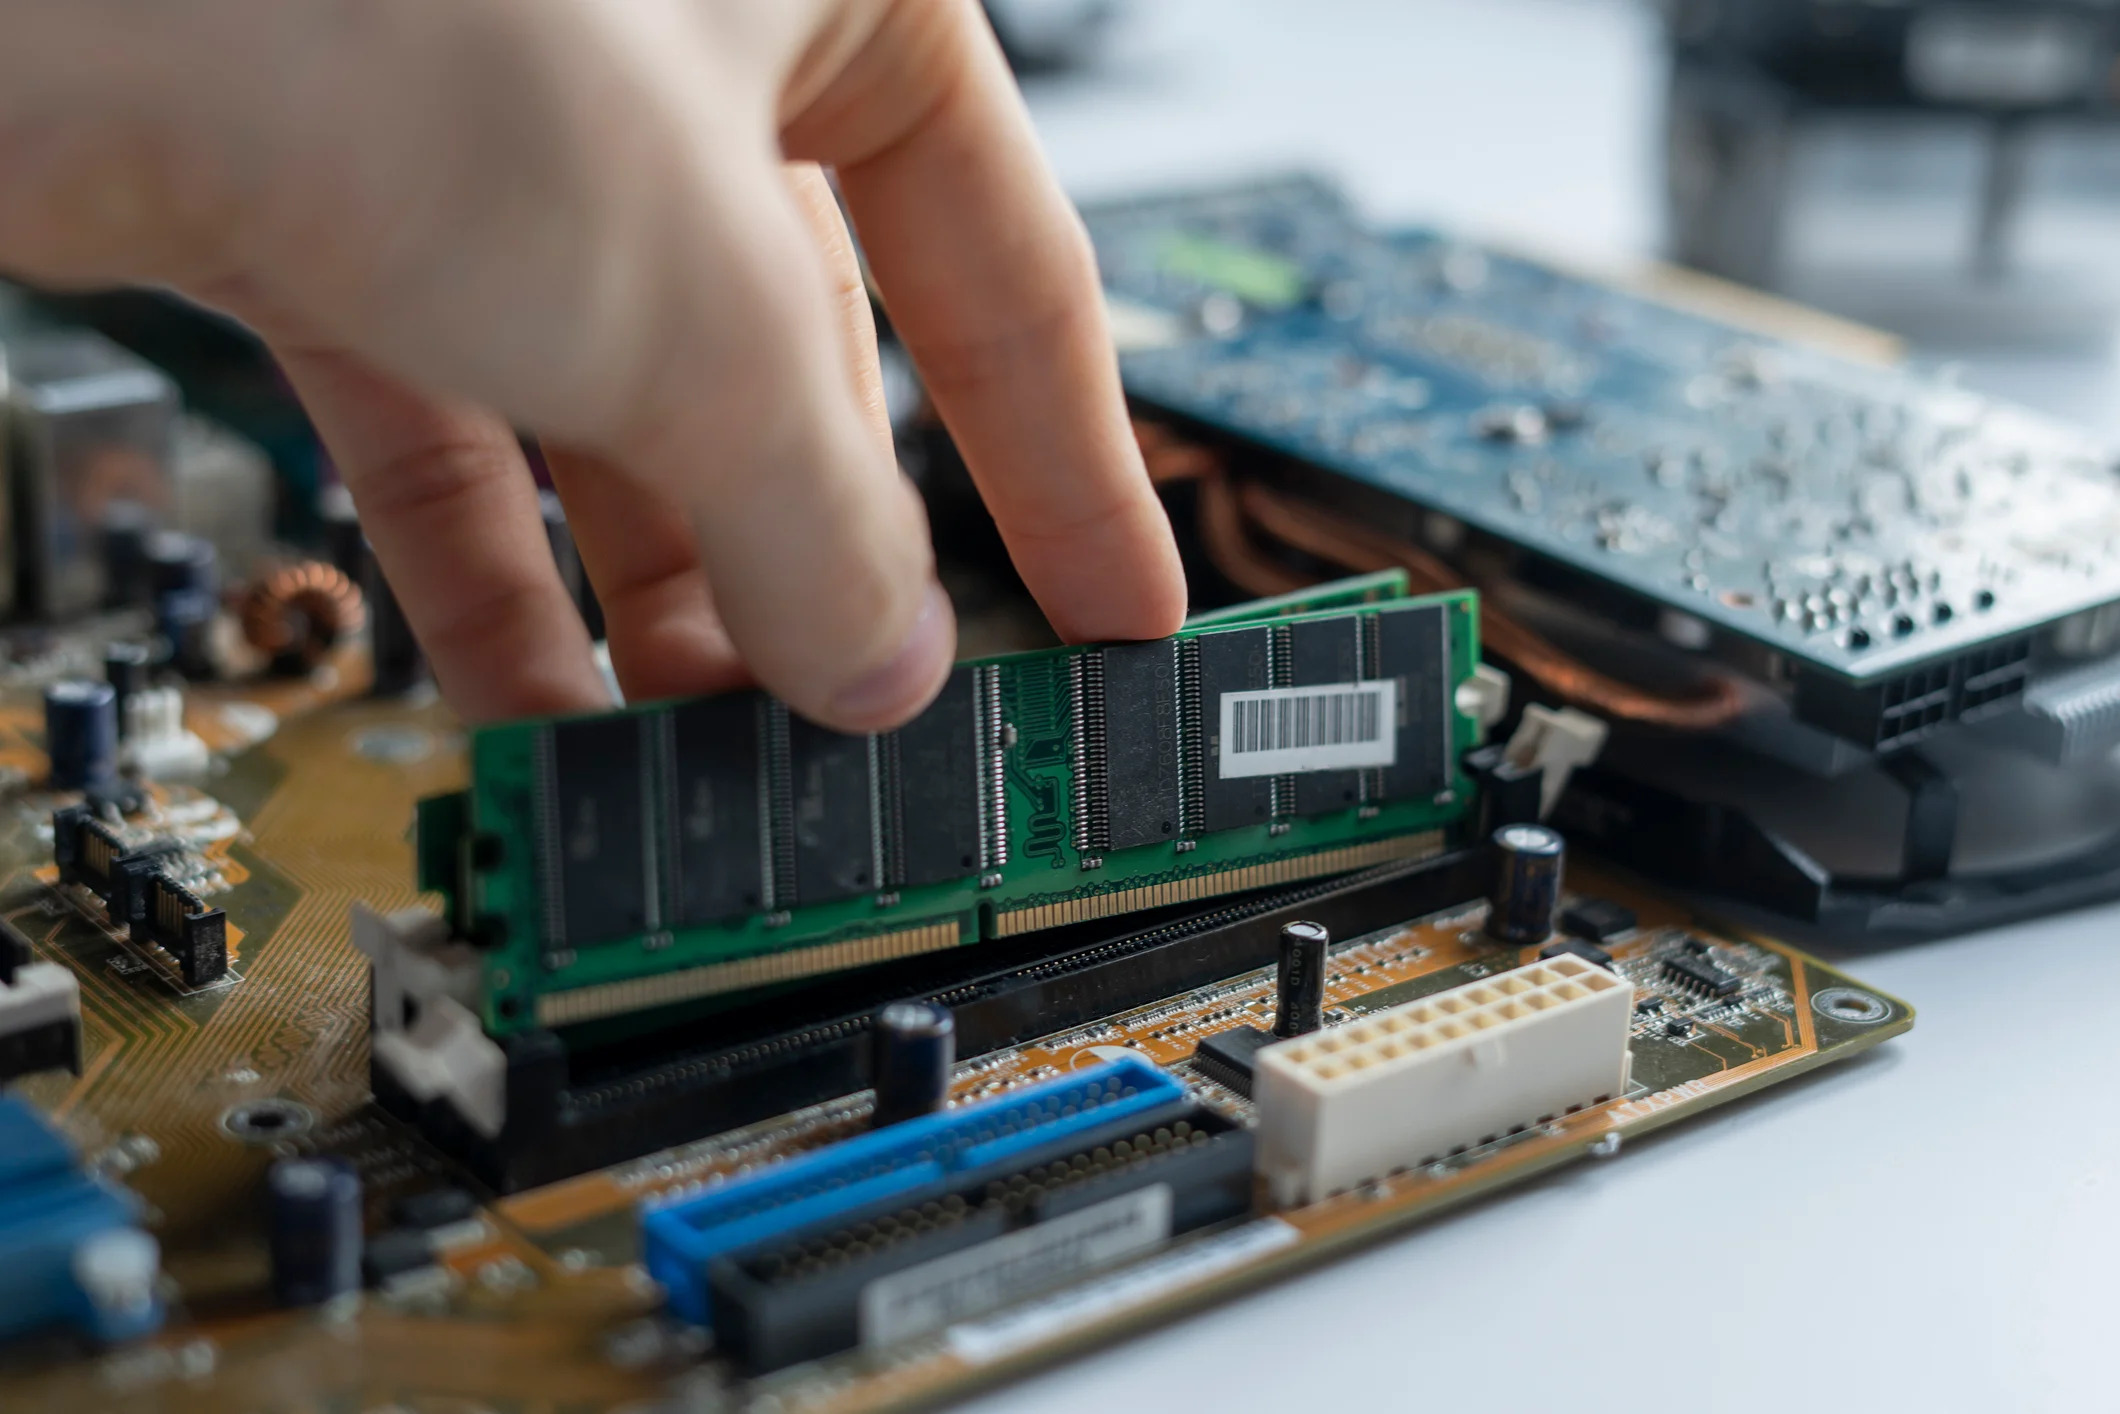
How to install or replace computer memory
Installing or replacing computer memory modules is a relatively straightforward process. Follow these step-by-step instructions to ensure a smooth upgrade:
- Gather the necessary tools: Before starting, make sure you have the necessary tools, which typically include a screwdriver and an antistatic wrist strap to protect the memory modules from potential electrostatic damage.
- Power off your computer: Shut down your computer and unplug the power cord from the wall outlet. This will prevent any potential damage to you or your computer components during the installation process.
- Locate the memory slots: Open your computer’s case and locate the memory slots. They are usually located near the CPU. Refer to your computer’s user manual or the manufacturer’s website for detailed instructions on locating the memory slots specific to your computer model.
- Remove the existing memory: If you are replacing existing memory modules, gently press the tabs on either side of the module to release it from the slot. Carefully remove the module from the slot, taking care not to apply excessive force.
- Insert the new memory modules: If you are installing new memory modules, align the notch on the module with the slot and firmly press it down into place. You should hear a click when it is properly seated. Repeat this step for each additional memory module.
- Secure the memory modules: After inserting all the memory modules, use the screwdriver to secure them in place if necessary. Some computer cases have clips or screws to hold the modules firmly in place.
- Close the computer case: Once the memory modules are securely installed, close the computer case and tighten any screws or clips to ensure proper sealing.
- Power on and test: Plug in the power cord, turn on the computer, and ensure that it detects the newly installed memory modules. You can check the system information or BIOS settings to verify the correct amount of memory displayed.
It’s important to follow these steps carefully to avoid damaging the memory modules or other components of your computer. If you encounter any difficulties during the installation process, refer to the user manual or consult a professional for assistance.
Common issues and troubleshooting tips
While installing or upgrading computer memory can be a straightforward process, occasionally, you may encounter some issues. Here are some common problems that may arise during the memory upgrade process and troubleshooting tips to help you resolve them:
Compatibility issues: If the new memory modules are not working or your computer is not recognizing them, double-check that they are compatible with your system. Verify that the memory type, capacity, and speed match the specifications outlined by the manufacturer. If there is a compatibility issue, consider returning or exchanging the memory modules for ones that are compatible with your device.
Improper installation: If the computer fails to boot or experiences random crashes after installing the new memory, it’s possible that the modules were not installed correctly. Remove the modules, ensure they are properly aligned with the slots, and firmly reinsert them, making sure they click into place. Additionally, check that all connections and cables are secure.
Insufficient power supply: In some cases, adding more memory may require additional power, especially when the system is under heavy load. Ensure that your power supply unit (PSU) has enough capacity to support the increased power demand. Upgrading the PSU may be necessary if power-related issues persist.
Memory module seating: If your computer experiences sporadic freezes or crashes after installing new memory, it could be due to poor seating of the modules. Remove the modules and clean the contacts using a soft, dry cloth. Ensure the modules are firmly seated in the slots, with the locking mechanisms engaged correctly.
Memory slot issues: If only specific memory slots are causing problems, test the memory modules individually. Insert each module into a different slot and see if the issue persists. If a specific slot consistently causes issues, it may be defective and require professional repair or replacement.
BIOS settings: Check your computer’s BIOS settings to ensure they are properly configured to recognize and utilize the new memory modules. Sometimes, manual configuration may be necessary, such as adjusting the memory speed or enabling XMP (Extreme Memory Profile) for optimal performance.
Firmware and driver updates: Ensure that your computer’s firmware (such as BIOS) and device drivers are up to date. Outdated firmware or drivers can cause compatibility issues with new memory modules. Visit the manufacturer’s website to download and install the latest updates for your system.
If you have followed these troubleshooting tips and are still experiencing issues with your computer memory, it may be beneficial to seek assistance from a computer technician or contact the memory manufacturer’s support for further troubleshooting and guidance.
Best practices for maintaining computer memory
Maintaining your computer’s memory is essential for optimal performance and longevity. By following these best practices, you can ensure that your computer memory remains in good condition:
Regularly clean your computer: Dust buildup can affect the performance and lifespan of your computer components, including memory modules. Use compressed air or a soft brush to remove dust from the memory slots, ensuring better contact and heat dissipation.
Avoid physical damage: Handle memory modules with care and avoid dropping them or bending the pins. Physical damage can result in connection issues and permanent memory failure.
Protect against static electricity: Before touching or installing memory modules, use an antistatic wrist strap or ground yourself by touching a metal object to discharge any static electricity. Static shocks can damage the sensitive electronic components of memory modules.
Keep your computer cool: High temperatures can adversely affect memory performance. Ensure sufficient airflow inside your computer case by cleaning fan vents, replacing thermal paste on the CPU if necessary, and considering additional cooling options like case fans or liquid cooling.
Avoid overclocking: Overclocking, or running memory modules at higher than specified speeds, can increase performance but also generate more heat and put additional stress on the modules. Unless you have experience and a proper cooling system, it’s generally best to avoid overclocking to preserve memory stability and longevity.
Regularly update drivers and firmware: Keeping your computer’s drivers and firmware up to date ensures compatibility and can help resolve any known memory-related issues. Check the manufacturer’s website regularly for the latest updates for your system.
Scan for malware and viruses: Malware and viruses can cause memory-related issues and slow down your computer. Use reputable antivirus software to regularly scan your system and remove any malicious software that could be impacting memory performance.
Avoid running too many programs simultaneously: Running too many applications at the same time can strain your computer’s memory resources. Closing unnecessary programs and processes frees up memory and ensures that your computer can allocate sufficient resources to the tasks at hand.
Restart your computer regularly: Restarting your computer clears the memory and closes any background processes that may be consuming excessive resources. Performing regular restarts can help maintain optimal memory performance.
By following these best practices, you can prolong the life of your computer memory modules and ensure consistent performance. Taking care of your computer’s memory is crucial for a smooth computing experience and the efficient operation of your system as a whole.
Upgrading memory in different computer models
Upgrading the memory in your computer can vary depending on the specific model and manufacturer. While the process is generally similar across different computers, there may be slight variations. Here are some general guidelines for upgrading memory in different computer models:
- Laptops: Many laptops have a dedicated memory slot on the bottom or under a removable panel. To upgrade the memory, locate the slot, remove any screws or clips securing the panel, and insert the new memory modules carefully. Some laptops may require removing the keyboard or other components to access the memory slots, so refer to the user manual or manufacturer’s website for specific instructions.
- Desktops: Desktop computers typically have easily accessible memory slots on the motherboard, either near the CPU or on the side. Open the case, locate the memory slots, and insert the new memory modules according to the specifications of your computer. Some desktops may have multiple memory slots, so take note of any specific installation instructions provided by the manufacturer.
- All-in-One PCs: All-in-One PCs usually have memory slots on the back or side of the monitor. Some models may require removing a cover or stand to access the memory slots. Follow the manufacturer’s instructions to upgrade the memory in an All-in-One PC.
- SFF (Small Form Factor) PCs: SFF PCs are compact computers that often have limited space for upgrading components. In these cases, you may need to remove the optical drive or other components to access the memory slots. Consult the user manual or manufacturer’s website for specific instructions on upgrading memory in SFF PCs.
- Custom-built PCs: Custom-built PCs can have varying configurations depending on the components used. The process of upgrading memory is similar to desktop computers, but the specific location of the memory slots may vary. Refer to the motherboard manual or documentation provided by the manufacturer of the custom-built PC for detailed instructions.
It’s worth noting that some computer models, particularly ultra-thin laptops or certain pre-built systems, may have memory that is soldered onto the motherboard, making it impossible to upgrade. In such cases, upgrading the memory may not be an option.
Always ensure that you purchase memory modules that are compatible with your computer’s specific model, taking into consideration factors like memory type, capacity, and speed. Consult the manufacturer’s documentation or their website for detailed information on compatible memory modules and any specific installation guidelines.
If you are unsure about upgrading the memory in your computer or have any doubts, it’s recommended to seek professional assistance or consult with the manufacturer’s support team for guidance specific to your computer model.