
Determine the Type and Amount of Memory Required
Before you can add memory to your desktop computer, it is important to determine the type and amount of memory your computer supports. This will ensure that you purchase the correct memory modules and avoid any compatibility issues.
First, you need to identify the type of memory your computer uses. The most common type of memory for desktop computers is DDR (Double Data Rate) memory. However, there are different generations of DDR memory, such as DDR2, DDR3, and DDR4. To find out which generation of DDR memory your computer supports, you can check the documentation that came with your computer or visit the manufacturer’s website.
Next, you should determine the maximum amount of memory your computer can support. Again, this information can usually be found in the documentation or on the manufacturer’s website. It’s important to note that some older computers may have a hardware limitation on the maximum amount of memory they can support.
Another consideration is the number of memory slots available on your computer’s motherboard. Each memory slot can accommodate a certain amount of memory, so you need to make sure you have enough slots to accommodate the additional memory you want to add. You can typically find this information in the motherboard manual, which can be downloaded from the manufacturer’s website.
Lastly, you should also consider the speed of the memory modules. The speed of DDR memory is measured in megahertz (MHz). If you’re adding memory to an existing system, it’s best to match the speed of the existing memory modules to ensure optimal performance. However, if you’re building a new system or replacing all the memory modules, you can choose memory modules with a higher speed to improve overall performance.
By determining the type and amount of memory required for your desktop computer, you can make an informed decision when purchasing the memory modules. This will ensure compatibility and allow you to maximize the performance of your computer.
Purchase the Compatible Memory Modules
Once you have determined the type and amount of memory your desktop computer requires, it’s time to purchase the compatible memory modules. Here are some steps to guide you through the process:
1. Research and compare prices: Start by researching reputable computer hardware retailers or online stores. Look for deals and compare prices to ensure you’re getting the best value for your money.
2. Check for compatibility: Make sure the memory modules you are considering are specifically designed to be compatible with your computer’s make and model. Refer back to the documentation or the manufacturer’s website for the specific memory specifications.
3. Verify the memory type and speed: Double-check that the memory modules you intend to purchase match the type (such as DDR2, DDR3, or DDR4) and speed requirements of your computer. This will help ensure seamless integration and optimal performance.
4. Consider the brand and quality: Opt for reputable brands known for their quality and reliability. While there may be lesser-known brands that offer cheaper alternatives, it is always safer to invest in well-known brands to ensure longevity and compatibility.
5. Determine the appropriate memory capacity: Based on the maximum memory capacity of your computer, decide on the amount of memory you wish to add. Consider your intended usage and any resource-intensive tasks you may perform, such as gaming or video editing, to determine if you need to max out the memory or settle for a certain capacity.
6. Purchase the memory modules: Once you have done your research and considered your computing needs, make the purchase from a trusted retailer. Ensure that the memory modules come with a warranty to protect your investment.
7. Optional: Consult a professional: If you are uncertain about the compatibility or installation process, it may be beneficial to consult a professional technician who can guide you in selecting the right memory modules and assist with the installation.
Purchasing compatible memory modules is a crucial step in upgrading your computer’s memory. By following these steps, you can ensure a smooth and successful upgrade process that will enhance your computer’s performance and overall efficiency.
Power Off the Computer and Disconnect Cables
Before adding memory to your desktop computer, it is essential to power off the computer and disconnect all cables. This step ensures your safety and prevents any potential damage to the computer components. Follow these steps to power off and disconnect your computer:
1. Save and close all open files: Before shutting down your computer, save any work you have open and close all applications. This ensures that you don’t lose any unsaved data.
2. Shut down the computer: Click on the Start menu in the bottom left corner of the screen, and then click on the “Shut Down” option. Wait for the computer to completely shut down before proceeding to the next step.
3. Unplug the power cord: Locate the power cord connected to the back of the computer case. Firmly grasp the plug and gently pull it out of the power socket or surge protector. This will completely cut off power to the computer.
4. Disconnect other cables: In addition to the power cord, you may have various cables connected to your computer, such as Ethernet, USB, HDMI, and audio cables. Carefully unplug each cable from its respective port on the back of the computer. If needed, label the cables to make reconnection easier later.
5. Ground yourself: To prevent any static electricity discharge that could harm sensitive computer components, it is essential to ground yourself. You can do this by touching a grounded metal object or wearing an anti-static wristband.
6. Optional: Remove the side panel of the computer case: Depending on your computer’s configuration, you may need to remove the side panel to access the memory slots. Refer to your computer’s manual or online resources specific to your model for instructions on how to remove the panel safely.
By following these steps and ensuring that your computer is completely powered off and disconnected from all cables, you can proceed with adding memory to your desktop computer safely and avoid any potential damage to the components.
Open the Computer Case
To add memory to your desktop computer, you need to open the computer case. Opening the case gives you access to the internal components, including the memory slots. Follow these steps to open the computer case safely:
1. Ground yourself: Before touching any internal components, it is important to ground yourself to prevent any static electricity discharge. You can do this by touching a grounded metal object or wearing an anti-static wristband.
2. Locate the computer case: The computer case is the enclosure that houses all the internal components of your desktop computer. It typically sits horizontally or vertically on your desktop, depending on the design of the case.
3. Identify the case screws: Look for the screws securing the computer case. These screws are usually located on the backside of the case. Common types of case screws include thumb screws, Phillips-head screws, or standard flat-head screws.
4. Unscrew and remove the case panel: Use the appropriate screwdriver or your hands to loosen and remove the screws securing the case panel. Gently slide the panel towards the back of the case until it is completely detached. Set the panel aside in a safe place.
5. Optional: Remove any additional panels: Depending on the case design, there may be additional panels that need to be removed to access the memory slots. Refer to your computer’s manual or online resources specific to your model for instructions on removing these panels.
6. Take caution with sharp edges: While working with the computer case, be mindful of any sharp edges. Computer cases are generally designed with safety features, but it is still important to exercise caution to avoid any accidental cuts or injuries.
With the computer case open, you now have access to the internal components of your desktop computer. This allows you to proceed with adding the memory modules to the appropriate slots on the motherboard.
Locate the Memory Slots on the Motherboard
Before you can add memory modules to your desktop computer, you need to locate the memory slots on the motherboard. The memory slots are where the memory modules will be inserted. Follow these steps to find the memory slots:
1. Identify the motherboard: The motherboard is the main circuit board of your computer. It is usually mounted horizontally in the computer case and is the central hub for all hardware components. Identify the motherboard by looking for a large rectangular or square-shaped board.
2. Refer to the motherboard manual: The motherboard manual provides detailed information about the layout and components of the motherboard. It will specifically indicate the location of the memory slots. Locate the manual either in the documentation that came with your computer or download it from the manufacturer’s website.
3. Look for memory slot labels: On the motherboard, the memory slots are often labeled with numbers or letters to denote their sequence or channel configuration. These labels ensure proper installation and alignment of the memory modules. Refer to the motherboard manual for the specific labeling scheme.
4. Observe the color-coded slots: Some motherboards have color-coded memory slots as an additional aid for installation. The colors may signify different memory channels or configurations. Be sure to check the motherboard manual or the manufacturer’s website for the specific meaning of the colors on your motherboard.
5. Count the number of memory slots: Take note of the total number of memory slots available on the motherboard. This will determine the maximum number of memory modules you can install. Common desktop motherboards have two to four memory slots, although some high-end motherboards may have more.
6. Inspect the physical location: Depending on the motherboard design, the memory slots are typically positioned in a line or grouped together in pairs. They are often located near the CPU socket on modern motherboards. Take note of their position to facilitate installation later.
By following these steps and referring to the motherboard manual, you can quickly and accurately locate the memory slots on the motherboard. This knowledge is essential for correctly adding the memory modules to enhance your computer’s performance.
Remove Existing Memory Modules, if Applicable
If your desktop computer already has memory modules installed, it may be necessary to remove them before adding new ones. This section will guide you through the process of removing existing memory modules, if applicable:
1. Power off and disconnect the computer: Before removing any internal components, ensure that the computer is powered off and all cables are disconnected. Refer to the previous section on how to properly power off and disconnect the computer.
2. Ground yourself: To prevent any static electricity discharge that could harm sensitive computer components, it is important to ground yourself. You can do this by touching a grounded metal object or wearing an anti-static wristband.
3. Locate the existing memory modules: On the motherboard, you will see the installed memory modules inserted into the memory slots. These modules are typically small rectangular circuit boards with chips on one or both sides.
4. Release the module retention clips: Most memory slots have retention clips on either side that hold the memory modules in place. Gently push the clips outward to release the module. The clips should move away from the module, allowing it to pop up slightly.
5. Remove the memory module: Holding the memory module by its edges, carefully lift it up and out of the memory slot. Avoid touching the gold contacts on the bottom of the module to prevent any damage due to static electricity or oils from your fingers.
6. Repeat for additional modules (if applicable): If there are multiple memory modules installed, repeat the process for each module to remove them all.
7. Optional: Clean the memory slots: With the existing memory modules removed, you may take the opportunity to clean the memory slots using compressed air or a soft, dry brush. This helps remove any dust or debris that may have accumulated.
By following these steps and handling the existing memory modules with care, you can safely remove them from your desktop computer. Once the existing modules are removed, you can proceed with adding the new memory modules to upgrade your computer’s memory capacity.
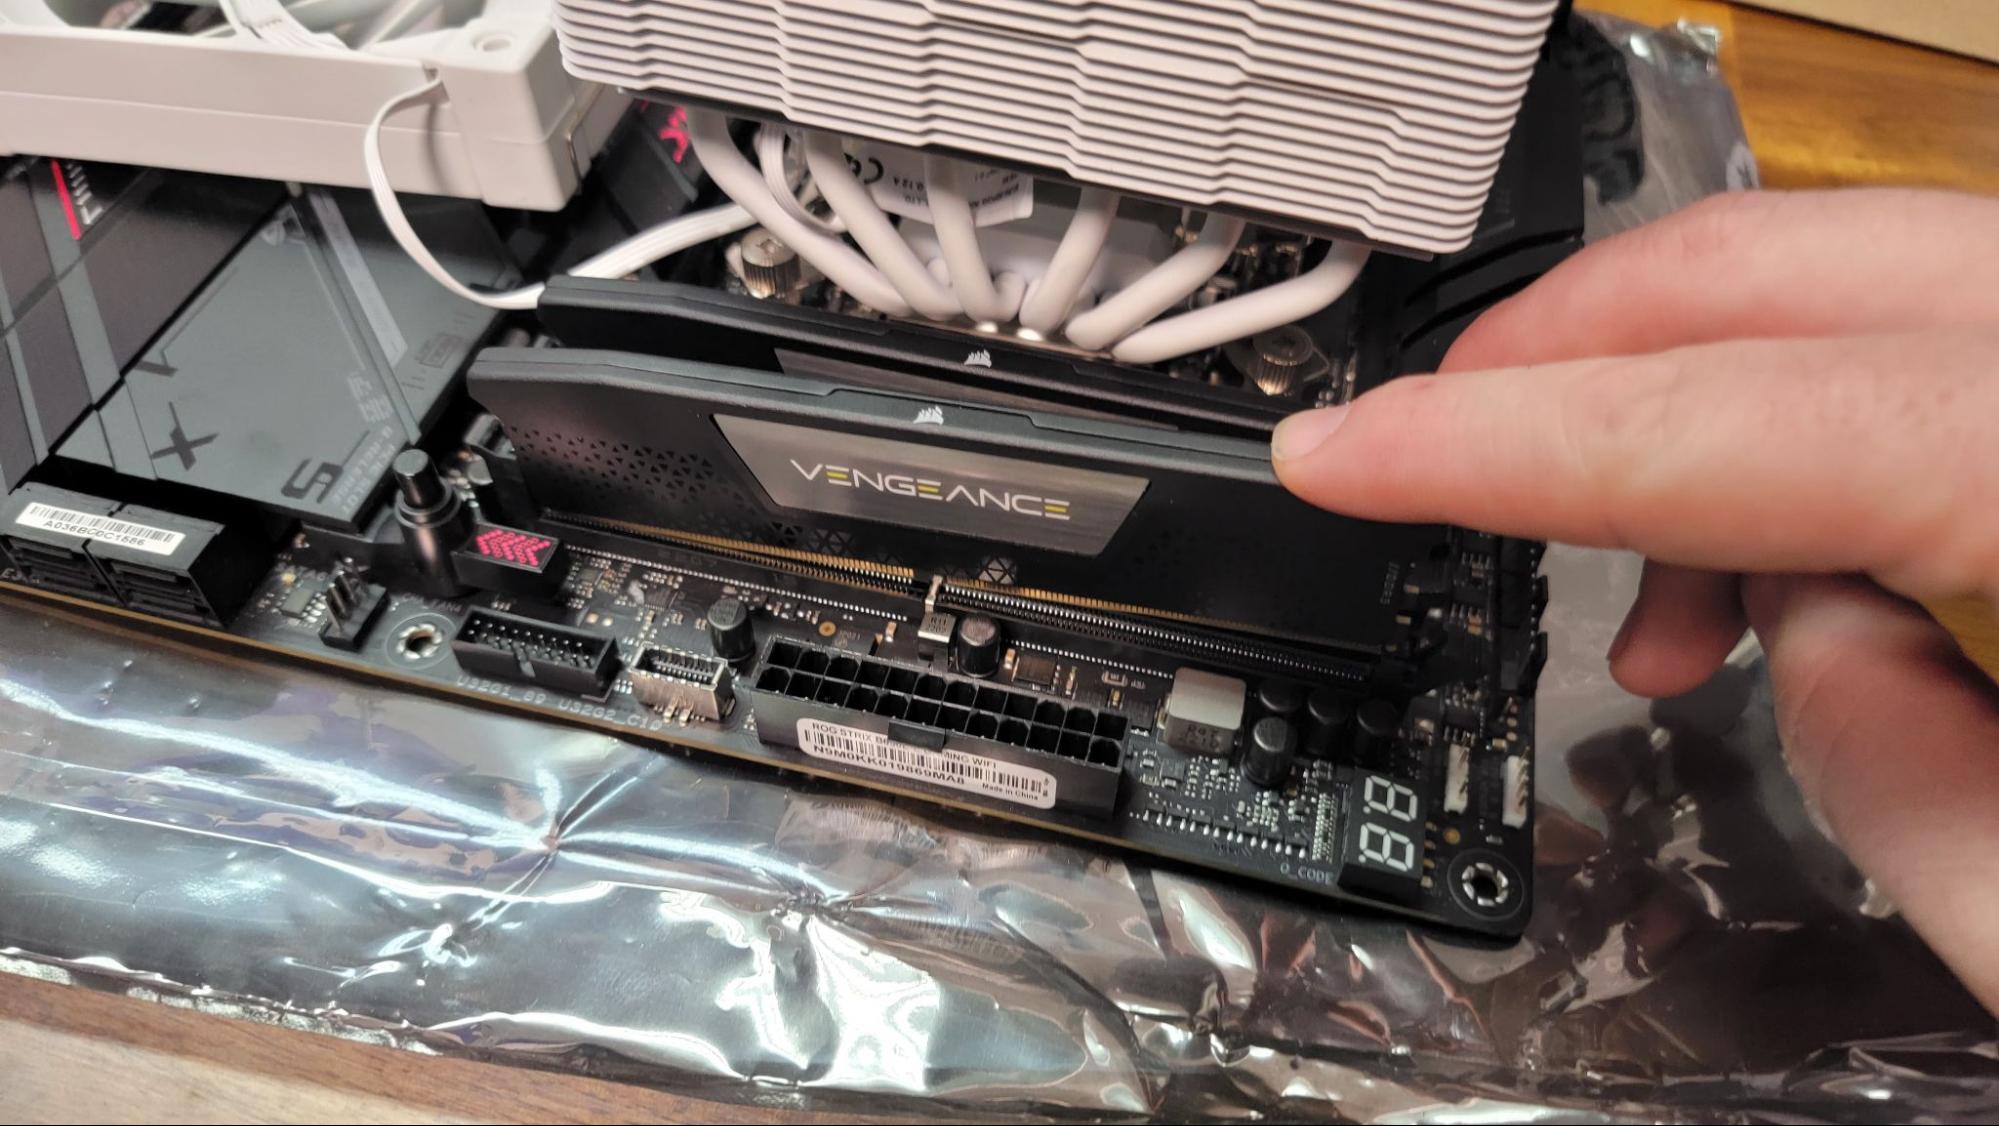
Insert the New Memory Modules
After removing any existing memory modules, it’s time to insert the new memory modules into your desktop computer. Follow these steps to ensure a successful installation:
1. Ground yourself: Before handling the new memory modules, ground yourself by touching a grounded metal object or wearing an anti-static wristband. This helps prevent any static electricity discharge that could harm sensitive computer components.
2. Orient the memory module: Take a close look at the memory module and locate the notch or keying feature on the bottom edge. The memory slot on the motherboard will have a corresponding tab or notch that the module needs to align with for proper insertion.
3. Align the memory module with the slot: Carefully align the memory module with the memory slot on the motherboard. Ensure that the notch or keying feature on the module matches the tab or notch on the slot. Gently slide the module into the slot at a slight angle, ensuring it is fully seated.
4. Apply even pressure: Once the memory module is aligned with the slot, apply even pressure to both ends of the module. Push down firmly but gently until you hear a click or feel the retention clips on the slot engage. This confirms that the module is securely in place.
5. Repeat for additional modules: If you are installing multiple memory modules, repeat the previous steps for each module, ensuring they are inserted into the correct slots according to the motherboard’s specifications.
6. Verify proper installation: After inserting all the new memory modules, visually inspect them to ensure they are seated correctly, with the retention clips engaged and the module fully inserted. Ensure that they are all aligned and level with each other. Double-check the motherboard manual for any specific installation instructions or configurations.
By following these steps and paying attention to proper alignment and gentle pressure, you can successfully insert the new memory modules into your desktop computer. With the memory modules securely in place, you are one step closer to boosting your computer’s performance and capabilities.
Secure the Memory Modules in Place
After inserting the new memory modules into your desktop computer, it is essential to secure them in place to prevent any movement or dislodging during use. Follow these steps to ensure the memory modules are properly secured:
1. Check the retention clips: On each memory slot, there are retention clips that hold the memory modules in place. Take a close look at these clips to ensure they have securely latched onto the module. They should be fully engaged and hold the module firmly in place.
2. Double-check the alignment: Verify that the memory modules are aligned correctly within the slots. They should be level with each other and parallel to the motherboard. Misaligned modules may not seat properly or cause connectivity issues.
3. Apply gentle pressure: With the modules in their proper positions, apply gentle pressure to each module to ensure it is firmly seated and secured. Press down on both ends of the module to ensure even pressure distribution. You should feel resistance when applying pressure, indicating that the modules are secured in place.
4. Listen for the click: As you apply pressure, listen for a click sound, which indicates that the retention clips have locked into place. This confirms that the memory modules are securely seated and will not easily come loose during operation.
5. Avoid excessive force: While it is important to ensure the memory modules are securely attached, be cautious not to exert excessive force. Applying too much force can damage the modules or the slots on the motherboard. Use a gentle yet firm touch to secure them.
6. Optional: Additional securing mechanisms: Some motherboards may include additional securing mechanisms such as screws or latches to further secure the memory modules. Consult your motherboard’s manual or the manufacturer’s website for any specific instructions on using these mechanisms.
By following these steps and ensuring that the memory modules are properly secured in place, you can have peace of mind knowing that they will remain stable and functional during your computer’s operation. This attention to securing the modules helps optimize overall system performance and reliability.
Close the Computer Case
Once you have successfully installed and secured the new memory modules in your desktop computer, it’s time to close the computer case. Properly closing the case is essential for protecting the internal components and ensuring the overall integrity of your computer. Follow these steps to close the computer case securely:
1. Organize cables: Before closing the case, take a moment to organize and route any cables inside the case. Make sure they are neatly arranged and not obstructing any components or airflow. This will help prevent tangling and ensure efficient cooling.
2. Align the case panel: Position the case panel back onto the computer case aligning it with the screw holes or hooks. The panel should fit snugly and evenly against the case frame. Take care to avoid trapping any cables or components between the panel and the case.
3. Secure the screws or latches: If your computer case uses screws to secure the panel, insert and tighten them using the appropriate screwdriver. Make sure to tighten them evenly, following a crisscross or sequential pattern. If your case employs latches or hooks, ensure they are engaged and secure.
4. Avoid overtightening: When tightening the screws, be cautious not to overtighten them, as this can cause damage to the case or strip the screw holes. Firmly tighten the screws to a point where the panel is secure but not excessively tight.
5. Verify proper closure: Once the screws or latches are secure, visually inspect the case to ensure that it is closed properly. Double-check that all sides of the panel are flush with the case frame, indicating a secure closure.
6. Optional: Lock the case (if applicable): Some computer cases have locking mechanisms for added security. If your case includes a lock, use the appropriate key or mechanism to lock the case.
By following these steps and double-checking the secure closure of the computer case, you can protect your computer’s internal components from dust, debris, and potential damage. Closing the case properly helps maintain proper airflow and ensures the longevity and stability of your desktop computer.
Reconnect Cables and Power On the Computer
After closing the computer case, it’s time to reconnect the cables and power on your desktop computer. Properly connecting the cables ensures that all components are functional and ready for use. Follow these steps to reconnect the cables and power on your computer:
1. Reconnect the cables: Begin by reconnecting the cables that were disconnected earlier. This includes the power cord, monitor cable, keyboard and mouse cables, network cables, and any other peripherals that were disconnected. Ensure each cable is securely plugged into its corresponding port.
2. Double-check cable connections: Take a moment to double-check each cable connection. Ensure that they are properly inserted into their respective ports and that there are no loose or bent pins. Check for any signs of damage or fraying on the cables as well.
3. Power on the computer: Once all the cables are securely connected, locate the power button on your computer. Press the button to power on the computer. You should hear the fans start spinning, and lights or indicators on the computer may illuminate. Wait for the computer to boot up.
4. Monitor display: Check if the monitor display is working properly. If the monitor remains blank or shows an error message, verify that the monitor cable is securely connected and that the monitor itself is powered on. You may need to adjust the input source on the monitor as well.
5. Test peripherals: Ensure that all peripherals, such as the keyboard and mouse, are functioning correctly. Test their responsiveness to ensure they are properly connected and recognized by the computer. If necessary, reconnect or troubleshoot any problematic peripherals.
6. Check memory recognition: Once the computer is powered on, it should automatically recognize the newly added memory modules. To check if the memory is recognized, you can access the computer’s BIOS settings or open the operating system and verify the total installed memory.
By following these steps, you can safely reconnect the cables and power on your computer. Double-checking the cable connections and testing peripherals allows you to ensure that all components are functioning properly and ready for use with the upgraded memory.
Verify that the New Memory is Recognized by the Computer
After adding the new memory to your desktop computer, it is important to verify that the computer recognizes the newly installed memory modules. This step ensures that the computer is utilizing the upgraded memory capacity and can provide optimal performance. Follow these steps to verify the recognition of the new memory:
1. Restart the computer: If you haven’t already done so, restart the computer. This will allow the computer to detect and initialize the new memory modules during the startup process.
2. Enter the BIOS settings: During the startup process, your computer may display a message indicating which key to press to enter the BIOS settings. Typically, it is the “Delete,” “F2,” or “F12” key. Press the designated key to access the BIOS settings.
3. Locate the memory information: Once in the BIOS settings, navigate to the section that displays system information or hardware configuration. Look for information about the installed memory. It should indicate the total installed memory capacity and possibly other details such as memory speed and configuration.
4. Verify the correct memory capacity: Check that the total installed memory matches the capacity of the new modules that you added. If the capacity is not as expected, ensure that the memory modules are properly seated in their slots and securely connected.
5. Exit BIOS and boot into the operating system: If the memory information in the BIOS settings is accurate, exit the BIOS settings and allow the computer to boot into the operating system. Once in the operating system, you can further verify the recognized memory in various ways.
6. Open the System Information tool: In Windows, you can press the Windows key + R to open the Run dialog box, then type “msinfo32” and press Enter. In macOS, you can go to the Apple menu, select “About This Mac,” and click on the “Memory” tab. Both methods will display information about the installed memory.
7. Check the recognized memory: In the System Information or About This Mac window, verify that the recognized memory matches the capacity of the new modules you installed. It should display the correct total memory capacity, along with other details like memory type and speed.
By following these steps and verifying that the computer recognizes the newly installed memory in both the BIOS settings and the operating system, you can ensure that your computer is utilizing the added memory capacity. This allows for improved performance and the ability to handle more demanding tasks efficiently.
Test the Computer’s Performance with the Upgraded Memory
Once you have verified that the computer recognizes the newly installed memory modules, it is important to test the computer’s performance to ensure that the upgraded memory is functioning as expected. Performing performance tests allows you to gauge the impact of the upgraded memory on your computer’s overall efficiency and responsiveness. Follow these steps to test the computer’s performance:
1. Run benchmark software: Utilize reputable benchmark software to measure the performance of your computer before and after the memory upgrade. Benchmarking tools like PassMark PerformanceTest or 3DMark can provide an objective comparison of different hardware components, including memory performance.
2. Compare benchmark scores: Run the benchmark software on your computer and record the scores obtained. Then, compare these scores with the previous results obtained before the memory upgrade. A higher score after the upgrade indicates improved performance, particularly in tasks that heavily rely on memory utilization.
3. Test resource-intensive applications: Open and run resource-intensive applications that you frequently use, such as video editing software, graphic design tools, or complex games. Check for improvements in performance, shorter loading times, and smooth multitasking capabilities.
4. Monitor system resources: Open the Task Manager (Windows) or Activity Monitor (macOS) to monitor the utilization of system resources, including memory. Observe how memory usage fluctuates with different applications and tasks. Ideally, you should see a decrease in memory load with the upgraded memory.
5. Multitasking and responsiveness: Test the computer’s multitasking capabilities by simultaneously running multiple applications or tasks. Check for any delays, lags, or system slowdowns. With the upgraded memory, your computer should handle multitasking more efficiently and exhibit improved responsiveness.
6. Stress tests: If you want to push the limits of your system, consider using stress testing software like Prime95 or IntelBurnTest. These tools put a heavy load on the processor and memory, allowing you to test the stability and performance of your newly upgraded system under excessive conditions.
7. Evaluate overall system performance: Take note of any noticeable improvements in everyday tasks, such as faster boot times, quicker file transfers, or smoother web browsing. These improvements indicate that the upgraded memory is positively impacting your computer’s overall performance.
By following these steps and conducting performance tests, you can ensure that the upgraded memory is functioning optimally, leading to improved system performance and a more efficient computing experience. If you notice any issues or unexpected results during testing, consult with a professional or refer to online resources for further troubleshooting options.