
Check Storage Usage
Before embarking on the journey of clearing your Android device’s storage, it’s essential to understand how your storage space is being utilized. This insight will guide you in identifying the areas that require attention and help you make informed decisions about what to clear or delete.
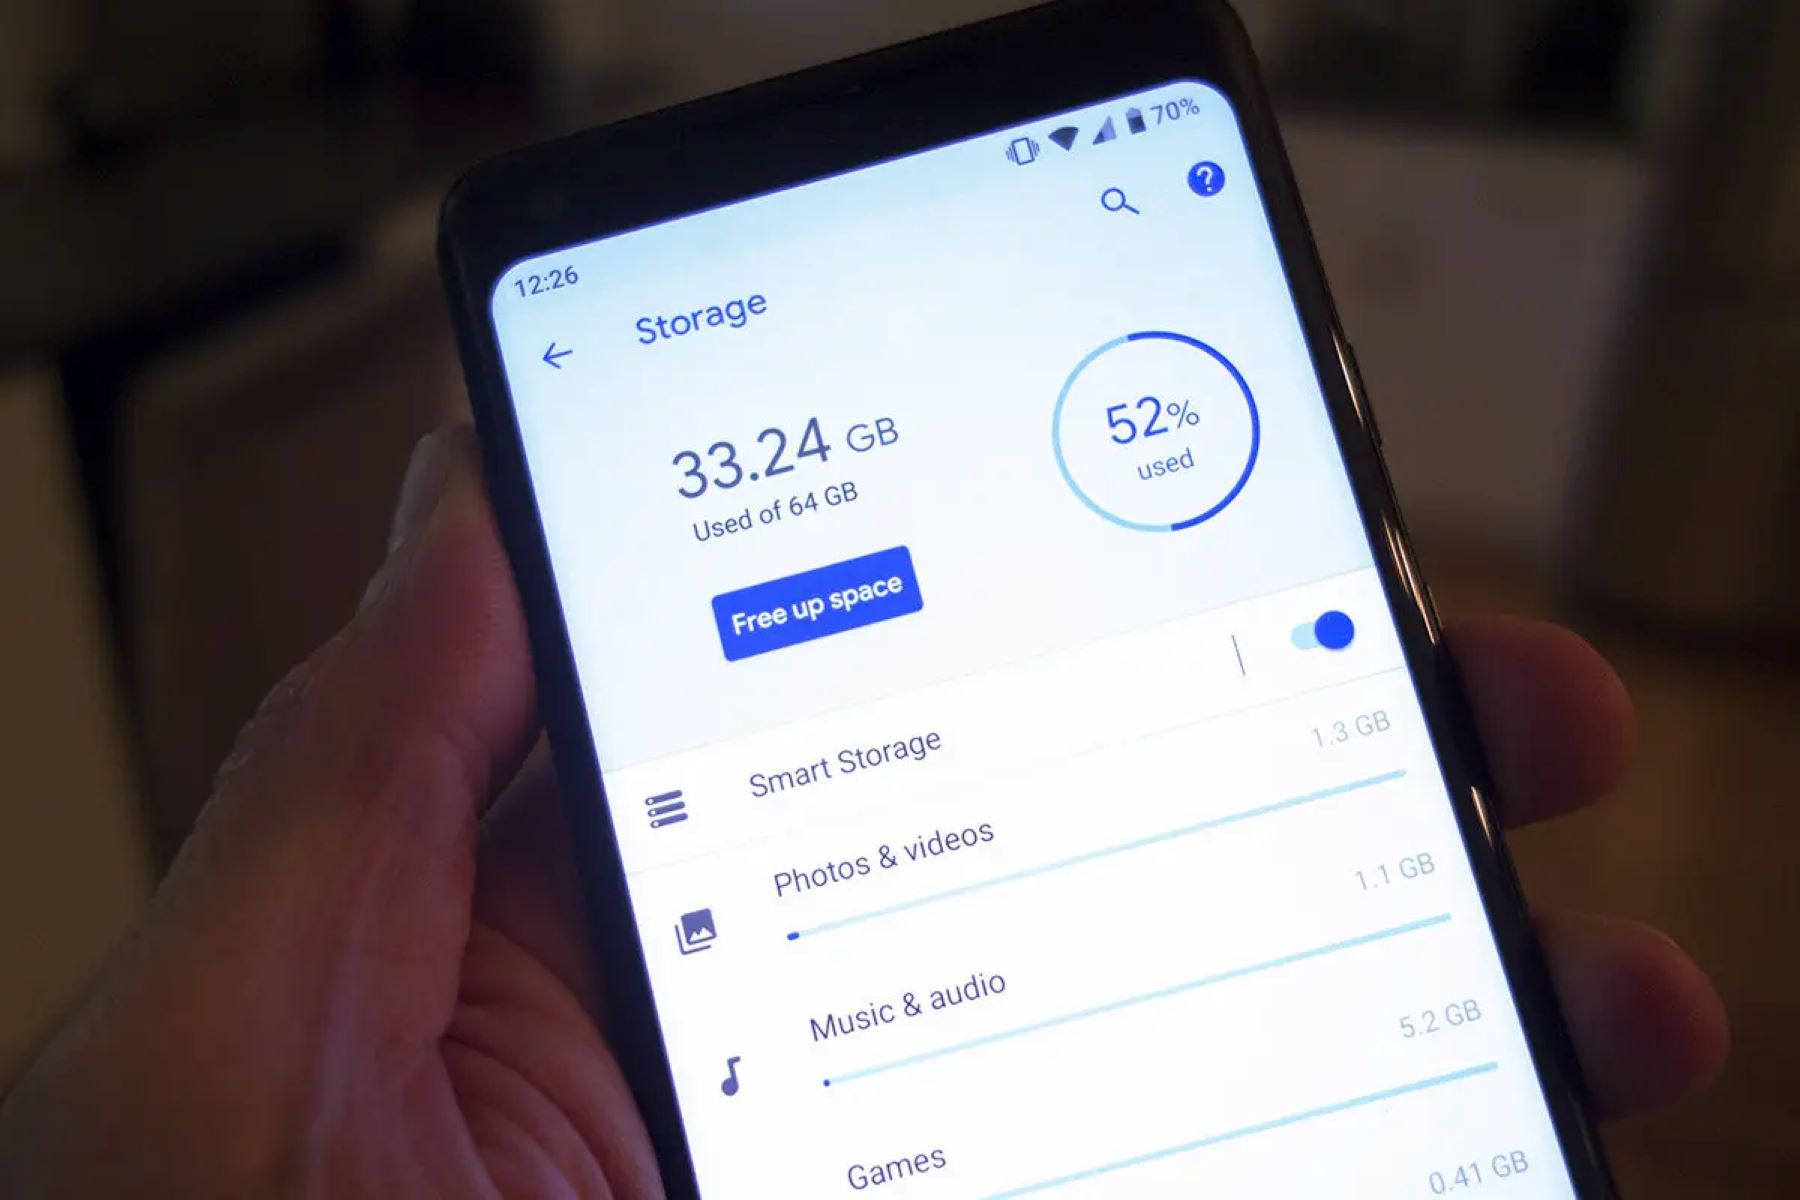
Here’s how you can check your storage usage:
- Open the “Settings” app on your Android device.
- Scroll down and tap on “Storage” or “Storage & USB.”
- You’ll see a breakdown of how your device’s storage is being used, including categories like Apps, Images, Videos, Audio, Cached Data, and Miscellaneous files.
By reviewing this information, you can pinpoint which areas are consuming the most space. For example, if the “Apps” category is taking up a significant portion of your storage, you may need to consider uninstalling or clearing data from certain apps. Similarly, if “Images” or “Videos” occupy a large chunk, it’s time to transfer them to an external storage or cloud service.
Understanding your storage usage is the first step in reclaiming valuable space on your Android device. With this knowledge in hand, you can proceed to the next steps of freeing up storage and optimizing your device’s performance.
Delete Unnecessary Apps
Over time, our Android devices tend to accumulate a plethora of apps, many of which we no longer use or need. These unused apps not only take up valuable storage space but can also impact the device’s performance. Here’s how you can streamline your app collection:
Start by assessing the apps installed on your device. Navigate to the “Settings” app and select “Apps” or “Applications.” You’ll see a list of all the apps installed on your device, along with the amount of storage each app consumes. Identify the apps that you haven’t used in a while or those that serve redundant functions.
Consider the following when deciding which apps to remove:
- Frequency of Use: If you haven’t opened an app in months, it’s likely safe to uninstall.
- Redundancy: Are there multiple apps that serve similar purposes? If so, you can retain the one you use most and remove the rest.
- Storage Impact: Some apps, particularly games and media-intensive applications, can occupy substantial storage space. Evaluate whether the storage they consume justifies their utility.
Once you’ve identified the unnecessary apps, proceed to uninstall them. Simply tap on the app in the “Apps” or “Applications” settings and select “Uninstall.” Confirm the action, and the app will be removed from your device, freeing up storage in the process.
Regularly decluttering your app collection not only optimizes storage but also enhances your device’s performance and battery life. It’s a simple yet effective way to keep your Android device running smoothly.
Clear App Cache
As you use various apps on your Android device, they accumulate temporary data known as “cache.” While this cache can enhance the app’s performance by storing frequently accessed information, it can also consume a significant amount of storage over time. Clearing the app cache can free up space and potentially resolve performance issues. Here’s how to accomplish this:
1. Access App Settings: Open the “Settings” app on your Android device and select “Apps” or “Applications.”
2. Select App: From the list of installed apps, choose the app for which you want to clear the cache.
3. Clear Cache: Within the app’s settings, you’ll find an option to clear the cache. Tap on “Storage” and then select “Clear Cache.” Confirm the action, and the app’s cache will be cleared.
It’s important to note that clearing an app’s cache does not delete any essential data or settings within the app. It simply removes temporary files that may no longer be needed, such as images, scripts, and other temporary data. After clearing the cache, the app may take a bit longer to load the next time you use it, as it rebuilds the necessary cache data.
Regularly clearing app caches can contribute to a smoother and more responsive user experience on your Android device. It’s a simple maintenance task that can help optimize storage and keep your device running efficiently.
Transfer Photos and Videos to Cloud Storage
Photos and videos often constitute a significant portion of the storage on Android devices. To free up space while preserving your precious memories, consider transferring them to cloud storage. Cloud services such as Google Photos, Dropbox, and OneDrive offer convenient and secure platforms for storing media. Here’s how to transfer your photos and videos to cloud storage:
1. Select a Cloud Service: Choose a cloud storage service that aligns with your preferences and offers ample storage capacity. Install the corresponding app from the Google Play Store if it’s not already on your device.
2. Upload Media: Open the cloud storage app and locate the option to upload photos and videos. This process may vary slightly depending on the service, but it typically involves selecting the media from your device’s storage and initiating the upload process.
3. Organize and Manage: Once your media is uploaded to the cloud, you can organize it into albums or folders for easy access. Many cloud services also offer features for automatically organizing and categorizing your photos and videos.
By transferring your photos and videos to cloud storage, you not only free up space on your device but also gain the added benefits of cloud-based accessibility, backup, and synchronization across devices. Additionally, cloud storage provides a safeguard against potential data loss due to device damage or loss.
Regularly backing up your media to cloud storage ensures that your memories are securely preserved while keeping your Android device’s storage uncluttered and available for current use.
Delete Old Messages and Call Logs
Over time, text messages and call logs can accumulate and occupy a substantial amount of storage on your Android device. Deleting old messages and call logs not only frees up space but also enhances your device’s performance. Here’s how you can efficiently manage these communication records:
Managing Text Messages:
1. Open Messaging App: Navigate to your messaging app, where you can view all your text conversations.
2. Select Conversations: Identify older conversations or those with large multimedia attachments that you no longer need. Tap and hold on a conversation to select it, and then proceed to select additional conversations if desired.
3. Delete Conversations: Once you’ve selected the conversations to delete, look for the delete option, often represented by a trash bin icon. Confirm the deletion, and the selected conversations will be removed from your device.
Managing Call Logs:
1. Access Call Log: Open the Phone app on your device and navigate to the call log, which typically displays your recent call history.
2. Delete Call Records: Look for an option to manage your call log, often accessible through a menu or settings icon. From there, you can select and delete individual call records or clear the entire call log, depending on your preference.
By regularly purging old messages and call logs, you can keep your device’s storage uncluttered and optimize its performance. Additionally, this practice can contribute to improved organization and efficiency in managing your communication records.
Use SD Card for Media Storage
Expanding your Android device’s storage capacity with an SD card can be a practical solution for managing media files and alleviating storage constraints. By offloading photos, videos, music, and other media to the SD card, you can free up valuable internal storage while ensuring easy access to your media. Here’s how to utilize an SD card for media storage:
Inserting the SD Card:
1. Locate the SD Card Slot: Depending on your device model, the SD card slot may be located on the side or back of the device. Use a SIM card removal tool or a small pin to eject the SIM card tray, if necessary, and insert the SD card into the designated slot.
2. Format the SD Card: Upon inserting the SD card, your device may prompt you to format it. Follow the on-screen instructions to format the card as portable storage, which allows it to be used for storing media and other files.
Transferring Media to the SD Card:
1. Access Storage Settings: Open the “Settings” app on your device and navigate to “Storage” or “Storage & USB.”
2. Transfer Media: Within the storage settings, you can often find an option to transfer media to the SD card. This may involve selecting specific media categories, such as photos, videos, or music, and choosing to move them to the SD card.
By utilizing an SD card for media storage, you can effectively expand your device’s capacity for storing photos, videos, and music without compromising performance. This approach not only optimizes internal storage but also provides a convenient way to manage and access your media files.
Clear Downloads Folder
Over time, the Downloads folder on your Android device can accumulate a variety of files, including documents, images, videos, and application installers. Clearing this folder not only frees up storage space but also helps in organizing your files and maintaining a clutter-free device. Here’s how to efficiently manage your Downloads folder:
Accessing the Downloads Folder:
1. Open the File Manager: Navigate to the “Files” or “File Manager” app on your device. Look for the Downloads folder within the list of available storage locations.
2. View Downloaded Files: Upon accessing the Downloads folder, you’ll see a list of files that have been downloaded to your device. These may include images, documents, PDFs, APK files, and various other types of downloads.
Clearing Unnecessary Downloads:
1. Identify Unneeded Files: Review the contents of the Downloads folder and identify files that are no longer needed or have been successfully utilized. This may include outdated documents, duplicate files, or files that have been superseded by newer versions.
2. Delete Unnecessary Files: Select the files you wish to remove from the Downloads folder. Depending on the file manager app, you may be able to select multiple files at once for deletion, or you can delete them individually.
Organizing Remaining Downloads:
1. Create Subfolders: If you have remaining files that you’d like to keep in the Downloads folder, consider organizing them into subfolders based on file type or category. This can help streamline the folder and make it easier to locate specific files in the future.
2. Move Files to Alternate Storage: For files that you wish to retain but don’t need immediate access to, consider moving them to external storage or cloud storage. This can further free up space on your device while ensuring that your important files are securely stored.
Regularly clearing and organizing your Downloads folder is an effective way to manage your device’s storage and maintain a clutter-free file system. By removing unnecessary files and organizing the remaining downloads, you can optimize storage space and streamline file management on your Android device.
Uninstall Unused Apps
As you continue to use your Android device, you may find that certain apps have become obsolete or are no longer relevant to your needs. Uninstalling these unused apps not only declutters your device but also frees up valuable storage space and can contribute to improved performance. Here’s how to efficiently identify and uninstall unused apps:
Identifying Unused Apps:
1. Review Installed Apps: Navigate to the “Apps” or “Applications” settings on your device to view a comprehensive list of installed apps. This list typically includes details about each app’s storage usage and frequency of use.
2. Assess App Usage: Evaluate the apps based on their frequency of use and relevance to your current needs. Apps that have remained dormant for an extended period or no longer serve a purpose are prime candidates for uninstallation.
Uninstalling Unused Apps:
1. Select Apps for Removal: Tap on the app you wish to uninstall within the “Apps” or “Applications” settings. This will open the app’s details, including the option to uninstall it.
2. Uninstall the App: Once you’ve selected an app for removal, proceed to uninstall it by tapping the “Uninstall” button. Confirm the action, and the app will be removed from your device, freeing up the storage it previously occupied.
Considerations for Uninstallation:
1. Pre-installed Apps: Exercise caution when uninstalling pre-installed apps, as some may be integral to the device’s functionality. While many pre-installed apps can be disabled, they may not be fully removable without rooting the device.
2. App Data and Settings: Keep in mind that uninstalling an app typically removes its data and settings from your device. If you anticipate needing this data in the future, consider backing it up or exporting it before uninstalling the app.
Regularly reviewing and uninstalling unused apps is an effective way to optimize your device’s storage and streamline its app collection. By removing apps that no longer serve a purpose, you can ensure that your device’s storage is dedicated to the apps and content that matter most to you.