
What is a SIM Card in a Camera?
A SIM (Subscriber Identity Module) card in a camera serves a similar purpose to that in a mobile phone. It enables the camera to connect to a cellular network, allowing for remote access and control. This feature is particularly useful for surveillance cameras, enabling users to monitor and manage the camera from anywhere with network coverage. Additionally, it allows the camera to send alerts or notifications via text messages or emails, enhancing its functionality and accessibility.
Typically, cameras with SIM cards are equipped with advanced features such as live streaming, motion detection, and cloud storage. The SIM card facilitates the transmission of data and communication with the camera, empowering users with greater flexibility and convenience in monitoring their premises or capturing important events remotely.
Moreover, the SIM card in a camera can be utilized for geotagging photos, enabling users to track the location where the images were captured. This can be beneficial for professional photographers, security personnel, and outdoor enthusiasts who require precise location data for their visual records.
Why Clearing a SIM Card is Necessary
Clearing a SIM card in a camera is essential for maintaining smooth functionality and ensuring optimal performance. Over time, SIM cards can accumulate unnecessary data, temporary files, or configuration settings that may lead to connectivity issues or operational disruptions. By clearing the SIM card, you can address potential issues and enhance the camera’s reliability and responsiveness.
Furthermore, clearing the SIM card allows for the removal of outdated network configurations or access point settings that might hinder the camera’s ability to connect to the cellular network effectively. This process can resolve network-related issues and improve the camera’s connectivity, ensuring seamless communication and data transmission.
Another reason to clear a SIM card is to eliminate any potential security risks or vulnerabilities. Resetting the SIM card can help safeguard the camera against unauthorized access attempts or potential breaches that may compromise its data or functionality. By clearing the SIM card, you can mitigate security concerns and establish a clean, secure connection to the cellular network.
Additionally, clearing the SIM card provides an opportunity to refresh the network connection and re-establish a stable link to the cellular network. This can be particularly beneficial if the camera has been experiencing intermittent connectivity issues or if it has been relocated to a new area with different network coverage. Clearing the SIM card allows the camera to re-establish a reliable network connection, ensuring consistent performance and uninterrupted communication.
Overall, clearing a SIM card in a camera is a proactive measure to optimize its connectivity, security, and performance. By periodically clearing the SIM card and refreshing its settings, users can maximize the camera’s capabilities and maintain a robust, reliable connection to the cellular network, enhancing its effectiveness in remote monitoring and communication.
Step 1: Power Off the Camera
Before clearing the SIM card in a camera, it is crucial to power off the device to prevent any potential data corruption or disruption during the process. By turning off the camera, you ensure that no active data transmission or network operations are ongoing, allowing for a safe and effective SIM card clearing procedure.
To power off the camera, locate the power button or switch, typically situated on the camera’s body or control panel. Press and hold the power button until the camera’s display or indicator lights are deactivated, indicating that the device is completely powered down. It is important to wait for a few seconds to ensure that all internal processes have ceased before proceeding to the next step.
Powering off the camera also serves to protect the SIM card and the camera’s internal components from potential damage that may occur if the clearing process is initiated while the device is operational. This precautionary measure helps to maintain the integrity of the SIM card and prevents any unintended consequences that could arise from clearing the card while the camera is actively connected to the network.
By following this initial step and ensuring that the camera is powered off, you set the stage for a smooth and successful SIM card clearing process, minimizing the risk of data corruption or operational issues. Once the camera is powered off, you can proceed with confidence to the subsequent steps, knowing that the device is in an optimal state for clearing the SIM card effectively.
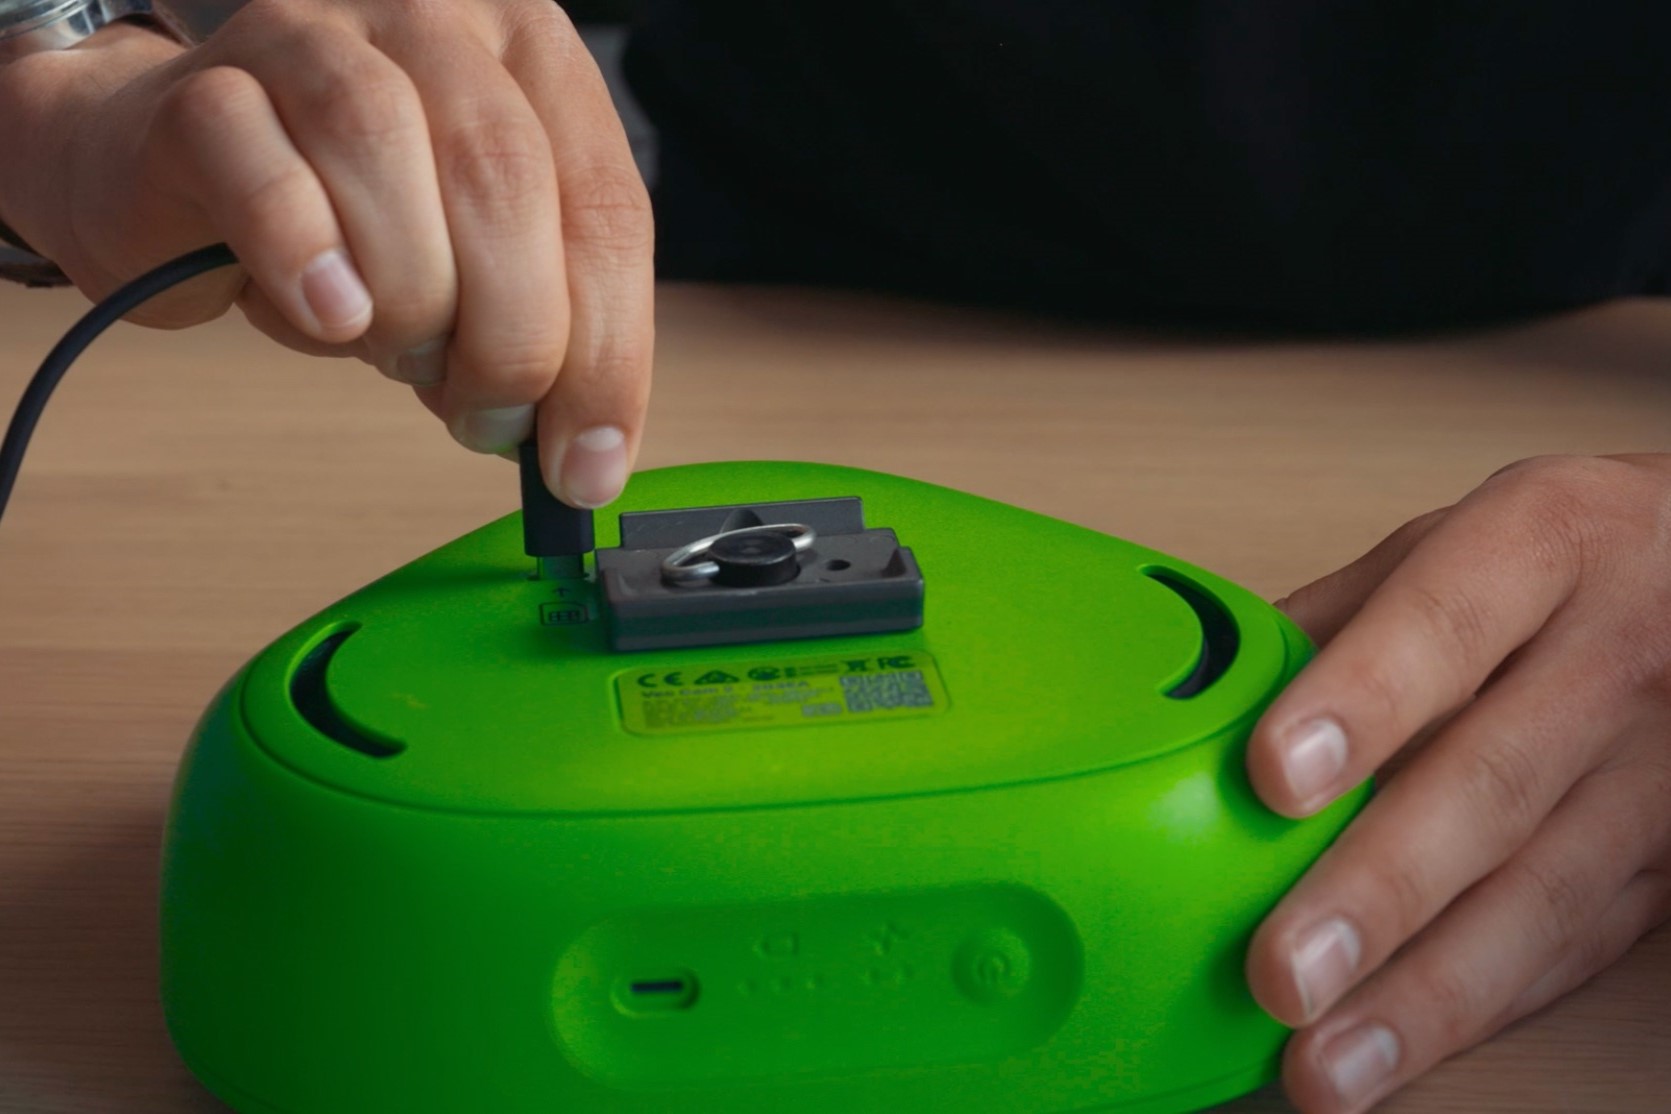
Step 2: Locate the SIM Card Slot
Locating the SIM card slot is the next crucial step in the process of clearing a SIM card in a camera. The SIM card slot is typically located in a designated compartment on the camera, often accessible by removing a protective cover or panel. It is essential to identify the specific location of the SIM card slot to proceed with the clearing process effectively.
Begin by carefully inspecting the exterior of the camera, paying close attention to any markings or indicators that denote the presence of a SIM card slot. In many camera models, the SIM card slot is positioned alongside other interface ports or memory card slots, often labeled with the acronym “SIM” or accompanied by a small icon representing a SIM card.
If the camera’s user manual is available, it can provide valuable guidance in locating the SIM card slot, offering detailed illustrations or instructions for accessing and handling the SIM card compartment. In the absence of a user manual, online resources or support from the camera’s manufacturer can be valuable sources of information for identifying the SIM card slot’s precise location.
Once the SIM card slot is located, take note of any mechanisms or locking mechanisms that secure the SIM card in place. Some cameras may feature a spring-loaded mechanism or a small tray for inserting the SIM card, while others may require the removal of a small cover or door to access the SIM card slot.
By successfully locating the SIM card slot, you are one step closer to initiating the clearing process, setting the stage for the subsequent steps of removing, cleaning, and reinserting the SIM card. This foundational step ensures that the SIM card can be accessed and managed effectively, facilitating a seamless and efficient clearing procedure to optimize the camera’s connectivity and performance.
Step 3: Remove the SIM Card
After identifying the SIM card slot, the next essential step in clearing a SIM card in a camera is to carefully remove the SIM card from its designated slot. This process requires precision and attention to detail to ensure that the SIM card is extracted without causing any damage to the card or the camera’s internal components.
To begin, gently access the SIM card slot according to the camera’s design, whether it involves sliding a cover, releasing a latch, or opening a compartment door. Once the SIM card slot is accessible, carefully assess the positioning of the SIM card within the slot. Some cameras utilize a spring-loaded mechanism that partially ejects the SIM card when it is unlocked, while others may require manual extraction using a small tool or your fingertips.
When removing the SIM card, it is crucial to exercise caution and avoid applying excessive force that could potentially damage the SIM card or the delicate components within the camera. If the SIM card is equipped with a spring-loaded mechanism, gently press on the card to release it from the slot, ensuring a smooth and controlled extraction.
If manual extraction is necessary, use a gentle, steady motion to slide the SIM card out of the slot, taking care to maintain alignment with the designated guides or rails. Avoid bending or twisting the SIM card during removal, as this could lead to physical damage or deformation that may impede its functionality when reinserted.
Once the SIM card is successfully removed from the camera, place it in a secure location, such as a protective case or holder, to prevent any potential damage or loss. By delicately and meticulously removing the SIM card, you prepare it for the subsequent step of cleaning, ensuring that it remains in optimal condition for reinsertion into the camera.
Step 4: Clean the SIM Card and Slot
Once the SIM card has been carefully removed from the camera, the next crucial step is to clean both the SIM card and the SIM card slot to ensure optimal connectivity and performance. Cleaning the SIM card and slot is essential for removing any dust, debris, or residue that may impede the card’s functionality or hinder its proper insertion into the camera.
Begin by inspecting the SIM card for any visible dirt, smudges, or foreign particles that may have accumulated on its surface. Using a soft, lint-free cloth or microfiber cloth, gently wipe the SIM card to remove any contaminants, ensuring that the card remains free of debris that could interfere with its contact points or the insertion process.
For stubborn debris or residue, lightly dampen the cloth with isopropyl alcohol and carefully clean the SIM card, taking care to avoid excessive moisture that could potentially damage the card. It is important to allow the SIM card to air dry completely before proceeding to the next step to ensure that no moisture remains on the card’s surface.
Simultaneously, inspect the SIM card slot within the camera for any dust, lint, or foreign matter that may have accumulated during regular use. Using a can of compressed air or a soft brush, gently remove any debris from the SIM card slot, ensuring that it is clean and free of obstructions that could hinder the reinsertion of the SIM card.
It is crucial to exercise caution and precision when cleaning the SIM card slot to avoid causing any damage to the camera’s internal components or the delicate connectors within the slot. By delicately removing any debris or contaminants, you prepare the SIM card slot for the seamless reinsertion of the cleaned SIM card, ensuring a reliable and secure connection.
By meticulously cleaning both the SIM card and the SIM card slot, you optimize the conditions for reestablishing a robust connection between the SIM card and the camera, setting the stage for the subsequent step of reinserting the SIM card and powering on the camera to complete the clearing process.
Step 5: Reinsert the SIM Card
After cleaning the SIM card and the SIM card slot, the next vital step in clearing a SIM card in a camera is to reinsert the SIM card into its designated slot. This process requires precision and care to ensure that the SIM card is properly aligned and securely placed within the camera, facilitating reliable connectivity and optimal performance.
Begin by examining the cleaned SIM card for any residual moisture or debris, ensuring that it is completely dry and free of contaminants. Once the SIM card is confirmed to be clean and in optimal condition, position it for reinsertion into the SIM card slot, aligning the card according to the designated guides or markings within the slot.
Gently slide the SIM card into the slot, taking care to maintain proper alignment and avoid forcing the card into place. The SIM card should fit smoothly and securely within the slot, with minimal resistance. If the SIM card features a spring-loaded mechanism, ensure that it is fully engaged and seated within the slot to establish a reliable connection.
As you reinsert the SIM card, verify that it is oriented correctly, aligning the notched corner or designated markings with the corresponding indicators within the SIM card slot. This alignment is crucial for ensuring that the SIM card makes proper contact with the camera’s internal connectors, facilitating seamless communication and data transmission.
Once the SIM card is securely reinserted into the camera, take a moment to ensure that it is firmly seated and properly aligned within the slot. Avoid applying excessive pressure or attempting to force the SIM card into place, as this could lead to damage or misalignment that may affect its functionality.
By successfully reinserting the cleaned SIM card into the camera, you pave the way for the subsequent steps of powering on the device and testing the SIM card to verify its connectivity and functionality. This critical step ensures that the SIM card is securely integrated into the camera, setting the stage for reliable network access and seamless operation.
Step 6: Power On the Camera
After reinserting the SIM card, the next significant step in the process of clearing a SIM card in a camera is to power on the device. This step is crucial for initiating the camera’s startup sequence and establishing the connection to the cellular network, allowing for the verification of the SIM card’s functionality and network access.
To power on the camera, locate the power button or switch, typically situated on the camera’s body or control panel. Press the power button to activate the camera, allowing the device to initialize its internal systems and commence the network connection process. As the camera powers on, observe the indicator lights or display to monitor the startup progress and network connectivity status.
During the startup sequence, the camera will attempt to establish a connection to the cellular network using the reinserted SIM card. It is essential to allow the device sufficient time to complete the startup process and establish a stable network connection, especially if the camera is initializing the network settings or obtaining an IP address for remote access.
As the camera powers on, listen for any audible indicators or notifications that may signal the successful establishment of the network connection. Some cameras emit a distinct sound or display a specific indicator light pattern to signify that the SIM card has been recognized and that the device is connected to the cellular network.
If the camera features a display screen, monitor the network status or connection information to verify that the SIM card is functioning correctly and that the camera has successfully established network access. This step is crucial for confirming that the SIM card clearing process has been completed effectively and that the camera is ready for testing the SIM card’s functionality.
By powering on the camera, you initiate the process of verifying the SIM card’s connectivity and ensuring that the camera can establish a reliable network connection. This step sets the stage for the subsequent testing of the SIM card to confirm its functionality and the successful completion of the clearing process.
Step 7: Test the SIM Card
After powering on the camera, the final step in clearing a SIM card is to test its functionality to ensure that the device can successfully connect to the cellular network and perform its intended operations. Testing the SIM card involves verifying network access, remote connectivity, and any specific features or functions that rely on the SIM card for communication and data transmission.
Begin by accessing the camera’s network settings or connectivity options to verify that the SIM card has been recognized and that the device has established a stable connection to the cellular network. Check for indicators such as signal strength, network status, and IP address assignment to confirm that the SIM card is functioning correctly and that the camera can communicate over the cellular network.
If the camera supports remote access or monitoring via the SIM card, test the device’s ability to transmit data, receive commands, or provide live streaming functionality. This step involves accessing the camera’s remote management interface or mobile app to ensure that the SIM card enables seamless communication and control of the device from a remote location.
Additionally, if the camera utilizes the SIM card for alert notifications or event triggers, test these features to confirm that the device can send and receive alerts via text messages, emails, or other communication channels. This step ensures that the SIM card’s communication capabilities are fully operational and that the camera can effectively relay important notifications or updates.
For cameras that utilize the SIM card for geotagging photos or location tracking, capture a test image and verify that the location data is accurately recorded and associated with the image. This confirms that the SIM card enables the camera to utilize location-based services and that the geotagging functionality is functioning as intended.
Throughout the testing process, monitor the camera’s performance and responsiveness to ensure that the SIM card facilitates seamless connectivity and communication. Verify that the camera can reliably access the cellular network, transmit data, and perform any specific functions that rely on the SIM card for network connectivity.
By thoroughly testing the SIM card, you confirm that the clearing process has been completed successfully and that the camera can effectively utilize the SIM card for its intended operations. This step ensures that the SIM card is fully functional and that the camera is ready to leverage its network capabilities for remote monitoring, communication, and data transmission.