
Why Change the Default Message Font in Mozilla Thunderbird
Mozilla Thunderbird is a popular email client that allows users to manage their emails efficiently. While Thunderbird comes with a default message font, you may find it necessary to change this font to better suit your preferences or improve readability. Whether you want to make the text more visually appealing or adjust the font to accommodate any visual impairments, changing the default message font in Thunderbird can make a significant difference in your email experience.
One of the main reasons to change the default message font is personal preference. You may have a particular font that you find more visually appealing or easier to read. By customizing the font in Thunderbird, you can create a more personalized and enjoyable email reading experience.
Additionally, some users may have specific font requirements to accommodate visual impairments. By changing the default message font to a larger, bolder, or more legible font, individuals with visual challenges can better read and comprehend their emails, which is crucial for effective communication.
Moreover, changing the default message font can be beneficial for users who frequently work with different languages or character sets. Certain fonts are optimized for displaying specific languages or character sets accurately. By selecting a font that supports the languages or character sets you frequently encounter, you can improve the legibility and display of your messages.
Furthermore, if you frequently switch between different email clients or devices, changing the default message font can provide consistency in the appearance of your emails. By selecting a font that is widely available and supported across various platforms, you can ensure that the font you choose in Thunderbird will be correctly displayed in other email clients or on different devices.
Step 1: Open Thunderbird and Go to Preferences
Before you can change the default message font in Mozilla Thunderbird, you need to access the Preferences menu. To do this, follow the simple steps outlined below:
- Launch Mozilla Thunderbird on your computer. The application icon is usually located on your desktop or in the Applications folder.
- Once Thunderbird is opened, click on the “Menu” button in the top-right corner of the window. It is represented by three horizontal lines stacked on top of one another.
- From the drop-down menu, select “Preferences” to open the Thunderbird settings.
- A new window called “Thunderbird Preferences” will appear. This is where you can customize various settings in Thunderbird, including the default message font.
By accessing the Preferences menu, you gain access to a wealth of customization options, allowing you to tailor Thunderbird to your specific needs and preferences.
It’s important to note that the steps provided above are applicable to Thunderbird on a computer. If you’re using Thunderbird on a mobile device, the process might be slightly different. However, the general idea remains the same – you need to locate the settings or preferences option to make changes to the default message font.
Step 2: Go to the Display section
After accessing the Preferences menu in Mozilla Thunderbird, you need to navigate to the Display section in order to change the default message font. Follow the step-by-step instructions below:
- In the “Thunderbird Preferences” window, look for the sidebar on the left side of the screen.
- Locate and click on the “Display” option in the sidebar. This will open the Display settings for Thunderbird.
- The Display section contains various customization options for the appearance of Thunderbird, including fonts and colors.
By going to the Display section, you are now one step closer to changing the default message font and making Thunderbird more visually appealing and comfortable to use.
It’s worth mentioning that Thunderbird’s user interface might undergo updates and changes over time, so the exact location of the Display section could vary slightly. However, the general process should remain consistent. If you can’t find the Display section in the sidebar, look for other related options such as “Appearance” or “Customization” that may contain the font settings you need.
Once you have successfully reached the Display section, you are ready to proceed with the next steps of changing the default message font in Thunderbird.
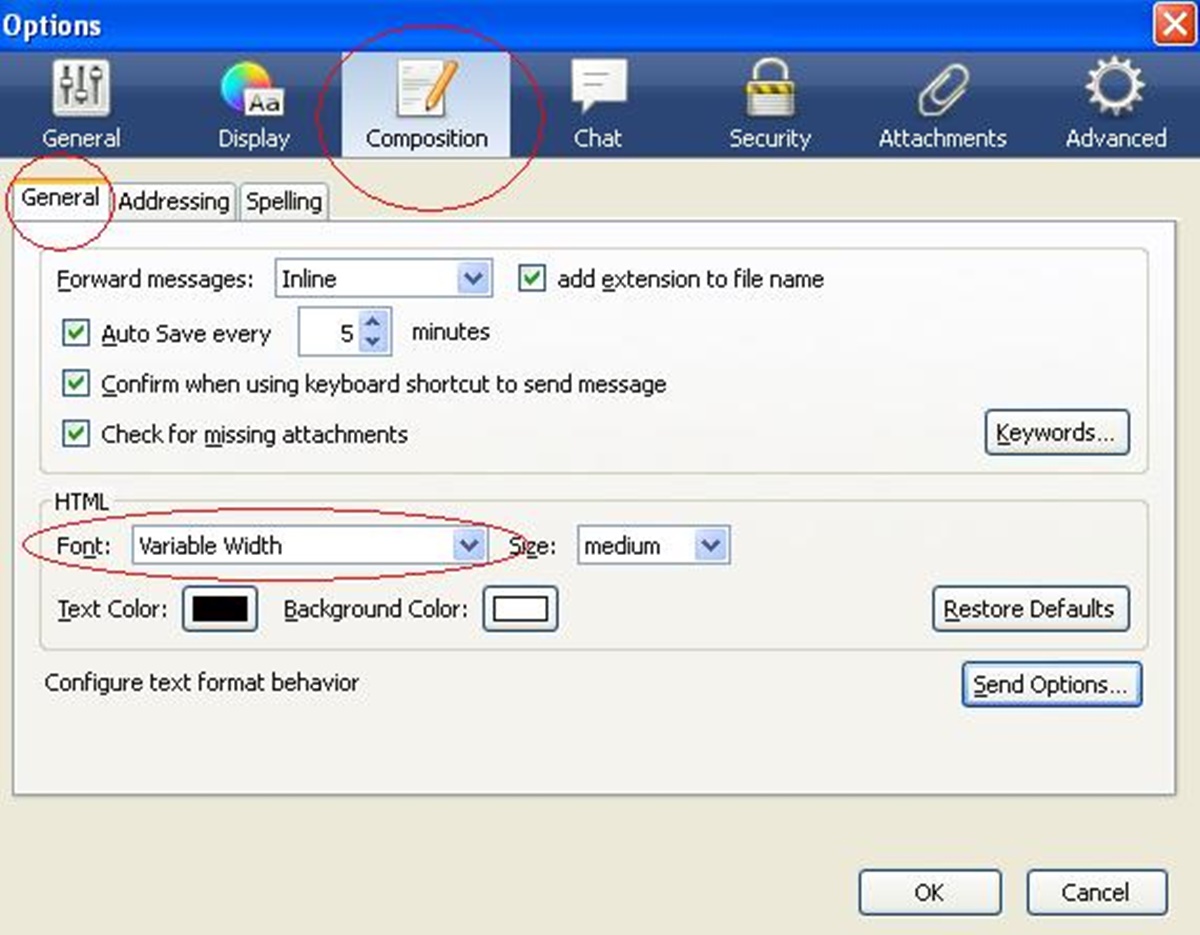
Step 3: Select Fonts & Colors
Now that you have reached the Display section in Mozilla Thunderbird’s Preferences menu, the next step is to select the Fonts & Colors option. This will allow you to customize the default message font. Follow the steps below:
- In the Display section, look for the “Fonts & Colors” tab or option. Click on it to access the font customization settings.
- A new window or panel will open, displaying the available options for customizing fonts and colors in Thunderbird.
- Within the Fonts & Colors settings, you will find various font-related options, such as the default font for messages, the font for different message elements (e.g., headers, paragraphs), and the font for fixed-width or monospaced text.
The Fonts & Colors tab allows you to fine-tune the appearance of Thunderbird’s text, making it easier to read and more visually appealing.
Keep in mind that the specific labels and layout of the Fonts & Colors section may vary depending on the version of Thunderbird you are using. However, the general idea remains consistent across different versions, providing you with the necessary tools to customize the default message font.
Once you have selected the Fonts & Colors option, you are ready to move on to the next step and make the desired changes to the default message font in Thunderbird.
Step 4: Change the font for messages
After accessing the Fonts & Colors settings in Mozilla Thunderbird, it’s time to change the default font for messages. Follow the steps below to make the desired font changes:
- Look for the “Default font” or “Message font” option within the Fonts & Colors settings. This option controls the font used for the main body of your emails.
- Click on the dropdown menu next to the “Default font” or similar label to see the available font options.
- Select the font you want to use for your Thunderbird messages. You can choose from the list of available fonts on your system.
- Once you have selected the desired font, you may also have the option to customize additional attributes such as font size, style (bold, italic, underline), and color.
- Adjust the font attributes as desired to create your preferred visual style for message content.
By changing the font for messages, you can enhance readability and personalize your email experience in Thunderbird.
Remember that the specific labels, options, and layout in the Fonts & Colors settings may vary depending on the version of Thunderbird you are using. However, the general process of selecting and customizing the font for messages should remain consistent across different versions.
Once you have made the desired changes to the message font, you are ready to move on to the next step and further refine your font settings in Thunderbird.
Step 5: Change the font for fixed-width and monospace text
In Mozilla Thunderbird, you have the option to customize not only the default font for messages, but also the font used for fixed-width and monospace text. This is particularly useful for viewing code snippets or preserving the formatting of certain messages. Follow the steps below to make the desired font changes:
- Within the Fonts & Colors settings, locate the option for “Fixed-width font” or “Monospace font”. This option controls the font used for text that requires a fixed character width, such as code or tables.
- Click on the dropdown menu next to the “Fixed-width font” or similar label to see the available font options.
- Select the font you want to use for fixed-width and monospace text. You can choose from the list of available fonts on your system.
- Similarly, you may have the option to customize additional attributes for the fixed-width font, such as font size, style, and color.
- Adjust the font attributes according to your preferences, ensuring that the fixed-width and monospace text is displayed in a way that best suits your needs.
By changing the font for fixed-width and monospace text, you can ensure that this type of content remains legible and neatly formatted within your emails.
It’s important to note that the specific labels and options within the Fonts & Colors settings may differ depending on the version of Thunderbird you are using. However, the general process of selecting and customizing the font for fixed-width and monospace text should remain similar across different versions.
Once you have made the desired changes to the fixed-width font, you are ready to proceed to the next step and apply your font settings in Thunderbird.
Step 6: Apply the changes and exit Preferences
After making the necessary font changes in the Fonts & Colors settings, it’s time to apply those changes to Thunderbird and exit the Preferences menu. Follow the steps below:
- Review your font settings to ensure that you have selected the desired fonts for both messages and fixed-width text.
- Once you are satisfied with your font selections, look for the “Apply” or “OK” button within the Fonts & Colors settings window.
- Click on the “Apply” or “OK” button to apply the font changes to Mozilla Thunderbird.
- After applying the changes, you may need to restart Thunderbird for the new font settings to take effect. If prompted, follow the instructions to restart the application.
- Once the changes have been applied and Thunderbird has restarted, you can exit the Preferences menu. Look for the “Close” or “Done” button within the Preferences window, and click on it.
By applying the changes and exiting the Preferences menu, you have successfully customized the default message font and fixed-width font in Mozilla Thunderbird according to your preferences.
Keep in mind that the specific labels and buttons within the Preferences menu may differ slightly depending on the version of Thunderbird you are using. However, the general process of applying the changes and exiting the Preferences menu should remain consistent.
Now that you have completed these steps, you can test the new message font in Thunderbird to see how it looks and ensure that it meets your expectations.
Step 7: Test the new message font in Thunderbird
Once you have made the desired font changes in Mozilla Thunderbird, it’s important to test the new message font to ensure that it appears as expected. Testing allows you to verify that the font settings you have customized are visually appealing and easy to read. Follow the steps below to test the new message font:
- Compose a new email or open an existing email in Thunderbird.
- Take note of the font used for the message content. It should reflect the changes you made in the Fonts & Colors settings.
- Type a few sentences or copy and paste some text into the email body.
- Pay attention to how the text appears, including the font style, size, and any custom attributes you applied.
- Read through the text to ensure that it is clear and legible. Consider factors such as spacing, line height, and overall readability.
Testing the new message font enables you to gauge its readability and verify that it aligns with your preferences. If you are not satisfied with the font appearance, you can revisit the Fonts & Colors settings and make further adjustments.
Remember to test the new font settings in various scenarios, such as reading incoming emails, viewing forwarded messages, and replying to or composing new messages. This ensures that the font is consistently applied throughout your Thunderbird experience.
If you are satisfied with the changes and find the new message font visually appealing and easy to read, congratulations! You have successfully customized the default message font in Mozilla Thunderbird.
Now, you can continue to enjoy a personalized and comfortable email reading experience in Thunderbird, thanks to your customized font settings.