
What is Blackmagic Disk Speed Test?
Blackmagic Disk Speed Test is a powerful software tool that allows you to measure the speed and performance of your Mac’s drives. It is specifically designed for Mac users and provides accurate and reliable results to assess the read and write speeds of your hard drives, solid-state drives (SSDs), and other storage devices.
Developed by Blackmagic Design, a renowned company known for its professional video and audio production equipment, the Disk Speed Test tool is widely used by professionals and enthusiasts alike to evaluate the performance of their storage devices.
Whether you’re a filmmaker working with high-resolution video files, a photographer editing RAW images, or simply someone who wants to optimize their Mac’s performance, understanding the speed and efficiency of your drives is crucial. Blackmagic Disk Speed Test can help you determine if your drives are up to the task.
One of the key features of Blackmagic Disk Speed Test is its ability to provide real-world simulations of different video formats and resolutions. This helps you assess how your drives will perform when handling specific video editing workloads.
Furthermore, the software is capable of performing both sequential and random read/write tests, allowing you to analyze the overall performance of your drives under different scenarios.
With its user-friendly interface and straightforward functionality, Blackmagic Disk Speed Test provides an efficient way to measure disk performance and identify any potential bottlenecks that may be affecting your Mac’s overall speed and responsiveness.
Whether you’re planning to upgrade your storage or simply want to benchmark your existing setup, Blackmagic Disk Speed Test is an invaluable tool for determining the speed and efficiency of your Mac’s drives.
Why Should You Use Blackmagic Disk Speed Test?
Blackmagic Disk Speed Test is an essential tool for Mac users who want to optimize their system’s performance and ensure smooth operations. Here are several reasons why you should consider using this powerful software:
1. Assess Drive Performance: Blackmagic Disk Speed Test provides accurate and detailed read and write speed measurements, allowing you to determine how well your drives are performing. This information is crucial for tasks that require high-speed data transfer, such as video editing, gaming, or working with large files.
2. Identify Bottlenecks: By measuring the speed of your drives, Blackmagic Disk Speed Test can help you identify any potential bottlenecks in your system. If you notice that your drive’s performance is significantly lower than expected, it could indicate issues with your hardware or configuration that need to be addressed.
3. Optimize Workflow: Understanding the speed limitations of your drives can help you make informed decisions about storage configurations and workflow optimization. For example, if you frequently work with high-definition video, you may need to invest in faster drives or use RAID configurations to ensure smooth playback and editing.
4. Compare Drive Performance: Blackmagic Disk Speed Test allows you to benchmark the performance of different drives and storage devices. This enables you to make informed decisions when purchasing new hardware or when evaluating different storage options for your Mac.
5. Test External Drives: Whether you’re using USB drives, external SSDs, or Thunderbolt-connected storage devices, Blackmagic Disk Speed Test can assess their performance. This is particularly useful if you rely on external storage for backups, file sharing, or portable workflows.
6. Troubleshoot Issues: If you are experiencing performance issues with your system, Blackmagic Disk Speed Test can help you pinpoint the cause. By testing different drives and configurations, you can determine if the problem lies with a specific drive or with the broader system setup.
7. Validate Hardware Upgrades: When upgrading your Mac’s storage, it’s essential to ensure that the new hardware delivers the expected performance gains. By running Blackmagic Disk Speed Test before and after the upgrade, you can validate the effectiveness of the change and ensure that you are getting the best performance possible.
How to Download and Install Blackmagic Disk Speed Test
Downloading and installing Blackmagic Disk Speed Test is a straightforward process. Follow these steps to get started:
1. Visit the Blackmagic Design Website: Go to the official Blackmagic Design website in your web browser.
2. Navigate to the Support Page: Once on the website, navigate to the Support section. Look for the software downloads or utilities page.
3. Find Blackmagic Disk Speed Test: On the software downloads page, locate Blackmagic Disk Speed Test. Click on the link or button to start the download process.
4. Verify System Requirements: Before downloading, make sure your Mac meets the system requirements for Blackmagic Disk Speed Test. Check for compatibility with your operating system version and hardware specifications.
5. Start the Download: Click on the download link to initiate the download. The file size is relatively small, so it should not take long to complete.
6. Open the Installer: Once the download is complete, locate the downloaded file (usually in your Downloads folder) and double-click on it to open the installer.
7. Follow the Installation Steps: The installation process is straightforward. Simply follow the on-screen instructions to install Blackmagic Disk Speed Test on your Mac. Review and accept the terms of use when prompted.
8. Launch Blackmagic Disk Speed Test: Once the installation is complete, you can find Blackmagic Disk Speed Test in your Applications folder. Double-click on the app icon to launch it.
9. Grant Necessary Permissions: Depending on your Mac’s security settings, you may be prompted to grant permissions for Blackmagic Disk Speed Test to access your drives. Allow the necessary permissions for accurate testing.
10. Ready to Test: With Blackmagic Disk Speed Test installed, you are now ready to start measuring the performance of your drives. Connect the drives you want to test to your Mac and follow the instructions provided by the software to begin the testing process.
Remember to ensure that you have properly closed any applications or processes using the drives you wish to test to obtain accurate measurements.
How to Use Blackmagic Disk Speed Test
Once you have installed Blackmagic Disk Speed Test on your Mac, follow these simple steps to effectively measure the performance of your drives:
1. Launch the Application: Locate and open Blackmagic Disk Speed Test from your Applications folder or the shortcut on your desktop.
2. Select the Drive to Test: From the available drives, select the one you want to test from the drop-down menu. Ensure that the drive you selected is the one you want to evaluate.
3. Configure Test Settings: Blackmagic Disk Speed Test offers various customizable settings to suit your testing needs. You can adjust the file size, video frame rate, codec, and resolution to simulate real-world workloads. However, if you are unsure about these settings, it is recommended to use the default options.
4. Start the Test: Click on the “Start” button to initiate the testing process. Blackmagic Disk Speed Test will begin writing and reading data from the selected drive, measuring its speed and performance.
5. Monitor the Test: While the test is in progress, you will see a progress bar that indicates the current status. You can also view the read and write speeds in real-time during the testing phase.
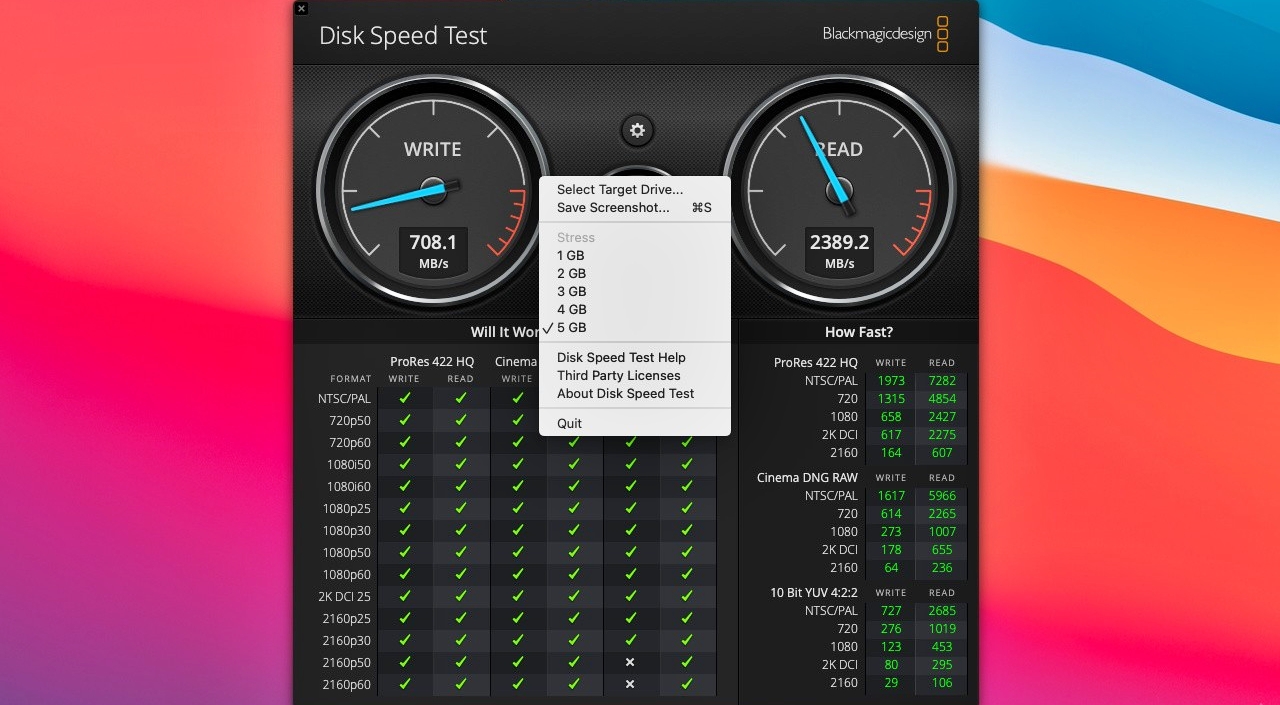
6. Collect the Results: Once the test is complete, Blackmagic Disk Speed Test will display the read and write speeds of your drive, typically in megabytes per second (MB/s). Note down these values for further analysis or comparison.
7. Repeat the Test: For accurate results, you may want to perform multiple tests on the same drive and take an average of the readings. This helps to ensure consistency and eliminate any potential outliers.
8. Analyze the Results: Interpret the results based on your specific requirements. Higher read and write speeds indicate better performance. Compare the obtained speeds with the specifications of the drive or with the performance of other similar drives to assess its relative performance.
9. Save or Share the Results: If desired, you can save the test results for future reference or share them with others. Blackmagic Disk Speed Test allows you to export the results as a CSV file, which can be opened and analyzed in spreadsheet software.
Remember that the performance of your drives may vary based on factors such as drive type, file system, capacity, and other hardware or software configurations. Therefore, it’s important to consider these variables when analyzing the results obtained from Blackmagic Disk Speed Test.
Interpreting the Results: What Do the Numbers Mean?
When using Blackmagic Disk Speed Test, it’s crucial to understand how to interpret the results to gain insights into the performance of your drives. Here’s a breakdown of what the numbers mean:
Read Speed: The read speed refers to how quickly data can be read from the drive. It measures the speed at which files can be accessed, opened, or copied from the drive. Higher read speeds indicate better performance, enabling faster file transfers and smoother playback of media files.
Write Speed: The write speed, on the other hand, represents how fast data can be written to the drive. It measures the speed at which files can be saved, exported, or written to the drive. Higher write speeds are desirable for tasks that involve creating or saving large files, such as video editing or data backups.
Sequential vs. Random: Blackmagic Disk Speed Test measures both sequential and random read/write speeds. Sequential tests involve reading or writing data in a continuous manner, simulating large file transfers. Random tests, on the other hand, involve random access patterns similar to what occurs during everyday use. Sequential speeds are generally higher than random speeds.
Units of Measurement: Blackmagic Disk Speed Test typically displays speeds in megabytes per second (MB/s). The higher the number, the faster the drive performs. Keep in mind that the speeds can vary depending on the drive’s technology, such as HDD (hard disk drive) or SSD (solid-state drive).
Comparing Results: It’s useful to compare the results obtained from different drives or against the specifications provided by the manufacturer. This allows you to evaluate the performance of your drives relative to others in the market or to determine if they meet your specific requirements.
Real-World Performance: While Blackmagic Disk Speed Test provides valuable speed measurements, it’s important to remember that real-world performance may differ based on various factors. Factors such as file size, drive capacity, fragmentation, and simultaneous access by other applications can affect actual performance during everyday tasks.
Considerations for Different Use Cases: The optimal read and write speeds will depend on your specific needs and use cases. For example, video editing applications often require high sustained read and write speeds for smooth playback and rendering, while general use cases may prioritize a balance between cost, capacity, and moderate performance.
By understanding and analyzing the results obtained from Blackmagic Disk Speed Test, you can make informed decisions about the suitability of your drives for different tasks, identify any potential performance bottlenecks, and optimize your system’s storage environment to enhance overall productivity.
Understanding the Different Metrics: Read and Write Speed
When using Blackmagic Disk Speed Test, two key metrics to pay attention to are read speed and write speed. These metrics provide insights into how your drives perform in terms of data retrieval and storage capabilities. Understanding these metrics is essential for optimizing your Mac’s performance. Let’s take a closer look at each metric:
Read Speed: Read speed refers to the rate at which data can be read from a storage device. It measures how quickly your Mac can access and retrieve files from the drive. A higher read speed indicates faster file opening, data access, and data transfer from the drive to the computer’s memory. This is particularly important for tasks like video editing, gaming, and working with large files, where quick access to data is crucial for smooth performance.
Write Speed: Write speed, on the other hand, measures the rate at which data can be written to a storage device. It determines how fast you can save files, export data, or create new files on the drive. A higher write speed means faster saving times, which is essential for tasks that involve creating or modifying large files, such as video rendering, photo editing, or data backups. With faster write speeds, you can work efficiently and avoid bottlenecks that may slow down your workflows.
It’s important to note that read and write speeds can vary based on several factors. First, the type of storage device plays a significant role. Solid-state drives (SSDs) generally offer faster read and write speeds compared to traditional hard disk drives (HDDs) due to their different underlying technology. Additionally, the speed also depends on the specific model, capacity, and quality of the drive.
Another factor that influences read and write speeds is the file size. Large files typically allow for faster sequential read and write speeds compared to small files. This is because sequential transfers involve reading or writing data in a continuous manner, which benefits from sustained high-speed data transfer rates.
Lastly, the drive’s condition and fragmentation can also affect read and write speeds. As a drive becomes more fragmented over time (files stored in non-contiguous locations), it can impact its performance, leading to slower read and write speeds. Regularly defragmenting or optimizing your drives can help mitigate this issue and improve overall performance.
Understanding the significance of read and write speeds and how they impact your day-to-day tasks will allow you to make informed decisions when it comes to choosing storage devices, upgrading hardware, or optimizing your workflow for enhanced productivity.
How to Improve Your Mac’s Drive Speed
If you want to enhance your Mac’s drive speed and optimize its overall performance, here are some effective strategies to consider:
Upgrade to an SSD: Consider upgrading your Mac’s storage to a solid-state drive (SSD). SSDs are faster and more reliable than traditional hard disk drives (HDDs), providing significant improvements in read and write speeds. This upgrade can result in faster boot times, quicker application launches, and overall snappier performance.
RAID Configuration: If you work with large files or require extreme speed, consider setting up a RAID (Redundant Array of Independent Disks) configuration. RAID combines multiple drives in a way that enhances performance and redundancy. RAID 0, for example, stripes data across multiple drives, improving read and write speeds.
Trim Support: Enable TRIM support on your SSD. TRIM is a feature that ensures efficient handling of deleted data blocks, which helps sustain the performance and longevity of your SSD. To enable TRIM, open the Terminal and enter the command “sudo trimforce enable” (without quotes) and follow the prompts.
Keep Your Drives Clean and Organized: Regularly clean up your drives by removing unnecessary files and organizing your data. Cluttered drives can lead to slower performance. Consider using macOS’ built-in Disk Utility or third-party software to scan for and repair any disk errors or issues.
Optimize System Storage: macOS offers built-in disk optimization features. Go to “About This Mac” > “Storage” > “Manage” to access tools like storing files in iCloud, optimizing storage, or reducing clutter by removing unneeded files and old system backups.
Regularly Update macOS and Software: Keeping your operating system and software up to date ensures you have the latest bug fixes and performance improvements. Check for updates regularly through the “App Store” and “System Preferences” > “Software Update” to maintain optimal performance.
Monitor Background Processes: Be aware of resource-intensive background processes that may be affecting your drive speed. Use Activity Monitor (located in the Utilities folder within Applications) to identify and quit any unnecessary processes that may be using significant system resources.
Avoid Overfilling Your Drives: Leave a reasonable amount of free space on your drives. When drives are nearly full, performance can suffer. Aim to keep at least 10-20% of the drive’s total capacity free for optimal performance.
Regularly Restart Your Mac: Restarting your Mac periodically can help clear temporary files and free up system resources, leading to improved drive speed and overall performance.
By implementing these strategies, you can greatly enhance your Mac’s drive speed and optimize its performance, resulting in a smoother and more efficient computing experience.
Tips for Accurate Testing with Blackmagic Disk Speed Test
To ensure accurate and reliable results when using Blackmagic Disk Speed Test, consider the following tips:
Close Unnecessary Applications: Before running the speed test, close any unnecessary applications running in the background. Applications that are actively reading or writing data to the drive being tested can impact the results and provide inaccurate readings.
Avoid Testing a Drive with Active Processes: Make sure that the drive you plan to test is not currently performing any resource-intensive tasks. This includes ongoing file transfers, system backups, or other data-intensive operations. Testing a busy drive can yield artificially low results.
Test Different Drives Separately: If you have multiple drives connected to your Mac, it’s best to test them one at a time. This allows you to accurately measure the performance of each drive individually. Testing multiple drives concurrently may not provide accurate results due to potential bandwidth sharing or other limitations.
Choose Appropriate Test Settings: When configuring the test settings in Blackmagic Disk Speed Test, select options that reflect your typical use cases. For example, if you primarily work with high-definition video editing, choose settings that simulate the file format, resolution, and frame rate you commonly use.
Perform Multiple Test Runs: To account for variations and ensure more accurate results, conduct multiple test runs on the same drive. This helps eliminate any outliers and provides a more reliable average speed measurement. Consider performing three or more test runs and calculating the average for a more accurate assessment.
Consider Disk Cache: Blackmagic Disk Speed Test relies on reading and writing a large file to measure drive performance. Some drives may utilize a disk cache, which temporarily stores data to enhance speed. This cache can affect initial read and write speeds. To obtain accurate results, perform repeated test runs to allow the cache to fill and stabilize.
Monitor System Temperature: Overheating can impact drive performance. Ensure that your Mac’s cooling system is functioning properly and monitor system temperature during testing. High temperatures can lead to thermal throttling, resulting in reduced drive performance. If necessary, consider using a laptop cooling pad or optimizing airflow around your desktop.
Avoid Other Network Activity: Network-related activities, such as downloading large files or streaming multimedia, can consume bandwidth and impact test results. To obtain accurate readings, avoid concurrent network-intensive tasks that may contend with the available bandwidth and affect the drive’s performance measurements.
Take Note of Drive Health: It’s essential to consider the health of your drives when interpreting the test results. Ensure that your drives are in good condition and free from any potential issues that could affect performance, such as bad sectors or impending hardware failure.
By following these tips, you can conduct accurate and reliable tests using Blackmagic Disk Speed Test, providing you with valuable insights into your drive’s performance and helping you make informed decisions about optimizing your Mac’s storage environment.
Comparing Results: Normal vs. Optimal Conditions
When comparing the results of Blackmagic Disk Speed Test, it’s important to understand that the performance of your drives can vary depending on the conditions under which the test was conducted. Here’s a comparison between normal and optimal testing conditions:
Normal Conditions: Normal testing conditions refer to running the speed test under typical day-to-day usage scenarios. This means that your Mac is operating with its usual settings and background processes, and the drive being tested may have some level of fragmentation or other factors that can affect performance. Normal conditions can provide a realistic depiction of how your drive performs in typical usage situations.
Optimal Conditions: Optimal testing conditions are idealized scenarios that aim to maximize drive performance. This involves taking certain steps to ensure peak performance during the test. Optimal conditions include factors such as having a freshly formatted and defragmented drive, closing all unnecessary applications and background processes, and disabling any power-saving settings that may limit drive performance. By creating these ideal conditions, you can obtain results that showcase the drive’s full potential.
It’s important to note that comparing results from normal and optimal conditions can provide insights into the drive’s performance capabilities. Optimal conditions allow you to see the maximum potential speeds that the drive can achieve. However, in real-world usage, it may be challenging to replicate these ideal conditions consistently.
When interpreting and comparing results between normal and optimal conditions, consider the following:
Real-World Expectations: Under normal conditions, the drive’s performance reflects how it’s likely to perform in everyday tasks. This gives you a better understanding of its capabilities in real-world scenarios.
Baseline Measurement: Conducting tests under optimal conditions provides a baseline measurement of the drive’s performance potential. This allows you to gauge how the drive performs when all factors that can limit performance are minimized or eliminated.
Practical Constraints: Keep in mind that achieving optimal conditions consistently may not be practical for day-to-day usage. Background processes, fragmented files, and other factors can impact performance in real-world scenarios. Hence, aim for a balance between consistent drive performance and occasional optimization when necessary.
Identifying Bottlenecks: Comparing results from normal and optimal conditions can help identify potential bottlenecks in your system. If the performance gap between the two conditions is significant, it may indicate that your drive’s performance is being limited by outside factors, such as excessive background processes or suboptimal drive setup.
By understanding the difference between normal and optimal testing conditions and comparing the results obtained under each set of conditions, you can make better-informed decisions about drive performance optimization and establish realistic expectations for your Mac’s storage capabilities.
Blackmagic Disk Speed Test vs. Other Speed Testing Tools: Pros and Cons
When it comes to evaluating drive speed and performance, there are various testing tools available. Here, we’ll compare Blackmagic Disk Speed Test with other speed testing tools, considering their pros and cons:
Blackmagic Disk Speed Test:
- Pros: Blackmagic Disk Speed Test is specifically designed for Mac users and provides accurate and reliable speed measurements. It offers real-world simulations of different video formats, which is advantageous for video professionals. The software has a user-friendly interface and is widely used in the industry for drive performance assessment.
- Cons: Blackmagic Disk Speed Test is limited to measuring the read and write speeds of drives and does not offer extensive diagnostic capabilities or advanced features.
CrystalDiskMark:
- Pros: CrystalDiskMark is a popular cross-platform speed testing tool that allows users to measure the sequential and random read/write speeds of drives. It offers a variety of test modes and customizable settings for more detailed analysis.
- Cons: CrystalDiskMark can be overwhelming for casual users, as it provides numerous detailed options and may require technical knowledge for optimal usage. It lacks some of the user-friendly features and real-world simulations found in Blackmagic Disk Speed Test.
ATTO Disk Benchmark:
- Pros: ATTO Disk Benchmark is well-known for its accurate and consistent drive speed measurements. It offers a simple and straightforward interface, making it accessible to users of all levels. It provides detailed graphs and reports, allowing for better visualization of drive performance.
- Cons: ATTO Disk Benchmark focuses on measuring speed and does not provide additional diagnostic or optimization features. Its interface may not be as visually appealing or modern compared to some other tools.
HD Tune:
- Pros: HD Tune is a versatile tool that combines various features, including drive speed testing, health monitoring, error scanning, and drive information. It offers a comprehensive overview of drive performance and health, making it suitable for users who want an all-in-one solution.
- Cons: HD Tune’s user interface can be less intuitive, especially for beginners. It may require some exploration to fully utilize all its features. Its speed testing capabilities may not be as specialized or optimized as tools like Blackmagic Disk Speed Test.
Ultimately, the choice of a speed testing tool depends on your specific needs and preferences. Blackmagic Disk Speed Test is a reliable choice for Mac users, particularly those in the media industry. It offers an easy-to-use interface and real-world simulations. Other tools like CrystalDiskMark, ATTO Disk Benchmark, and HD Tune provide more detailed analysis and broader functionality, accommodating varying levels of technical expertise.
Consider your requirements, the level of detail you need, and the platforms you are working with when choosing a speed testing tool to effectively assess your drive’s performance.
Common Issues and Troubleshooting Tips
While using Blackmagic Disk Speed Test, you may encounter some common issues. Here are a few troubleshooting tips to help you overcome these problems:
1. Inconsistent Results: If you notice inconsistent or fluctuating results across multiple test runs, try closing any unnecessary applications or background processes that may be utilizing system resources. Restarting your Mac before testing can also help in ensuring a clean and stable testing environment.
2. Slow Read/Write Speeds: If your read and write speeds are significantly lower than expected, check if there are any background activities or system processes consuming resources. Additionally, ensure that your drive is not nearly full, as this can lead to reduced performance. Consider optimizing your drive by removing unnecessary files or defragmenting it to improve speed.
3. USB Drive Performance: If you are testing the read/write speeds of a USB drive, make sure it is connected to a high-speed USB port (USB 3.0 or higher) for optimal performance. Some older USB ports may not provide the maximum transfer speeds, resulting in lower test results.
4. External Drive Connection: If you are testing the performance of an external drive, ensure that the connection cables and ports are in good condition. Use high-quality cables and make sure they are securely connected to avoid any speed degradation caused by a weak or faulty connection.
5. Device Firmware and Drivers: Keep your drives’ firmware and system drivers up to date. Check the manufacturer’s website for any available firmware updates for your devices. Outdated firmware or drivers can sometimes lead to lower performance or compatibility issues.
6. Drive Formatting: If you recently formatted your drive, ensure that it is properly formatted with the appropriate file system. Different file systems, such as APFS or HFS+, may have different performance characteristics. Formatting the drive to match your needs can help optimize its performance.
7. Disk Space Allocation: For accurate testing, make sure you have enough free space on the drive you are testing. Insufficient free space can lead to lower performance. Aim to have at least 10-20% of the drive’s capacity available to maintain optimal speed.
8. Hardware Limitations: It’s important to be aware of the hardware limitations of your system, such as the maximum capabilities of your storage device or the connection interface (e.g., SATA, Thunderbolt). Ensure that your expectations align with the hardware’s capabilities to prevent unrealistic performance expectations.
9. Seek Professional Assistance: If you have tried troubleshooting and are still experiencing issues, consider seeking professional assistance from Apple support or contacting the manufacturer of your storage devices for further guidance.
By following these troubleshooting tips, you can resolve common issues and ensure better accuracy and reliability when using Blackmagic Disk Speed Test to evaluate your Mac’s drive performance.