
Overview of Automatic Wireless Network Connections in Windows XP
Windows XP offers a convenient feature called Automatic Wireless Network Connections, which allows users to seamlessly connect to wireless networks without the hassle of manually configuring network settings. This feature is especially useful for individuals who frequently move between different locations with wireless networks, such as homes, offices, and public places.
To facilitate automatic connections, Windows XP utilizes the Wireless Zero Configuration (WZC) service. WZC actively scans for available wireless networks in the vicinity and automatically connects to networks that have been previously configured or marked as preferred by the user.
Enabling the WZC service is essential for automatic network connections. With WZC enabled, Windows XP takes care of all the necessary steps, including authentication and obtaining IP addresses, to establish a successful wireless connection. By eliminating manual configuration, users can save time and effort when connecting to networks.
However, there may be instances when users want to disable the WZC service. This can be necessary for compatibility reasons with third-party wireless network management software or to prevent Windows XP from automatically connecting to undesired networks. Disabling the WZC service can be done easily through the Windows Services management interface.
To benefit from automatic connections, users can create a list of preferred networks. These networks can be either open networks or secured networks with Wi-Fi passwords. Windows XP will prioritize connecting to these preferred networks whenever they are within range. This eliminates the need for manually selecting and connecting to networks each time the user moves between locations.
In the next section, we will explore how to add and remove preferred networks on Windows XP, as well as how to view available wireless networks. Additionally, we will discuss common troubleshooting steps to overcome issues that may arise when using automatic wireless network connections on Windows XP.
Using the Windows XP Wireless Zero Configuration (WZC) Service
The Windows XP Wireless Zero Configuration (WZC) service is responsible for managing automatic wireless network connections. It scans for available wireless networks, provides a list of networks for the user to select from, and handles the connection process. This service simplifies the task of connecting to wireless networks by automating the configuration process.
To start using the WZC service, ensure that it is enabled. By default, the service is enabled on Windows XP. However, it can be disabled if a third-party wireless network management utility is installed. To check the status of WZC and enable it if necessary, follow these steps:
- Click on the Start button and open the Control Panel.
- Open the Administrative Tools folder and double-click Services.
- In the Services window, scroll down and locate the Wireless Zero Configuration service.
- Double-click the service to open its Properties.
- In the General tab, set the Startup Type to Automatic if it is not already set.
- Click the Start button to start the service.
- Click Apply and then OK to save the changes.
With the WZC service enabled, automatic connections to wireless networks can be established. Windows XP will scan for available networks and list them in the Wireless Network Connection window. From there, users can select the desired network and click the Connect button to initiate the connection process. Windows XP will handle the authentication and obtain the necessary IP settings automatically.
It is important to note that the WZC service prioritizes connecting to networks that have been marked as preferred by the user. Preferred networks are networks that Windows XP will attempt to connect to first when they are available. Users can add or remove preferred networks to customize the automatic connection behavior.
In the next section, we will explore how to add and remove preferred networks on Windows XP, as well as how to view the available wireless networks list. Additionally, we will discuss common troubleshooting steps to overcome potential issues that may arise when using automatic wireless network connections on Windows XP.
Enabling the WZC Service
The Windows XP Wireless Zero Configuration (WZC) service is responsible for managing automatic wireless network connections. By default, the WZC service is enabled on Windows XP. However, if it has been disabled or stopped, users may need to enable it to ensure automatic connections to wireless networks.
To enable the WZC service, follow these steps:
- Click on the Start button and open the Control Panel.
- In the Control Panel, select Administrative Tools.
- Double-click on Services to open the Services window.
- In the Services window, scroll down and locate the Wireless Zero Configuration service.
- Double-click on the Wireless Zero Configuration service to open its Properties.
- In the General tab, set the Startup Type to Automatic if it is not already set.
- Click the Start button to start the service.
- Click Apply and then OK to save the changes.
Once the WZC service is enabled, it will automatically scan for available wireless networks and manage the connection process. Users can then connect to networks by selecting them from the available networks list and clicking the Connect button.
Enabling the WZC service ensures a seamless and convenient experience when connecting to wireless networks in Windows XP. It eliminates the need for manual network configuration and authentication by handling these processes automatically.
It is important to note that in some cases, the WZC service may conflict with third-party wireless network management utilities. If you are using such software, you may need to disable the WZC service and rely on the provided utility. However, for most users, enabling the WZC service is the recommended approach for automatic wireless network connections on Windows XP.
In the next section, we will explore how to add and remove preferred networks on Windows XP, as well as how to view the available wireless networks list. Additionally, we will discuss common troubleshooting steps to overcome potential issues that may arise when using automatic wireless network connections on Windows XP.
Disabling the WZC Service
The Windows XP Wireless Zero Configuration (WZC) service is responsible for managing automatic wireless network connections. While this service is enabled by default on Windows XP, there may be cases where users need to disable it. This could be due to compatibility issues with third-party wireless network management utilities or to prevent Windows XP from automatically connecting to undesired networks.
To disable the WZC service, follow these steps:
- Click on the Start button and open the Control Panel.
- In the Control Panel, select Administrative Tools.
- Double-click on Services to open the Services window.
- In the Services window, scroll down and locate the Wireless Zero Configuration service.
- Double-click on the Wireless Zero Configuration service to open its Properties.
- In the General tab, set the Startup Type to Disabled.
- Click the Stop button to stop the service if it is currently running.
- Click Apply and then OK to save the changes.
Once the WZC service is disabled, Windows XP will no longer automatically manage the process of connecting to wireless networks. Users will need to manually configure their network settings and connect to networks through alternate software or settings provided by their wireless network adapter manufacturer.
It is important to note that disabling the WZC service will disable the automatic connection functionality in Windows XP. Users will need to manually select and connect to wireless networks each time they want to establish a connection. This may be desired in scenarios where users prefer more control over which networks they connect to or when using third-party wireless network management utilities.
If you decide to disable the WZC service, make sure to have an alternative method for managing your wireless network connections in place. This could include using software provided by your wireless network adapter manufacturer or third-party network management utilities.
In the next section, we will explore how to add and remove preferred networks on Windows XP, as well as how to view the available wireless networks list. Additionally, we will discuss common troubleshooting steps to overcome potential issues that may arise when using automatic wireless network connections on Windows XP.
Automatic Connections with Preferred Networks
One of the benefits of using the Windows XP Wireless Zero Configuration (WZC) service is the ability to establish automatic connections with preferred networks. Preferred networks are wireless networks that Windows XP will prioritize connecting to whenever they are within range. This feature provides convenience and eliminates the need for users to manually select and connect to networks each time they are available.
To add a preferred network, follow these steps:
- Click on the Start button and open the Control Panel.
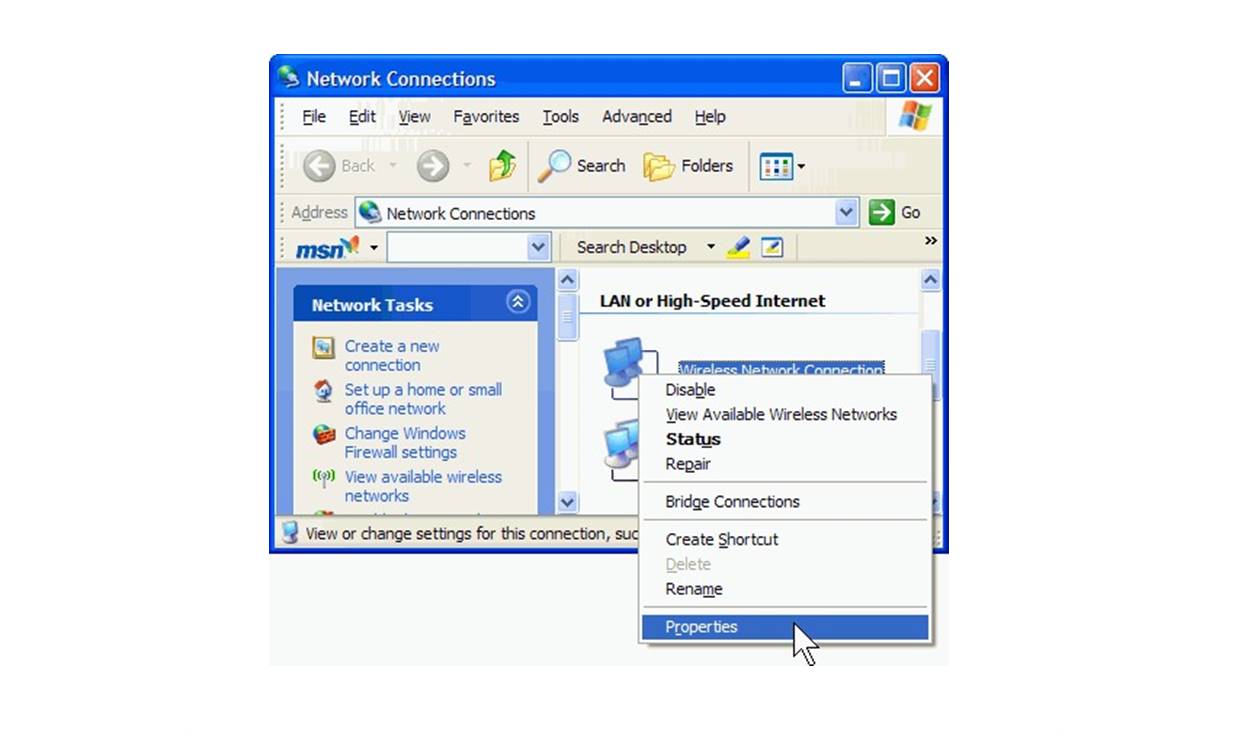
- In the Control Panel, open the Network Connections folder.
- Right-click on the wireless network adapter and select Properties.
- In the Wireless Networks tab, click the Add button.
- In the Available Networks list, select the desired network and click the Configure button.
- In the Connection tab, specify the network’s name (SSID) and select the appropriate security settings if applicable.
- Click OK to save the settings.
Once a network is added as a preferred network, Windows XP will automatically connect to it whenever it is in range. This eliminates the need for manual configuration and authentication, allowing for a seamless and hassle-free connection experience.
If a preferred network is no longer needed or if you want to remove it for any reason, follow these steps:
- Click on the Start button and open the Control Panel.
- In the Control Panel, open the Network Connections folder.
- Right-click on the wireless network adapter and select Properties.
- In the Wireless Networks tab, locate the preferred network in the Preferred networks list.
- Select the network and click the Remove button.
- Click OK to save the changes.
By managing and customizing the list of preferred networks, users can ensure that Windows XP connects to the desired networks automatically, providing a convenient and efficient wireless network experience.
In the next section, we will explore how to view available wireless networks in Windows XP, as well as discuss common troubleshooting steps to overcome potential issues that may arise when using automatic wireless network connections on Windows XP.
Adding a Preferred Network
Windows XP allows users to add preferred networks, which are wireless networks that the system will prioritize when establishing automatic connections. By adding a preferred network, users can streamline the process of connecting to commonly used networks, such as those at home, the office, or public places.
To add a preferred network in Windows XP, follow these steps:
- Click on the Start button and open the Control Panel.
- Within the Control Panel, locate and open the Network Connections folder.
- Right-click on the wireless network adapter and select Properties.
- In the Wireless Networks tab, click on the Add button.
- In the list of available networks, choose the network you want to add as a preferred network and click on the Configure button.
- In the Connection tab, enter the network’s name (also known as the SSID) and choose the appropriate security settings, if applicable.
- Click OK to save the settings.
Once the preferred network is added, Windows XP will automatically prioritize connecting to it whenever it is within range. This eliminates the need for manual selection and configuration, ensuring a seamless and convenient wireless connection experience.
It is important to note that the network’s security settings, including the correct key or password, must be entered correctly in order for Windows XP to connect automatically. If there are any changes to the network’s security settings or password, make sure to update the preferred network settings accordingly.
By adding preferred networks to Windows XP, users can save time and effort when connecting to frequently used wireless networks. Whether it’s connecting to networks at home, work, or other common locations, the automatic connection feature simplifies the process and enhances the overall user experience.
In the next section, we will explore how to remove a preferred network in Windows XP, as well as discuss common troubleshooting steps to overcome potential issues that may arise when using automatic wireless network connections.
Removing a Preferred Network
If you no longer need to connect to a specific wireless network or if you want to remove a network from the list of preferred networks in Windows XP, you can easily do so using the Network Connections settings. Removing a preferred network ensures that Windows XP will no longer automatically connect to that particular network.
To remove a preferred network in Windows XP, follow these steps:
- Click on the Start button and open the Control Panel.
- Within the Control Panel, locate and open the Network Connections folder.
- Right-click on the wireless network adapter and select Properties.
- In the Wireless Networks tab, you will see a list of preferred networks.
- Select the network you want to remove from the list.
- Click on the Remove button.
- Click OK to save the changes.
By removing a preferred network, Windows XP will no longer attempt to automatically connect to that network. This can be helpful in situations where you no longer have access to a particular network or if you want to prioritize other networks on the list.
It’s important to note that removing a preferred network does not delete the network’s configuration settings from your computer entirely. If you want to completely remove all traces of a network, including its settings, you may need to delete the network profile altogether. Network profiles store information such as the network’s name (SSID), security settings, and any other specific configurations. To delete a network profile, you can use the “Manage Wireless Networks” option in the Network and Sharing Center of Windows XP.
By removing a preferred network effectively, users can customize and manage their automatic connection preferences in Windows XP. This allows for more flexibility and control over the wireless networks that Windows XP will automatically prioritize when connecting.
In the next section, we will explore how to view available wireless networks in Windows XP, as well as discuss common troubleshooting steps to overcome potential issues that may arise when using automatic wireless network connections on Windows XP.
Viewing Available Wireless Networks
Windows XP provides a convenient way to view the list of available wireless networks in your vicinity. This feature allows users to see all the wireless networks that are within range of their computer’s wireless network adapter. By viewing available wireless networks, users can easily select and connect to the desired network, whether it’s a home network, office network, or a public Wi-Fi hotspot.
To view the available wireless networks in Windows XP, follow these steps:
- Click on the Start button and open the Control Panel.
- Within the Control Panel, locate and open the Network Connections folder.
- Right-click on the wireless network adapter and select View Available Wireless Networks.
Windows XP will then display a list of the available wireless networks in your area. The list will include the network’s name (SSID), signal strength, and whether the network is secure or open. In some cases, additional information such as the network’s encryption type and signal quality may also be shown.
By viewing available wireless networks, users can easily identify and select the network they want to connect to. Simply click on the desired network in the list, and if necessary, enter the network’s security key or password. Windows XP will then proceed to authenticate and establish a connection to the selected network.
It is important to note that if a network is not listed in the available networks, it may be out of range or hidden. Hidden networks are networks that do not broadcast their SSID (network name) and require manual configuration to connect to. In such cases, you will need to manually add the network as a preferred network in the wireless network adapter settings.
Viewing available wireless networks in Windows XP provides users with the necessary information to connect to the desired network quickly and easily. Whether you are at home, in the office, or traveling, this feature simplifies the process of discovering and connecting to wireless networks.
In the next section, we will discuss common troubleshooting steps to overcome potential issues that may arise when using automatic wireless network connections on Windows XP.
Troubleshooting Automatic Wireless Network Connections in Windows XP
While automatic wireless network connections in Windows XP are designed to be seamless and convenient, there are instances where issues may arise. These issues can prevent users from successfully connecting to wireless networks or cause intermittent connection problems. Fortunately, Windows XP provides several troubleshooting steps to help resolve these issues and ensure smooth automatic network connections.
Here are some common troubleshooting steps to consider:
- Update Wireless Network Adapter Drivers: Outdated or incompatible wireless network adapter drivers can often cause connection issues. It is important to regularly update the drivers to ensure compatibility and stability. Check the manufacturer’s website for the latest drivers and install them if necessary.
- Reset TCP/IP Protocol: Resetting the TCP/IP protocol can help fix network configuration issues. Open the Command Prompt and enter the command “netsh int ip reset” followed by pressing Enter. Restart your computer to apply the changes.
- Power Cycle the Wireless Router: Sometimes, the wireless router may encounter temporary glitches. Power cycling the router can refresh its settings and help establish a stable connection. Simply unplug the power cable from the router, wait for a few seconds, and then plug it back in.
- Use the Network Troubleshooter Tool: Windows XP includes a built-in Network Troubleshooter tool that can automatically diagnose and fix common network connection problems. To access it, right-click on the wireless network adapter in the Network Connections folder, select Diagnose, and follow the on-screen instructions.
These troubleshooting steps cover some of the common issues that users may encounter when using automatic wireless network connections in Windows XP. However, if the problems persist, it may be worth seeking further assistance from technical support or IT professionals.
By following these troubleshooting steps, users can overcome common issues and ensure a reliable and stable connection when utilizing automatic wireless network connections in Windows XP. It is always recommended to keep the wireless network adapter drivers up to date and perform regular maintenance tasks to optimize the network connection experience.
Remember, troubleshooting and resolving network issues is an ongoing process, and it may require a combination of different solutions to achieve the desired results.
Common Issues and Solutions
When using automatic wireless network connections in Windows XP, users may encounter common issues that can disrupt the connection experience. Understanding these issues and having knowledge of their solutions can help users troubleshoot and resolve problems efficiently. Here are some common issues and their corresponding solutions:
- Weak Signal or Limited Range: If the wireless network signal is weak or there is limited range, it can result in poor or dropped connections. To mitigate this issue, try moving closer to the wireless router or access point. Additionally, reducing obstructions between the device and the wireless router, such as walls or other electronic devices, can help improve the signal strength.
- Incorrect Security Key or Password: When connecting to a secured network, entering an incorrect security key or password will prevent successful connection. Ensure that the security key or password is entered correctly, paying attention to uppercase and lowercase characters. If necessary, contact the network administrator for the correct security information.
- Interference from Other Devices: Wireless networks can be affected by interference from other devices operating in the same frequency range, such as cordless phones or microwave ovens. To minimize interference, try changing the wireless channel on the router to a less congested frequency band.
- Outdated Wireless Network Adapter Drivers: Outdated or incompatible wireless network adapter drivers can cause connection problems. Make sure to regularly update the drivers to the latest version provided by the manufacturer. This can be done by visiting the manufacturer’s website and downloading the appropriate drivers for the specific wireless network adapter model.
- Software Conflicts: Sometimes, conflicts between the Windows XP Wireless Zero Configuration service and third-party wireless network management utilities can disrupt automatic connections. If using third-party software, consider disabling the Windows XP Wireless Zero Configuration service and rely solely on the provided utility for managing wireless network connections.
By understanding these common issues and their corresponding solutions, Windows XP users can effectively troubleshoot and resolve problems that may arise when using automatic wireless network connections. It is important to note that these solutions may not address all network issues, and in some cases, advanced troubleshooting or professional assistance may be required.
Regularly updating wireless network adapter drivers, ensuring the correct security key or password is entered, and minimizing interference can help maintain a stable and reliable wireless connection in Windows XP. By identifying and addressing common issues promptly, users can enjoy a seamless and uninterrupted wireless network experience.
Updating Wireless Network Adapter Drivers
Updating wireless network adapter drivers is an important step in ensuring the smooth and reliable operation of wireless connections in Windows XP. Outdated or incompatible drivers can cause various issues, such as connectivity problems, slow transfer speeds, or even system crashes. By keeping the drivers up to date, users can benefit from improved performance, enhanced security, and compatibility with the latest wireless technologies.
To update the wireless network adapter drivers in Windows XP, follow these steps:
- Identify the make and model of your wireless network adapter. This information can usually be found on the adapter itself or in the documentation that came with your computer.
- Visit the manufacturer’s website for your wireless network adapter.
- Look for the “Support” or “Downloads” section on the manufacturer’s website.
- Search for the latest driver for your specific wireless network adapter model and download it.
- Once the driver is downloaded, double-click on the file to begin the installation process.
- Follow the on-screen instructions to complete the installation. It may be necessary to restart your computer after the driver installation is complete.
Alternatively, you can use a driver update utility or Windows Update to automatically detect and install the latest drivers for your wireless network adapter. Windows Update can be accessed through the Control Panel or by simply typing “Windows Update” in the search bar of the Start menu.
Updating the wireless network adapter drivers not only ensures compatibility with the latest wireless standards and technologies, but it also provides access to bug fixes and performance improvements. These updates can address known issues and enhance the overall stability and reliability of the wireless connection.
It is recommended to check for driver updates periodically, especially when experiencing issues with the wireless connection. By keeping the wireless network adapter drivers up to date, users can maximize their wireless network performance and maintain a seamless wireless networking experience on Windows XP.
In the next section, we will discuss common troubleshooting steps to overcome potential issues that may arise when using automatic wireless network connections on Windows XP.
Resetting TCP/IP Protocol
The TCP/IP protocol is a fundamental component of network communication in Windows XP. Sometimes, network configuration issues can arise, leading to connectivity problems or failure to establish a proper connection. Resetting the TCP/IP protocol can help resolve these issues and restore network functionality.
To reset the TCP/IP protocol in Windows XP, follow these steps:
- Click on the Start button and open the Command Prompt. You can do this by typing “cmd” in the search bar and selecting the Command Prompt from the search results.
- In the Command Prompt window, type the following command:
netsh int ip reset - Press Enter to execute the command.
- Wait for the command to complete. This process may take a few moments.
- Once the command has finished executing, restart your computer to apply the changes.
After restarting your computer, the TCP/IP protocol will be reset to its default settings. Resetting the protocol can resolve various network-related issues, including problems with automatic wireless network connections.
It’s important to note that when you reset the TCP/IP protocol, any custom network settings or configurations you have made will be reversed to their default values. Therefore, it’s advisable to record any specific network settings or configurations before resetting the protocol, so you can easily reconfigure them after the reset.
If resetting the TCP/IP protocol doesn’t resolve the connectivity issues, you may need to consider other troubleshooting steps, such as checking for driver updates, power cycling the wireless router, or using the network troubleshooter tool.
By resetting the TCP/IP protocol in Windows XP, users can troubleshoot and resolve network configuration issues, ensuring a stable and reliable connection. This can lead to a smoother and more seamless experience when using automatic wireless network connections on Windows XP.
In the next section, we will explore the process of power cycling the wireless router, as well as discuss other common troubleshooting steps to overcome potential connection issues in Windows XP.
Power Cycling the Wireless Router
Power cycling the wireless router is a simple yet effective troubleshooting step that can help resolve connectivity issues with automatic wireless network connections in Windows XP. When a router encounters temporary glitches or is not functioning properly, power cycling can refresh its settings and restore proper functionality.
To power cycle the wireless router, follow these steps:
- Locate the power adapter connected to your wireless router.
- Unplug the power adapter from the router.
- Wait for approximately 10 to 15 seconds.
- Plug the power adapter back into the router.
- Wait for the router to fully power on and establish a stable connection.
Power cycling the wireless router allows it to reset itself and clear any temporary issues that may have occurred. This process can help resolve connectivity problems, intermittent connection drops, or slow network speeds.
It’s important to note that power cycling the router will temporarily disrupt the internet connection for all devices connected to it. Make sure to inform others who may be using the network to avoid any inconvenience.
If power cycling the router does not resolve the connectivity issues, you may need to consider other troubleshooting steps, such as updating wireless network adapter drivers, resetting the TCP/IP protocol, or using the network troubleshooter tool provided by Windows XP.
By power cycling the wireless router, users can resolve temporary issues and restore a stable and reliable connection for automatic wireless network connections in Windows XP. This ensures a seamless and uninterrupted browsing and network experience.
In the next section, we will explore how to use the network troubleshooter tool in Windows XP, as well as discuss other common troubleshooting steps to overcome connectivity issues.
Using Network Troubleshooter Tool
Windows XP comes equipped with a built-in Network Troubleshooter tool that can automatically diagnose and resolve common network connectivity issues. If you are experiencing difficulties with automatic wireless network connections, using the Network Troubleshooter tool can help identify and fix the problem quickly.
To use the Network Troubleshooter tool in Windows XP, follow these steps:
- Click on the Start button and open the Control Panel.
- In the Control Panel, locate and open the Network Connections folder.
- Right-click on the wireless network adapter and select Diagnose.
- The Network Troubleshooter tool will automatically run tests to diagnose network issues.
- Follow the instructions provided by the troubleshooter to resolve the detected problems.
The Network Troubleshooter tool will perform a series of tests to analyze the network configuration and connectivity. It will then provide suggestions or automatically fix any identified issues. This tool is designed to address common network problems, such as IP address conflicts, DNS resolution issues, or problems with the wireless network adapter.
If the Network Troubleshooter tool successfully resolves the connectivity problems, you should be able to establish automatic wireless network connections without any issues. However, in some cases, the tool may not be able to fix the problem or may identify more complex issues. In such situations, you may need to seek additional help from technical support or IT professionals.
Using the Network Troubleshooter tool can save time and effort in diagnosing and resolving network connectivity issues. It provides a guided, automated approach to troubleshooting and can be a valuable tool for users experiencing problems with automatic wireless network connections in Windows XP.
In addition to using the Network Troubleshooter tool, you may need to try other troubleshooting steps, such as updating wireless network adapter drivers, power cycling the wireless router, resetting the TCP/IP protocol, or checking for any physical issues like loose cables or antenna connections.
In the next section, we will summarize the key troubleshooting steps discussed and provide some closing remarks for troubleshooting automatic wireless network connections in Windows XP.