
Understanding Visual Effects
Visual effects are the graphical elements and animations that enhance the overall appearance of your computer’s user interface. They include features like window animations, fading effects, transparent windows, and more. While these effects can make your PC experience more visually appealing, they can also slow down your computer’s performance, especially if you have a lower-end system.
It’s important to understand that visual effects consume system resources, such as CPU and GPU power, as well as memory. This means that the more visual effects you have enabled, the more strain it puts on your computer’s hardware, potentially slowing down its overall speed and responsiveness.
For users who have older computers or are looking to optimize their PC’s performance, adjusting visual effects settings can be a beneficial step. By fine-tuning these settings, you can strike a balance between visual aesthetics and system performance.
It’s worth noting that adjusting visual effects is not about completely eliminating them; it’s about optimizing them to ensure smoother performance while still maintaining a visually pleasing experience. So, let’s dive into the various settings you can tweak to improve your PC’s speed.
Adjusting Visual Effects Settings
Adjusting the visual effects settings on your computer allows you to customize the level of graphical enhancements while maximizing your PC’s performance. To access these settings, follow the steps below:
- Right-click on the Start button and select “System.”
- Click on “Advanced system settings” on the left-hand side of the window.
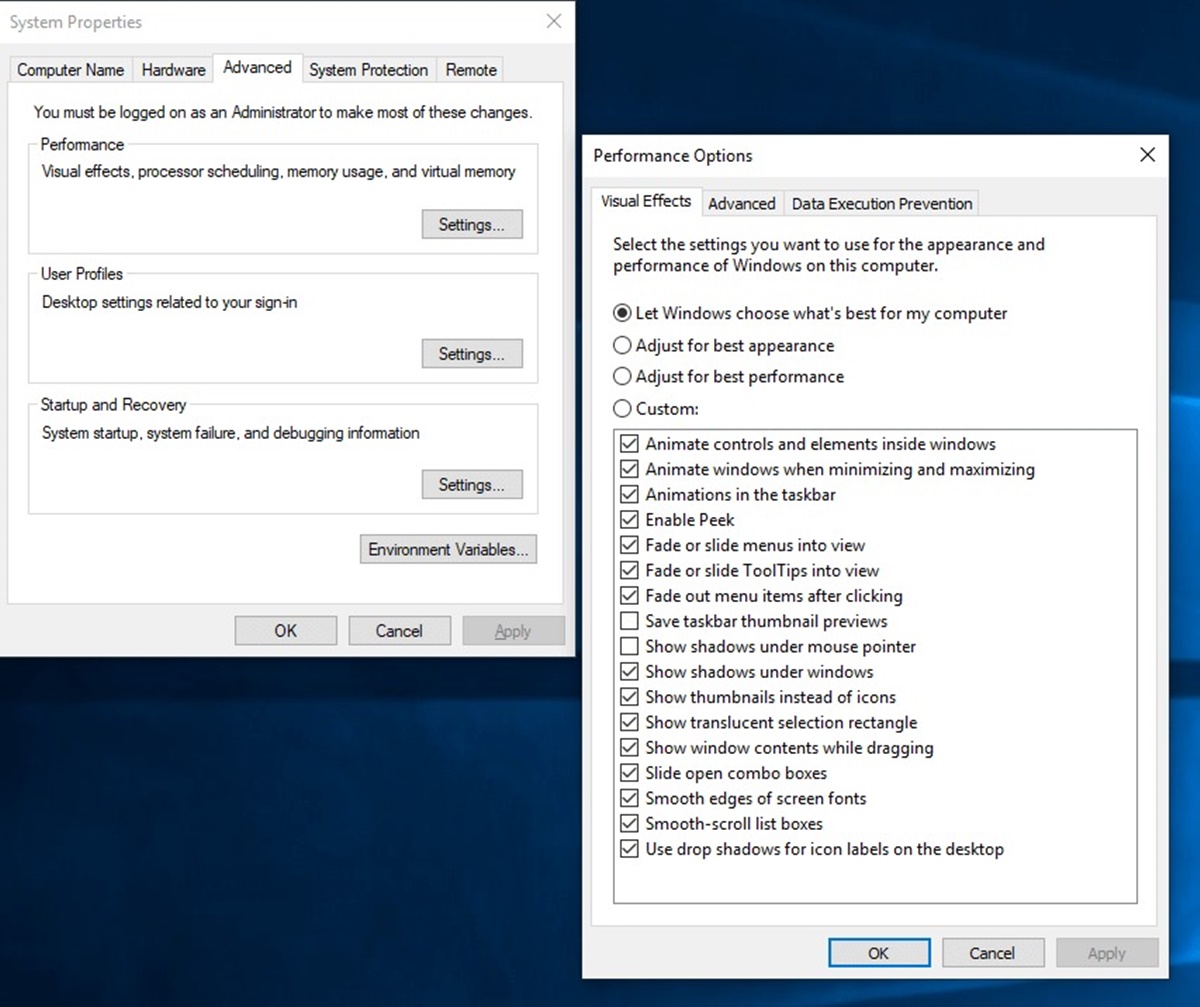
- In the System Properties window, click on the “Settings” button under the “Performance” section.
Once you’ve reached the Performance Options window, you’ll find several options to adjust visual effects. These options include:
- Let Windows choose what’s best for my computer: This option allows Windows to automatically adjust the visual effects based on your system’s specifications. It is recommended for those who prefer a hassle-free experience but want to optimize performance.
- Adjust for best appearance: Selecting this option enables all visual effects, providing the best-looking experience. However, it may lead to reduced performance, especially on lower-end systems.
- Adjust for best performance: This option disables most visual effects, prioritizing system performance over appearance. It is recommended for older machines or users looking for maximum speed.
- Custom: By selecting this option, you can individually enable or disable specific visual effects according to your preference. It allows you to strike a balance between performance and aesthetics.
Once you’ve chosen the desired option, click on “Apply” and then “OK” to save your changes. Your computer will then apply the new visual effects settings and you should notice a difference in performance.
It’s important to note that adjusting visual effects settings may not result in a noticeable performance boost on high-end systems. However, for older computers or those experiencing sluggishness, optimizing visual effects can make a significant difference in overall performance.
Disable Transparency Effects
Transparency effects, such as see-through window borders and taskbar overlays, can add a touch of elegance to your computer’s visual interface. However, they can also consume valuable system resources and impact performance, especially on older or underpowered machines. Disabling transparency effects can help improve your PC’s speed, and here’s how you can do it:
- Right-click on the Desktop and select “Personalize.”
- In the Personalization settings, click on “Colors” in the left-hand menu.
- Scroll down and toggle off the switch for “Transparency effects.”
Once you’ve disabled transparency effects, you should notice an instant improvement in performance, as your system will no longer have to render and display the transparent elements. This can be particularly beneficial when it comes to minimizing windows and navigating through different applications.
While disabling transparency effects may result in a slightly less visually appealing experience, the trade-off in improved speed and responsiveness is worth considering, especially if your computer is struggling to keep up with the demands of the transparent interface elements.
By disabling transparency effects, you can ensure that your computer dedicates more resources to running applications and processes rather than rendering aesthetic visual elements, allowing for a smoother and more efficient computing experience.
Lower Screen Animations
Screen animations, such as fade-in and fade-out effects, smooth scrolling, and animated transitions, can make your computer feel more dynamic and interactive. However, these animations can also contribute to a slower overall performance, especially on older or less powerful machines. Lowering screen animations can help improve your PC’s speed and responsiveness. Here’s how you can do it:
- Open the Start menu and search for “Ease of Access settings.”
- In the Ease of Access settings window, click on “Display” in the left-hand menu.
- Scroll down to the “Simplify and personalize Windows” section.
- Toggle on the switch for “Show animations in Windows” to disable it.
By disabling screen animations, you reduce the amount of graphical rendering and processing power required by your computer. This can result in faster window transitions, application launches, and overall system responsiveness.
While lowering screen animations may lead to a slightly less visually engaging experience, the performance boost is often well worth it, especially if your computer is struggling to smoothly navigate through various tasks and applications.
If you’re not comfortable completely disabling screen animations, you can customize the animation settings to a lower level. This can be done by following the same steps mentioned above, but instead of toggling off the switch for “Show animations in Windows,” click on “Customize” and choose a lower duration for the animations.
By reducing screen animations, you allow your computer to allocate more processing power to essential tasks, resulting in improved speed and overall performance. Experiment with different levels of animation settings until you find the right balance between visual appeal and performance.
Turn Off Visual Effects for Window Resizing and Minimizing
When you resize or minimize windows on your computer, you may notice various visual effects, such as animations and transitions. While these effects can be visually appealing, they can also slow down your PC’s performance, especially if you have a lower-end system. Turning off visual effects for window resizing and minimizing can help improve your PC’s speed. Here’s how to do it:
- Right-click on the Start button and select “System.”
- Click on “Advanced system settings” on the left-hand side of the window.
- In the System Properties window, click on the “Settings” button under the “Performance” section.
- In the Performance Options window, go to the “Visual Effects” tab.
- Scroll down and uncheck the box next to “Animate windows when minimizing and maximizing.”
- Click on “Apply” and then “OK” to save the changes.
Once you’ve disabled the visual effects for window resizing and minimizing, you should notice a quicker response when manipulating windows on your desktop. The elimination of these animated effects reduces the strain on your system’s resources, resulting in improved speed and overall system performance.
While turning off these visual effects may result in a less visually appealing experience, the performance benefits can outweigh the aesthetic sacrifice, especially if your computer is struggling to keep up with the demands of window animations.
By disabling visual effects for window resizing and minimizing, you streamline the window management process, allowing your computer to dedicate more resources to essential tasks and applications. This can lead to a smoother and more efficient computing experience, especially on lower-end systems.
Reduce Taskbar Animations
The taskbar on your computer provides quick access to frequently used programs and displays notifications. By default, the taskbar may include various animations, such as hover effects and thumbnail previews. While these animations can add a touch of visual flair, they can also contribute to decreased performance, especially on older or less powerful machines. Reducing taskbar animations can help improve the speed and responsiveness of your PC. Here’s how you can do it:
- Right-click on an empty space in the taskbar and select “Taskbar settings.”
- In the Taskbar settings window, scroll down to the “Multiple displays” section.
- Toggle off the switch for “Show taskbar animations.”
By disabling taskbar animations, you’ll eliminate the visual effects that occur when hovering over icons or displaying thumbnail previews when hovering over open applications. This helps to reduce the strain on your computer’s resources and can result in a snappier and more efficient user experience.
While reducing taskbar animations may lead to a less visually dynamic taskbar, the trade-off is improved performance, especially when it comes to navigating through open applications and managing your workflow.
For users who prefer to retain some visual cues, you can customize the taskbar animations to a lower level. This can be done by going to “Settings” > “Ease of Access” > “Visual effects” and adjusting the animation settings according to your preference.
By reducing taskbar animations, you allow your computer to allocate more processing power to essential tasks and applications, resulting in improved speed and overall performance. Experiment with different animation settings until you find the balance between aesthetics and performance that suits your needs.
Disable Background Slide Show
The background slide show feature on your computer allows you to display a rotating set of images as your desktop background. While this can be visually appealing, it can also consume system resources and impact the performance of your PC, particularly on older or less powerful machines. Disabling the background slide show can help improve your PC’s speed. Here’s how to do it:
- Right-click on the desktop and select “Personalize.”
- In the Personalization settings, click on “Background” in the left-hand menu.
- Under the “Background” section, select “Solid color” or a specific image instead of “Slideshow.”
- Alternatively, you can click on “Browse” and choose a single image as your background.
By disabling the background slide show, you eliminate the need for your computer to constantly load and display different images, thereby reducing the strain on its resources. This can result in improved responsiveness and overall system performance.
While disabling the background slide show may result in a less dynamic and changing desktop experience, the performance benefits are often worth it, especially if your computer is struggling to handle constant image transitions.
If you still want the flexibility to change your desktop background periodically, consider manually changing it from time to time or selecting a few favorite images to rotate instead of an entire slideshow.
By disabling the background slide show, you can free up system resources, allowing your computer to prioritize essential tasks and applications. This leads to a smoother and more efficient computing experience, particularly on older or less powerful systems.
Adjust Visual Effects for Best Performance
One effective way to optimize the performance of your PC is to adjust visual effects settings for the best performance. By disabling unnecessary visual effects, you can significantly improve your computer’s speed and responsiveness. Here’s how you can adjust visual effects settings:
- Right-click on the Start button and select “System.”
- Click on “Advanced system settings” on the left-hand side of the window.
- In the System Properties window, click on the “Settings” button under the “Performance” section.
- In the Performance Options window, select the “Visual Effects” tab.
- Choose the option “Adjust for best performance.”
- You can also manually customize the visual effects by selecting the “Custom” option and disabling specific effects.
- Click on “Apply” and then “OK” to save the changes.
By choosing the “Adjust for best performance” option, you are disabling most, if not all, of the visual effects that consume valuable system resources. This ensures that your computer dedicates its resources to running applications and processes more efficiently, resulting in improved speed and overall performance.
If you prefer to retain some visual effects while still optimizing performance, you can manually customize the visual effects by selecting the “Custom” option. This allows you to disable specific effects that you deem unnecessary or demanding on your system’s resources.
By adjusting visual effects for best performance, you optimize your PC’s capabilities and ensure it operates at its maximum potential. This is particularly beneficial for older or less powerful computers that may struggle to handle the visual demands of certain effects.
It’s important to note that adjusting visual effects settings may result in a less visually appealing experience. However, the trade-off in improved performance and efficiency is well worth it, especially if your primary focus is on maximizing speed and responsiveness.
Experiment with different visual effects settings until you find the right balance between performance and aesthetics that suits your needs and preferences.