
Why add a header to the first page?
Adding a header to the first page of your document in LibreOffice can provide important information or branding that sets the tone for the rest of the document. Whether you are preparing a professional report, a school assignment, or any other type of document, a header can make a significant impact. Here are a few reasons why you might want to consider adding a header to the first page:
- Identification: A header on the first page can help identify the document and provide essential details such as the document title, author name, and date. This information can be especially useful when sharing the document with others or when archiving it for future reference.
- Visual appeal: A well-designed header can enhance the visual appeal of your document. It allows you to incorporate branding elements such as a company logo or specific color scheme, creating a cohesive and professional look.
- Contextual information: In some cases, you may want to provide additional contextual information in the header on the first page. This could include a brief summary of the document’s contents or any other pertinent details that help the reader understand the purpose or scope of the document.
- Navigation aid: A header on the first page can also serve as a handy navigation aid for multi-page documents. By including a table of contents or section headings in the header, you can improve the reader’s ability to navigate through the document quickly.
- Professionalism: Including a header on the first page demonstrates a level of professionalism and attention to detail. It shows that you have taken the time to organize and present your document in a polished manner.
By adding a header to the first page of your document in LibreOffice, you can convey important information, enhance the visual appeal, provide context, aid navigation, and showcase your professionalism. The next sections will guide you through the process of adding a header to only the first page of your document in LibreOffice.
Step 1: Open your document in LibreOffice
The first step in adding a header to the first page of your document is to open it in LibreOffice. Ensure that you have the latest version of LibreOffice installed on your computer before proceeding with the following steps:
- Launch LibreOffice: Locate and open LibreOffice from your applications or programs menu. The exact location may vary depending on your operating system.
- Open your document: Once LibreOffice is open, click on the “File” dropdown menu and select “Open” or use the keyboard shortcut Ctrl+O. Browse to the location where your document is saved, select the file, and click “Open” to open it in LibreOffice.
After completing these steps, your document should be opened and ready for you to proceed to the next steps to insert a section break and edit the header on the first page.
Step 2: Insert a section break at the end of the first page
To add a header to only the first page in LibreOffice, you will need to insert a section break at the end of the first page. The section break will allow you to have different headers for different sections of your document. Here’s how you can do it:
- Navigate to the end of the first page: Place your cursor at the end of the content on the first page.
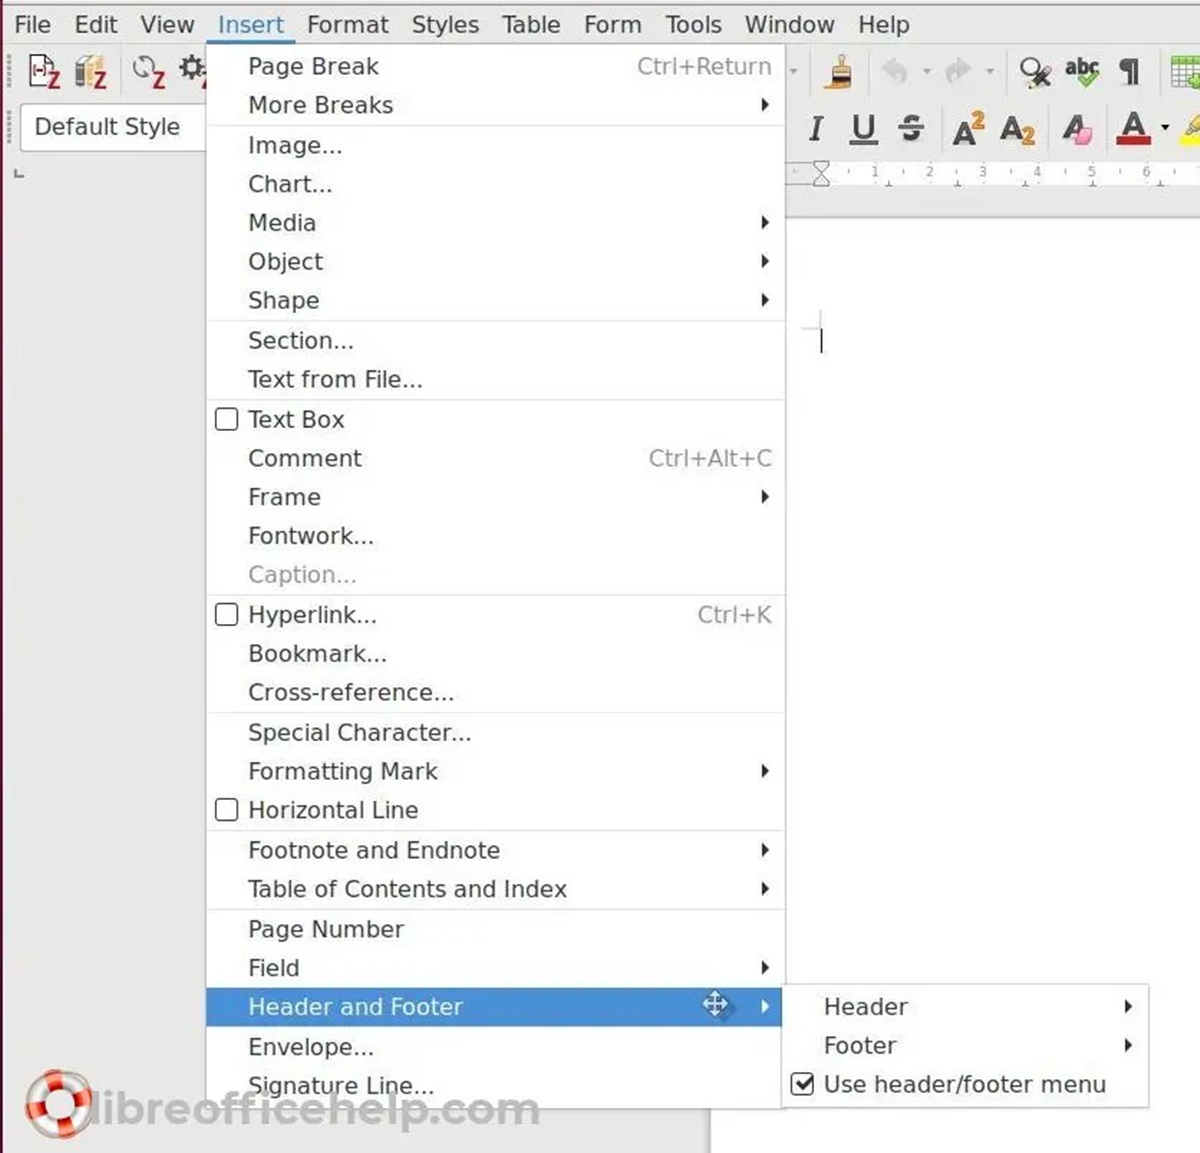
- Access the Insert menu: Click on the “Insert” tab in the menu bar at the top of the LibreOffice window.
- Insert the section break: From the drop-down menu, select “More Breaks” and then choose “Manual Break”. This will open a dialog box.
- Select the type of break: In the dialog box, make sure the “Page” option is selected under “Type”.
- Specify the break location: Check the box next to “Before” and select “Current Page” from the drop-down menu. This will ensure that the section break is inserted at the end of the first page.
- Apply the section break: Click the “OK” button to insert the section break at the end of the first page. You will now have two separate sections in your document.
Once you have inserted the section break, you can proceed to the next step to edit the header on the second page while leaving the header on the first page intact.
Step 3: Edit the header on the second page
After inserting the section break in LibreOffice, you can proceed to edit the header on the second page while keeping the header on the first page unchanged. Here’s how you can do it:
- Navigate to the second page: Scroll down to the beginning of the second page in your document.
- Activate the header area: Double-click anywhere in the header area on the second page. The header area is the top margin of the page, represented by a shaded section.
- Edit the header: Once the header area is activated, you can start editing the content. Add any text, images, or formatting that you want to appear exclusively on the second page. This can include page numbers, section titles, or any other relevant information.
- Customize the header: Utilize the various formatting tools available in LibreOffice to customize the appearance of the header. You can change the font, size, color, and alignment to match your document’s style.
- Save your changes: After editing the header on the second page, click outside the header area to save your changes. LibreOffice will automatically update the header on the second page while preserving the original header on the first page.
Editing the header on the second page allows you to differentiate the content and formatting between the first and second pages of your document. This step ensures that the header on the first page remains intact while fulfilling your desired customization on subsequent pages.
Step 4: Add your desired header to the first page
After editing the header on the second page, it’s time to add your desired header to the first page of your document in LibreOffice. By customizing the header on the first page, you can make it visually distinct and informative. Follow these steps to add your desired header:
- Activate the header area on the first page: Double-click anywhere in the header area on the first page. This will activate the header for editing purposes.
- Edit the header: Once the header area is active, you can start adding the content you want to include in the header of the first page. This could be the document title, a logo, or any other relevant information.
- Apply formatting: Use the formatting options available in LibreOffice to customize the appearance of your header. You can adjust the font, size, color, and alignment to match the style of your document.
- Save your changes: Once you have finished editing the header on the first page, click outside the header area to save your changes. LibreOffice will update the header on the first page with your desired content, while preserving the headers on subsequent pages.
By adding your desired header to the first page, you can create a visually appealing and informative introduction to your document. It helps establish the document’s identity, enhances its professionalism, and sets the tone for the rest of the content.
Step 5: Remove the section break if needed
In certain cases, you may find the need to remove the section break that was inserted at the end of the first page in LibreOffice. This can be done if you decide to revert back to having a consistent header throughout the entire document. Here’s how you can remove the section break:
- Locate the section break: Scroll to the end of the first page or the beginning of the second page where the section break was inserted.
- Delete the section break: Place your cursor immediately before the section break and press the “Delete” or “Backspace” key on your keyboard. This will remove the section break.
- Adjust header settings: After deleting the section break, the headers on both the first and second pages will merge into a single header. You may need to adjust the header settings to maintain consistency throughout the document.
Removing the section break allows you to have a uniform header style across all pages of your document. However, before removing the section break, ensure it is not essential for distinguishing the headers on the first and second pages.
Step 6: Save and view your document
Once you have added your desired headers, made any necessary adjustments, and ensured the document looks just as you intended, it’s time to save and view your document. Follow these final steps:
- Save your document: Click on the “File” menu at the top left corner of the LibreOffice window and select “Save” or use the keyboard shortcut Ctrl+S. Choose a file name and location to save your document, then click the “Save” button.
- View your document: To ensure that the headers appear as expected, it’s important to preview your document. Click on the “File” menu again and select “Print Preview” to open the preview mode. You can navigate through the pages to check the headers on each page to verify that they are displayed correctly.
- Make any necessary adjustments: While in the print preview mode, if you notice any issues with the headers, return to the editing mode by clicking the “Close” button. Make any necessary adjustments to the headers or other elements of your document, and repeat the saving and viewing process until you are satisfied with the final result.
Once you have confirmed that your headers are correctly displayed in the preview mode, you can proceed to print or share your document with confidence.