
Setting Up Windows Mail
Windows Mail is a built-in email program in Windows 10 that allows you to manage your email accounts in one convenient location. Follow these steps to set up Windows Mail and get your Gmail account up and running:
- Open Windows Mail: To start, click on the Start menu and search for “Windows Mail.” Once you find it, click to open the application.
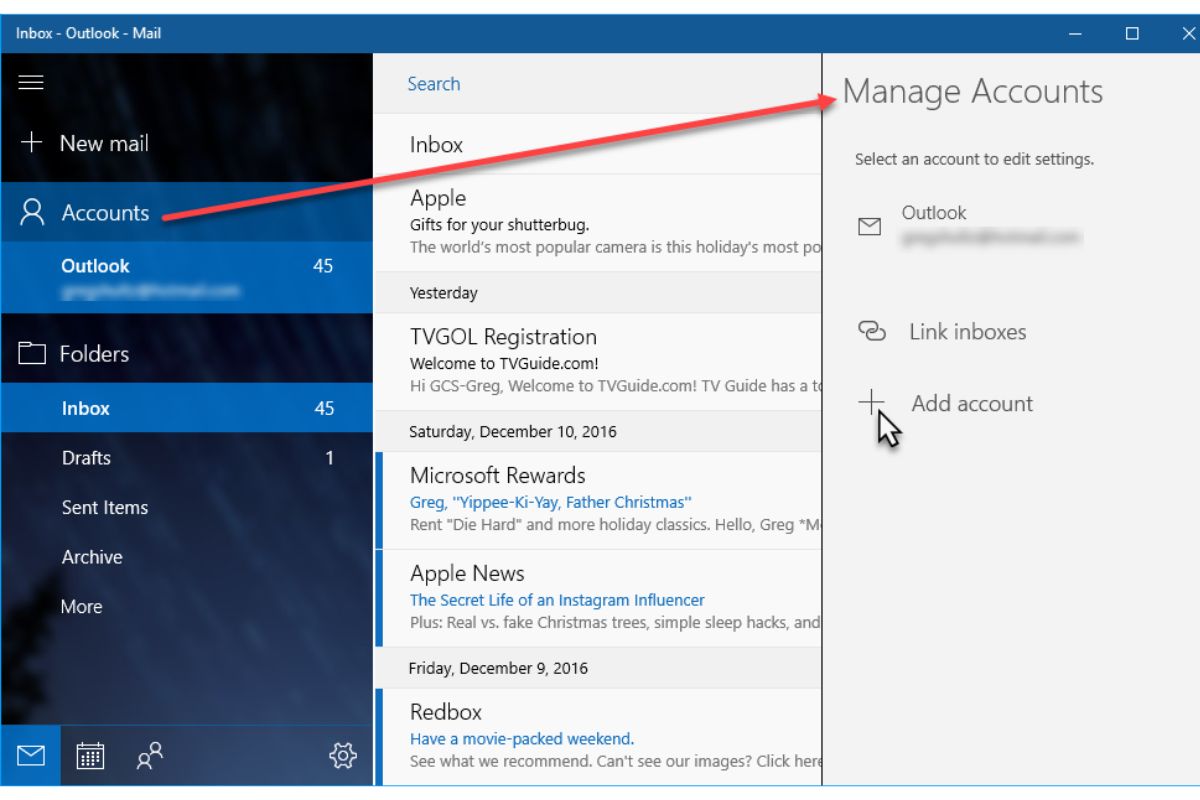
- Add an Account: In the Windows Mail app, click on the “Settings” icon (shaped like a gear) in the lower-left corner of the window. Then, click on “Manage Accounts” and select “Add account.”
- Choose Gmail: From the list of email providers, select “Google” or “Gmail.” Windows Mail will automatically forward you to the Gmail sign-in page.
- Sign in to Your Gmail Account: Enter your Gmail email address and click “Next.” Then, enter your password and click “Next” again.
- Confirm Permissions: Google may ask you to grant Windows Mail permission to access your Gmail account. Review the permissions and click “Allow” to proceed.
- Complete Setup: After granting permission, Windows Mail will take a moment to sync your emails, contacts, and calendar with your Gmail account. Once the setup process is complete, you will see your Gmail inbox displayed in Windows Mail.
That’s it! You have successfully set up Windows Mail to access your Gmail account. You can now start managing your emails, composing new messages, and organizing your inbox right from your Windows 10 device.
Setting up Windows Mail is a simple and convenient way to keep all of your email accounts organized in one place. In the next section, we’ll explore how to configure Gmail account settings in Windows Mail to further customize your email experience.
Adding a Gmail Account
To access your Gmail account in Windows Mail, you need to add it as an account in the application. Follow these steps to add your Gmail account:
- Open Windows Mail: Launch the Windows Mail app by clicking on the Start menu and searching for “Windows Mail.” Once you find it, click to open the application.
- Access Account Settings: In the Windows Mail app, click on the “Settings” icon, which resembles a gear, located in the lower-left corner of the window. Then, click on “Manage Accounts.”
- Add an Account: Under the “Manage Accounts” section, click on the “+ Add account” button.
- Select Gmail: From the list of account types, choose “Google” or “Gmail.”
- Sign in to Gmail: Windows Mail will redirect you to the Gmail sign-in page. Enter your Gmail email address and click “Next.” Then, enter your password and click “Next” again.
- Confirm Permissions: Google may require you to grant permission to Windows Mail to access your Gmail account. Review the permissions and click “Allow” to proceed.
- Complete Setup: After granting permission, Windows Mail will take a moment to sync your Gmail account. Once the setup is complete, you will see your Gmail inbox displayed in Windows Mail.
Congratulations! You have successfully added your Gmail account to Windows Mail. Now, all your Gmail emails will be accessible directly from the Windows Mail app, allowing you to conveniently manage all your email accounts in one place.
By adding your Gmail account to Windows Mail, you can enjoy features like synchronized emails, quick access to your inbox, and the ability to compose and send emails without leaving the app. In the next section, we’ll dive into configuring Gmail account settings to optimize your email experience in Windows Mail.
Configuring Gmail Account Settings
After adding your Gmail account to Windows Mail, you can further customize your email experience by configuring the account settings. Follow these steps to configure your Gmail account settings in Windows Mail:
- Open Account Settings: Launch the Windows Mail app and click on the “Settings” icon (shaped like a gear) in the lower-left corner of the window. Then, select “Manage Accounts.”
- Select Gmail Account: Under “Manage Accounts,” click on your Gmail account to access its settings.
- Manage Account Options: Here, you can customize various settings for your Gmail account, such as:
- Email Sync Frequency: Specify how often Windows Mail synchronizes with your Gmail account to check for new emails. You can choose from options like “15 minutes,” “30 minutes,” or “Based on my usage.”
- Notifications: Enable or disable email notifications for your Gmail account. You can choose whether to receive notifications for all emails or only important ones.
- Signature: Create a personalized signature that will be included in the emails you send from your Gmail account through Windows Mail.
- Folder Management: Windows Mail automatically syncs your Gmail folders, allowing you to manage your inbox, sent items, drafts, and other folders directly from the app.
- Manage Synced Calendars and Contacts: You can also configure the sync settings for your Gmail calendars and contacts. By default, Windows Mail syncs both your Gmail contacts and calendars, providing seamless access to events and relationship details within the app.
- Save Changes: After making any desired adjustments to your Gmail account settings, click “Save” to apply the changes.
By configuring your Gmail account settings in Windows Mail, you can tailor your email experience to suit your preferences. Whether it’s adjusting the synchronization frequency, customizing notification preferences, or managing synced calendars and contacts, Windows Mail offers versatile options to enhance your productivity and convenience.
Next, we will explore the different ways you can manage your emails within the Windows Mail app, such as organizing your inbox, composing new messages, and utilizing advanced features.
Managing Emails in Windows Mail
Once you have set up and configured your Gmail account in Windows Mail, you can start managing your emails efficiently. Here are some key features and actions you can perform within the Windows Mail app:
- Inbox Organization: Windows Mail allows you to organize your emails in several ways. You can create folders to categorize emails, move messages between folders, and flag important emails for quick access.
- Compose and Reply: To compose a new email, click on the “New mail” button in the top-left corner of the app. Fill in the recipient’s email address, subject, and the content of your message. Additionally, you can reply to or forward emails by selecting the appropriate options in the toolbar.
- Formatting Options: Windows Mail provides formatting options to enhance the appearance of your email. You can apply bold, italic, or underline styling to your text, as well as change the font size and color.
- Attachment Management: You can easily attach files to your emails in Windows Mail. Click on the paperclip icon in the email composition window, select the file(s) you want to attach, and click “Open.” Windows Mail supports various file formats.
- Search Functionality: Windows Mail features a powerful search function that allows you to quickly locate specific emails. Simply click on the search box at the top of the window and enter relevant keywords, sender names, or subject lines to find the desired email.
These are just a few features that make managing your emails in Windows Mail a breeze. The app provides a user-friendly interface and a range of tools that enable you to stay organized and efficient. Make sure to explore the different features available to you and find the ones that best suit your needs.
In the next section, we will discuss how you can sync your Gmail contacts and calendar with Windows Mail, allowing you to conveniently access and manage your important dates and contact information.
Syncing Contacts and Calendar
Windows Mail not only allows you to manage your Gmail emails but also provides the ability to sync your Gmail contacts and calendar. Here’s how you can sync and access your important contacts and events within the Windows Mail app:
- Contact Syncing: To sync your Gmail contacts with Windows Mail, open the app and click on the “Settings” icon in the lower-left corner. Then, select “Manage Accounts” and choose your Gmail account. Make sure the toggle for “Mail” and “Calendar” is turned on. Windows Mail will automatically synchronize your Gmail contacts, enabling you to access them within the app. You can now browse, search, and manage your Gmail contacts conveniently.
- Calendar Syncing: Similarly, to sync your Gmail calendar with Windows Mail, ensure the toggle for “Mail” and “Calendar” is switched on in the account settings. Windows Mail will sync your Gmail calendar, allowing you to view and manage your events directly within the app. You can access your schedule, create new events, set reminders, and stay organized without switching between different platforms.
- Managing Contacts: With your Gmail contacts synced to Windows Mail, you have the flexibility to add, edit, and delete contacts as needed. Windows Mail provides a user-friendly interface to easily manage your contacts and keep your address book up to date.
- Managing Calendar Events: Windows Mail offers a comprehensive set of tools for managing your calendar events. You can create new events, set reminders, invite attendees, and organize your schedule efficiently. Additionally, Windows Mail supports recurring events and allows you to customize event details, such as location, description, and event color.
By syncing your Gmail contacts and calendar with Windows Mail, you gain seamless access to your important contacts and stay on top of your schedule. This integration ensures that you can manage your personal and professional commitments effectively, all from within the Windows Mail app.
In the next section, we will address common issues that users may encounter when using Windows Mail with a Gmail account, along with troubleshooting solutions.
Troubleshooting Common Issues
While using Windows Mail with a Gmail account, you may encounter certain issues. However, most problems can be resolved by following these troubleshooting steps:
- Incorrect Login Credentials: Double-check that you have entered the correct Gmail email address and password. Ensure that there are no typos or misspellings. If the login information is incorrect, Windows Mail will not be able to access your Gmail account.
- Two-Factor Authentication: If you have enabled two-factor authentication for your Gmail account, you may need to generate an app password specifically for Windows Mail. To generate an app password, visit your Gmail account settings and navigate to the “Security” section. Look for the “App Passwords” option to create a unique password for Windows Mail.
- Syncing Issues: If you are experiencing problems with email syncing, open the Windows Mail app settings and select the problematic Gmail account. Ensure that the toggle for “Mail” is enabled. If it is disabled, turn it on to initiate the syncing process.
- Network Connection: Check your internet connection to ensure that Windows Mail can establish a stable connection to sync with your Gmail account. If you are having connectivity issues, try restarting your modem or contacting your internet service provider.
- Outdated Windows or App Version: Ensure that you are using the latest version of Windows Mail and that your operating system is up to date. Outdated software versions can sometimes cause compatibility issues and disrupt the functionality of Windows Mail.
- App Crash or Freezing: If Windows Mail is crashing or freezing frequently, try closing the app and reopening it. If the problem persists, you may need to reset the app by going to Windows Settings > Apps > Apps & features. Locate Windows Mail in the list, click on it, and select “Advanced options.” Finally, click on the “Reset” button to reset the app’s settings.
If the above troubleshooting steps do not resolve your issues, you may need to seek further assistance. Consider checking the Windows support website, the Gmail Help Center, or contacting the respective support teams for Windows Mail or Gmail for further guidance.
By addressing common issues and following the appropriate troubleshooting steps, you can ensure a smooth experience while using Windows Mail with your Gmail account.
Finally, in the last section, we will briefly explore how you can customize Windows Mail to suit your preferences and enhance your email management experience.
Customizing Windows Mail Preferences
Windows Mail offers various customization options to personalize your email management experience. Here are some ways you can customize the preferences in Windows Mail:
- Appearance: You can adjust the visual appearance of Windows Mail to suit your preferences. Open the app’s settings, go to the “Personalization” section, and choose from the available options for the app theme, accent color, and background.
- Notification Settings: Customize the notifications you receive from Windows Mail. Open the settings, select the “Notifications & actions” tab, and locate the Windows Mail entry. From there, you can enable or disable email notifications and choose the action center behavior that suits your needs.
- Signature: Create a personalized email signature that will be automatically added to the bottom of your emails. Open the app’s settings, select your Gmail account, and scroll down to the signature section. Here, you can enter your desired signature text and format it using various formatting options.
- Swiping Actions: Windows Mail allows you to customize the swipe actions for emails in your inbox. Open the settings, select “Reading” from the left-hand menu, and choose the desired swipe actions for both left and right swipes. You can assign actions like delete, flag, mark as read, and more.
- Sync Settings: Windows Mail provides options to customize the sync settings of your Gmail account. Open the account settings, select your Gmail account, and click on “Change mailbox sync settings.” From here, you can specify the sync frequency, download settings, and the period for syncing emails.
These are just a few examples of ways you can customize Windows Mail to enhance your email management experience. Explore the settings and preferences available in the app to find other customization options that suit your workflow and preferences.
Customizing Windows Mail preferences allows you to tailor the application to meet your specific requirements, making it a more efficient and personalized email management tool.
With this, we have covered the essential aspects of using Windows Mail to access and manage your Gmail account. Utilize the features and customization options available to streamline your email management process and stay organized.
Thank you for following this guide, and we hope it has helped you in setting up and customizing Windows Mail for your Gmail account. Enjoy managing your emails effortlessly!