
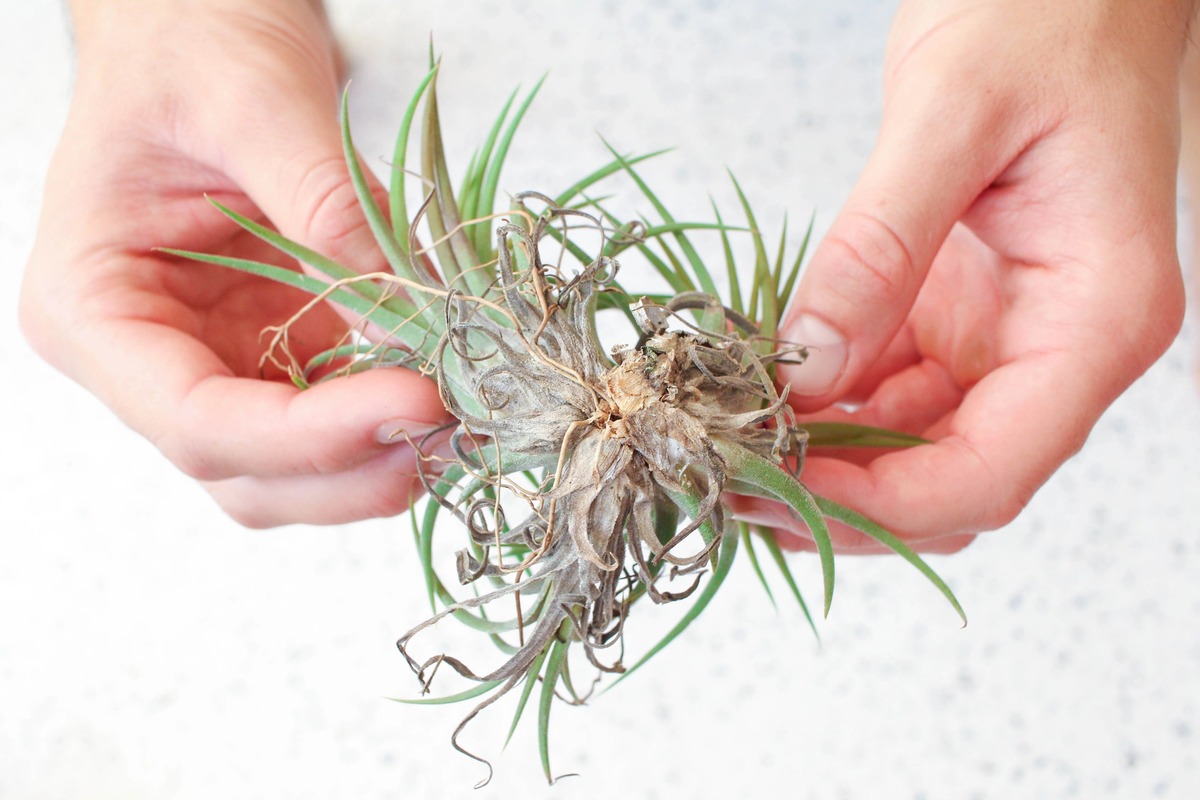
Signs of a Dying Air Plant
Air plants, also known as Tillandsias, are unique plants that can thrive without soil. However, like any living organism, they require proper care and attention to stay healthy. If you notice any of the following signs in your air plant, it may be indicating that it is in a state of decline:
- Changes in color: One of the most obvious signs of a dying air plant is a change in color. Instead of vibrant green, the leaves may appear dull or yellowish.
- Wilting or drooping leaves: Air plants normally have a firm and upright appearance. If the leaves start to wilt or droop, it indicates that the plant is not receiving enough water.
- Dry and crispy leaves: Touch the leaves gently. If they feel dry or crispy to the touch, it suggests that the air plant is dehydrated and in need of moisture.
- Lack of new growth: A healthy air plant will continue to produce new leaves and roots. If you notice a lack of new growth over an extended period, it may indicate underlying issues.
- Loss of leaves: If the plant is shedding its leaves or if they easily detach from the plant, it is a sign of stress or distress.
- Presence of mold or fungus: Mold or fungus on the leaves or base of the air plant suggests that it is not receiving adequate air circulation or is being overwatered.
It is crucial to recognize these signs early on to take appropriate action and save your air plant from further deterioration. By addressing the root cause of the problem, you can increase the chances of reviving your plant and restoring its vibrant and healthy appearance.
Common Mistakes When Caring for an Air Plant
Caring for air plants may seem simple, but there are common mistakes that many plant enthusiasts make that can lead to the decline of these unique plants. By avoiding these pitfalls, you can ensure the health and longevity of your air plants:
- Overwatering: One of the most prevalent mistakes is overwatering. Air plants do not require constant moisture like traditional plants. Instead, they prefer periodic misting or soaking. Overwatering can cause root rot and lead to the death of the plant.
- Improper watering techniques: While it is important to avoid overwatering, proper watering techniques are just as crucial. Soaking the plant for too long or providing inadequate moisture can cause dehydration and leave the plant susceptible to damage.
- Inadequate lighting: Air plants thrive in bright, indirect light. Placing them in locations with insufficient light or in direct sunlight for extended periods can damage the leaves and hinder their overall growth.
- Extreme temperature and humidity fluctuations: Air plants prefer moderate temperatures and consistent humidity levels. Subjecting them to extreme temperature changes or placing them near heating or cooling vents can stress the plants and lead to their decline.
- Using improper fertilizer: Air plants require minimal nutrients. Using regular plant fertilizer or using too much can harm the plant and disrupt its natural growth cycles. It is best to use a diluted, well-balanced fertilizer specifically formulated for air plants.
- Neglecting air circulation: Air plants need proper air circulation to thrive. Placing them in enclosed glass containers or neglecting to provide adequate ventilation can result in the growth of mold or rot.
Avoiding these common mistakes can significantly enhance the health and well-being of your air plants. By understanding their unique needs and providing the right care, you can enjoy their beauty and resilience for years to come.
Lack of Proper Watering Techniques
When it comes to caring for air plants, proper watering techniques are crucial for their survival and well-being. Air plants absorb water through their leaves, rather than roots, making their watering needs unique. Here are some important considerations to ensure you are giving your air plants the right amount of hydration:
Misting: Regular misting is a simple and effective way to provide moisture to your air plants. Use a spray bottle filled with filtered or distilled water to mist the plant’s leaves once or twice a week. Ensure that the mist reaches all parts of the plant, including the base and center of the rosette.
Soaking: Another method of watering air plants is soaking. Once every two weeks, submerge your air plant in a bowl of water at room temperature. Let it soak for about 20-30 minutes. After soaking, gently shake off excess water and place the plant in a well-ventilated area to dry completely before returning it to its display.
Water quality: The quality of water used is also important for air plant care. Avoid using tap water, as it can contain chemicals and minerals that can harm the plant. Instead, use filtered, distilled, or rainwater for misting and soaking.
Avoid overwatering: Overwatering is a common mistake that can lead to the decline of air plants. Unlike traditional plants, air plants do not require constant moisture. Overwatering can cause the plant to rot and die. Ensure that the plant has dried completely between watering sessions to prevent waterlogged roots.
Temperature and humidity: Consider the temperature and humidity levels in your environment when determining the frequency of watering your air plants. In hot and dry climates, you may need to water more frequently, while in cooler and more humid conditions, watering less often may be sufficient.
By understanding and implementing proper watering techniques, you can provide your air plants with the necessary moisture to thrive. Remember to monitor the plant’s appearance and adjust your watering schedule accordingly. With the right care, your air plants will flourish and bring joy to your space.
Overwatering: A Common Air Plant Killer
Overwatering is one of the most common mistakes made when caring for air plants and can quickly lead to their demise. While it is important to provide adequate moisture to your air plants, it is equally crucial to avoid overwatering. Here’s why overwatering is detrimental to air plants and how to prevent it:
Root rot: Air plants have roots, but they primarily use them for anchoring themselves rather than absorbing water and nutrients. When the roots are constantly wet, they become susceptible to rot. This can lead to a breakdown of the plant’s system, causing it to wilt, droop, and eventually die.
Depriving air circulation: Overwatering can create a damp environment that inhibits air circulation around the plant. Lack of proper air circulation can lead to the growth of mold, fungi, and bacteria, which can further damage the plant and hinder its ability to absorb necessary moisture and nutrients.
Suffocating the plant: Air plants rely on oxygen to survive. Excessive moisture saturates the air plant’s root system, depriving it of the oxygen it needs for respiration. Without proper oxygen supply, the plant’s cells begin to deteriorate, resulting in a weakened and eventually dying plant.
Preventing overwatering: To avoid overwatering your air plants, it is vital to follow these guidelines:
- Observe the drying time: Allow your air plants to dry completely before the next watering. Depending on the climate, this can typically range from a few hours to one day.
- Monitor the plant’s appearance: Pay attention to the leaves and overall appearance of your air plant. If you notice signs of overwatering, such as yellowing or brown leaves, adjust your watering schedule accordingly.
- Use the “touch” test: Before watering, gently touch the base of the plant. If it feels damp or cool, it is a sign that the plant is still moist and does not need additional water.
- Opt for misting: Instead of soaking, consider misting your air plant to provide moisture. Misting allows for more controlled and lighter watering, reducing the risk of overwatering.
- Provide proper drainage: If you choose to display your air plants in containers, ensure they have proper drainage. Excess water should be able to flow out easily to prevent water from pooling at the base of the plant.
By understanding the importance of avoiding overwatering and implementing proper watering practices, you can help your air plants thrive and grow healthily.
Improper Lighting and Sun Exposure
Proper lighting is essential for the health and growth of air plants. While they can tolerate a range of lighting conditions, improper lighting and sun exposure can have detrimental effects on their well-being. Here’s why getting the right amount of light is crucial for air plants and how to ensure they receive optimal lighting:
Insufficient lighting: Without adequate light, air plants may struggle to photosynthesize and grow. They rely on light as a source of energy to convert carbon dioxide into sugars, which is essential for their survival. Insufficient lighting can result in stunted growth, wilting, and a dull appearance.
Direct sunlight: While air plants require bright light, exposing them to direct sunlight for prolonged periods can lead to sunburn. This is particularly true for air plants that are not accustomed to intense sunlight. Sunburned leaves may turn brown or yellow and become crispy.
Indirect bright light: The ideal lighting conditions for air plants are bright, indirect light. Place them near a window with filtered or diffused light, such as a north or east-facing window. In this type of lighting, the plants can receive adequate light without the risk of sunburn.
Adjusting the light levels: Monitor the appearance of your air plants to assess their lighting needs. If the leaves start to stretch or become lighter in color, it may indicate that they are not receiving enough light. On the other hand, if the leaves turn yellow or brown, it may be a sign of too much direct sunlight.
Artificial lighting: If you do not have access to sufficient natural light, or if the lighting conditions in your space are consistently low, consider providing artificial lighting. LED grow lights or fluorescent lights can be used to supplement the natural light and ensure that your air plants receive the light they need to thrive.
Rotating the plants: To ensure that your air plants receive even light exposure, rotate them regularly. This allows all sides of the plant to receive adequate light and prevents the plant from leaning or bending towards the light source.
By establishing the right balance of lighting conditions and avoiding excessive sun exposure, you can promote healthy growth and vibrant appearance in your air plants. Remember to observe their reactions to light and make necessary adjustments to maintain the optimal lighting environment for their well-being.
Temperature and Humidity: Finding the Right Balance
Proper temperature and humidity levels play a significant role in the health and well-being of air plants. While these plants are adaptable, extreme temperature fluctuations and improper humidity levels can have adverse effects. Here’s why finding the right balance of temperature and humidity is crucial for your air plants:
Temperature: Air plants thrive in moderate temperatures, typically ranging from 50°F to 90°F (10°C to 32°C). Sudden temperature drops or prolonged exposure to extreme temperatures can cause stress and damage to the plants. Avoid placing air plants near drafty areas, open windows, or heating/cooling vents.
Humidity: Air plants are naturally tropical plants that thrive in humid environments. The ideal humidity range for air plants is between 50% and 60%. In drier climates or during winter months when indoor humidity tends to decrease, it is crucial to provide additional moisture and humidity to your air plants.
Increasing humidity: There are several ways to increase humidity for your air plants:
- Misting: Regularly misting your air plants helps increase humidity levels around them. Use a spray bottle filled with filtered or distilled water and mist the leaves, taking care to reach all parts of the plant.
- Pebble tray: Place your air plants on a tray filled with pebbles and water. As the water evaporates, it increases the humidity around the plants. Ensure that the base of the plants is not sitting in water to prevent overwatering.
- Humidifier: Using a humidifier in the room where your air plants are located can help maintain optimal humidity levels. Set the humidifier to a level that is suitable for tropical plants.
Avoiding excessive humidity: While air plants appreciate humidity, excessively high humidity can lead to problems such as mold growth, rot, and fungal infections. Ensure that there is proper air circulation around the plants to prevent moisture from accumulating and causing issues.
Temperature and humidity monitor: Investing in a temperature and humidity monitor can help you keep track of the conditions in your air plant’s environment. This way, you can make adjustments as necessary to ensure they are within the optimal range for their growth and well-being.
By providing the right balance of temperature and humidity, you can create an environment that promotes the health and vitality of your air plants. Regularly monitor these factors and make adjustments as needed to ensure your plants thrive in their surroundings.
Nutrient Deficiency and Fertilizer Usage
Air plants are naturally adapted to grow in nutrient-poor environments, but they still require some level of nutrients to thrive. Nutrient deficiency can occur in air plants if they are not provided with the necessary elements for healthy growth. Here’s what you need to know about nutrient deficiency in air plants and how to use fertilizer effectively:
Natural nutrient sources: Air plants primarily obtain nutrients from the environment, including the air, rainwater, and debris that accumulates on their leaves. These natural sources provide small amounts of essential elements such as nitrogen, phosphorus, and potassium.
Symptoms of nutrient deficiency: If your air plants are lacking essential nutrients, they may exhibit noticeable symptoms. Common signs of nutrient deficiency include slow growth, yellowing or browning of leaves, and overall poor health. It is essential to identify these signs early to address nutrient deficiencies promptly.
Selecting the right fertilizer: While air plants do not require frequent fertilization, providing them with a balanced fertilizer can help supplement their nutrient needs. Look for a water-soluble fertilizer specifically formulated for air plants or bromeliads. These fertilizers typically have a low concentration of nitrogen and should be applied sparingly.
Application methods: There are two primary methods for applying fertilizer to air plants: foliar feeding and soaking.
- Foliar feeding: Dilute the fertilizer according to the package instructions and use a spray bottle to mist the leaves of the air plant. Apply the fertilizer every one to two months, taking care not to oversaturate the plant.
- Soaking: Alternatively, you can dilute the fertilizer in water and soak the air plant for 10 to 15 minutes every two to three months. After soaking, allow the plant to dry thoroughly before returning it to its display area.
Frequency and dosage: It is crucial to exercise caution when fertilizing air plants. Applying fertilizer too frequently or in high concentrations can harm the plant and lead to nutrient burn. Follow the package instructions or consult with a gardening professional for specific dosage recommendations.
Time of fertilization: Avoid fertilizing air plants when they are in bloom or during times of stress, such as extreme temperatures or drought conditions. It is best to fertilize them during their active growth period, typically in the spring and summer months.
Monitoring and adjustments: Regularly monitor the health and growth of your air plants, even after fertilization. If there are any signs of fertilizer burn or if the plant’s condition does not improve, reduce or discontinue fertilization to prevent further damage.
By understanding the need for balanced nutrition and using fertilizer judiciously, you can ensure that your air plants receive the necessary nutrients for optimal growth and vitality. Remember to monitor their health and make adjustments as needed to maintain a healthy nutrient balance.
Pests and Diseases: Identifying and Treating Air Plant Issues
While air plants are relatively low-maintenance, they are not immune to pests and diseases. Identifying and treating these issues promptly is crucial to keep your air plants healthy and thriving. Here’s a guide on how to spot common pests and diseases that can affect air plants and how to address them effectively:
Pests:
- Mealybugs: Look for small white, cottony masses on the leaves and base of the plant. Mealybugs can cause damage by sucking sap from the air plant. Use a cotton swab dipped in rubbing alcohol to remove the pests. Repeat treatment if necessary.
- Aphids: These tiny insects can cluster on the leaves and stems, causing distortion and stunted growth. Use a gentle stream of water or insecticidal soap to remove aphids from your air plants.
- Spider mites: Spider mites are tiny, reddish-brown pests that can infest air plants, causing yellowing leaves and webbing. Wash the plant thoroughly with water, making sure to target the undersides of leaves where mites tend to hide. Repeat the process if needed.
- Fungus gnats: Fungus gnats are small, dark-colored flies that are attracted to damp soil. They can infest air plant containers. Allow the soil to dry out between waterings and consider using yellow sticky traps to catch adult gnats.
Diseases:
- Root rot: Overwatering or poor drainage can lead to root rot in air plants. If you notice mushy or discolored roots, it is crucial to remove the affected parts and allow the plant to dry out. Adjust your watering practices to prevent future root rot.
- Leaf spot: Leaf spot appears as brown or black spots on the air plant’s leaves. It is often caused by fungal or bacterial infections. Trim affected leaves carefully and improve air circulation around the plant to prevent further spread.
- Gray mold: Gray mold, or Botrytis, is a fungal disease that causes fuzzy gray or brown patches on the air plant. Remove infected leaves and improve ventilation to reduce humidity levels and prevent the spread of the fungus.
- Leaf blight: Leaf blight appears as browning or blackening of the leaf tips and edges. It is often caused by overwatering or high humidity. Adjust your watering practices and ensure proper air circulation to prevent leaf blight.
Treating pests and diseases: When addressing pests and diseases, it is crucial to act promptly:
- Isolate infected plants to prevent the spread of pests and diseases to other air plants.
- Remove and dispose of severely damaged or infected plant parts.
- Use organic insecticidal sprays or diluted neem oil as a natural treatment for pests.
- Improve ventilation and airflow around the air plants to prevent moisture buildup.
- Adjust watering practices to avoid overwatering or creating a damp environment.
Regularly inspect your air plants for pests and signs of diseases, and take appropriate action as soon as possible. By implementing these preventative measures and applying effective treatments, you can keep your air plants healthy and thriving.
Reviving a Dying Air Plant: Steps to Take
Discovering that your air plant is in a declining state can be disheartening, but there are steps you can take to try and revive it. Although it may not always be successful, it’s worth giving your dying air plant some extra care and attention. Here are some steps to take when attempting to revive a dying air plant:
Assess the condition: Start by closely examining the plant to determine the extent of the damage. Look for signs of dehydration, root rot, or pest infestation. This will help you identify the primary issue and choose the appropriate course of action.
Watering: If the plant appears dehydrated, give it a thorough soaking. Submerge the entire plant in room temperature water for about 20-30 minutes. Afterward, gently shake off excess water and allow the plant to dry completely before placing it back in its display area.
Address root rot: If root rot is present, carefully remove the air plant from its container and inspect the roots. Trim away any soft, mushy, or discolored roots using clean pruning shears. Allow the plant to dry out for a day or two before returning it to a dry environment.
Reevaluate the lighting: Ensure that your air plant is receiving adequate, indirect light. Move it to a spot near a window with filtered or diffused light if necessary. Avoid direct sunlight, as it can cause damage and further stress the plant.
Check the humidity levels: Assess the humidity in the air around your air plant. Consider using a humidity tray, misting the plant regularly, or using a humidifier to increase moisture if needed. Remember to provide proper airflow to prevent excessive humidity and the growth of mold.
Give it time: Reviving a dying air plant takes time, patience, and consistent care. Monitor the plant closely and be patient as it begins to recover. It may take several weeks or even months to see noticeable improvements in its condition.
Adjust care as needed: As the plant begins to show signs of revival, adjust your watering and care practices accordingly. Keep an eye on its appearance and adjust the frequency of watering, light exposure, and humidity levels as necessary.
Consider fertilization: Once your air plant starts to show signs of recovery, you can introduce a diluted, balanced fertilizer specifically formulated for air plants. Follow the instructions on the packaging and apply the fertilizer sparingly to avoid overfeeding.
It’s important to note that not all dying air plants can be revived, especially if the damage is too severe or the underlying issues are not effectively addressed. However, by taking these steps and providing the necessary care, you give your air plant the best chance of survival and potential rejuvenation.
Preventing Air Plant Decline: Maintaining a Healthy Plant
Prevention is key when it comes to keeping your air plants healthy and thriving. By implementing proper care and maintenance practices, you can prevent air plant decline and ensure their longevity. Here are some essential steps to maintain a healthy air plant:
Proper watering: Watering is crucial for air plants, but it’s important to strike the right balance. Rather than following a strict watering schedule, observe your air plant’s needs. Allow the plant to dry out completely between waterings to prevent overhydration and root rot.
Provide adequate lighting: Air plants require bright, indirect light to thrive. Place them near a window with filtered or diffused light, but avoid direct sunlight, as it can cause sunburn. Regularly assess the lighting conditions and adjust the plant’s location as needed.
Maintain optimal temperature and humidity: Air plants prefer moderate temperatures and humidity levels. Avoid exposing them to extreme temperature fluctuations and provide proper humidity through misting, using a humidity tray, or using a humidifier.
Ensure proper air circulation: Good air circulation is essential for air plants. Avoid placing them in enclosed containers without adequate airflow. This helps prevent the growth of mold and ensures the plant receives necessary oxygen.
Regularly inspect for pests and diseases: Conduct routine inspections to identify any signs of pests or diseases early on. Look for indications such as discoloration, wilting, or presence of insects. Promptly address any issues to prevent further damage and spread of pests or diseases.
Avoid chemical exposure: Air plants are sensitive to chemicals, so avoid exposing them to household cleaning products, pesticides, or other chemicals. These can harm the plant’s leaves and overall health. Opt for natural and organic solutions when caring for your air plants.
Rotate the plant: To encourage even growth, rotate your air plant every few weeks. This ensures that all sides of the plant receive adequate light exposure and prevents the plant from leaning or bending towards the light source.
Observe and adjust care: Be attentive to any changes in your air plant’s appearance and adjust your care routine accordingly. If the plant exhibits signs of stress or decline, reassess its watering, lighting, and other care practices to determine the cause and make necessary changes.
Learn from experience and experimentation: Every air plant is unique, so it may require some experimentation to find the best care routine. Learn from your experience, observe how your plant responds to different conditions, and adapt your care techniques accordingly.
By following these preventative measures and consistently providing appropriate care, you can maintain a healthy and vibrant air plant collection. With time, observation, and dedication, your air plants will continue to thrive and bring natural beauty to your space.