
Best Time to Plant Bulbs
Planting bulbs at the right time is crucial for their growth and development. The timing depends on the specific type of bulbs you are planting, as different bulbs have different flowering seasons. Understanding when to plant bulbs will maximize their chances of blooming beautifully. Here are some guidelines to help you determine the best time to plant bulbs.
Spring-Flowering Bulbs: Bulbs like tulips, daffodils, and crocuses are known as spring-flowering bulbs. Plant these bulbs in the fall, ideally before the first frost. This allows them to establish their roots during the winter months and bloom in the spring. Planting them too early may result in premature sprouting, while planting them too late may inhibit root development.
Summer-Flowering Bulbs: Bulbs such as lilies, dahlias, and gladiolus are categorized as summer-flowering bulbs. These bulbs thrive in warm weather, so they should be planted in the spring once the soil has warmed up and there is no longer a risk of frost. Planting them too early in cold soil can cause rot, while planting them too late may not give them sufficient time to establish themselves before blooming.
Fall-Flowering Bulbs: Fall-flowering bulbs, including colchicums and autumn crocuses, have a unique planting time. They should be planted in late summer or early fall, usually around August or September. This timing allows them to root before the ground freezes, ensuring a beautiful fall display.
Keep in mind that these general guidelines may vary depending on your climate and location. It’s always best to consult the specific planting recommendations for the type of bulbs you intend to grow.
By planting bulbs at the right time, you are setting them up for success. The timing affects their ability to establish strong roots, grow healthy foliage, and produce vibrant flowers. Before embarking on your bulb planting journey, research the specific requirements of the bulbs you have chosen to ensure optimal planting time and conditions.
Factors to Consider
When deciding to plant bulbs, there are several factors to consider that can impact the success of your garden. By taking these factors into account, you can ensure that your bulbs thrive and produce beautiful blooms. Here are some key factors to consider before planting bulbs:
Climate and Hardiness Zones: Different bulbs have different temperature and climate requirements. Understanding your hardiness zone and selecting bulbs that are suited for your specific climate will increase their chances of survival and success. Bulbs that are not suited to your climate may struggle to establish and grow properly.
Soil Conditions: Bulbs prefer well-draining soil that is rich in organic matter. Testing your soil’s pH level and fertility can help you determine if any amendments are needed. Improving soil conditions by adding compost or organic matter can create an ideal environment for bulb growth.
Sun Exposure: Most bulbs thrive in full sun or partial shade. Assess the amount of sunlight your planting area receives throughout the day and choose bulbs accordingly. Bulbs that require full sun may not bloom properly if planted in a shaded area, while those that prefer shade may struggle in direct sunlight.
Watering: Bulbs require regular watering during their active growth phase. Consider the natural rainfall patterns in your area and supplement with additional watering if necessary. Avoid overwatering, as this can lead to rot or disease. Well-drained soil is crucial to prevent waterlogging.
Pest and Disease Resistance: Some bulbs are more resistant to pests and diseases than others. Research the common pests and diseases in your area and choose bulbs that have a higher resistance. This can help reduce the need for chemical interventions and increase the chances of successful bulb growth.
Complementary Planting: Consider the overall design of your garden and how the bulbs will fit into it. Choose bulbs that complement other plants in terms of height, color, and bloom time. This ensures a visually appealing and well-coordinated garden throughout the growing season.
By considering these factors, you can make informed decisions when selecting and planting bulbs. Taking into account your specific climate, soil conditions, sun exposure, watering requirements, pest and disease resistance, and complementary planting options will help create a thriving and visually stunning bulb garden.
Spring-Flowering Bulbs
Spring-flowering bulbs are a wonderful addition to any garden, bringing bursts of color and joy after a long winter. These bulbs are typically planted in the fall, allowing them to establish their roots during the colder months and bloom in the spring. Here are some popular spring-flowering bulbs to consider for your garden:
Tulips: Tulips are one of the most beloved spring-flowering bulbs, known for their tall, elegant stems and vibrant blooms in a wide array of colors. They come in various shapes and sizes, from single to double, fringed to parrot-like, allowing for endless possibilities when designing your garden.
Daffodils: Daffodils, also known as narcissus, bring cheerful yellow, white, or bi-colored flowers to the garden. They are easy to grow and provide a pop of color early in the spring. Daffodils come in different sizes and shapes, including trumpet, large-cupped, and small-cupped varieties.
Crocuses: Crocuses are among the first signs of spring, with their delicate cup-shaped flowers in vibrant shades of purple, yellow, and white. They are low-growing bulbs that work well in borders, rock gardens, or naturalized areas. Crocuses also attract early pollinators, making them a valuable addition to any garden.
Hyacinths: Hyacinths offer not only beautiful blooms but also a delightful fragrance. These bell-shaped flowers come in various colors and emit a sweet scent that perfumes the air. Hyacinths can be planted in clusters or mixed with other spring-flowering bulbs to create a visually stunning display.
Snowdrops: Snowdrops are enchanting little bulbs that emerge from the ground when winter is still lingering. Their delicate white flowers, often adorned with green markings, bring a touch of magic to the garden. Snowdrops thrive in shady areas and can be naturalized in woodland gardens or under trees.
When planting spring-flowering bulbs, it’s important to choose a location with well-draining soil and adequate sunlight. Consider the bloom time, height, and color of the bulbs to create an aesthetically pleasing arrangement. Plant the bulbs at the recommended depth and spacing, usually three times the bulb’s diameter, ensuring proper establishment and growth.
By incorporating spring-flowering bulbs into your garden, you can enjoy a burst of color and beauty as the winter fades away. Whether you choose tulips, daffodils, crocuses, hyacinths, or snowdrops, these bulbs will bring new life and vibrancy to your outdoor space.
Summer-Flowering Bulbs
Summer-flowering bulbs add a vibrant touch to gardens during the warmer months, providing stunning blooms and a burst of color. These bulbs are typically planted in the spring, once the soil has warmed up and there is no longer a risk of frost. Here are some popular summer-flowering bulbs that you can consider for your garden:
Lilies: Lilies are known for their elegant and showy flowers that come in various shapes, sizes, and colors. From the classic Asiatic lilies to the fragrant Oriental lilies, there is a wide range of options to choose from. Lilies make excellent cut flowers and are ideal for adding vertical interest to your garden.
Dahlias: Dahlias are beloved for their stunning, intricate blooms in a range of shades, sizes, and forms. These flowers can be as small as a button or as large as dinner plates, and their unique shapes add drama and texture to any garden. Dahlias are a favorite among many gardeners for their versatility and long-lasting blooms.
Gladiolus: Gladiolus, also known as glads, produce tall spikes adorned with a succession of brightly colored flowers. They are available in a wide variety of hues and add vertical interest to beds and borders. Gladiolus blooms throughout the summer, offering a continuous display of vibrant flowers.
Cannas: Cannas are tropical-looking plants with large, lush foliage and vibrant flowers. They are available in a range of colors, including shades of red, orange, yellow, and pink. Cannas thrive in warm climates and add a touch of exotic beauty to gardens, borders, or along water features.
Calla Lilies: Calla lilies feature elegant, trumpet-shaped flowers that come in various shades of white, pink, and yellow. They are perfect for adding a touch of elegance to flowerbeds or containers. Calla lilies are also popular as cut flowers, often used in floral arrangements and wedding bouquets.
When planting summer-flowering bulbs, choose a location with full sun and well-draining soil. These bulbs thrive in warm weather and require regular watering during their active growth phase. Adequate spacing between bulbs allows for proper air circulation and prevents overcrowding.
By incorporating summer-flowering bulbs into your garden, you can enjoy a stunning floral display that lasts throughout the summer months. Whether you choose lilies, dahlias, gladiolus, cannas, or calla lilies, these bulbs will add beauty, color, and texture to your outdoor space.
Fall-Flowering Bulbs
Fall-flowering bulbs bring a burst of color and beauty to gardens when summer begins to transition into autumn. These bulbs have a unique planting time and are typically planted in late summer or early fall, allowing them to establish roots before the ground freezes. Here are some popular fall-flowering bulbs to consider for your garden:
Colchicums: Colchicums, also known as autumn crocuses, are charming bulbs that produce delicate, crocus-like flowers in shades of pink, purple, and white. They bloom in the fall, often before their foliage emerges, creating a vibrant display. Colchicums prefer well-drained soil and can be planted in gardens or naturalized areas.
Autumn Crocuses: Autumn crocuses, as the name suggests, bloom in the autumn, bringing stunning colors and delicate beauty to the garden. Their flowers can range from pale lilac to deep purple, and they often have contrasting yellow centers. Autumn crocuses thrive in well-drained soil and prefer sunny or partially shaded areas.
Autumn Daffodils: Autumn daffodils, or Nerine lilies, are a type of daffodil that blooms in the fall. These bulbs produce bright pink, lily-like flowers that add a touch of elegance and sophistication to the garden. Autumn daffodils prefer well-drained soil and can be planted in borders, rock gardens, or containers.
Sternbergia: Sternbergia, also known as autumn daffodils, are bulbs that produce bright yellow, crocus-like flowers in the fall. They are known for their resilience and ability to bloom even in dry or infertile soil. Sternbergia bulbs can be planted in sunny or partially shaded areas where they will bring a burst of color to the late-season garden.
When planting fall-flowering bulbs, choose a location with well-drained soil and adequate sunlight. Late summer to early fall is the ideal time for planting, allowing the bulbs to root before winter arrives. Plant the bulbs at the recommended depth and spacing, ensuring proper establishment and growth.
By incorporating fall-flowering bulbs into your garden, you can extend the beauty of the growing season and create a stunning display of color when other plants are starting to fade. Whether you choose colchicums, autumn crocuses, autumn daffodils, or Sternbergia, these bulbs will add beauty and vibrancy to your outdoor space in the autumn months.
Choosing the Right Bulbs
Choosing the right bulbs for your garden is essential to ensure successful growth and a vibrant display of flowers. With so many varieties available, it’s important to consider a few key factors when selecting bulbs. Here are some tips to help you choose the right bulbs for your garden:
Climate Suitability: Consider your climate and hardiness zone when selecting bulbs. Different bulbs have specific temperature and climate requirements. Choose bulbs that are suited to the conditions in your region to ensure they can thrive and produce beautiful blooms.
Flowering Time: Pay attention to the flowering time of bulbs. Bulbs can be categorized into spring-flowering, summer-flowering, and fall-flowering types. Plan your garden with bulbs that will bloom at different times throughout the season, ensuring a continuous display of color and preventing any gaps in your flowerbeds.
Colors and Height: Consider the color scheme and height preferences for your garden. Bulbs come in a wide range of hues and heights. Choose bulbs that complement your existing plants and create a visually appealing arrangement. Consider the heights of the bulbs in relation to the surrounding plants to create a balanced and harmonious garden design.
Bulb Quality: When purchasing bulbs, opt for high-quality bulbs that are firm, plump, and free from signs of rot or disease. Look for bulbs that have not dried out or become moldy. Healthy bulbs are more likely to establish well and produce vigorous growth and abundant blooms.
Special Considerations: Some bulbs have specific considerations that need to be taken into account. For example, certain bulbs may require special soil conditions, such as alkaline or acidic soil. Others may need extra protection during colder winters. Research the specific requirements of the bulbs you are interested in to ensure they align with your garden’s conditions and your gardening capabilities.
Variety Selection: Experiment with different varieties of bulbs to add diversity and interest to your garden. Explore different colors, shapes, and textures to create a unique and captivating display. Mix early, mid, and late-blooming varieties to enjoy an extended flowering season and ensure a constantly evolving garden throughout the year.
By considering these factors when choosing bulbs, you can create a stunning and diverse garden with a variety of colors, heights, and bloom times. Remember to select bulbs that are suitable for your climate, pay attention to flowering times, and consider the overall aesthetic of your garden. With the right bulbs in place, you can enjoy a vibrant and thriving floral display year after year.
Preparing the Soil
Preparing the soil is an essential step in ensuring the successful growth and development of bulbs in your garden. By providing a healthy and nutrient-rich environment, you can give your bulbs the best start for vigorous growth and abundant blooms. Here are some tips for preparing the soil for planting bulbs:
Clear the Area: Start by clearing the area where you plan to plant the bulbs. Remove any weeds, rocks, or debris that could interfere with bulb establishment and growth. This will provide a clean and clutter-free planting bed for your bulbs.
Loosen the Soil: Use a garden fork, spade, or tiller to loosen the soil in the planting area. Loosening the soil improves drainage and allows the roots to penetrate easily. Break up any clumps and remove any compacted areas to create a loose and friable soil texture.
Remove Excess Weeds: Before planting your bulbs, remove any persistent weeds or grass from the planting area. Weeds compete with bulbs for nutrients, water, and sunlight. Removing them will help your bulbs thrive without unnecessary competition.
Add Organic Matter: Incorporate organic matter, such as compost, well-rotted manure, or leaf mold, into the soil. Organic matter improves soil structure, enhances drainage, and provides essential nutrients for healthy bulb growth. Mix the organic matter thoroughly into the soil, distributing it evenly throughout the planting area.
Soil Amendments: Test your soil’s pH level and fertility to determine if any specific soil amendments are needed. Bulbs generally prefer a slightly acidic to neutral pH range. If necessary, adjust the soil’s pH by adding lime to raise it or sulfur to lower it. Consult a soil testing kit or local extension service for accurate recommendations.
Provide Drainage: Ensure that the soil in the planting area has good drainage. Bulbs are prone to rotting if they sit in waterlogged soil. If the soil retains excessive moisture, consider amending it with sand or perlite to improve drainage or create raised beds to elevate the planting area.
Level the Soil: Once you have incorporated organic matter and made any necessary amendments, level the soil in the planting area. A level surface ensures that bulbs are planted at consistent depths and allows for even growth and blooming across the planting bed.
By properly preparing the soil before planting bulbs, you are setting the stage for their success. Clearing the area, loosening the soil, removing weeds, adding organic matter, adjusting pH if necessary, ensuring good drainage, and leveling the soil will create an optimal environment for bulb growth.
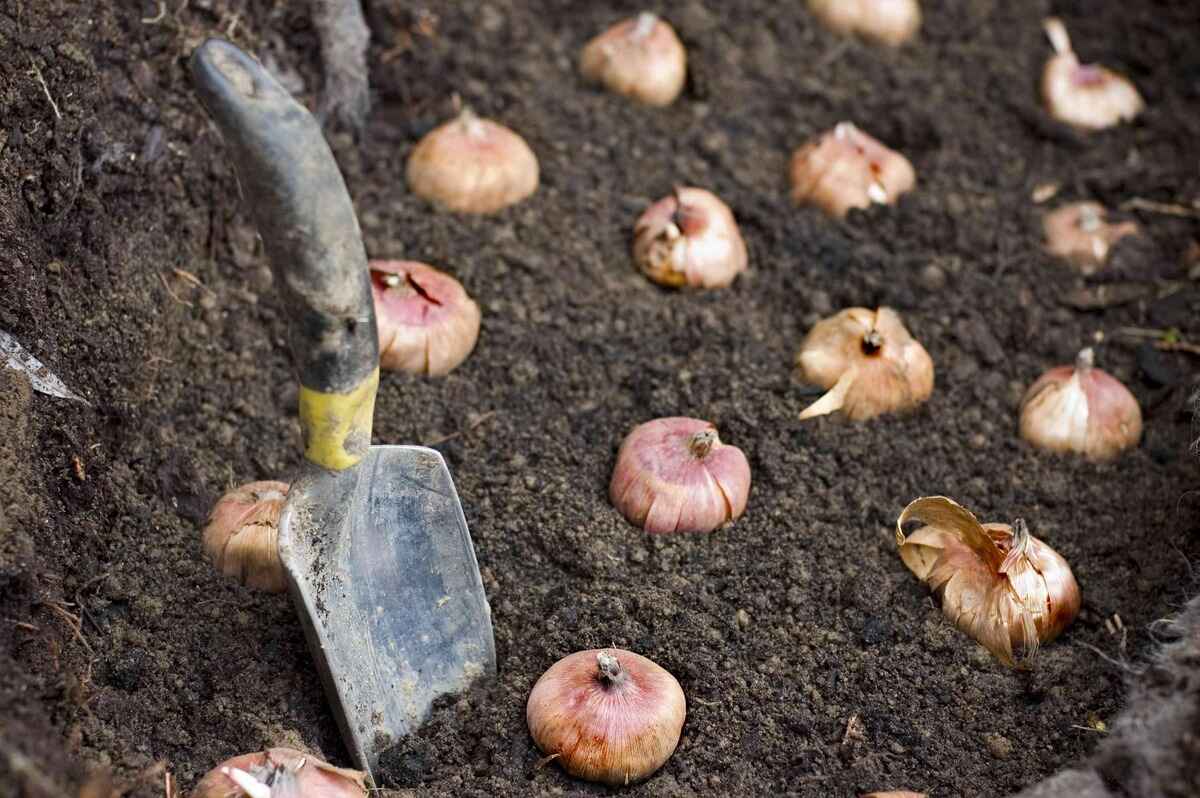
Planting Depth and Spacing
The proper planting depth and spacing of bulbs are crucial for their healthy growth and development. Planting bulbs at the correct depth allows them to establish roots and emerge at the appropriate time, while proper spacing ensures adequate air circulation and prevents overcrowding. Here are some guidelines for planting depth and spacing:
Planting Depth: The general rule of thumb is to plant bulbs at a depth that is approximately two to three times their diameter. Larger bulbs, such as tulips or daffodils, are typically planted at a deeper depth than smaller bulbs like crocuses or snowdrops. Planting too shallow may result in bulbs being exposed and susceptible to damage, while planting too deep may hinder their emergence and flowering.
Spacing: Proper spacing is important to allow for optimal growth and prevent overcrowding. The spacing requirement varies depending on the type of bulbs. As a general guideline, space bulbs approximately two to three times their width apart. This ensures that each bulb has enough room to grow and access necessary nutrients and sunlight, preventing competition for resources.
Consider Mature Size: Take into account the mature size of the bulb and its foliage when determining spacing. Some bulbs produce larger plants with wider foliage, while others have small and slender leaves. Plan the spacing accordingly to accommodate the size of the plants at their full growth to avoid overcrowding and allow for a visually appealing arrangement.
Grouping or Drifting: For a more impactful display, consider grouping or drifting bulbs rather than planting them individually. Grouping bulbs in clusters of three to seven creates a concentrated burst of color and visual impact. Drifting, on the other hand, involves scattering bulbs in a more natural and random pattern, mimicking the way bulbs would grow in the wild.
Depth and Spacing Variations: Some bulbs have specific depth and spacing requirements, so it’s crucial to read the planting instructions provided with the bulbs or consult reliable gardening resources. For example, certain bulbs like anemones or ranunculus are planted closer to the soil surface, while others, like lilies or gladiolus, may need deeper planting.
When planting bulbs, use a gardening tool, such as a trowel or bulb planter, to create a hole of the appropriate depth. Place the bulb in the hole with the pointed end facing up (unless planting anemones or ranunculus, where the bulb should be placed flat side down). Fill the hole with soil, gently firming it around the bulb.
By following the recommended planting depth and spacing guidelines, you can ensure healthy bulb growth, proper emergence, and a visually appealing display in your garden. Take into account the specific requirements of each bulb type, consider mature sizes, and experiment with grouping or drifting for added impact.
Planting Techniques
Planting bulbs properly is essential for their successful growth and the creation of a beautiful garden display. By utilizing the right planting techniques, you can provide the bulbs with the best conditions for establishment and ensure optimal flowering. Here are some planting techniques to consider:
Preparing the Planting Hole: Before placing the bulb in the ground, prepare the planting hole by loosening the soil and removing any weeds or debris. Dig a hole that is deep enough to accommodate the bulb at the recommended planting depth and wide enough to allow for adequate spacing and root growth.
Planting Orientation: When placing the bulb in the ground, pay attention to its orientation. The pointed end of the bulb should generally face up (unless planting certain bulbs like anemones or ranunculus which should be placed flat side down). If the bulb is planted upside down, it may still grow, but it may take longer to emerge and bloom.
Firming the Soil: After placing the bulb in the hole, gently firm the soil around it, ensuring good soil-to-bulb contact. This helps to eliminate air pockets and provides stability for the bulb. Be careful not to press the soil too tightly, as it can hinder root development and cause waterlogging.
Watering After Planting: After planting the bulbs, give them a thorough watering. This helps to settle the soil, initiate root growth, and ensure moisture penetration to the bulb. Watering is especially important if the soil is dry or if there is no rainfall immediately after planting. However, avoid overwatering, as excessive moisture can lead to bulb rot.
Mulching: Apply a layer of organic mulch, such as straw or shredded leaves, around the planted bulbs. Mulching helps to retain soil moisture, regulate soil temperature, and suppress weed growth. Ensure that the mulch layer is not too thick, as it can prevent proper emergence of the bulbs.
Protecting from Pests: To protect bulbs from pests, such as rodents or squirrels, consider covering the planting area with a wire mesh or using specialized bulb protection products. These measures can help prevent critters from digging up or damaging the bulbs, ensuring their safe establishment.
Labeling: It is a good practice to label the planted bulbs, especially if you have different varieties or types in your garden. Use plant markers or labels to identify the bulbs and their specific locations. This will help you keep track of the plantings, monitor their growth, and make adjustments or additions in the future.
By employing these planting techniques, you can provide the bulbs with the best start for successful growth and development. Preparing the planting hole, orienting the bulbs correctly, firming the soil gently, watering adequately, applying mulch, protecting from pests, and labeling the plantings will help create a well-planned and thriving bulb garden.
Caring for Bulbs
Caring for bulbs throughout their growth cycle is essential to ensure healthy plants and beautiful blooms. By providing the right care, you can help bulbs thrive and maximize their potential. Here are some important care practices to consider:
Watering: Monitor the moisture levels in the soil and water the bulbs as needed. Bulbs require regular watering, especially during periods of dry weather or when rainfall is scarce. Aim to keep the soil evenly moist, but not waterlogged, to prevent rotting. Deep watering is preferable, as it encourages the roots to grow deeper into the ground.
Fertilizing: Bulbs can benefit from a balanced fertilizer application during their growth stages. Apply a slow-release, granular bulb fertilizer according to the package instructions. Fertilize bulbs in early spring when they’re actively growing, and again after they’ve finished flowering to support bulb development for the following year. Avoid over-fertilizing, as it can lead to excessive foliage growth and reduced flowering.
Dealing with Faded Blooms: After the blooms have faded, remove the spent flowers to prevent the plant from expending energy on seed production. Deadheading encourages the bulbs to channel their energy into strengthening their underground storage structures, promoting better bulb size and future flowering. When removing faded blooms, be careful not to damage the foliage or emerging shoots.
Leaf Maintenance: Allow the foliage to remain intact until it turns yellow and withers naturally. The green leaves play a vital role in photosynthesis, providing essential energy to the bulbs for storage and growth. Refrain from cutting back or tying up the foliage prematurely, as it can hinder bulb development and reduce the chances of successive blooming.
Controlling Pests and Diseases: Monitor your bulbs regularly for any signs of pest or disease issues. Common problems include aphids, slugs, snails, and fungal infections. Take appropriate measures to control pests and diseases, such as using organic insecticides or practicing cultural methods like hand-picking pests. Keeping the planting area clean and practicing good hygiene will help minimize potential issues.
Dividing and Transplanting: Over time, bulbs may become overcrowded or form clumps that inhibit their growth and flowering. When this occurs, consider dividing and transplanting the bulbs during their dormant season (usually in late summer or early fall). Gently dig up the clumps, separate the bulb offsets, and replant them at the appropriate depth and spacing in a new location or back into the existing bed.
Winter Protection: In regions with harsh winters, provide appropriate protection to bulbs to prevent frost damage. Apply a thick layer of mulch or insulating material, such as straw or pine needles, over the planting bed once the ground has frozen. This helps to insulate the bulbs and regulate soil temperature, preventing freeze-thaw cycles that can harm the underground bulbs.
By following these care practices, you can ensure the health and longevity of your bulbs. Regular watering, proper fertilization, deadheading, maintenance of foliage, pest and disease control, dividing and transplanting when necessary, and providing winter protection will contribute to the overall success of your bulb garden and ensure beautiful blooms year after year.
Bulb Maintenance
Maintaining bulbs is essential to promote their longevity, health, and continuous blooming. By implementing regular maintenance practices, you can ensure that your bulbs remain vibrant and productive year after year. Here are some important maintenance tips for bulbs:
Remove Foliage Properly: After the foliage has turned yellow or withered, it is safe to remove it. However, it’s essential not to cut off the leaves prematurely. Allow the foliage to photosynthesize and channel energy into the bulbs for storage. Once the foliage has naturally withered, gently remove it from the plant, being careful not to disturb the bulbs or emerging shoots.
Stake Tall Varieties: If you have taller bulb varieties, such as lilies or gladiolus, consider staking them to provide support. Tall stems can be vulnerable to bending or breaking, especially in windy conditions. Use stakes, bamboo canes, or other suitable supports to prop up the plants and prevent them from toppling over.
Prevent Overcrowding: Bulbs tend to multiply and form clumps over time, which can lead to overcrowded conditions. To prevent this, periodically divide and replant the bulbs, especially when you notice decreased blooming or crowded growth. Dig up the clumps during their dormant period and separate the bulbs, allowing them more space to grow and preventing competition for nutrients.
Monitor and Control Pests: Regularly inspect your bulbs for pests such as aphids, slugs, or snails. These critters can damage bulbs or feed on foliage, inhibiting growth and blooming. Use appropriate pest control measures, such as organic insecticides or hand-picking, to keep the pest populations in check and protect your bulbs.
Inspect for Disease: Keep an eye out for signs of disease, such as fungal infections or rot. Yellowing or discolored leaves, moldy patches, or wilting can indicate disease problems. If you notice any suspicious symptoms, promptly remove and discard the affected bulbs to prevent the spread of disease to healthy bulbs. Avoid over-watering or allowing the bulbs to sit in waterlogged soil, as this can contribute to disease development.
Replenish Nutrients: Bulbs deplete nutrients from the soil as they grow and bloom. To ensure continuous healthy growth, consider applying a balanced bulb fertilizer during the growing season. This will replenish essential nutrients and promote vigorous foliage, strong root development, and abundant blooms. Follow the fertilizer manufacturer’s instructions for proper application rates.
Keep Records: Maintain a record of your bulb plantings, including bulb varieties, planting dates, and locations. This will help you monitor their growth, blooming habits, and any specific maintenance requirements over time. It will also facilitate planning for future plantings and allow you to rotate bulb types to maintain soil health and prevent disease build-up.
By implementing these bulb maintenance practices, you can ensure the longevity and productivity of your bulbs. Proper foliage removal, staking tall varieties, preventing overcrowding, pest and disease control, nutrient replenishment, and keeping records will contribute to healthy bulb growth and vibrant blooms for years to come.
Frequently Asked Questions
1. When is the best time to plant bulbs?
The timing of bulb planting depends on the specific type of bulb. Generally, spring-flowering bulbs are planted in the fall, while summer-flowering and fall-flowering bulbs are planted in the spring.
2. How deep should bulbs be planted?
The depth at which bulbs should be planted varies depending on the bulb size. As a general guideline, plant bulbs at a depth that is about two to three times their diameter. Larger bulbs are usually planted deeper than smaller bulbs.
3. How much spacing should I provide between bulbs?
Spacing between bulbs typically depends on the specific bulb species and its mature size. As a general rule, space bulbs approximately two to three times their width apart to allow for proper root development and prevent overcrowding.
4. Can I plant bulbs in containers?
Absolutely! Bulbs can be successfully planted in containers, allowing you to create beautiful displays on patios, balconies, or small spaces. Ensure the containers have proper drainage and use well-draining potting soil.
5. Do all bulbs need full sun?
While many bulbs prefer full sun, there are also bulbs that can thrive in partial shade. Before planting, consider the light requirements of the specific bulb species you have chosen and select the appropriate location in your garden.
6. What do I do with bulbs after they finish flowering?
After the blooms have faded, allow the foliage to mature and wither naturally. This allows for the bulbs to store energy for the next flowering season. Refrain from cutting back or tying up the foliage prematurely.
7. Should I fertilize bulbs?
Bulbs generally benefit from a balanced fertilizer application during their active growth period. Apply a slow-release, granular bulb fertilizer according to the package instructions in early spring and after flowering to support healthy growth.
8. Can I plant bulbs in already established gardens?
Absolutely! Bulbs can be planted in existing gardens as long as there is appropriate space and sunlight. Carefully select the locations to ensure the bulbs complement the existing plants and consider the soil requirements of the bulbs.
9. Do bulbs need winter protection?
Many bulbs are hardy and can withstand winter temperatures. However, in regions with harsh winters, it may be beneficial to provide insulation by adding a layer of mulch or protective covering to prevent frost damage.
10. Can I cut flowers from bulbs for indoor arrangements?
Absolutely! Many bulbs, such as tulips or daffodils, make excellent cut flowers. When cutting, leave some foliage intact to allow the bulbs to store energy for the following season.
These frequently asked questions cover some fundamental aspects of planting and caring for bulbs. Remember, specific bulb species may have unique requirements, so it’s essential to research and follow the recommendations for the specific bulbs you are planting to ensure optimal growth and beautiful blooms.