
Why Remove the Faucet Strainer?
Removing the faucet strainer is necessary for several reasons. Firstly, over time, debris and sediment can build up in the strainer, causing a decrease in water flow and pressure. This can be especially troublesome if you notice a decrease in the performance of your faucet. By removing the strainer, you can easily clean out any debris, restoring optimal water flow.
In addition, removing the strainer allows for a thorough cleaning or replacement. The strainer may become clogged with mineral deposits, resulting in an unpleasant taste or odor in the water. By removing the strainer, you can clean it thoroughly or replace it with a new one, ensuring clean and fresh water.
Furthermore, removing the strainer allows for easy maintenance and repairs. If there are any issues with the faucet, such as leaking or dripping, removing the strainer gives you access to the internal components, making it easier to identify and fix the problem.
Another reason to remove the strainer is to upgrade or customize your faucet. If you want to install a new aerator or add a water-saving device, removing the strainer is necessary to access the aerator and make the desired modifications.
Overall, removing the faucet strainer is an essential step in maintaining the performance, cleanliness, and functionality of your faucet. Whether it’s to improve water flow, eliminate unpleasant odors, perform maintenance and repairs, or customize your faucet, removing the strainer is a straightforward process that can greatly enhance your overall faucet experience.
Tools Needed
Before you begin removing the faucet strainer, gather the necessary tools to ensure a smooth and efficient process. Here are the tools you will need:
- Adjustable wrench: This tool will help you loosen and tighten the necessary fittings without causing any damage.
- Needle-nose pliers: These pliers will come in handy for gripping small components and removing the strainer with precision.
- Bucket or container: It’s important to have a container nearby to catch any water that may spill during the removal process.
- Clean cloth or towel: Having a cloth or towel on hand will allow you to wipe away any excess water or debris during the process.
- Teflon tape: This tape is necessary for resealing the fittings and preventing leaks once the strainer is reinstalled.
- A replacement strainer (if needed): If you’re planning to replace the strainer, make sure you have the new one ready before starting the removal process.
By ensuring you have these tools readily available, you’ll be fully prepared to tackle the task of removing the faucet strainer without any unexpected delays or complications.
Step 1: Turn Off the Water Supply
The first step in removing the faucet strainer is to turn off the water supply. This is a crucial step to prevent any water from flowing during the removal process.
Locate the shut-off valves underneath the sink or near the main water supply line. Turn the valves clockwise until they are fully closed. This will ensure that no water is flowing to the faucet.
Next, turn on the faucet to release any remaining water in the line. This will help to relieve any pressure and make the removal process easier.
If your sink does not have shut-off valves, you may need to shut off the main water supply to your home. This is typically located near the water meter or in the basement. Consult the instructions or contact a professional if you are unsure how to do this.
Remember to double-check that the water supply is completely off before proceeding to the next step.
By turning off the water supply, you’ll prevent any potential mess or damage from water leakage during the removal and cleaning process.
Step 2: Prepare the Work Area
Before you begin removing the faucet strainer, it’s important to prepare the work area to ensure a smooth and organized process.
Start by clearing any items from the sink or countertop to create a clean and clutter-free workspace. This will give you plenty of room to maneuver and access the faucet components.
Next, place a towel or cloth in the sink to prevent any small parts from falling into the drain. This will provide a protective barrier and make it easier to locate and retrieve any dropped components.
If you’re concerned about accidentally damaging the sink or countertop during the removal process, you can also place a soft cloth or a piece of cardboard underneath the area where you’ll be working.
Additionally, ensure you have good lighting in the work area to clearly see the faucet and its components. Natural light or a bright lamp can be helpful in illuminating the space.
By preparing the work area beforehand, you’ll create an organized and secure environment to work in, minimizing the chance of losing small parts or causing any damage. This will make the process of removing the faucet strainer much more efficient and hassle-free.
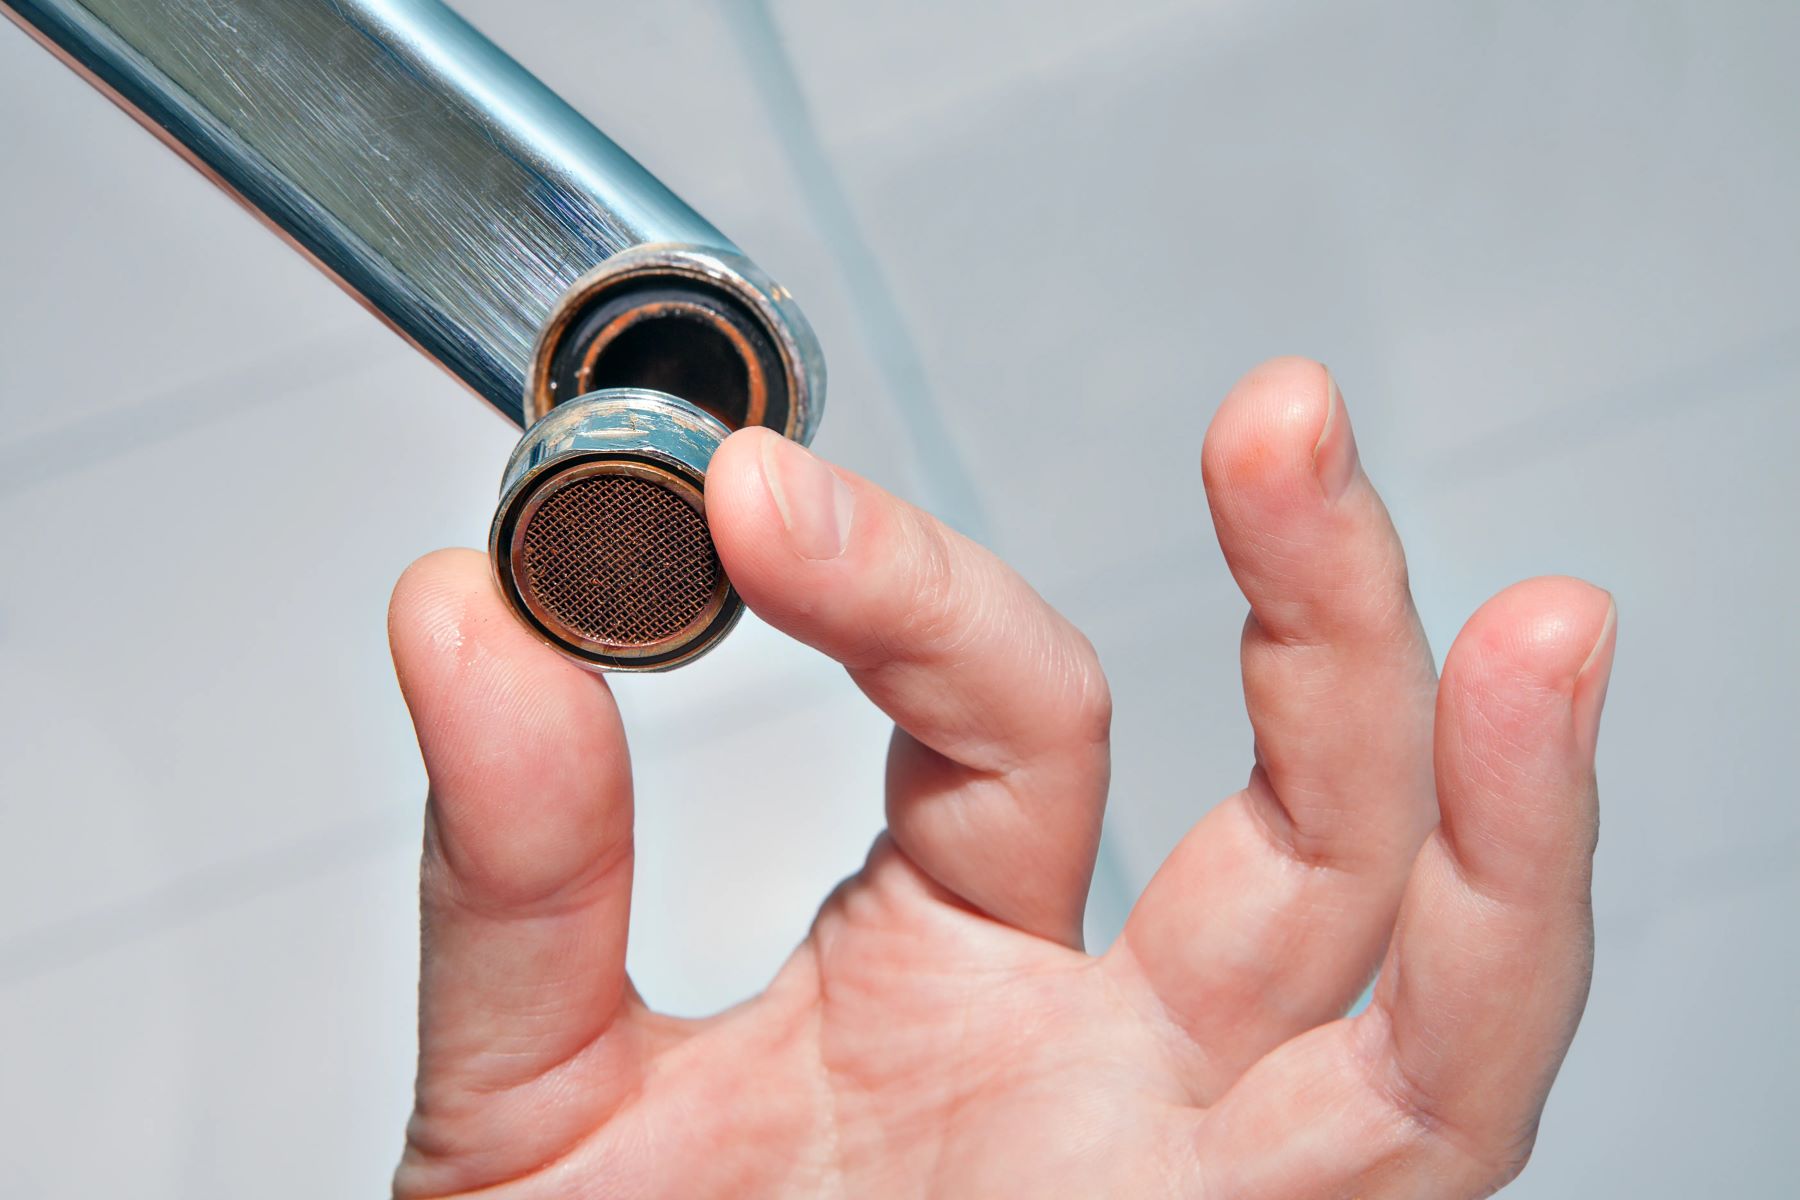
Step 3: Locate the Faucet Strainer
Now that you have prepared the work area, it’s time to locate the faucet strainer. The location of the strainer may vary depending on the type of faucet you have.
In most cases, the strainer is located at the end of the faucet spout. It is a small, cylindrical component with tiny holes or mesh that filters out debris from the water flow.
Take a close look at the end of your faucet spout and identify any visible components or attachments. The strainer may be covered by a separate part called the faucet aerator, which we will remove later.
If you’re having trouble finding the strainer, consult the manufacturer’s instructions or look for online resources specific to your faucet model. Alternatively, you can seek assistance from a plumber or a knowledgeable professional for guidance.
Once you have identified the location of the strainer, you’re ready to move on to the next step and remove the faucet aerator to access the strainer.
By locating the faucet strainer, you are taking a crucial step towards removing it. Understanding its position will help you proceed with confidence and efficiency in the following steps.
Step 4: Remove the Faucet Aerator
Before you can remove the faucet strainer, you’ll need to remove the faucet aerator, which is often connected to or covers the strainer. The aerator is a small device that mixes air with the water, creating a smooth and consistent flow.
To remove the aerator, start by wrapping a cloth or towel around it to protect the finish and provide a better grip. If the aerator is tightly secured, you can use a pair of pliers to grip it firmly.
Turn the aerator counterclockwise to loosen it. Be cautious not to apply excessive force, as this can damage the aerator or the faucet. Instead, use a gentle yet firm grip to unscrew it.
Once the aerator is loosened, continue unscrewing it by hand until it is completely detached from the faucet spout. Set the aerator aside in a safe place for now.
Removing the aerator may also reveal the underlying strainer, or you may find it still attached to the aerator. If the strainer is still attached, you can proceed to the next step and remove both components together.
If you encounter any difficulties in removing the aerator, such as it being stuck or stubborn, you may need to use some penetrating oil or contact a professional for assistance.
By successfully removing the faucet aerator, you’ve cleared the way for accessing the strainer and progressing with the removal process.
Step 5: Remove the Strainer
Now that the faucet aerator is removed, it’s time to remove the strainer itself. The strainer is typically located inside the faucet spout or attached to the aerator.
Use your fingers or a pair of needle-nose pliers to grip the strainer firmly. Slowly rotate it counterclockwise to loosen it from the faucet spout.
Keep in mind that some strainers may have a rubber gasket or O-ring that holds them securely in place. If your strainer has this feature, be careful not to damage or lose it during the removal process.
If the strainer is resistant to turning or feels stuck, you can try using a bit of penetrating oil to loosen it. Apply a small amount of oil around the threaded area and allow it to penetrate for a few minutes before attempting to remove the strainer again.
Once the strainer is loosened, twist it gently until it is completely detached from the faucet spout or aerator. Take care not to force it or apply excessive pressure, as this can cause damage to the faucet or the strainer itself.
Inspect the removed strainer for any signs of corrosion or buildup. If it appears dirty or clogged, it’s a good idea to clean or replace it before reassembling the faucet.
By successfully removing the strainer, you’ve completed a significant step in maintaining and restoring the functionality of your faucet. Now, you can proceed to cleaning or replacing the strainer in the next step.
Step 6: Clean or Replace the Strainer
After removing the faucet strainer, it’s essential to clean or replace it to ensure optimal water flow and quality. This step will help prevent any debris or sediment buildup that can hinder the performance of your faucet.
If the strainer appears dirty or clogged, you can begin by cleaning it. Rinse the strainer under running water to remove any loose debris. Then, use an old toothbrush or a small brush to gently scrub away any stubborn buildup.
If the strainer is heavily corroded or damaged, it may be best to replace it altogether. Check with your local hardware store or consult the faucet manufacturer to find a suitable replacement strainer.
When installing a new strainer, make sure it matches the specifications and size of your faucet. Carefully screw the new strainer into place, ensuring a snug fit.
If you are reusing the existing strainer, thoroughly inspect it to ensure it’s clean and in good condition. Use a gentle cleaning solution, such as a mixture of warm water and mild dish soap, to soak the strainer if necessary.
Once the strainer is clean or replaced, take the opportunity to clean the faucet spout as well. Wipe away any residue or buildup on the surface with a damp cloth.
By cleaning or replacing the strainer, you’ll help restore the proper functioning of your faucet and ensure a clean and efficient water flow.
Step 7: Reassemble the Faucet
With the cleaned or replaced strainer in hand, it’s time to reassemble the faucet. This step involves carefully putting back the components that were removed earlier.
If you removed the strainer from the faucet spout, align it with the opening and gently screw it back into place. Make sure to thread it clockwise to secure it tightly without over-tightening.
If the strainer was attached to the aerator, reattach the aerator to the faucet spout. Hold the aerator with one hand and screw it onto the spout using your other hand. Again, remember to turn it clockwise to ensure a tight fit without excessive force.
Ensure that the strainer and aerator are securely attached and properly aligned with the faucet. This will prevent any leaks or disruption to the water flow once the faucet is in use.
If your faucet had any additional components or attachments that were removed during the process, such as decorative caps or handles, now is the time to reattach them as well.
Once all the components are properly reassembled, double-check that everything is tightly secured and aligned. This will help prevent any potential leaks or issues when you turn on the water supply.
By successfully reassembling the faucet, you’re one step closer to completing the process. The final step is to test the faucet and ensure its proper functionality.
Step 8: Test the Faucet
After reassembling the faucet, it’s crucial to test its functionality and ensure that everything is working properly. This step will help you verify that the faucet strainer removal and reassembly process was successful.
Start by slowly turning on the water supply valves underneath the sink or near the main water supply. Gradually open the valves to allow water to flow to the faucet.
With the water running, observe the faucet for any signs of leaks, drips, or irregular water flow. Check around the strainer, aerator, and other areas where components were removed and reattached. If you notice any leakage, gently tighten the corresponding component until the leakage stops. Avoid over-tightening, as this can damage the faucet.
Next, test the water flow and pressure by fully opening the faucet. Pay attention to any changes compared to the previous performance. If the water flow and pressure are significantly improved, or if any previous issues have been resolved, it indicates a successful removal and cleaning or replacement of the strainer.
While testing the faucet, also listen for any unusual noises or vibrations that could signal a problem. Additionally, check for proper temperature control if your faucet has both hot and cold water handles.
If everything seems to be working well, turn off the water supply and dry any moisture around the faucet. This will help prevent any water damage and maintain the overall cleanliness of the area.
Congratulations! By testing the faucet and ensuring its proper functionality, you have successfully completed the process of removing and cleaning or replacing the faucet strainer.