
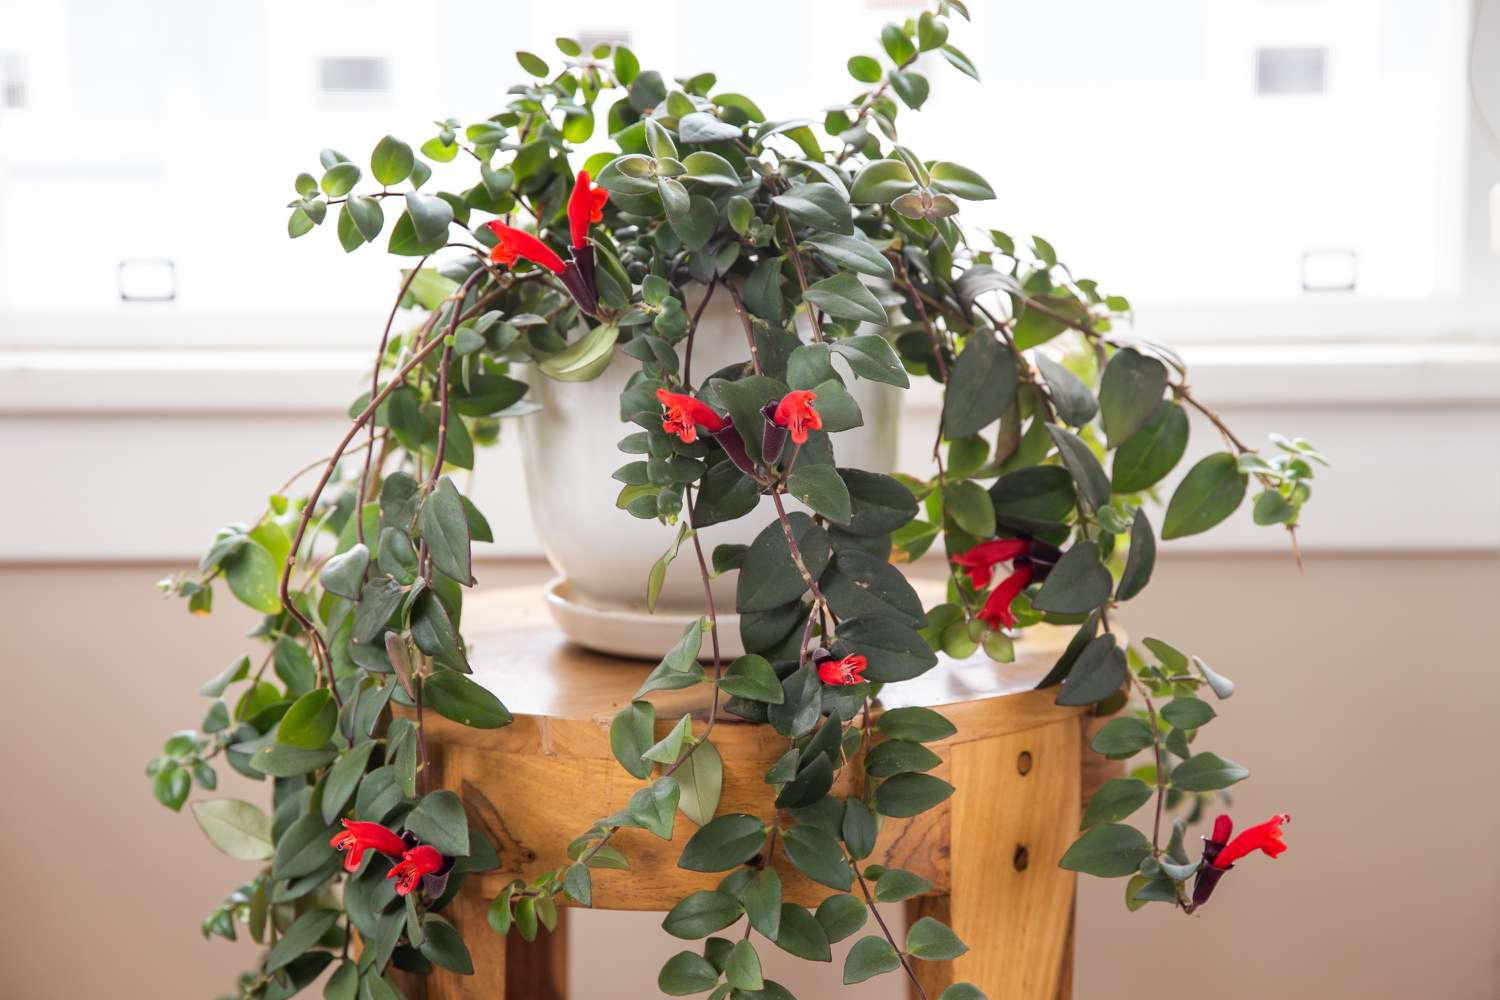
Choosing a Healthy Mother Plant
When propagating a lipstick plant, selecting a healthy mother plant is crucial for successful propagation. The mother plant serves as the source of the stem cuttings, so it’s important to choose one that is robust and disease-free. Here are some tips for selecting the perfect mother plant:
- Look for vibrant foliage: Choose a mother plant with lush, vibrant foliage. Avoid plants with yellowed, wilted, or damaged leaves, as these may indicate underlying issues.
- Inspect for pest infestation: Carefully examine the plant for any signs of pests, such as aphids, mealybugs, or spider mites. Avoid selecting mother plants with visible pest damage.
- Check for overall health: Assess the overall health of the plant by examining its stems and roots. Opt for plants with sturdy stems and healthy root systems.
- Consider growth habit: Evaluate the growth habit of the mother plant. Look for compact and bushy plants rather than tall and leggy ones, as compact plants tend to produce better cuttings.
- Ensure sufficient maturity: Select a mother plant that is mature enough to provide viable cuttings. Young plants may not have developed enough root mass to sustain new growth.
By choosing a healthy mother plant, you increase the chances of successful propagation. Take your time to inspect various plants, comparing their health and characteristics, before making your final selection. Remember that a healthy mother plant will yield strong and vigorous stem cuttings, setting the stage for successful propagation.
Gathering Necessary Supplies
Before you begin propagating your lipstick plant, it is important to gather all the necessary supplies. Having the right tools and materials on hand will ensure a smooth and successful propagation process. Here are the essential supplies you’ll need:
- Pruning shears: Invest in a sharp pair of pruning shears or sharp scissors. These will be used to take stem cuttings from the mother plant.
- Clean containers: Prepare clean containers for planting the cuttings. Use small pots or seed trays with good drainage holes to avoid waterlogged soil.
- Propagating medium: Choose a well-draining propagating medium for planting the cuttings. A mix of peat moss and perlite or a commercial potting mix specifically formulated for propagation works well.
- Rooting hormone: Consider using a rooting hormone powder or gel to encourage faster root growth on the cuttings. This is optional but can improve success rates.
- Misting bottle: Fill a misting bottle with water to help maintain humidity levels around the cuttings. This will prevent them from drying out during the initial stages of propagation.
- Cover or plastic bag: Use a clear plastic bag or a propagation dome to create a mini greenhouse effect and retain moisture around the cuttings.
- Watering can: Have a watering can on hand for watering the propagated plants. Use room temperature water to avoid shocking the delicate root system.
Ensure all your supplies are clean and sterilized before use to prevent the introduction of diseases or pests. It’s also a good idea to have a clean workspace and gloves to maintain hygiene during the propagation process.
By gathering these necessary supplies, you’ll be well-equipped to successfully propagate your lipstick plant. Having everything prepared in advance will make the process smoother and more efficient, allowing you to focus on nurturing your newly propagated plants.
Taking Stem Cuttings
Now that you have a healthy mother plant and all the necessary supplies, it’s time to take stem cuttings for propagation. This is one of the most critical steps in the process, as it determines the quality and success of your new plants. Here’s how to take stem cuttings from your lipstick plant:
- Select the right stems: Choose healthy, non-flowering stems from the mother plant. Look for stems that are about 4-6 inches long and have 3-4 nodes.
- Use clean tools: Sterilize your pruning shears or scissors with rubbing alcohol or bleach to minimize the risk of spreading diseases. Ensure the blades are sharp for a clean cut.
- Make the cut: Cut the stems just below a node, using a slanted cut. This provides a larger surface area for root development.
- Remove lower leaves: Remove the lower leaves from the cuttings, leaving only a few at the top. This helps prevent excessive moisture loss and focuses the energy on root development.
- Optional: Apply rooting hormone: If desired, dip the cut end of the stem into a rooting hormone powder or gel. This can enhance root development and increase the success rate of propagation.
Once you have taken the stem cuttings, it’s important to proceed quickly to avoid wilting. Place the cuttings in a container with water or moist paper towels to keep them hydrated until you’re ready to prepare them for planting.
Remember to take multiple cuttings to increase your chances of success, as not all cuttings may root successfully. It’s always better to have extras than to rely on just one or two.
By following these steps, you’ll be well on your way to propagating new lipstick plants from your healthy mother plant. Taking care and precision during this process will lay the foundation for healthy, thriving plants in the future.
Preparing the Cuttings for Propagation
After taking stem cuttings from your lipstick plant, it’s important to prepare them properly before planting them for propagation. This step ensures that the cuttings have the best chance of developing roots and growing into healthy plants. Here’s how to prepare the cuttings:
- Trim the cuttings: Trim the cuttings to a length of about 4 inches if needed. This will promote healthy root development and ensure the cuttings fit comfortably in the chosen pots or seed trays.
- Remove any flower buds: Pinch off any flower buds or blooms on the cuttings. This redirects energy towards root development rather than flower production.
- Apply rooting hormone: If you haven’t done so already, dip the cut end of each stem into a rooting hormone powder or gel. This helps stimulate root growth and improves the success rate of propagation.
- Make planting holes: Use a pencil or your finger to create planting holes in the propagating medium. The holes should be deep enough to accommodate the cuttings without crowding them.
- Plant the cuttings: Insert the prepared stem cuttings into the planting holes, making sure the nodes are below the surface of the propagating medium. Gently press the medium around the base of each cutting to stabilize it.
Once you have prepared and planted the cuttings, it’s essential to provide them with the right conditions for successful root development and growth. Remember that maintaining proper moisture levels, humidity, and temperature are key factors in the success of the propagation process.
By taking the time to properly prepare your cuttings for propagation, you set them up for success. Providing the necessary care and attention during this stage will help ensure that your cuttings develop healthy roots and ultimately grow into beautiful lipstick plants.
Planting the Cuttings
Once you have prepared the stem cuttings of your lipstick plant, it’s time to plant them for propagation. Planting the cuttings correctly will provide them with the optimal conditions to establish roots and grow into healthy plants. Here’s how to plant the cuttings:
- Select the right containers: Choose small pots or seed trays with good drainage holes to plant the cuttings. Ensure the containers are clean and sterilized to prevent the spread of diseases.
- Fill the containers: Fill the containers with a well-draining propagating medium, such as a mix of peat moss and perlite or a commercial potting mix specifically designed for propagation.
- Make planting holes: Use a pencil or your finger to create small planting holes in the propagating medium. Space the holes apart to allow each cutting enough room to grow.
- Place the cuttings: Carefully place each prepared stem cutting into a planting hole, ensuring that the nodes are beneath the surface of the propagating medium. Be gentle to avoid damaging the delicate roots.
- Stabilize the cuttings: Gently press the propagating medium around the base of each cutting to provide stability and support.
- Water the cuttings: After planting, give the cuttings a thorough yet gentle watering. Water should be applied to moisten the propagating medium without saturating it.
Once the cuttings are planted, it’s important to provide them with the right growing environment to encourage root development. Place the containers in a warm area with indirect light, maintaining proper humidity levels by covering them with a clear plastic bag or using a propagation dome. This helps create a mini greenhouse effect, promoting moisture retention and preventing excessive drying.
Remember to monitor the moisture level of the propagating medium and water the cuttings when needed. Avoid overwatering, as this can lead to rotting and fungal issues.
By following these planting guidelines, you give your lipstick plant cuttings a favorable start for successful propagation. With proper care and patience, you’ll soon see the development of roots and the growth of new plants.
Creating a Suitable Growing Environment
After planting the stem cuttings of your lipstick plant, it’s crucial to create a suitable growing environment that fosters their growth and development. Providing the right conditions will increase the chances of successful propagation and ensure the establishment of healthy new plants. Here’s how to create an ideal growing environment for your lipstick plant cuttings:
- Light: Place the containers in an area with bright, indirect light. Avoid exposing the cuttings to direct sunlight, as it can lead to leaf burn. A location near a window with filtered light or under grow lights is ideal.
- Temperature: Maintain a consistent temperature range of around 70-75°F (21-24°C). Avoid exposing the cuttings to extreme temperature fluctuations, as it can hinder their growth and root development.
- Humidity: Lipstick plants thrive in humid conditions. To increase humidity around the cuttings, cover the containers with a clear plastic bag or use a propagation dome. This helps retain moisture and create a mini greenhouse effect.
- Air circulation: Ensure proper air circulation around the cuttings while maintaining humidity. This prevents the buildup of moisture, which can lead to fungal issues. If necessary, provide gentle air movement with a fan set on low.
- Watering: Keep the propagating medium consistently moist but not soggy. Water the cuttings when the top inch of the soil feels slightly dry. Use room temperature water and avoid overwatering, as it can cause root rot.
Monitoring the growing environment is essential throughout the propagation process. Regularly check the moisture levels of the propagating medium, ensuring it doesn’t become too dry or overly saturated. Also, observe the cuttings for any signs of wilting or disease, such as yellowing leaves or mold growth.
By creating a suitable growing environment, you offer your lipstick plant cuttings the ideal conditions for successful propagation. Remember to strike a balance between humidity, temperature, light, and airflow to help the cuttings thrive and develop into healthy new plants.
Caring for the Propagated Plants
Once your lipstick plant cuttings have rooted and established themselves, it’s important to provide proper care to ensure their continued health and growth. Caring for the propagated plants involves attention to watering, light, feeding, and potential pest control. Follow these essential care tips to nurture your newly propagated lipstick plants:
- Watering: Water the plants whenever the top inch of the soil feels dry. Ensure thorough watering, allowing excess water to drain away to avoid waterlogging. Avoid overwatering, as it can lead to root rot.
- Light: Place the propagated plants in a location with bright, indirect light. Provide them with filtered sunlight or supplement with grow lights if natural light is insufficient. Avoid direct sunlight, as it can scorch the leaves.
- Fertilization: Feed the plants with a balanced, water-soluble fertilizer that is specifically formulated for houseplants. Follow the instructions on the fertilizer packaging for proper dosage and frequency. Fertilize during the growing season, usually from spring to early fall.
- Pruning: Regular pruning helps maintain the shape and promote bushier growth in your propagated plants. Prune any leggy or damaged stems, and pinch off any spent flowers to redirect the plant’s energy towards new growth.
- Pest control: Keep an eye out for common pests such as aphids, mealybugs, or spider mites. If you notice any signs of infestation, take immediate action to control and eliminate the pests. You can use natural remedies or insecticidal soap to treat them.
In addition to these care tips, be observant of your propagated plants and respond to their specific needs. Adjust the care routine as necessary to accommodate variations in temperature, humidity, and growth patterns. Regularly check the plants for any signs of stress, such as yellowing leaves or leaf drop, and address the underlying causes promptly.
By providing proper care, you will ensure the health and vitality of your propagated lipstick plants. With attention to watering, light, fertilization, and pest control, your plants will flourish and become beautiful additions to your indoor garden.
Troubleshooting Common Issues
While propagating and caring for your lipstick plants, you may encounter some common issues along the way. It’s important to be aware of these problems and their potential solutions to ensure the success and well-being of your plants. Here are some common issues and troubleshooting tips:
- Yellowing leaves: Yellowing leaves can indicate various issues, such as overwatering, underwatering, nutrient deficiencies, or too much direct sunlight. Adjust watering habits, provide appropriate lighting conditions, and consider fertilizing with a balanced plant food.
- Leaf drop: Leaf drop can be caused by environmental stress, root issues, pests, or improper care. Check for overwatering, pests, or nutrient deficiencies. Adjust the watering routine, inspect for pests, and provide optimal growing conditions.
- Pest infestation: Common pests such as aphids, mealybugs, and spider mites can affect lipstick plants. Treat infestations with natural remedies like neem oil or insecticidal soap. Consider isolating affected plants to prevent the spread of pests.
- Root rot: Root rot occurs when the roots are consistently exposed to overly moist or waterlogged soil. Improve drainage, adjust watering practices, and ensure proper soil moisture levels to prevent root rot. If root rot is severe, consider repotting the affected plants.
- Drooping or wilting: Drooping or wilting can occur due to underwatering, overwatering, inadequate light, or root issues. Adjust the watering routine, provide sufficient light, and check for root health. Ensure proper drainage to prevent waterlogging.
- Lack of growth: If your propagated plants show signs of slow or stunted growth, it may be due to inadequate light, nutrient deficiencies, or improper care. Provide sufficient indirect light, feed the plants with a balanced fertilizer, and reassess the care routine to address any shortcomings.
Regular monitoring, timely intervention, and adjustment of care practices are key to troubleshooting and resolving these common issues. Remember that each plant is unique, and it may require some trial and error to find the best solutions for your specific circumstances.
By promptly addressing and troubleshooting these common issues, you’ll be able to maintain the health and vitality of your lipstick plants, ensuring their continued growth and beauty in your home.
Transplanting the New Plants
Once your propagated lipstick plants have grown and established a healthy root system, you may need to consider transplanting them into larger containers or outdoor garden beds. Transplanting allows the plants to have more room to grow and access to nutrient-rich soil. Here’s how to successfully transplant your new lipstick plants:
- Choose the right time: Transplant your lipstick plants during the spring or early summer when they are actively growing. Avoid transplanting during periods of extreme heat or cold.
- Select suitable containers: Choose containers that are slightly larger than the current ones, providing enough room for the roots to expand. Ensure the containers have drainage holes to prevent waterlogging.
- Prepare the new planting site: If you plan to transplant the lipstick plants into an outdoor garden bed, prepare the site by removing weeds, loosening the soil, and incorporating organic matter for better drainage and nutrient retention.
- Water the plants: Water the plants thoroughly before transplanting to ensure the root ball remains intact. This helps minimize stress during the transplanting process.
- Carefully remove the plants: Gently loosen the root ball by tapping the sides of the container and carefully slide the plant out. Be cautious not to damage the fragile roots.
- Place in the new container or garden bed: Dig a hole in the new container or garden bed that is slightly larger than the root ball. Position the plant in the hole, ensuring it is at the same depth as it was in its previous container.
- Backfill and firm the soil: Fill the hole with soil, gently firming it around the base of the plant. Ensure there are no air pockets and the plant is securely held in place.
- Water thoroughly: Give the newly transplanted plants a thorough watering to settle the soil and help establish a good connection between the roots and the surrounding medium. Keep the soil evenly moist during the initial establishment period.
After transplanting, monitor the plants closely for a few weeks to ensure they adjust well to their new environment. Provide appropriate care, including regular watering, fertilizing as needed, and protecting them from extreme weather conditions.
Transplanting your new lipstick plants gives them the space and resources they need to thrive. With proper care and attention, they will continue to grow and flourish, adding beauty to your indoor or outdoor garden.