
Choosing the Right Variety of Sweet Peas
When it comes to planting sweet peas, selecting the right variety is crucial for success. With so many options available, it’s essential to choose a variety that suits your taste, climate, and garden space. Here are a few factors to consider when selecting sweet pea varieties:
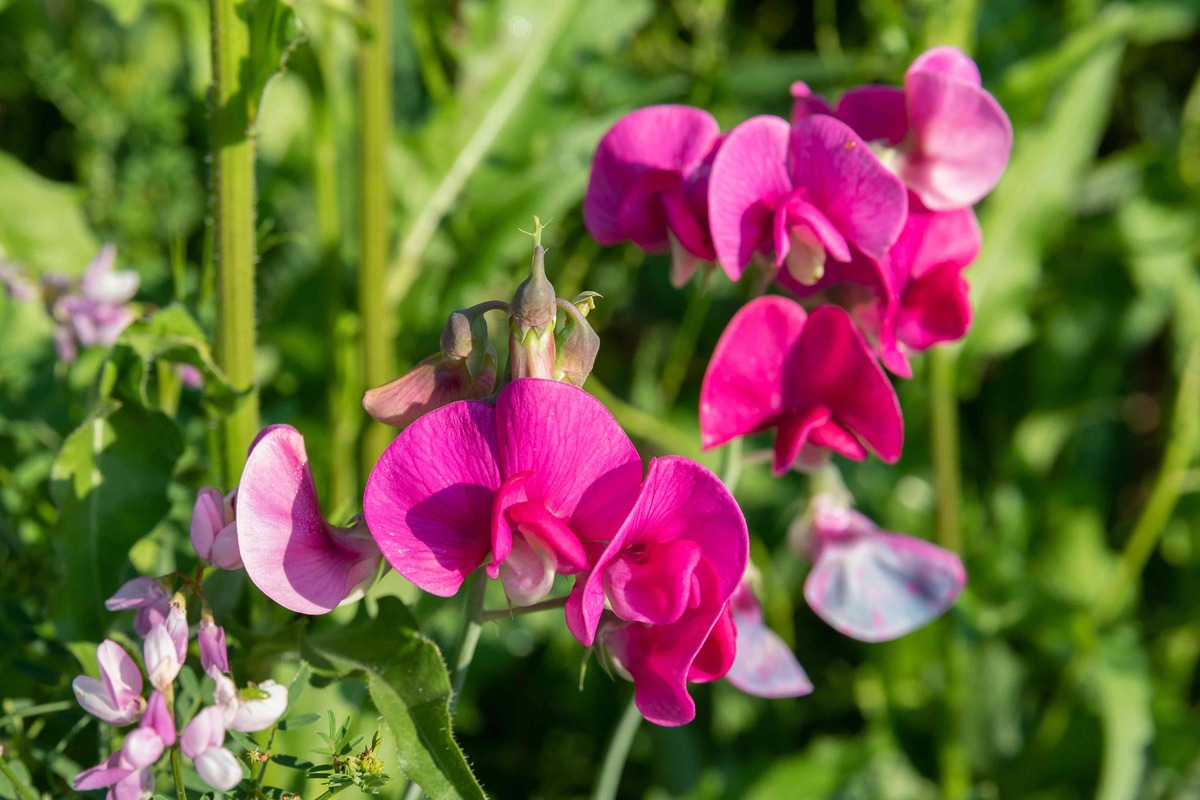
1. Fragrance: Sweet peas are known for their delicate fragrance, which can vary from mild to intensely sweet. Choose a variety with a scent that appeals to you and adds a touch of romance to your garden.
2. Flower Colors: Sweet peas come in a wide range of stunning colors, including pastels, brights, and bi-colors. Consider your garden’s color palette and personal preferences when selecting varieties. You can mix and match different colors to create a beautiful and vibrant display.
3. Growth Habit: Sweet peas can be categorized into two main growth habits: bush and climbing. Bush varieties are compact and more suitable for container gardening or smaller spaces. Climbing varieties, on the other hand, require trellises or supports to grow vertically.
4. Early or Late Blooming: Some sweet pea varieties bloom early in the season, while others bloom later. If you want to enjoy sweet pea flowers as early as possible, choose an early blooming variety. If you prefer to extend the blooming season, opt for a later blooming variety.
5. Disease Resistance: Sweet peas can be susceptible to certain diseases like powdery mildew. To prevent or minimize disease issues, choose varieties that are known for their resistance to common diseases in your area.
Before making a final decision, research and read about different sweet pea varieties. Take into account the growing conditions in your area and consult with local gardeners or experts for recommendations. By selecting the right sweet pea variety, you’ll ensure a successful and beautiful garden filled with fragrant and colorful blooms.
Preparing the Soil for Planting
Preparing the soil properly is essential for the successful growth of sweet peas. By providing a nutrient-rich and well-draining environment, you’ll set the stage for healthy plants and abundant blooms. Here are the steps to prepare the soil for planting sweet peas:
1. Choose a Sunny Location: Sweet peas thrive in full sun. Select a spot in your garden that receives at least six hours of direct sunlight each day. Avoid areas with excessive shade or competition from other plants.
2. Clear the Area: Remove any weeds, grass, or debris from the planting area. Clearing the space will prevent competition for nutrients and create a clean bed for your sweet pea plants.
3. Loosen the Soil: Use a garden fork or tiller to loosen the soil to a depth of about 12 inches. This will improve drainage, aeration, and allow the sweet pea roots to penetrate easily.
4. Amend the Soil: Add organic matter to enrich the soil. Incorporate well-rotted compost, aged manure, or a commercial organic soil amendment into the top 6 inches of soil. This will improve soil fertility and provide essential nutrients for the sweet pea plants.
5. Test Soil pH: Sweet peas prefer slightly acidic to neutral soil with a pH range of 6.0 to 7.5. Test the soil pH using a soil testing kit available at garden centers. If the pH is too low or high, adjust it accordingly by adding lime to raise the pH or sulfur to lower the pH.
6. Ensure Good Drainage: Sweet peas dislike soggy soil, so ensure proper drainage by amending the soil with organic matter and avoiding areas prone to waterlogging. If the soil doesn’t drain well, consider creating raised beds or adding sand or gravel to improve drainage.
7. Pre-Soak the Seeds: Before planting, it’s beneficial to pre-soak sweet pea seeds in water overnight. This will help soften the seed coat and speed up germination.
By following these steps, you’ll create an optimal growing environment for your sweet peas. The well-prepared soil will provide the necessary nutrients and drainage, promoting healthy root development and ensuring a successful planting season.
Sowing Sweet Pea Seeds
Sowing sweet pea seeds is an exciting step in the process of growing these beautiful flowers. By following the right techniques and timing, you can ensure successful germination and healthy seedlings. Here’s how to sow sweet pea seeds:
1. Choose the Right Time: Sweet peas are cool-season plants that prefer to grow in spring or fall. In most regions, it’s best to sow seeds in early spring after the last frost has passed. However, in areas with mild winters, fall sowing is also possible for early blooms in the following year.
2. Soak the Seeds: Before sowing, soak the sweet pea seeds in water for about 24 hours. This helps soften the hard seed coat and encourages faster germination.
3. Prepare Seed Pots or Trays: Fill seed pots or trays with a good quality, well-draining seed starting mix. Moisten the mix slightly before sowing the seeds to create a moist environment for germination.
4. Sow the Seeds: Make a small hole in the soil with your finger or a pencil, about 1 inch deep. Place a soaked seed into the hole, and cover it with soil. Space the seeds about 2 to 3 inches apart to give each seedling enough room to grow.
5. Water the Seeds: After sowing, water the pots or trays gently to ensure the seeds are well-moistened. Avoid overwatering, as excessive moisture can lead to rotting or fungal diseases.
6. Provide Optimal Conditions: Place the seed pots or trays in a warm, bright location such as a sunny windowsill or a greenhouse. The ideal temperature for germination is around 60 to 65°F (15 to 18°C). Ensure the location is well-ventilated to prevent damping-off or fungal issues.
7. Maintain Moisture: Check the soil moisture regularly and mist the seedlings if the top layer of soil feels dry. Be careful not to overwater, as this can cause root rot. A fine mist spray bottle is ideal for watering delicate seedlings.
By following these steps, you’ll give your sweet pea seeds the best chance at germination and healthy growth. With a little patience and care, you’ll soon see the lovely seedlings emerge, ready to grow into beautiful sweet pea plants.
Caring for Sweet Pea Seedlings
Once your sweet pea seedlings emerge, it’s important to provide them with proper care to ensure strong and vigorous growth. By following a few essential care practices, you’ll help your seedlings thrive and prepare them for planting in the garden. Here are some guidelines for caring for sweet pea seedlings:
1. Provide Ample Light: Place your sweet pea seedlings in a well-lit area that receives around 12-14 hours of sunlight per day. If natural light is limited, supplement with fluorescent grow lights placed a few inches above the seedlings.
2. Maintain Optimal Temperature: Sweet pea seedlings prefer cooler temperatures around 55-65°F (13-18°C) during the day and slightly cooler at night. Avoid exposing them to extreme heat or cold, as this can stunt their growth.
3. Water Carefully: Keep the soil slightly moist, but not soggy. Water the seedlings gently at the base to avoid causing damage to the delicate stems and leaves. Ensure proper drainage to prevent root rot or fungal diseases.
4. Thin out the Seedlings: As the seedlings grow and develop their second set of leaves, thin them out to give each plant enough space to grow. Space them at least 6 inches apart to allow for proper airflow and prevent overcrowding.
5. Fertilize Regularly: Sweet pea seedlings benefit from regular feeding. Apply a balanced liquid fertilizer every two weeks to provide a steady supply of nutrients. Follow the package instructions for the recommended dilution and application rate.
6. Pinch or Prune: Pinch or prune the tips of the seedlings when they have developed a few sets of leaves. This encourages bushier growth and more flowering stems. Simply pinch off the top 1 inch of the main stem to stimulate branching.
7. Harden off the Seedlings: Before transplanting the seedlings into the garden, gradually acclimate them to the outdoor conditions. This process, known as hardening off, involves exposing them to increasing amounts of sunlight and outdoor temperatures over a week or so.
Caring for sweet pea seedlings requires attention to their light, temperature, watering, and nutrition needs. By providing them with the necessary care, you’ll ensure healthy growth and robust plants that are ready to thrive in your garden.
Providing Support for Growing Sweet Peas
As your sweet pea plants grow, they will need proper support to keep them upright and prevent them from sprawling on the ground. Providing the right support not only helps them reach their full potential but also enhances the overall appearance of your garden. Here are some methods to support your growing sweet peas:
1. Trellis or Obelisk: Install a trellis or obelisk structure near your sweet pea plants. This vertical support system allows the plants to climb and twine their tendrils around the structure, aiding their growth upwards. Ensure the trellis is sturdy and tall enough to accommodate the height of mature sweet pea plants.
2. Netting or Mesh: Attach a netting or mesh against a wall or fence where your sweet peas are growing. This creates a vertical framework for the plants to latch onto and climb. Secure the netting at regular intervals to prevent sagging and to provide ample support for the climbing vines.
3. Bamboo Canes or Stakes: Insert bamboo canes or stakes into the ground near your sweet pea plants. As the plants grow, gently tie the stems to the canes or stakes using soft plant ties or twine. This method helps keep the plants upright and prevents them from bending or breaking under their weight.
4. Pea Sticks: Another traditional method for supporting sweet peas is by using natural pea sticks. These are straight, twiggy branches collected from deciduous trees or shrubs. Push the sticks into the ground around the plants, creating a framework for them to grow through. The plants will naturally twine around the sticks as they grow, providing support as well as a rustic charm.
5. Fence or Wall: If your sweet pea plants are growing near a sturdy fence or wall, they can be trained to climb it. Attach small hooks or wire to the structure and gently guide the plant’s tendrils to latch onto the support. Regularly check and adjust the growing vines to ensure they are properly secured.
6. Regular Monitoring and Adjustments: Pay attention to your sweet pea plants as they grow and periodically check their support structures. As the plants reach for the support, guide their tendrils towards it or gently tie them if needed. Regularly trim away any excess growth that may become tangled or overwhelmed.
Providing proper support for growing sweet peas is essential to help them reach their full potential and create a stunning display in your garden. Choose the support method that best suits your needs and garden space, and ensure regular monitoring and adjustments to maintain the plants’ stability and health.
Watering and Feeding Sweet Peas
Proper watering and feeding are crucial for the healthy growth and blooming of sweet peas. These plants require consistent moisture and a balanced supply of nutrients to thrive. Here are some guidelines for watering and feeding your sweet peas:
1. Watering: Sweet peas prefer consistently moist soil. Water them deeply and thoroughly, ensuring that the soil is evenly moist but not waterlogged. Avoid overhead watering, as this can lead to disease issues. Aim to water at the base of the plants to keep the foliage dry. Increase watering during dry spells or hot weather, but be careful not to overwater, as it can cause root rot.
2. Mulching: Mulching around the base of sweet pea plants helps conserve moisture, suppresses weed growth, and regulates soil temperature. Apply a 2-3 inch layer of organic mulch, such as straw or shredded leaves, around the plants, taking care to avoid directly touching the stems. This will help retain moisture and reduce the frequency of watering.
3. Feeding: Sweet peas are heavy feeders and benefit from regular feeding. Start by incorporating organic matter, such as compost or well-rotted manure, into the soil before planting. As the plants grow, apply a balanced liquid fertilizer every two to three weeks during the growing season. Follow the instructions on the fertilizer package for the proper dilution and application rate.
4. Nitrogen Boost: Sweet peas appreciate a nitrogen boost early in their growth to encourage lush foliage and robust flowering. You can use a nitrogen-rich fertilizer or apply a side dressing of well-balanced granular fertilizer with a higher nitrogen content. Be sure to follow the recommended application instructions and avoid overfeeding, as excessive nitrogen can lead to vigorous leaf growth but fewer flowers.
5. Foliar Feeding: To supplement the regular feeding, you can also foliar feed sweet peas. Mix a balanced liquid fertilizer with water and apply it directly to the leaves using a spray bottle or sprayer. This provides a quick dose of nutrients and can help address any deficiencies.
6. Regular Inspections: Keep a close eye on your sweet pea plants for any signs of nutrient deficiencies or watering issues. Yellowing leaves or stunted growth may indicate a lack of nutrients, while wilting or drooping foliage may signal insufficient watering. Adjust your watering and feeding practices accordingly to address any deficiencies or imbalances.
By providing adequate water and nutrient supply, you’ll ensure strong, healthy sweet pea plants with abundant blooms. Regular monitoring and adjustments to their watering and feeding needs will help your sweet peas thrive throughout the growing season.
Protecting Sweet Peas from Pests and Diseases
Sweet peas, like any other plants, can be susceptible to pests and diseases that can hinder their growth and flowering. By implementing preventive measures and practicing good garden hygiene, you can protect your sweet peas and ensure their health and vitality. Here are some tips for protecting sweet peas from pests and diseases:
1. Aphids: Aphids are common pests that feed on the sap of sweet pea plants, causing stunted growth and distorted leaves. Regularly inspect your plants for aphids and manually remove them by spraying a strong stream of water or by wiping them off with a damp cloth. In severe cases, use organic insecticidal soap or neem oil as a last resort.
2. Slugs and Snails: These slimy creatures can munch on sweet pea foliage, leaving behind ragged edges and holes. To deter slugs and snails, create physical barriers like copper tape around the base of the plants or surround them with diatomaceous earth. Beer traps and handpicking can also be effective organic control methods.
3. Powdery Mildew: Powdery mildew is a fungal disease that appears as white powdery patches on the leaves of sweet peas. To prevent powdery mildew, ensure proper airflow around the plants by spacing them adequately and removing any dense foliage. If necessary, use fungicidal sprays specifically formulated for powdery mildew control.
4. Botrytis Blight: Botrytis blight, also known as gray mold, is a common fungal disease that causes browning and decaying of sweet pea flowers and foliage. Avoid over-watering and provide good air circulation by removing dead or dying plant material. If necessary, treat with fungicides labeled for botrytis blight control.
5. Virus Diseases: Sweet peas can be affected by virus diseases transmitted by aphids or contaminated tools. To prevent virus infections, practice good garden hygiene, including disinfecting tools between plants and regularly scouting for aphids to prevent their spread.
6. Healthy Plant Practices: Maintaining the overall health of your sweet pea plants is crucial in preventing pests and diseases. Provide optimal growing conditions, including well-draining soil, proper spacing, and adequate sunlight. Remove any infected or diseased plants promptly to prevent the spread to healthy ones.
7. Monitor Regularly: Inspect your sweet pea plants regularly for any signs of pests or diseases. Early detection allows for prompt action and reduces the risk of severe infestations or infections. Stay vigilant and take appropriate measures as soon as you notice any issues.
By following these preventive measures and maintaining good garden practices, you can safeguard your sweet peas from pests and diseases, ensuring they thrive and reward you with beautiful blooms throughout the season.
Harvesting Sweet Pea Flowers
Harvesting sweet pea flowers is an exciting moment for gardeners as they get to enjoy the beautiful blooms they’ve nurtured. Timing is essential when it comes to harvesting sweet peas to ensure the flowers are at their peak freshness and fragrance. Here are some guidelines for harvesting sweet pea flowers:
1. Select the Right Time: Sweet pea flowers should be harvested when they are fully open, but before they start to fade or drop petals. The best time to harvest is in the early morning or evening when the blossoms are at their most vibrant.
2. Use Clean Tools: Before harvesting, make sure your cutting tools, such as sharp scissors or garden pruners, are clean and sharp. This helps prevent damage to the plant and ensures clean cuts that promote better water uptake in the vase.
3. Cut the Stems: Select the sweet pea stems that have multiple open flowers. Cut the stem at a diagonal angle just above a leaf node or bud joint. This encourages the plant to produce more blooms and prevents water from pooling on the cut surface.
4. Remove Excess Foliage: Strip off any leaves and tendrils that would be submerged in water when arranging the flowers. Leave a few leaves at the top of the stem to maintain some foliage for continued growth and energy production for the plant.
5. Place in Water Immediately: After cutting, immediately place the sweet pea stems in a bucket of clean water. This helps prevent dehydration and ensures the flowers stay fresh for longer. Take them indoors as soon as possible for arranging or display.
6. Enjoy Floral Fragrance: Sweet pea flowers are not only visually stunning but also known for their delightful fragrance. Place the bouquets or arrangements in areas where their fragrance can be appreciated, such as living rooms, kitchens, or bedrooms.
7. Continual Harvesting: To encourage further blooming, continue to harvest sweet pea flowers regularly. The more you harvest, the more the plant will produce new blossoms. Snip off spent blooms to prevent seed pod development and redirect energy toward new flower production.
Remember, sweet pea flowers are fragile and have a shorter vase life compared to other flowers. However, their beauty and fragrance make them well worth it. With proper timing and care, you can enjoy a bountiful harvest of sweet pea flowers throughout the blooming season.
Storing and Saving Sweet Pea Seeds
One of the joys of growing sweet peas is the opportunity to save their seeds for future planting. Storing and saving sweet pea seeds allows you to preserve your favorite varieties and share them with other gardening enthusiasts. Here’s a guide on how to store and save sweet pea seeds:
1. Choose Ripe Pods: Wait until the sweet pea pods are fully matured and dry on the vine before harvesting the seeds. The pods should turn brown and feel crisp to the touch. Avoid harvesting seeds from green or immature pods as they are unlikely to germinate.
2. Collect the Seeds: Gently open the dried sweet pea pods and carefully remove the seeds. The seeds are typically dark in color, round or wrinkled, and about the size of a pea. Remove any debris or chaff from the seeds, ensuring that only clean seeds are collected.
3. Air Dry the Seeds: Place the seeds in a dry and well-ventilated area to allow them to further air dry. This helps to remove any remaining moisture, which can cause the seeds to mold or rot during storage. It usually takes about two weeks for the seeds to completely dry.
4. Store in a Cool, Dry Place: Once the sweet pea seeds are thoroughly dry, transfer them into airtight containers, such as small envelopes, glass jars, or sealable plastic bags. Label each container with the variety name and the date of collection. Store the containers in a cool, dry location away from direct sunlight.
5. Maintain Consistent Temperature: Sweet pea seeds remain viable for several years if stored under ideal conditions. Aim for a storage temperature between 32-41°F (0-5°C) to ensure the best preservation. Avoid fluctuating temperatures, as this can reduce the seed’s germination rate.
6. Test Germination Rate: Before sowing the saved sweet pea seeds, perform a germination test to assess their viability. Place a few seeds on a damp paper towel or in a small container with moistened soil. Keep them in a warm and bright location. If the seeds sprout within a week or two, it indicates that they are still viable.
7. Share and Exchange: Sweet pea seeds make wonderful gifts for fellow gardeners and can be exchanged with others who share your passion for these flowers. Consider participating in seed swaps or offering them to friends and gardening communities to spread the joy of growing sweet peas.
Remember, saving sweet pea seeds allows you to preserve their unique characteristics and continue the legacy of your favorite varieties. By following these steps and proper storage techniques, you can enjoy growing sweet peas from your very own saved seeds for years to come.