
Choosing the right rug
When it comes to painting an area rug, choosing the right one is crucial. The type of rug you select will greatly impact the overall outcome of your project. Here are a few factors to consider when choosing the perfect rug:
- Size: Measure the area where you plan to place the rug and determine the appropriate size. Consider the dimensions of the room and the furniture placement to ensure a proper fit.
- Material: Pay attention to the material of the rug. Natural fibers like wool or cotton tend to absorb paint better than synthetic materials. Opt for a rug with a tight weave to ensure a smooth painting surface.
- Color: Choose a rug color that complements your interior design and the overall theme of the room. Lighter or neutral-colored rugs provide a blank canvas for your painting project, while darker rugs can create a bold and vibrant effect.
- Texture: Consider the texture of the rug. Rough textures may be trickier to paint on, while smoother surfaces allow for more precise brush strokes and detailing.
- Pattern: Think about any existing patterns on the rug and how they will interact with your desired design. If you prefer a more abstract or geometric pattern, a solid-colored rug might be the best choice.
By carefully considering these factors, you can select a rug that is not only suitable for painting, but also aligns with your personal style and the ambiance you want to create in your space.
Gathering the supplies
Before you start your area rug painting project, it’s essential to gather all the necessary supplies. Having everything you need at hand will make the process smoother and more enjoyable. Here is a list of supplies you will need:
- Paint: Choose a high-quality acrylic or fabric paint that is suitable for your rug’s material. Consider the colors you want to use in your design and ensure you have enough paint for the entire project.
- Paintbrushes: Invest in a variety of brushes in different sizes. A flat brush works well for base coats and larger areas, while smaller brushes are ideal for adding intricate details.
- Painter’s tape: Use painter’s tape to create clean lines and borders on your rug. This will help you achieve precise designs and prevent paint from bleeding into unwanted areas.
- Drop cloth or plastic sheet: Lay down a drop cloth or plastic sheet to protect your work surface from any potential paint spills or drips.
- Pencil or chalk: Use a pencil or chalk to lightly sketch out your design on the rug before applying paint. This will serve as a helpful guide during the painting process.
- Palette or paint tray: Pour your paint colors onto a palette or paint tray to make them easily accessible while you work. This will allow you to mix and blend colors as needed.
- Sealant: Once your painting is complete, you will need a sealant to protect your design and ensure its longevity. Choose a suitable sealant based on your rug’s material.
By having these supplies ready, you can confidently embark on your area rug painting journey and create a beautiful and personalized rug that reflects your own unique style.
Preparing the rug
Before you start painting your area rug, it’s essential to prepare the surface to ensure optimal paint adhesion and a smooth finish. Follow these steps to properly prepare your rug:
- Clean the rug: Begin by thoroughly cleaning the rug. Vacuum it to remove any dirt, dust, or debris. If there are any stains or spills, spot treat them using a mild detergent and warm water. Allow the rug to dry completely before proceeding.
- Smooth out wrinkles or creases: If your rug has any wrinkles or creases, use heavy objects like books or furniture to flatten them out. This will create a level painting surface and prevent the paint from pooling in certain areas.
- Tape down edges: Secure the edges of the rug with painter’s tape to prevent it from shifting or curling while you paint. This will help you achieve clean and crisp lines in your design.
- Test the paint: Before applying paint to the entire rug, test it on a small inconspicuous area or a scrap piece of the same material. This will allow you to determine how the paint interacts with the rug and make any necessary adjustments.
By taking the time to properly prepare your rug, you’ll ensure that the painting process goes smoothly and that the final result is both visually appealing and long-lasting. Proper preparation will help the paint adhere well to the rug’s surface and prevent any unwanted issues during the painting process.
Choosing a design
When it comes to painting an area rug, choosing a design is where you can let your creativity shine. The design you choose will be the focal point of your rug and can completely transform the look and feel of your space. Here are some tips to help you choose the perfect design:
- Consider your style: Think about your personal style and the overall aesthetic you want to achieve in your room. Do you prefer a classic, minimalist, or bohemian look? This will guide you in choosing a design that complements your style.
- Take inspiration from your surroundings: Look around your room and draw inspiration from the existing design elements. Consider the colors, patterns, and motifs already present in the space, and incorporate them into your rug design to create a cohesive look.
- Be mindful of scale: Consider the scale of your design in relation to the size of the rug. Large-scale patterns may overwhelm a small rug, while intricate details might get lost on a larger rug. Find a balance that suits the proportions of your rug.
- Create a theme: Think about creating a theme or a story with your rug design. This could be inspired by nature, art, or even a specific era. A themed design adds an extra layer of depth and interest to your rug.
- Experiment with shapes and placement: Don’t feel restricted to traditional rectangular or square designs. Consider incorporating different shapes like circles or triangles, or even playing with asymmetry. Experiment with the placement of your design elements to create a visually engaging composition.
Remember, your rug design should reflect your personality and create a statement in your space. Take your time exploring different ideas, sketching them out, and finding inspiration from various sources like magazines, websites, or artwork. By carefully considering your options and selecting a design that resonates with you, you’ll create a one-of-a-kind rug that enhances the ambiance of your room.
Preparing for painting
Before diving into the painting process, there are several important steps to take in order to properly prepare for the project. By following these steps, you can ensure that your painting process goes smoothly and that the end result is a beautifully painted area rug:
- Choose a well-ventilated area: Find a well-ventilated area to work in. Open windows or doors to allow for proper air circulation, as paint fumes can be potent.
- Protect your work surface: Lay down a drop cloth or plastic sheet to protect the surface you’ll be working on. This will catch any paint spills or drips, making cleanup much easier.
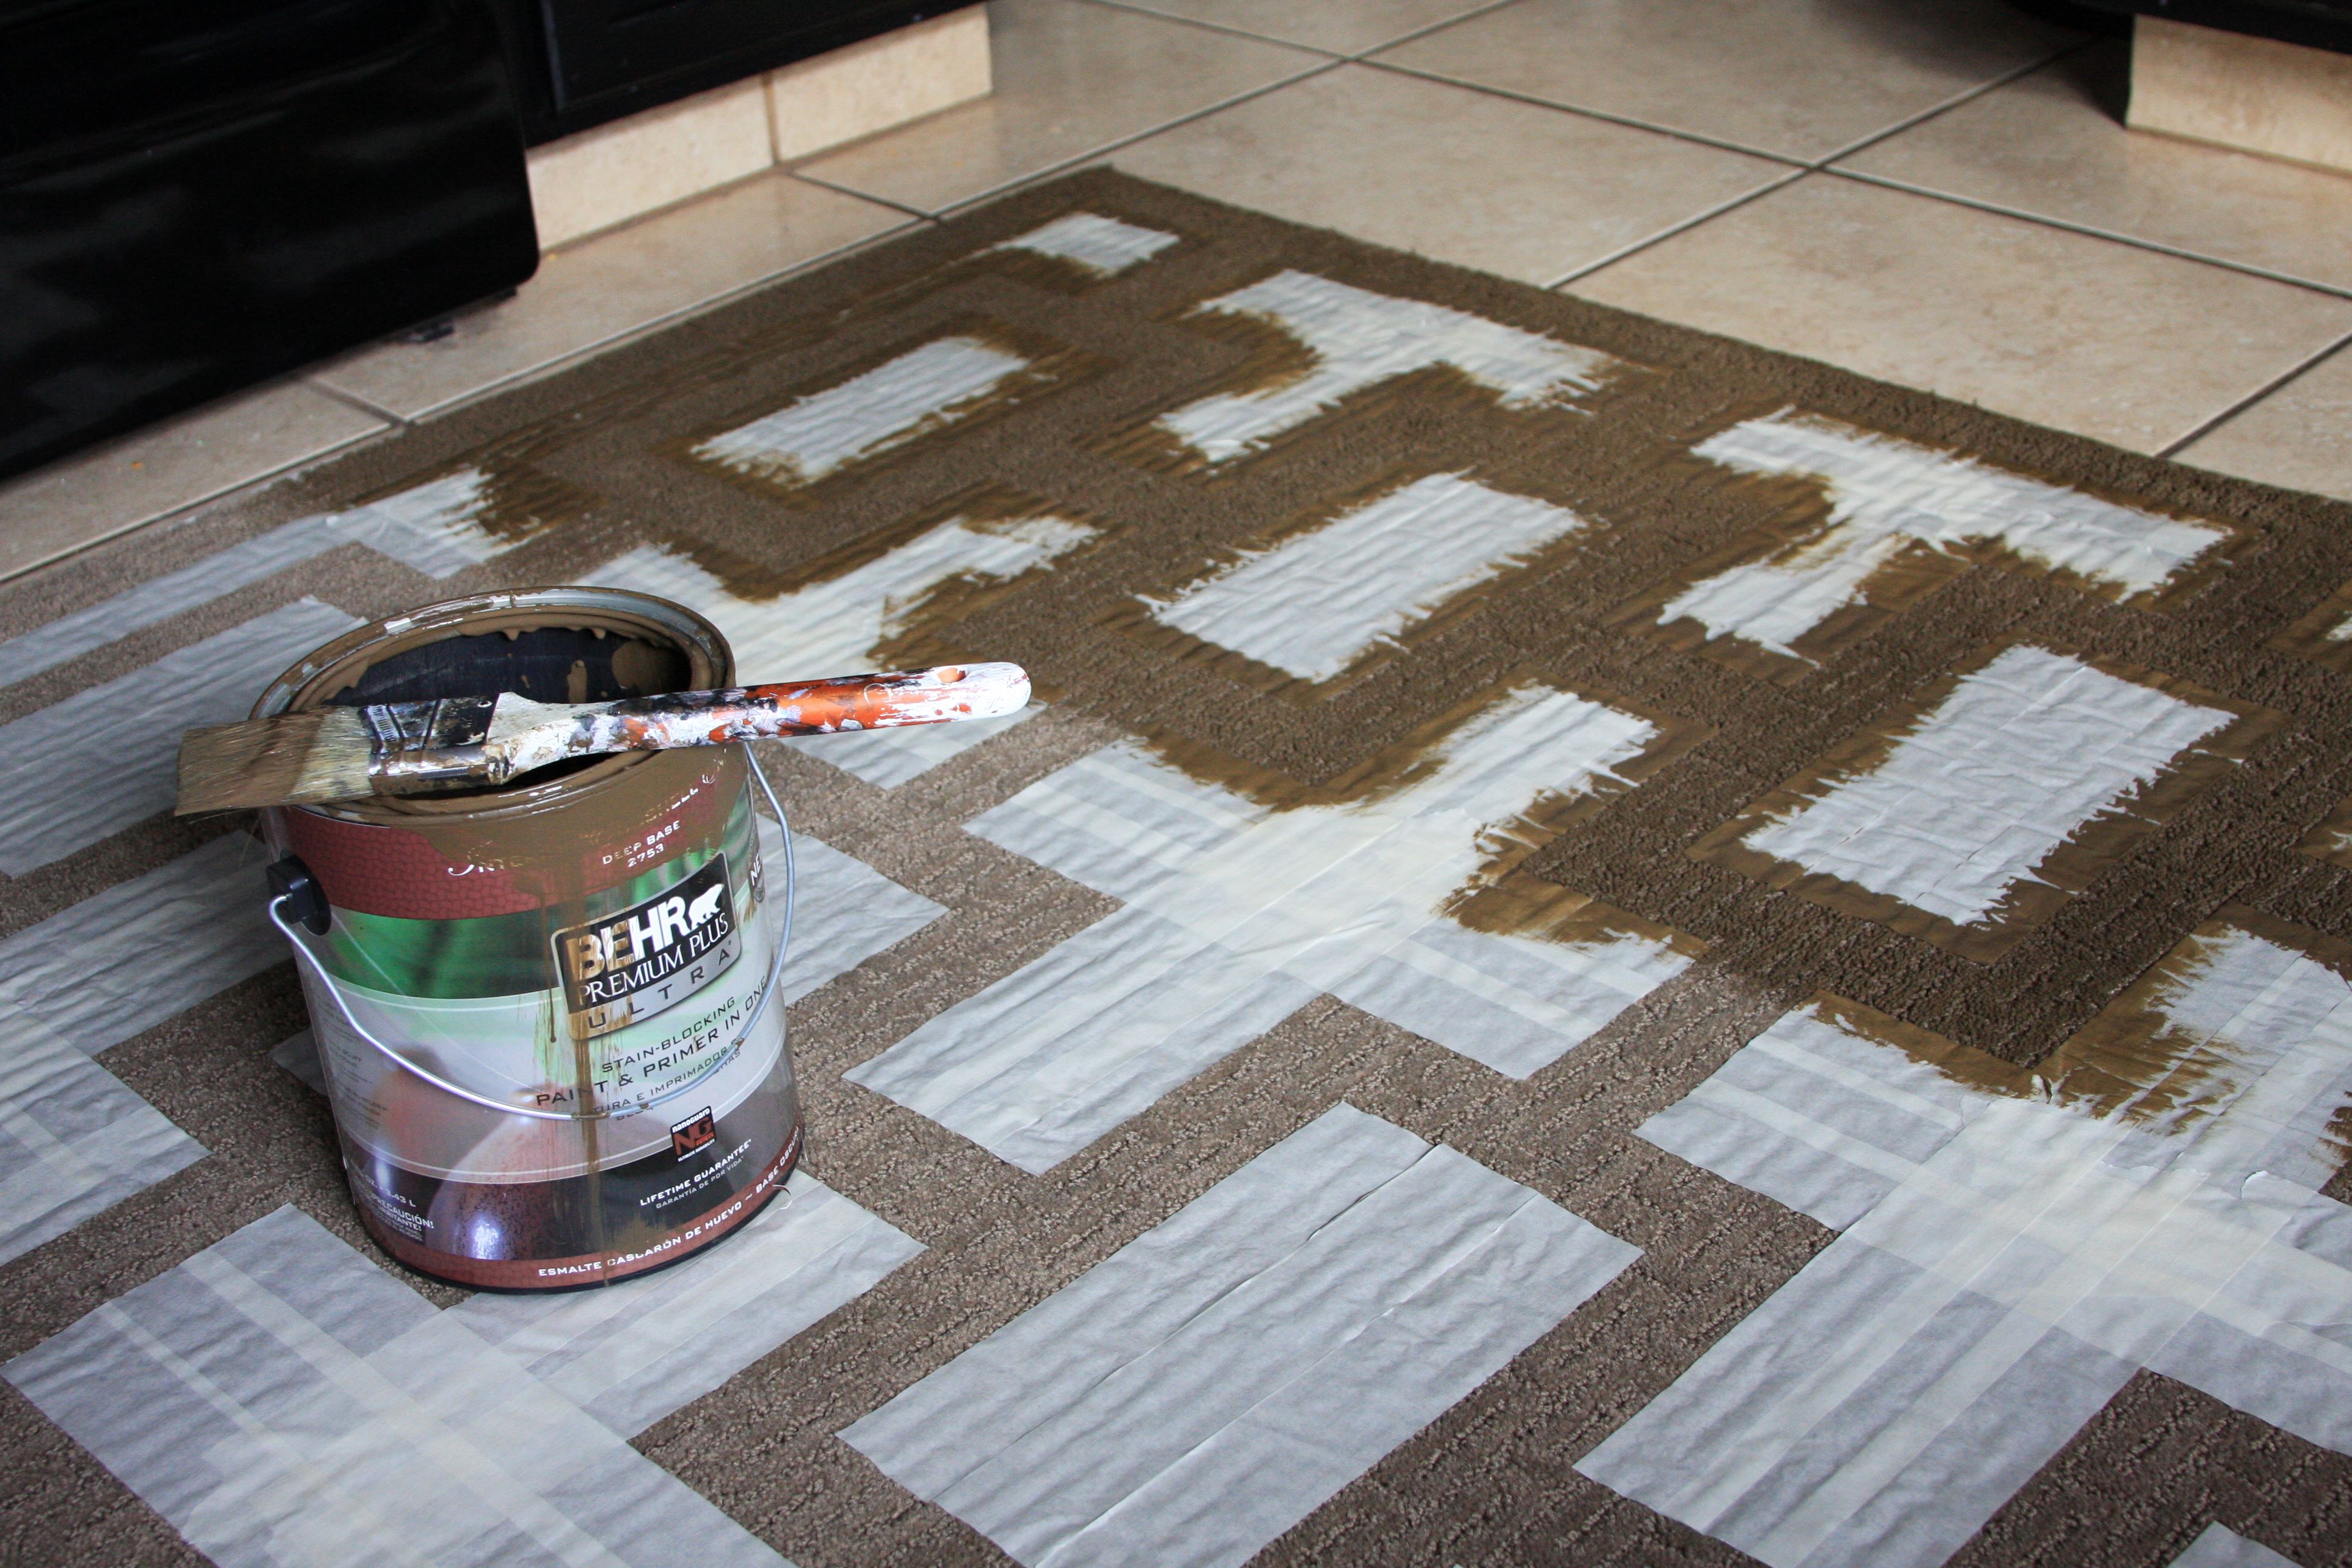
- Secure the rug: Place painter’s tape along the edges of the rug to secure it in place and prevent it from shifting while you paint. This will help you achieve clean lines and a professional finish.
- Prepare your paint: If needed, mix your paint colors according to the design you have chosen. Use a palette or paint tray to keep your colors organized and easily accessible as you work.
- Sketch out your design: With a pencil or chalk, lightly sketch out your design on the rug. This will serve as a helpful guide while painting and ensure you stay on track with your vision.
- Start with a base coat: Before adding details or patterns, apply a base coat of paint to the entire rug. This will provide a solid foundation for your design and help the colors appear more vibrant.
- Let the paint dry: Once you’ve finished painting, allow the rug to dry completely. Follow the drying time specified on the paint labels to ensure that the paint sets properly.
- Remove painter’s tape: Once the paint has dried, carefully remove the painter’s tape from the edges of the rug. This will reveal crisp and clean lines in your design.
By taking the time to properly prepare for the painting process, you’ll set yourself up for success and achieve the best possible results. These steps ensure that your painting environment is safe and organized, and that you have everything you need at hand to create a stunning painted area rug.
Mixing the paint
Once you’ve chosen your paint colors for your area rug project, the next step is to mix the paint properly. Mixing the paint ensures that you achieve the desired shades and consistency for your design. Here are some tips for mixing the paint effectively:
- Gather your materials: Start by gathering all the necessary materials, including your paint colors, palette or paint tray, and brushes.
- Use separate containers: If you’re mixing different colors to create custom shades, use separate containers for each individual color. This allows you to control the ratio of each color and helps you achieve consistency in your design.
- Start with small amounts: It’s always best to start with small amounts of paint and gradually add more as needed. This allows for better control over the color and prevents wastage of paint.
- Mix thoroughly: Use a clean brush or a palette knife to mix the paint colors together. Make sure to thoroughly blend the colors until you achieve a smooth and consistent shade. Take your time and be patient during this process.
- Test the paint: Before applying the mixed paint to your rug, test it on a small inconspicuous area or on a scrap piece of the same material. This will allow you to ensure that the color is what you envisioned and make any necessary adjustments.
- Keep track of your paint ratios: If you’re mixing specific ratios of paint colors for a particular design, make a note of the ratios used. This will help you replicate the color if you need to mix more paint later on.
- Mix as you go: If you need to mix additional paint during the project, try to match the color as closely as possible to your existing mix. Mixing paint as you go helps maintain color consistency throughout your design.
By following these steps and guidelines, you’ll be able to mix your paint effectively and achieve the desired colors for your area rug. Mixing the paint properly will ensure that your design looks cohesive and professional, enhancing the overall aesthetic of your space.
Painting the base coat
Painting the base coat is an essential step in the process of creating a painted area rug. The base coat acts as the foundation for your design and provides a solid background for the colors and patterns that will be added later. Here’s how to effectively paint the base coat:
- Prepare your rug: Ensure that your rug is clean and properly prepared before starting. Make sure it is free from any dirt, dust, or stains.
- Choose your color: Select the color for your base coat. This color should complement your overall design and enhance the other colors that will be added later.
- Use a large brush: Use a large brush, such as a flat brush or a roller, to apply the base coat. This will help you cover a larger area quickly and efficiently.
- Start at one corner: Begin painting the base coat from one corner of the rug. Work in small sections at a time to ensure that the paint is applied evenly.
- Apply multiple coats if needed: Depending on the color and opacity of the paint, you may need to apply multiple coats for a more solid and even base. Allow each coat to dry before applying the next one.
- Blend the edges: To create a seamless transition, blend the edges of each painted section with the adjacent section. This will help avoid any visible lines or unevenness in the base coat.
- Ensure even coverage: Make sure that the base coat is evenly applied to the entire rug. Pay attention to any areas that may require more coverage or touch-ups.
- Allow the base coat to dry completely: Once you have achieved the desired coverage and finish for your base coat, allow it to dry completely before proceeding with the next steps of your design.
Painting the base coat sets the stage for the rest of your design. It provides a solid background and allows the subsequent layers of paint and patterns to stand out. Take your time with this step to ensure a smooth and well-covered base that will beautifully showcase the final design of your painted area rug.
Adding patterns or designs
Once you’ve painted the base coat of your area rug, it’s time to unleash your creativity and start adding patterns or designs to make your rug truly unique. Here are some tips and techniques to help you effectively add patterns or designs:
- Plan your design: Before you begin, have a clear plan in mind for the patterns or designs you want to incorporate. You can sketch your design on paper or lightly mark it on the base-coated rug using a pencil or chalk.
- Use painter’s tape: Painter’s tape is an incredibly useful tool for creating clean and precise lines or shapes. Use it to mask off areas you want to keep unpainted or to form distinct borders between different patterns.
- Experiment with stencils: Stencils provide an easy way to add intricate or repetitive designs to your rug. You can either purchase ready-made stencils or create your own by cutting out patterns on cardboard or acetate sheets.
- Try freehand painting: If you’re confident in your painting skills, you can opt to freehand paint your patterns or designs directly onto the rug. This allows for more spontaneity and creative expression.
- Use different brush sizes: Depending on the size and intricacy of your patterns, select brushes of different sizes. Small brushes are great for detailed work, while larger brushes are more suited for broader strokes.
- Layer and blend colors: Experiment with layering and blending different paint colors together to create depth and dimension in your designs. This technique can add interest and give your rug a more dynamic appearance.
- Add texture or shading: For a more tactile effect, consider adding texture to your designs. You can achieve this by lightly dabbing or stippling the paint with a sponge or using a brush with varying pressure.
- Take breaks and step back: Painting patterns or intricate designs can be time-consuming. Take breaks and step back periodically to assess your progress and make any necessary adjustments.
Adding patterns or designs is the exciting part of the painting process where you can truly make your area rug a personalized masterpiece. Whether using stencils, painter’s tape, or freehand techniques, embrace your artistic side and have fun creating patterns and designs that reflect your style and creativity.
Letting the paint dry
Once you have finished painting the patterns or designs on your area rug, it’s important to allow the paint to dry completely. Proper drying ensures that the colors set and adhere to the rug’s surface, preventing smudging or smearing. Here are some essential steps to follow when letting the paint dry:
- Check the paint label: Refer to the paint label or manufacturer’s instructions for the recommended drying time. Different types of paint may require varying amounts of time to dry fully.
- Provide adequate ventilation: Ensure that the area where you painted the rug is well-ventilated. Open windows or use fans to promote air circulation, helping the paint to dry faster.
- Avoid touching the paint: While the paint is drying, avoid touching or disturbing the painted areas. This can cause smudging or lead to imperfections in the design.
- Keep the rug flat: Make sure the rug remains flat during the drying process. Avoid folding or rolling the rug until the paint is completely dry to prevent any unwanted creases or wrinkles.
- Allow sufficient drying time: Be patient and allow the paint to dry for the recommended duration. Rushing the drying process may compromise the quality and longevity of your painted area rug.
- Test the dryness: If you are unsure whether the paint has dried completely, perform a touch test on a discreet area of the rug. If the paint feels dry and does not transfer onto your fingers, it is likely ready.
- Provide extra drying time if necessary: Depending on the humidity and temperature in your area, the drying time may exceed the recommendations. In such cases, it’s better to allocate extra time to ensure proper drying.
By allowing the paint sufficient drying time, you ensure that your beautifully designed area rug will be ready to withstand daily use and maintain its vibrant appearance for years to come. Patience during the drying process ensures the best results and a rug that you can enjoy in your home.
Applying a sealant
Once the paint on your area rug has fully dried, it’s important to apply a sealant to protect your design and enhance its durability. A sealant acts as a protective barrier, preventing the paint from chipping, fading, or being damaged by regular use. Here’s how to apply a sealant to your painted area rug:
- Choose the right sealant: Select a sealant specifically designed for the type of paint and material of your rug. This ensures compatibility and maximizes the effectiveness of the sealant.
- Prepare the rug: Ensure that the rug is clean and free from any dust or debris. If necessary, lightly wipe the surface with a damp cloth to remove any particles that may affect the sealant’s application.
- Read the instructions: Carefully read and follow the instructions provided with the sealant. Different sealants may have specific application techniques and drying times.
- Apply the sealant: Use a clean brush or roller to apply the sealant evenly over the painted surface of the rug. Work in small sections, ensuring complete coverage without excessive build-up.
- Follow the drying time: Allow the sealant to dry completely according to the instructions. This typically ranges from a few hours to a full day, depending on the sealant you use.
- Apply multiple coats if necessary: If desired, you can apply multiple coats of sealant for added protection. Make sure to follow the recommended drying time between each coat.
- Be mindful of drying conditions: Provide adequate ventilation and ensure a dust-free environment while the sealant is drying to avoid any particles adhering to the surface.
- Allow for curing time: After the final coat of sealant has dried, allow for an additional curing time as recommended by the product. Curing time ensures that the sealant fully sets and hardens for maximum protection.
Applying a sealant to your painted area rug not only safeguards your design but also extends its lifespan. This protective layer helps preserve the colors, prevents fading, and makes the rug easier to clean and maintain over time. By following these steps, you can ensure that your painted area rug remains vibrant and beautiful for years to come.
Repeating the process if necessary
After applying the sealant and allowing it to dry and cure, it’s time to assess the final outcome of your painted area rug. Depending on the desired effect, you may find that repeating the painting process is necessary. Here are a few reasons why you might consider repeating the process and some guidelines to keep in mind:
- Color intensity: If you feel that the colors on your rug are not as vibrant or bold as you envisioned, you can repeat the painting process to intensify the colors. Apply additional coats of paint to achieve the desired saturation and richness.
- Pattern refinement: If you are not satisfied with the precision or overall appearance of your patterns or designs, repeating the process allows you to refine and perfect them. Take this opportunity to make any necessary adjustments or add more intricate details.
- Fixing mistakes or imperfections: If you notice any mistakes, smudges, or imperfections in your painted area rug, repeating the process can help you rectify those issues. Sand down or lightly buff any uneven areas before applying additional coats of paint.
- Layering or adding depth: Repeating the process gives you the opportunity to add layers or depth to your design. Consider adding shading, texture, or highlighting certain areas to create a more dynamic and visually interesting rug.
- Experimenting with new ideas: Repeating the painting process allows you to explore new ideas or try different techniques. Use this opportunity to unleash your creativity and incorporate fresh elements into your design.
When repeating the process, it’s important to assess the current state of your rug and carefully plan the changes you want to make. Take the time to evaluate the colors, patterns, and overall effect before proceeding with additional coats of paint. Remember to allow sufficient drying and curing time after each application.
Repeating the process is a chance to refine and enhance your painted area rug. It allows you to achieve the desired outcome and ensures your artwork meets or even exceeds your expectations. Embrace this opportunity and strive for a result that truly showcases your creativity and craftsmanship.
Enjoying your new painted area rug
Now that you have completed the process of painting your area rug, it’s time to step back and admire your creative masterpiece. Your new painted area rug is a unique and personalized addition to your space, reflecting your style and artistic expression. Here are some ways to fully enjoy and make the most of your new painted area rug:
- Showcase it as a focal point: Place your painted area rug in a prominent area of your room to make it a focal point. Let its vibrant colors and intricate designs draw attention and become a conversation starter.
- Complement your décor: Coordinate the rest of your room’s décor to harmonize with your painted area rug. Choose furniture, accessories, and colors that enhance and complement the rug, creating a cohesive and visually appealing space.
- Experiment with different placements: Don’t be afraid to move your painted area rug around and experiment with different placements. Try it in various rooms or switch it up within the same space to give your interior design a fresh look.
- Take proper care of your rug: Preserve the beauty and longevity of your painted area rug by taking proper care of it. Vacuum regularly to prevent dirt and dust buildup, blot spills immediately, and avoid placing heavy furniture directly on it.
- Share your masterpiece: Share your creation with friends, family, or on social media. Let others appreciate your artistic talent and gain inspiration from your painted area rug.
- Make it a cherished keepsake: Treat your painted area rug as more than just a decorative item. Consider it a cherished keepsake, a visual representation of your creativity and the time and effort you invested in its creation.
- Embrace the imperfections: Remember that hand-painted rugs may have slight variations and imperfections, which add to their uniqueness and charm. Embrace these individual characteristics as part of the artistic nature of your rug.
- Upgrade over time: As your style and tastes evolve, don’t be afraid to update or modify your painted area rug. You can add new designs, change colors, or update patterns to reflect your changing preferences and keep your space fresh.
Your new painted area rug is not only a beautiful addition to your home but also a reflection of your creative spirit. Embrace its presence and enjoy the sense of fulfillment that comes with transforming a simple rug into a work of art. Let it inspire and uplift your living space while bringing joy to your everyday life.