
Choosing the Right Rug for Painting
Painting a rug can be a fantastic way to add a unique and personal touch to your home decor. However, not all rugs are suitable for painting. It’s essential to choose the right type of rug for your project to ensure the best results. Here are some factors to consider when selecting a rug for painting:
Material: Opt for a rug made of a natural material like cotton or wool. These materials are ideal for painting as they absorb the paint well and provide a smooth surface for the colors to adhere to. Avoid synthetic fibers, as they may not hold the paint as effectively.
Texture: Look for a rug with a flat or low-pile texture. This type of surface is easier to paint on and allows for better control over brushstrokes and detailing. Avoid rugs with a high pile or shaggy texture, as the paint may not adhere as smoothly or evenly.
Color: Choose a rug with a light or neutral base color. Light-colored rugs provide a better background for the paint to stand out, and they also make it easier to correct any mistakes or make touch-ups. Neutral shades like white, beige, or light grey work well, but you can also experiment with other colors depending on your design preferences.
Size and Shape: Consider the size and shape of the rug. Larger rugs offer more space for creating intricate designs, while smaller rugs may be easier to handle, especially if it’s your first time painting a rug. Additionally, rectangular or square-shaped rugs are simpler to work with, but you can also explore round or oval rugs for a more unique look.
Condition: Inspect the rug for any damages or stains. It’s essential to start with a clean and well-maintained rug to achieve the desired results. Ensure that the rug is free of any loose fibers or imperfections that can impact the painting process.
By taking these factors into consideration, you can choose the perfect rug for painting. Remember, the right rug sets the foundation for a successful and visually appealing project. So, take your time in selecting a rug that meets your criteria and fits your artistic vision!
Gathering the Materials Needed
Before you begin painting your rug, it’s essential to gather all the necessary materials. Having everything prepared and within reach will make the process smoother and more enjoyable. Here’s a list of the materials you’ll need:
1. Rug: Choose the rug you’ve selected for painting, making sure it meets the criteria mentioned in the previous section.
2. Paints: Select high-quality fabric paints that are suitable for your rug’s material. Ensure they are colorfast and washable. Acrylic fabric paints work well for most rugs and provide vibrant and long-lasting results. Consider your color palette and choose paints that complement each other.
3. Paintbrushes: Invest in a variety of brushes in different sizes and shapes. Flat brushes are ideal for covering larger areas, while smaller round brushes are perfect for intricate details. Make sure the brushes are specifically designed for fabric painting to ensure optimal results.
4. Palette or Mixing Tray: You’ll need a palette or a mixing tray to mix and blend your paint colors. This will allow you to create different shades and tones for your design. A simple mixing tray made of plastic or ceramic will suffice.
5. Painter’s Tape: Painter’s tape is useful for creating clean and sharp lines in your design. It helps prevent colors from bleeding into unwanted areas and ensures precise edges. Use a low-tack painter’s tape to avoid damaging the rug’s surface when removing it.
6. Stencils or Templates: If you’re not confident in freehand painting, stencils or templates can be a helpful tool. They provide guidance and help you create consistent shapes and patterns. Look for stencils specifically designed for fabric painting or create your own using sturdy materials.
7. Water and Containers: Keep some water and containers nearby for rinsing and cleaning your brushes as you work. It’s essential to keep your brushes clean to prevent colors from mixing and to maintain the integrity of your design.
8. Protective Gear: Consider wearing an apron or old clothes to protect yourself from accidental paint splatters. It’s also a good idea to lay down a drop cloth or plastic sheet to protect your workspace.
9. Finisher or Sealer: Depending on the type of fabric paint you’re using, you may need a finisher or sealer to protect your design and make it washable. Follow the instructions provided by the paint manufacturer to determine if this step is necessary.
With these materials gathered and ready, you’re one step closer to creating your painted rug masterpiece. Having everything on hand will save you time and allow you to fully focus on the painting process. So, gather your supplies and let your creativity shine!
Preparing the Rug for Painting
Before you start painting your rug, it’s crucial to properly prepare it to ensure the best results. Here are the steps to follow to prepare your rug for painting:
1. Clean the Rug: Begin by thoroughly cleaning the rug to remove any dirt or dust. Vacuum the rug or shake it outside to get rid of loose debris. For stains or spots, spot clean the area using a mild detergent or stain remover specifically designed for the rug’s material. Allow the rug to dry completely before proceeding.
2. Avoid Creases: If your rug has creases or wrinkles, take steps to flatten it. You can use heavy objects like books or furniture to weigh down the corners and edges for a few days. Alternatively, you can place the rug under some heavy furniture to help smooth out any creases. The rug should be flat and taut before proceeding with the painting process.
3. Protect the Backside: Place a plastic sheet or drop cloth underneath the rug to protect the surface beneath it. This will prevent any accidental paint seepage and ensure that your work area stays clean.
4. Secure the Edges: Use painter’s tape to secure the edges of the rug to prevent them from curling up or fraying during the painting process. Make sure the tape adheres firmly but does not damage the rug’s fibers. This step will create clean and defined lines along the edges of your design.
5. Test the Paint: Before applying the paint directly to the rug, it’s a good idea to test it on a small, inconspicuous area of the rug or on a scrap piece of similar fabric. This will help you determine if the paint adheres well to the rug’s material and gives you an idea of the colors and effects you can achieve.
6. Plan Your Design: Take some time to plan and sketch out your design on paper. This will help you visualize the final outcome and make any necessary adjustments or revisions before starting. Consider the scale, placement, and composition of your design to ensure it fits well within the dimensions of your rug.
7. Ready your Workspace: Set up a comfortable and well-lit workspace for your painting project. Ensure good ventilation, as some paints may have fumes. Lay down your materials, including paints, brushes, palette, and stencils or templates if you’re using them, within easy reach. Organizing your workspace will enhance your efficiency and enjoyment during the painting process.
By properly preparing your rug, you’ll create a suitable canvas for your painting. Taking the time to clean the rug, flatten any wrinkles, and secure the edges will ensure a smooth and successful painting experience. So, get ready to unleash your creativity on your prepped rug!
Deciding on a Design or Pattern
Choosing the right design or pattern is an exciting part of the rug painting process. It’s an opportunity to infuse your creativity and personal style into the rug. Here are some tips to help you decide on a design or pattern that suits your vision:
1. Inspiration: Look for inspiration from various sources such as interior design magazines, websites, or even nature. Explore different art styles, patterns, and motifs that resonate with you. It could be geometric shapes, floral patterns, abstract designs, or even a combination of different elements.
2. Consider the Room: Take into consideration the room where the rug will be placed. Consider the existing color palette, furniture, and decor. Your design should complement these elements and tie the room together. You can either choose a design that harmonizes with the existing aesthetics or create a focal point by opting for a contrasting design.
3. Size and Scale: Determine the size and scale of your design. If you’re painting a large rug, consider creating a design that fills up the entire space. Smaller rugs may benefit from a more intricate and detailed pattern. Take measurements of your rug and sketch out the design on paper to ensure it fits well within the dimensions.
4. Sketch or Template: Start by drawing a rough sketch of the design on paper. This will give you a visual representation and allow you to make necessary adjustments. If you’re not confident in freehand drawing, consider using a stencil or template to guide you. There are various stencils available in different shapes and patterns that can help you achieve precision and consistency in your design.
5. Colors: Decide on the color scheme for your design. Consider the mood or ambiance you want to create in the room. Choose colors that complement each other and align with your overall vision. Experiment with different color combinations and shades until you find the perfect balance. Remember to incorporate the base color of your rug into the design to create harmony.
6. Personalization: Add a personal touch to your design by incorporating meaningful symbols, initials, or motifs that hold significance to you. It could be a representation of your heritage, a favorite quote, or a symbol that represents something important in your life. This will make the rug even more special and unique.
7. Mock-Up or Trial Run: Before diving straight into painting the entire rug, consider doing a mock-up or trial run of your design on a small piece of fabric or cardboard. This will allow you to test different color and pattern variations and make any necessary refinements before committing to the final design on the rug.
Ultimately, choose a design or pattern that speaks to you and reflects your personal style. Trust your instincts and let your creativity shine through. The decision-making process should be enjoyable and allow for exploration and self-expression. So, take your time, experiment, and have fun choosing the perfect design for your painted rug!
Transferring the Design onto the Rug
Once you have finalized your design or pattern, it’s time to transfer it onto the rug. This step is crucial in ensuring that your painting is accurate and well-executed. Here are some methods you can use to transfer your design onto the rug:
1. Freehand Drawing: If you have a steady hand and feel confident in your drawing skills, you can directly sketch your design onto the rug using a fabric pencil or chalk. Start with light and loose strokes to create a rough outline of the design. This method allows for spontaneity and a more organic feel to your painting.
2. Carbon Paper Tracing: Another method is using carbon paper to transfer the design onto the rug. Place the carbon paper between the design sketch and the rug, with the ink side facing down. Secure the edges of the design and the carbon paper with painter’s tape. Trace over the design with a pen or pencil, applying enough pressure to transfer the carbon ink onto the rug.
3. Stencil or Template: If you prefer a more precise and uniform design, use a stencil or template. Secure the stencil or template in place on the rug and trace over the openings with a fabric pencil or chalk. This will create a clean outline of your design, which you can then fill in with paint.
4. Projector Method: For more intricate or detailed designs, you can use a projector to project the image onto the rug. Simply place the projector at the desired distance and adjust the focus until the image is projected onto the rug. Trace the projected image with a fabric pencil or chalk to create the outline on the rug. This method is particularly useful for complex designs or patterns.
5. Grid Method: If you’re working with a large design, you can use a grid to transfer it onto the rug. Divide both your design and the rug into a grid of equal squares. Use this grid as a guide to accurately recreate the design square by square on the rug. This method ensures proportion and symmetry in your painting.
Choose the method that works best for you and the complexity of your design. Remember to use light strokes or markings and avoid pressing too hard, as this can damage the rug’s fibers. Once the design is transferred, you’re ready to bring it to life with colors and paint!
Selecting the Paint Colors
Selecting the right paint colors for your rug is a crucial step that will greatly influence the overall look and feel of your design. Here are some tips to help you choose paint colors that will enhance your painted rug:
1. Consider the Room: Take into account the color scheme and style of the room where the rug will be placed. Choose paint colors that complement or coordinate with the existing decor. Harmonizing the rug’s colors with the room’s palette will create a cohesive and visually pleasing space.
2. Contrast and Balance: Decide whether you want to create contrast or balance with your color choices. If the room has a predominantly neutral color scheme, opt for vibrant or contrasting colors in your design to make the rug stand out. On the other hand, if the room is already filled with bold colors, you may want to choose more subdued or complementary shades for a balanced look.
3. Color Psychology: Consider the psychology of colors and the mood you want to create. Warm colors like red, orange, and yellow evoke energy and vibrancy, while cool colors like blue, green, and purple promote calmness and relaxation. Choose colors that align with the desired ambiance of the room or reflect your personal preferences.
4. Base Color of the Rug: Take into account the base color of your rug when selecting paint colors. You can either enhance the base color by choosing complementary shades or create a striking contrast by opting for contrasting colors. Incorporating the base color into your design will create visual harmony and cohesion.
5. Color Harmony: Use the color wheel as a guide to achieve color harmony in your design. Complementary colors, which are opposite each other on the color wheel, create a bold and vibrant look. Analogous colors, which are adjacent on the color wheel, create a harmonious and cohesive feel. Experiment with different color combinations to find a palette that speaks to you.
6. Test Swatches: Before applying paint directly to your rug, test the colors on a small scrap piece of fabric or cardboard. This allows you to see how the colors will appear on your rug’s material and how they interact with each other. Consider the lighting conditions in the room where the rug will be placed, as it may affect the way the colors appear.
7. Gradation and Variation: Think about incorporating gradation or variation of colors to add depth and dimension to your design. Gradation involves blending colors from light to dark or vice versa, creating a sense of transition. Variation involves using different shades and tones of the same color to create interest and visual complexity.
With careful consideration and experimentation, you can select paint colors that will bring your design to life on the rug. Remember to trust your creativity and intuition when making color choices. The right color palette will contribute to the overall impact and success of your painted rug.
Mixing and Preparing the Paint
Before you start painting your rug, it’s essential to properly mix and prepare your paint. This step will ensure that you have the right consistency and quality of paint for your project. Here’s how to mix and prepare your paint effectively:
1. Read the Instructions: Before diving into the mixing process, carefully read the instructions on the paint bottles. Different brands and types of fabric paint may have specific instructions on how to mix, dilute, or prepare the paint. Follow these instructions for the best results.
2. Prepare Your Work Surface: Lay down a plastic sheet or drop cloth on your work surface to protect it from any potential spills or splatters. This will make it easier to clean up and maintain a tidy workspace.
3. Get Your Mixing Tools: Gather the necessary tools for mixing, including a palette or mixing tray, paintbrushes, and containers for mixing and diluting the paint. You may also need a small spray bottle filled with water for adjusting the paint consistency if required.
4. Start with Base Colors: Begin by squeezing out the base colors you’ve selected onto your palette or mixing tray. These are the colors that will form the foundation of your design. Use a paintbrush or palette knife to mix the colors thoroughly until you achieve a consistent and even tone.
5. Experiment with Color Mixing: If you want to create additional colors or shades, feel free to experiment with color mixing. Use small amounts of different paints and mix them together to create unique hues or variations. Take note of the proportions used, so you can recreate the color if needed.
6. Test the Paint Consistency: Dip your paintbrush into the mixed paint and apply a small stroke onto a scrap piece of fabric or cardboard. Assess the consistency and coverage of the paint. If it feels too thick or difficult to spread, you can add a few drops of water to thin it out. Conversely, if the paint is too watery, add a small amount of paint to thicken it.
7. Mix in Small Batches: It’s advisable to mix paint in small batches rather than large quantities, particularly if you’re using multiple colors or if you’re uncertain about the amount needed for your design. This prevents paint wastage and ensures that your paint remains fresh during the painting process.
8. Label Your Paints: To avoid confusion and make it easier to remix colors if needed, label your paint containers or palette wells with the corresponding color names. This will help you stay organized and maintain consistency throughout your painting project.
By properly mixing and preparing the paint, you’ll have the right consistency, colors, and quality required for your rug painting project. Take your time during this step to ensure that your paints are well-mixed, and don’t be afraid to experiment with color combinations. With your paints ready, you’re now set to bring your design to life on the rug!
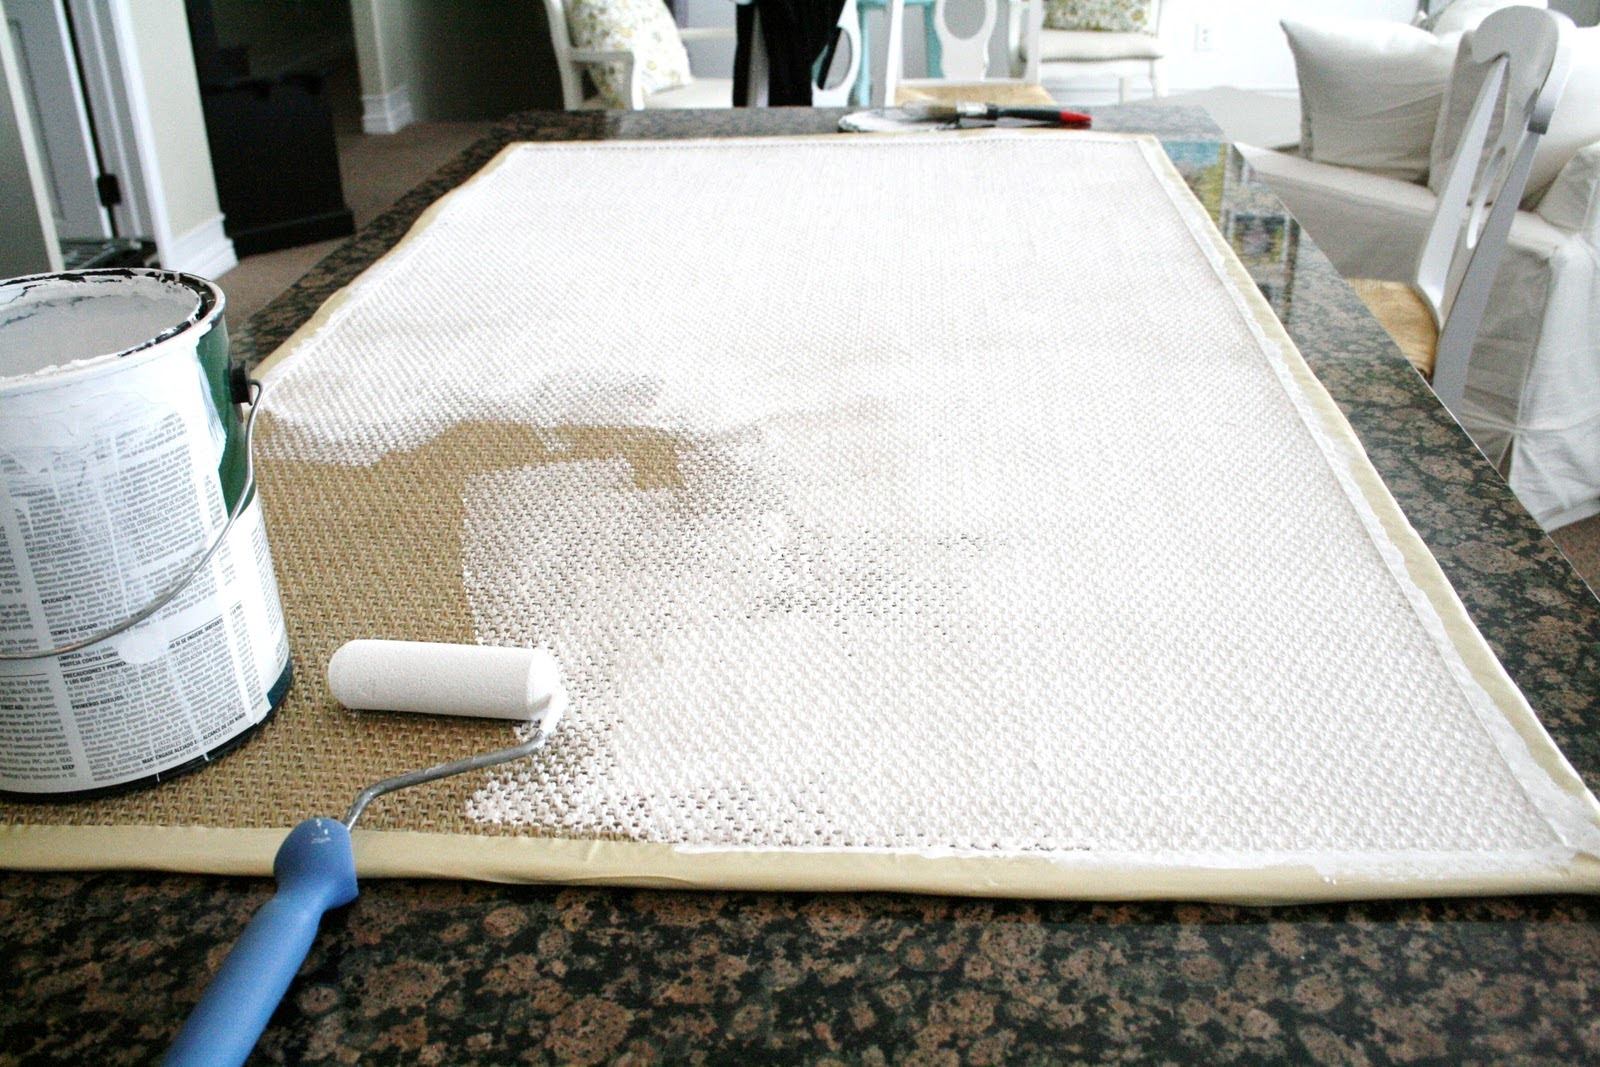
Applying the Base Coats
Once your paint is mixed and prepared, it’s time to start applying the base coats to your rug. The base coats serve as the foundation for your design and create a solid background for the subsequent layers of paint. Follow these steps to ensure a smooth and even application of the base coats:
1. Start with a Clean Rug: Ensure that your rug is clean and free from any dust or debris before applying the base coats. This will help the paint adhere better to the surface and prevent any imperfections in the final result.
2. Choose a Quality Brush: Select a suitable brush for applying the base coats. A flat brush or a large paintbrush with soft bristles works well for covering larger areas. Make sure the brush is clean and in good condition to achieve a smooth finish.
3. Dilute the Paint (if necessary): Depending on the type of fabric paint and the desired effect, you may need to dilute the paint with a small amount of water or fabric medium. Follow the instructions on the paint bottles for guidance on dilution ratios, if applicable. Stir the mixture thoroughly to ensure the paint is well combined.
4. Test the Paint on a Small Area: Before proceeding with the entire rug, it’s wise to test the paint on a small, inconspicuous area, such as a corner or the backside of the rug. This will allow you to make any adjustments and gauge the coverage and consistency of the paint.
5. Apply the Base Coat: Start by applying the base coat evenly to the entire rug using smooth and consistent brush strokes. Work in one section at a time, moving the brush in the direction of the rug’s fibers to ensure even coverage. Take care not to apply the paint too thickly, as it may take longer to dry and may affect the texture of the rug.
6. Allow the Base Coat to Dry: After applying the base coat, allow it to dry completely before moving on to the next steps. Refer to the paint manufacturer’s instructions for the recommended drying time. During this period, avoid placing objects or walking on the painted surface to prevent smudging or damaging the base coat.
7. Assess the Coverage: Once the base coat is dry, assess the coverage and opacity of the paint. If the base coat appears thin or uneven, you may need to apply additional coats to achieve the desired intensity and uniformity. Allow each coat to dry completely before applying the next to prevent mixing or smudging of colors.
8. Clean the Brush: After finishing the base coat application, clean your brush thoroughly with water or an appropriate cleaning solution. Properly cleaning the brush will maintain its quality and ensure optimal performance for subsequent layers of paint.
By applying the base coats correctly, you’re laying the groundwork for your painted rug’s design. Taking the time to apply the base coats evenly and allowing them to dry adequately will result in a beautiful and professional-looking finish. So, enjoy the process and move on to the next exciting steps in bringing your rug painting project to life!
Painting the Design
Now that the base coats are dry and your rug is prepared, it’s time to paint the design! This is where your creativity truly comes alive as you bring your envisioned pattern or image to life on the rug. Follow these steps to paint your design with precision and skill:
1. Reference Your Design: Keep your design sketch or reference image nearby for guidance as you paint. This will help you stay on track and ensure accuracy in recreating your intended design on the rug.
2. Start from the Background: Begin by painting the background or larger areas of your design first. This will allow you to establish a strong foundation and a clear visual hierarchy for your painting. Use a larger brush for this step to cover larger areas efficiently.
3. Work in Layers: When painting more intricate or detailed designs, it’s often helpful to work in layers. Start with the base colors and gradually build up the layers of your design, adding shading, highlights, or fine details as you go. This layering technique adds depth and dimension to your painting.
4. Use Thin Coats: Apply thin coats of paint, especially when working with multiple colors or blending techniques. This allows for better control, smoother transitions between colors, and faster drying time. Avoid applying thick layers of paint, as they can result in a less refined and uneven texture.
5. Blend and Feather Colors: To create seamless transitions between colors, use blending or feathering techniques. Blend the edges of adjacent colors while they are still wet to create smooth gradients. Feathering involves using a dry brush to lightly blend colors together, creating a soft and subtle effect.
6. Use Different Brush Sizes: Utilize brushes of different sizes to add variety and detail throughout your design. Use smaller brushes for fine lines and smaller elements, while larger brushes can be used for broader strokes and filling in larger areas. Experiment with different brush sizes to achieve the desired effect.
7. Take Breaks and Step Back: As you paint, take breaks and step back to assess your progress. This allows you to gain a fresh perspective and make any necessary adjustments. Sometimes, taking a step back can reveal areas that need refinement or highlight aspects that are working exceptionally well.
8. Practice Patience: Painting a rug is a labor of love, so be patient with yourself and the process. Allow each layer to dry completely before applying additional details or colors. Rushing the process may lead to smudges or unintended blending of colors, compromising the overall finish of your design.
9. Enjoy the Journey: Remember to enjoy the process of painting your rug. It’s an opportunity to express your creativity and add a unique touch to your home decor. Embrace any imperfections as part of the artistic journey and appreciate the beauty in the handmade nature of your painted rug.
With each brushstroke, you’re bringing your design to life on the rug’s surface. Embrace the artistic process, stay focused, and watch your painted rug transform into a work of art that will add beauty and personality to your space.
Adding Details and Accents
Now that the main elements of your design are painted, it’s time to add those wonderful details and accents that will truly make your rug shine. Adding intricate details and accents will enhance the overall visual appeal and bring depth to your painted rug. Here’s how you can add those finishing touches:
1. Small Brushes for Fine Details: Switch to a smaller brush or a liner brush to add fine details and delicate lines to your design. This will allow you to create intricate patterns, outlines, or small elements with precision and control.
2. Texture and Dimension: Consider incorporating texture and dimension into your design to make it visually interesting. This can be achieved by using techniques such as dry brushing, stippling, or using a sponge to dab or sponge on paint, creating a textured effect. Experiment with different techniques to achieve the desired texture and add depth to your design.
3. Accents with Metallic Paints: To add a touch of elegance and shine, consider using metallic paints or accents. Metallic gold, silver, or bronze can beautifully highlight certain areas or elements in your design, adding a luxurious and eye-catching effect. Apply these accents sparingly to avoid overpowering the rest of the design.
4. Highlights and Shadows: Create depth and visual interest by adding highlights and shadows to your design. This technique helps to make elements appear more three-dimensional and realistic. Use lighter shades or tints for highlights and darker shades or tones for shadows. Apply these strategically to enhance the depth and dimension of your design.
5. Incorporate Patterns or Textures: Consider incorporating patterns or textures within specific parts of your design. This can be achieved by using stencils or templates to create repeating patterns or by using different brushstrokes to create texture. This adds visual intrigue and variety to your design.
6. Layering and Overlapping Colors: If you want to add complexity and interest to your design, experiment with layering and overlapping colors. Apply thin layers of paint, allowing each layer to dry before adding the next. This technique creates visual depth and adds richness to your design.
7. Be Mindful of Proportions: As you add details and accents, pay attention to the proportions and balance within your design. Ensure that the size and intensity of the details complement the overall composition and do not overwhelm or detract from the rest of the design.
8. Step Back and Review: Periodically step back and review your painted rug to assess the overall effect and make any necessary refinements. This allows you to see the design as a whole and make adjustments to ensure coherence and harmony.
Adding details and accents is where your creativity truly shines. Take your time, be patient, and enjoy the process of transforming your painted rug from a beautiful design into a masterpiece. Remember to have fun and let your artistic instincts guide you as you add those final touches to create a rug that truly reflects your unique style and vision.
Allowing the Paint to Dry
Once you have finished adding the details and accents to your painted rug, it’s crucial to allow the paint to dry thoroughly. Proper drying ensures that the colors set and adhere to the rug’s surface, preventing smudging or damage. Follow these guidelines for a successful drying process:
1. Follow the Paint Manufacturer’s Recommendations: Different fabric paints may have varying drying times and instructions. Refer to the paint manufacturer’s recommendations on the label or packaging for specific drying instructions. These guidelines will provide the most accurate information for the particular paint you are using.
2. Maintain Proper Air Circulation: To facilitate drying, ensure that there is proper air circulation in the room. This helps the paint dry evenly and prevent any moisture from getting trapped under the painted surface. Open windows or use fans or air conditioning to enhance air movement in the space.
3. Avoid Touching the Painted Surface: It’s essential to resist the temptation to touch or handle the painted surface until it has completely dried. Even light contact can damage the paint or leave fingerprints. Be patient and let the paint naturally dry without any disturbances.
4. Protect the Drying Rug: Take measures to protect the drying rug from dust, dirt, and accidental damage. Cover the rug with a clean, lightweight fabric or plastic sheet to prevent any debris from settling onto the painted surface. Ensure that the cover does not touch the paint directly.
5. Allow Sufficient Drying Time: The drying time can vary depending on factors such as the type and thickness of paint, humidity, and air temperature. Give ample time for the paint to dry before considering the rug fully dry. Check the manufacturer’s instructions for an estimated drying time, but also consider allowing additional time for optimal results.
6. Test for Dryness: Before handling or moving the painted rug, test a small, inconspicuous area to ensure that the paint is fully dry. Lightly touch the surface with a clean finger or a piece of white fabric. If no paint transfers or smudges onto the finger or fabric, it indicates that the paint has dried adequately.
7. Avoid Placing Heavy Objects: During the drying process, avoid placing heavy objects on top of the painted rug, as this may cause the paint to shift, smudge, or adhere to the object. Allow the rug to dry in a flat and undisturbed position to maintain the integrity of the design.
8. Practice Patience: Drying times can vary, and it’s important to exercise patience during this phase. Rushing the process may result in compromised results or irreversible damage to the painted surface. Trust the drying time guidelines and resist the urge to handle or use the rug until it is fully dry.
By allowing the paint to dry thoroughly, you ensure the longevity and durability of your painted rug. Taking the necessary precautions and being patient during the drying process will reward you with a beautiful, vibrant, and long-lasting result. So, give your painted rug the time it needs to dry completely before unveiling your masterpiece.
Sealing the Painted Rug
After the paint has dried on your rug, it’s important to seal the design to protect it and ensure its longevity. Sealing the painted rug helps to enhance the durability of the paint, prevent fading, and make it easier to clean and maintain. Follow these steps to properly seal your painted rug:
1. Choose a Sealer: Select a sealer specifically designed for fabric or textile surfaces. Look for a clear, non-yellowing sealer that is compatible with the type of paint you used. Water-based sealers are generally preferred as they are easy to use and offer effective protection.
2. Test on a Small Area: Before applying the sealer to the entire rug, test it on a discreet area to ensure compatibility and the desired outcome. Apply a thin coat of the sealer and let it dry. Assess the results for any changes in color or texture, and make any necessary adjustments before proceeding.
3. Prepare the Rug: Ensure that the rug is clean and free from any dust or debris before applying the sealer. Thoroughly vacuum or shake off any loose particles. Clean any stains or spots with a mild detergent specifically formulated for the rug’s material. Allow the rug to dry completely before proceeding.
4. Apply the Sealer: Using a soft brush or a foam applicator, apply an even and thin coat of sealer onto the painted surface of the rug. Work in small sections, ensuring complete coverage. Avoid over-applying, as this may result in a tacky or uneven finish. Follow the manufacturer’s instructions regarding drying time and recoating if necessary.
5. Allow the Sealer to Dry: After applying the sealer, allow the rug to dry completely in a well-ventilated area. Follow the drying time recommended by the sealer manufacturer. Avoid walking on the rug or placing any objects on it until the sealer has fully cured to prevent any damage or smudging.
6. Apply Additional Coats (if needed): Depending on the type of sealer used and the level of protection desired, you may consider applying additional coats. Lightly sand the surface with fine-grit sandpaper between coats to ensure proper adhesion. Allow each coat to dry before applying the next, following the manufacturer’s instructions.
7. Test for Water Resistance: Once the sealer has dried and cured, test the water resistance by applying a small amount of water on an inconspicuous area of the rug. If the water beads up and does not soak into the paint, it indicates that the sealer has effectively sealed the rug. If the water is absorbed, consider applying an additional coat of sealer for added protection.
8. Reapply Sealer as Needed: Over time, the sealant may wear off due to foot traffic or regular cleaning. To maintain the longevity of your painted rug, periodically reapply the sealer according to the manufacturer’s recommendations. This will help to preserve the vibrancy and integrity of your design.
Sealing your painted rug will provide added protection and help preserve the beauty of your design. By following these steps and using a suitable sealer, you can ensure that your painted rug withstands the test of time and remains a cherished piece in your home for years to come.
Care and Maintenance of a Painted Rug
Once you have completed painting and sealing your rug, it’s important to implement proper care and maintenance practices to preserve its beauty and prolong its lifespan. Here are some guidelines for effectively caring for and maintaining your painted rug:
1. Regular Cleaning: Keep your painted rug clean by regularly vacuuming or gently shaking off any loose dirt or debris. This will prevent dirt particles from settling into the painted surface and potentially causing damage. Avoid vigorous shaking or beating the rug to prevent paint flaking or rubbing off.
2. Spot Cleaning: Address any spills or stains promptly to prevent them from setting into the painted area. Use a mild detergent or a stain remover specifically formulated for the rug’s material. Test the cleaning solution on an inconspicuous area first to ensure that it does not affect the paint. Blot the stained area gently without staining or rubbing. Allow it to air dry completely.
3. Gentle Handwashing (if applicable): If your painted rug is small and made of washable material, you may choose to hand wash it as needed. Use a basin or large sink filled with lukewarm water and mild detergent. Gently agitate the rug in the water and avoid scrubbing the painted area. Rinse thoroughly and allow the rug to air dry completely before placing it back in its designated area.
4. Avoid Harsh Chemicals: When cleaning your painted rug, avoid using harsh chemicals, bleach, or abrasive cleaners. These can cause fading, discoloration, or damage to the paint. Stick to mild, non-abrasive cleaners and test them on an inconspicuous area before applying them to the painted surface.
5. Protect from Direct Sunlight: Prolonged exposure to direct sunlight can cause colors to fade or the paint to deteriorate over time. Place your painted rug away from direct sunlight or use window coverings, such as blinds or curtains, to limit exposure to harmful UV rays. If necessary, rotate the rug periodically to ensure even wear and light exposure.
6. Use Rug Pads: Consider using rug pads or grippers underneath your painted rug to provide cushioning and prevent slipping. Rug pads also reduce wear and tear on the rug’s fibers and improve overall stability. Make sure to use rug pads suitable for the type of flooring and rug material.
7. Avoid Heavy Foot Traffic: Restrict heavy foot traffic on your painted rug to minimize wear and tear. If possible, place the rug in areas with less foot traffic or use it for decorative purposes rather than high-traffic areas. This will help maintain the vibrancy and integrity of the paint over time.
8. Professional Cleaning (if needed): If your painted rug requires more thorough cleaning or restoration, consider seeking professional rug cleaning services. Professional cleaners have the expertise and equipment to handle delicate painted rugs and remove deeply embedded dirt or stains without causing damage to the paint.
By implementing proper care and maintenance practices, you can enjoy your painted rug for years to come. Regular cleaning, prompt stain removal, and gentle handling will preserve the integrity and beauty of your design. Remember to exercise caution and use appropriate cleaning methods to protect the painted area. With proper care, your painted rug will continue to be a stunning and cherished addition to your home.