
Materials Needed
To make silicone candle molds, you’ll need a few essential materials. Here’s a list of what you’ll need:
- Model or object for the mold
- Silicone mold-making rubber
- Baseboard or sturdy surface
- Container for mixing the silicone
- Measuring cups and stirring sticks
- Release agent (optional but recommended)
- Plastic wrap or tape
- Scale for measuring
- Disposable gloves
- Protective eyewear
When selecting the silicone mold-making rubber, make sure to choose a high-quality product specifically designed for candle making. The type and quantity of silicone you’ll need will depend on the size and complexity of your mold.
It’s important to have a baseboard or sturdy surface to place your mold on. This will provide stability and prevent any accidental spills or movement during the molding process.
Using a dedicated container for mixing the silicone will help you accurately measure and control the ratio of components. Make sure the container is clean and free of any contaminants that could affect the quality of your mold.
Measuring cups and stirring sticks are essential for measuring and mixing the silicone components. Use separate measuring cups for each component to ensure accurate measurements. Avoid using wooden stirring sticks as they may contain moisture, which could interfere with the curing process of the silicone.
A release agent is highly recommended to aid in the demolding process. It helps prevent the silicone from sticking to the model or object, making it easier to remove the finished mold. There are various types of release agents available, including silicone-based sprays or powders.
Plastic wrap or tape can be used to secure and seal the mold during the curing process. This prevents any leakage or spills that could affect the quality of your mold.
Having a scale on hand allows you to accurately measure the silicone components. This is particularly important if your mold requires specific ratios or precise measurements.
Disposable gloves and protective eyewear are essential for your safety. The silicone materials can be sticky and messy, and it’s important to protect your hands and eyes from any potential irritation or harm.
Now that you have your materials ready, let’s move on to the next steps in making your own silicone candle molds.
Step 1: Prepare Your Model
Before you can start making your silicone candle mold, you need to prepare the model or object that you’ll be using. Follow these steps to ensure your model is ready:
1. Clean the Model: It’s important to start with a clean and dust-free model. Use a mild soap and water solution to gently clean the surface of the model. Make sure to remove any dirt, debris, or residues, as they can affect the quality of the mold.
2. Seal Porous Surfaces: If your model has any porous surfaces, such as wood or plaster, it’s recommended to seal them before applying the silicone. This will prevent the silicone from seeping into the pores and potentially damaging the model. Use a sealant or primer specifically designed for the material of your model.
3. Apply a Release Agent: To ensure easy demolding later on, apply a thin layer of release agent to the model’s surface. This will create a barrier between the model and the silicone, making it easier to remove the mold once it’s cured. Follow the instructions provided with your chosen release agent for best results.
4. Position and Secure the Model: Decide on the best position for your model within the mold. Keep in mind the desired orientation and any undercuts or intricate details you want to capture. Once you’ve determined the position, secure the model to the baseboard or surface using adhesive putty or hot glue. This will prevent the model from shifting or floating during the pouring process.
5. Create Registration Marks: Registration marks are reference points that allow you to accurately align the mold’s halves during the demolding process. Use a small tool, like a toothpick or modeling clay, to create small marks on the surface around the model. These marks will help you align the mold properly later on.
6. Protect Surrounding Areas: Depending on the size and shape of your model, it’s a good idea to protect the surrounding areas from any potential spills or drips. Use plastic wrap or tape to create a barrier around the model, ensuring that any excess silicone is contained within the mold.
By following these steps, you’ll have a properly prepared model for your silicone candle mold. Now let’s move on to the next step of building a container for your mold.
Step 2: Build a Container for Your Mold
Now that you have prepared your model, it’s time to build a container or mold box to hold the silicone as it cures. Follow these steps to create a container for your mold:
1. Choose the Right Material: Select a material to build your mold box that is sturdy and non-reactive to the silicone. Common choices include plastic, acrylic, or PVC. Ensure that the material is smooth and free from any imperfections that could transfer onto the mold.
2. Measure and Cut the Material: Measure the dimensions of your model and add an extra 1-2 inches to each side. This will provide enough space for the mold to adequately cover the model. Using a ruler or a measuring tape, mark and cut the material accordingly, ensuring straight and clean edges.
3. Assemble the Mold Box: Position the cut material pieces to form the sides of the mold box around the model. Use tape or clamps to hold the pieces together securely. Make sure the edges are flush and there are no gaps or spaces through which the silicone could leak.
4. Seal the Corners: To prevent any silicone from leaking through the corners of the mold box, apply a small amount of silicone or adhesive to seal the joints. Smooth out any excess with a tool or your finger to ensure a tight seal.
5. Check for Stability: Ensure that the mold box is stable and level. Place it on a flat surface and gently press down to make sure it doesn’t move or wobble. This will prevent any distortion or unevenness in your silicone mold.
6. Apply a Release Agent: Before you pour the silicone, apply a thin layer of release agent to the inside of the mold box. This will help prevent the silicone from sticking to the sides of the container, making it easier to remove the mold once it’s cured.
7. Reinforce the Mold Box (Optional): If your mold box is relatively large or if you anticipate a significant amount of pressure from the silicone, you can reinforce the sides of the mold box with an additional layer of sturdy material or by placing support structures around the box.
By following these steps, you’ll have a sturdy and well-prepared container for your silicone mold. Now, let’s move on to the next step of mixing and pouring the silicone.
Step 3: Mix and Pour the Silicone
With your mold box ready, it’s time to mix and pour the silicone to create your candle mold. Follow these steps to ensure a successful mixing and pouring process:
1. Prepare Your Work Area: Set up a clean and well-ventilated workspace. Ensure that all necessary tools and materials are within reach. Put on your disposable gloves and protective eyewear to protect yourself during the process.
2. Measure the Silicone: Follow the manufacturer’s instructions to determine the correct ratio for mixing the silicone components. Use a scale and separate measuring cups to accurately measure the required amounts of silicone base and catalyst.
3. Mix the Components: Pour the silicone base into a clean mixing container. Gradually add the catalyst while continuously stirring the mixture. Make sure to mix thoroughly to ensure a homogenous blend. Take note of the recommended mixing time to avoid premature curing.
4. Remove Air Bubbles: After mixing the silicone, gently tap or vibrate the mixing container to release any trapped air bubbles. This step is crucial as air bubbles can cause imperfections in your final mold. Allow the mixture to sit for a few minutes to let the larger bubbles rise to the surface.
5. Pour the Silicone: Slowly pour the silicone mixture into the mold box, ensuring even coverage of the model. Start pouring from one side and gradually move around to prevent trapping air within the mold. Continue pouring until the silicone completely covers the model and fills the mold box to the desired height.
6. Remove Additional Air Bubbles: To remove any remaining air bubbles, gently tap or vibrate the mold box. You can also use a toothpick or a small tool to carefully pop any visible bubbles that rise to the surface. Take care not to disturb the positioning of the model.
7. Allow the Silicone to Cure: Follow the manufacturer’s instructions for the recommended curing time. It’s essential to let the silicone cure undisturbed to ensure a proper and durable mold. Place the mold box in a well-ventilated area away from direct sunlight or heat sources.
8. Check the Curing Process: After the recommended curing time has passed, check the silicone for firmness. It should feel solid but still slightly flexible. If the silicone is too soft or tacky, allow it more time to cure before proceeding to the next step.
By following these steps, you’ll have successfully mixed and poured the silicone for your candle mold. Now, let’s move on to the next step of waiting for the silicone to set.
Step 4: Wait for the Silicone to Set
After pouring the silicone into your mold box, it’s important to exercise patience and let the silicone properly set and cure. Follow these steps to ensure the silicone fully sets:
1. Check the Curing Time: Refer to the instructions provided by the silicone manufacturer to determine the recommended curing time. This duration can vary depending on the type and brand of silicone you’re using. It’s crucial to adhere to the specified time for optimal results.
2. Avoid Disturbances: Once the silicone is poured and placed in the mold box, it’s essential to avoid any disturbances that could disrupt the curing process. Keep the mold box in a stable position and refrain from touching or manipulating the silicone during the setting period.
3. Maintain Optimal Conditions: To ensure proper curing, maintain a suitable environment for the silicone. Keep the mold box in a well-ventilated area with a consistent temperature. Avoid exposing it to direct sunlight, extreme heat, or cold temperatures. This will help prevent any deformities or imperfections in your silicone mold.
4. Monitor the Silicone: Periodically check on the silicone mold to observe the curing progress. Look for signs of firmness and solidity. Depending on the type of silicone, it may change color or become translucent as it sets. This is generally an indication that the silicone is curing properly.
5. Allow Sufficient Curing Time: It’s crucial to give the silicone enough time to fully set and cure before proceeding. Rushing the process may result in an unstable mold or difficulties with demolding. Follow the recommended curing time provided by the manufacturer to ensure the silicone is fully cured.
6. Conduct a Thumb Test: After the recommended curing time has passed, conduct a thumb test to check the firmness of the silicone. Gently press your thumb against a small area of the silicone. It should feel solid and resilient, with no indentations or tackiness. If the silicone is still soft or sticky, allow it more time to cure.
7. Be Patient: Waiting for the silicone to set can require patience, but it’s a vital step in achieving a high-quality and long-lasting candle mold. Rushing the process can lead to mold defects or difficulties during the demolding stage. Remember that proper curing ensures the success of your silicone candle mold.
By following these steps and allowing enough time for the silicone to set, you’ll be ready to move on to the next exciting step of demolding your silicone candle mold.
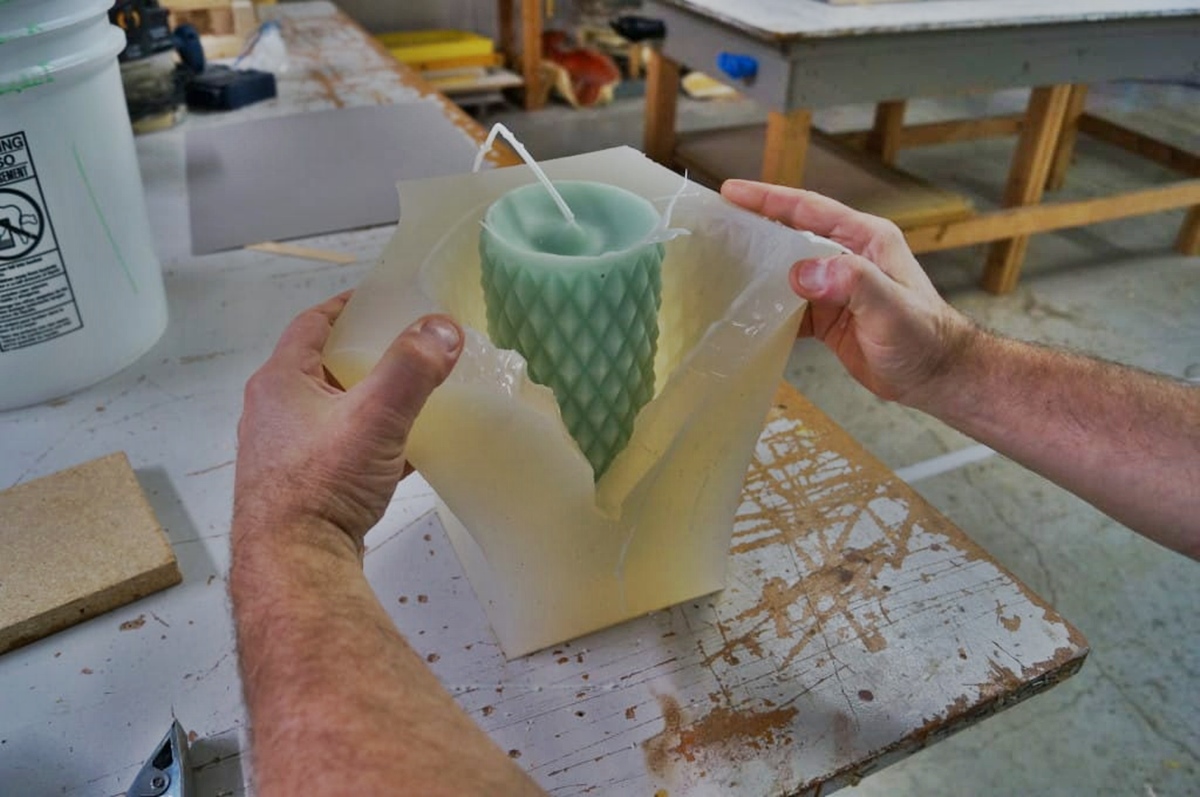
Step 5: Demold Your Silicone Candle Mold
Once the silicone has fully cured, it’s time to demold your silicone candle mold. Follow these steps to safely and effectively remove the mold from the mold box:
1. Remove the Mold Box: Gently remove any tape or clamps securing the mold box. Slowly separate the sides of the mold box, taking care not to disturb or damage the silicone mold inside.
2. Release the Mold: If you applied a release agent to the model before pouring the silicone, the mold should easily release from the model. If there are any stubborn spots, use a toothpick or a small tool to gently loosen the edges of the mold from the model. Be cautious not to tear or damage the mold during this process.
3. Carefully Extract the Mold: Once the mold is released from the model, carefully lift it out of the mold box. Support the mold from the bottom to prevent it from bending or distorting. Take your time to ensure the integrity of the mold is maintained.
4. Inspect and Clean: Carefully inspect the mold for any imperfections, air bubbles, or areas that may have not cured properly. If necessary, use a small tool or sandpaper to correct any minor imperfections. Rinse the mold with warm water to remove any debris or residue that might be stuck to the surface. Pat it dry with a soft cloth or allow it to air dry.
5. Check for Proper Dimensionality: Measure the mold to ensure it matches the desired dimensions for your candles. Pay attention to any undercuts, intricate details, or thin sections that may need additional support during candle pouring.
6. Test the Mold: Before using the mold for production, it’s a good idea to test it with a small batch of wax to ensure that it functions properly. This allows you to identify any potential issues and make necessary adjustments before committing to larger candle production runs.
7. Store the Mold: Once you’re satisfied with the mold’s functionality, store it in a clean and dry location. Protect it from dust and direct sunlight to maintain its quality for future use.
8. Repeat the Process: If you plan to make multiple silicone candle molds, repeat Steps 1-7 for each mold, ensuring that you properly clean and prepare the model and create a new mold box for each one.
By following these steps, you’ll be able to successfully demold your silicone candle mold, inspect it for quality, and prepare it for use in creating beautiful and unique candles. Now, let’s move on to the next step of cleaning and preparing your mold for use.
Step 6: Clean and Prepare Your Mold for Use
After demolding your silicone candle mold and ensuring its quality, it’s important to properly clean and prepare the mold before using it for candle making. Follow these steps to clean and prepare your mold:
1. Wash the Mold: Start by washing the mold with warm, soapy water. Use a gentle dish soap or a specialized mold cleaner to remove any residue or debris that may have accumulated during the demolding process. Gently scrub the mold with a soft brush or sponge to ensure a thorough cleaning.
2. Rinse and Dry: Rinse the mold with warm water to remove any soap or cleaning agents. Thoroughly dry the mold using a soft, lint-free cloth or allow it to air dry completely. Avoid using abrasive materials or harsh chemicals that can damage the mold’s surface.
3. Apply a Release Agent (Optional): Depending on the type of mold and the waxes or materials used for candle making, you may consider applying a release agent to the mold’s surface. This can help facilitate easy demolding and extend the lifespan of the mold. Follow the manufacturer’s instructions for the specific release agent you’re using.
4. Check for Imperfections: Inspect the mold for any imperfections, such as small tears, bubbles, or worn areas. Use a small tool or sandpaper to gently smooth out any rough edges or correct minor flaws. This step ensures that your candles will have a proper shape and finish.
5. Add Support (If Needed): If your mold has thin or delicate areas that may require additional support during candle pouring, consider using support structures such as rubber bands, toothpicks, or mold putty. These supports will help maintain the integrity of the mold and ensure accurate candle shapes.
6. Apply Mold Release (If Needed): If you anticipate any difficulties with demolding, especially for complex or intricate molds, consider applying a thin layer of mold release agent to the inside of the mold. This will create a barrier between the silicone and the candle material, making it easier to remove the finished candles from the mold.
7. Store the Mold Properly: Once clean and prepared, store your mold in a dry and cool place, away from direct sunlight or extreme temperatures. Avoid placing any heavy objects on top of the mold, as this could cause deformation or damage.
8. Test the Mold: Before mass-producing candles, it’s a good idea to test the mold using a small batch of wax. This will help ensure that the mold is in optimal condition and that the candles will turn out as desired. Identify any potential issues or adjustments that may be needed for perfecting the candle-making process.
By following these steps and properly cleaning and preparing your mold, you’ll ensure smooth demolding, prolong the mold’s lifespan, and create beautiful candles with consistent results. Now, let’s explore how to use your silicone candle mold effectively in the next step.
Step 7: Using Your Silicone Candle Mold
After properly cleaning and preparing your silicone candle mold, it’s time to put it to use and create stunning candles. Follow these steps to effectively use your silicone candle mold:
1. Select Candle Making Material: Choose the type of wax or candle-making material that you want to use for your candles. Consider factors such as scent, color, and melting point to achieve your desired results. Ensure that the selected material is compatible with the silicone mold.
2. Prepare the Candle Material: Depending on the type of candle material you’re using, follow the manufacturer’s instructions to melt and prepare the wax or other candle-making material. Add any desired colorants or fragrances, following the recommended ratios for optimal results.
3. Pour the Candle Material: Carefully pour the prepared candle material into the silicone candle mold. Fill the mold to the desired level, ensuring that it adequately covers all the details and contours of the mold. Take care not to overfill the mold, as it may result in uneven or distorted candles.
4. Tap and Release Air Bubbles: To ensure a smooth and flawless finish, gently tap or jiggle the mold to release any trapped air bubbles. This step helps prevent imperfections in the final candle. If necessary, use a toothpick or a small tool to pop any visible bubbles on the surface.
5. Allow the Candle to Cool and Solidify: Let the poured candle material cool and solidify within the silicone mold. The cooling time will depend on the type of candle material and the size of the mold. Follow the recommended cooling time provided with your chosen candle material.
6. Demold the Candle: Once the candle has fully solidified, gently flex or bend the silicone mold to release the candle. For larger or more intricate molds, you may need to carefully push the candle out from the bottom or use gentle pressure to release it. Take your time to avoid damaging the mold or the candle.
7. Trim and Finish the Candle: If necessary, trim any excess wax from the candle using a sharp knife or scissors. Smooth out any rough edges or imperfections with a warm, smooth tool or your fingertips. Polish the candle surface with a soft cloth to achieve a smooth and professional finish.
8. Repeat the Process: You can continue using your silicone candle mold to create more candles. Clean and prepare the mold between each use, ensuring that it is free from any residue or leftover wax. Follow the previous steps to pour and demold candles for consistent results.
9. Experiment and Explore: Don’t be afraid to experiment with different candle-making techniques, colors, fragrances, or decorations. Use your silicone candle mold as a canvas to create unique and personalized candles that reflect your style and creativity.
By following these steps, you’ll be able to effectively use your silicone candle mold to create beautiful and professional-looking candles. Now, let’s explore some troubleshooting tips for common issues you may encounter during the candle-making process in the next step.
Step 8: Troubleshooting Common Issues
While using your silicone candle mold, you may encounter some common issues that can affect the quality of your candles. Here are some troubleshooting tips to help you address and overcome these challenges:
1. Air Bubbles: Air bubbles are a common issue in candle making. To prevent air bubbles from forming, make sure to tap or jiggle the mold after pouring the candle material to release trapped air. You can also try pouring the material slowly or using a heat gun to gently remove any bubbles on the surface.
2. Uneven Surfaces: If your candles have uneven or bumpy surfaces, it may indicate that the candle material cooled unevenly within the mold. To prevent this, make sure the mold is at room temperature before pouring the candle material. Avoid placing the mold in a cold or drafty area during the cooling process.
3. Difficult Demolding: If you’re having trouble demolding your candles, ensure that the candle material is fully cooled and solidified before attempting to remove the candle from the mold. You can also try placing the mold in the freezer for a few minutes to help release the candle. If necessary, gently flex the mold or use a tool to carefully release the candle from the mold.
4. Wax Seepage: Wax seepage can occur when the silicone mold is not completely sealed or when the candle material is poured at a temperature that is too high. To prevent wax seepage, make sure the mold is properly sealed and that the candle material is poured at the recommended temperature. You can also try applying a thin layer of mold release agent to the inside of the mold for easier demolding.
5. Fragile Candles: If your finished candles are fragile or easily breakable, it may indicate that the candle material was poured too thin or that the mold lacks proper reinforcement. Consider pouring a slightly thicker layer of candle material or adding support structures, such as a wick holder or additional wax around the wick, to improve the stability and durability of the candle.
6. Wax Residue: Sometimes, a small amount of wax residue may be left behind in the mold after demolding. To remove any wax residue, gently heat the mold with a hairdryer or immerse it briefly in hot water. Once the wax softens, wipe it away with a soft cloth or paper towel. Make sure to dry the mold thoroughly before using it again.
7. Mold Degradation: Over time, silicone molds may degrade or become less flexible. If you notice any signs of mold deterioration, such as cracking, tearing, or loss of flexibility, it may be time to replace the mold. Proper care and storage can help prolong the lifespan of your silicone molds.
8. Variations in Candle Size: If you’re experiencing variations in candle size, ensure that you’re pouring the same amount of candle material into each mold. Use measurement tools or pour pre-measured quantities to ensure consistent results. Additionally, make sure you’re allowing the candle material to cool and solidify fully before removing the candles from the molds.
By implementing these troubleshooting tips, you’ll be better equipped to overcome common issues that may arise during the candle-making process. With practice and patience, you’ll create high-quality candles using your silicone candle mold. Now, let’s explore some tips and tricks for achieving success in your candle-making endeavors.
Step 9: Tips and Tricks for Success
To ensure success in your silicone candle mold usage and candle-making endeavors, consider the following tips and tricks:
1. Measure Accurately: Precise measurements are essential for consistent results. Use a scale and measuring tools to ensure accurate proportions of materials when creating your candle mixture.
2. Experiment with Colors and Fragrances: Don’t be afraid to get creative with your candle-making process. Add colorants and fragrances to customize your candles and create unique scents and hues.
3. Use High-Quality Materials: Invest in high-quality silicone mold-making rubber and candle-making materials. They will result in better molds and longer-lasting, more fragrant candles.
4. Test Small Batches: Before mass-producing candles, test new molds or variations in your candle-making process by creating small test batches. This allows you to evaluate the candle quality and make any necessary adjustments before producing larger quantities.
5. Be Mindful of Temperature: Maintain the optimal temperature for both the mold and the candle material. Extreme temperatures can affect the quality and setting time of the candle and the mold.
6. Keep the Mold Clean: Regularly clean and dry your silicone candle mold after each use to ensure its longevity and prevent any contamination or lingering residue that may affect future candles.
7. Support Delicate Areas: For molds with intricate or delicate areas, consider reinforcing them with additional support structures like toothpicks or mold putty. This will help maintain the shape and integrity of your candles.
8. Take Safety Precautions: Always wear gloves and protective eyewear when working with candle-making materials. Follow safety guidelines for melting and handling wax to prevent accidents and injuries.
9. Learn from Others: Join online communities or attend candle-making workshops to learn from experienced candle makers. Share tips and techniques, and gain inspiration from others in the candle-making community.
10. Have Fun and Be Creative: Candle making is a creative and enjoyable craft. Embrace your creativity, experiment with different techniques, and have fun while making beautiful and unique candles with your silicone candle mold.
By incorporating these tips and tricks into your candle-making process, you’ll enhance your skills and achieve success in creating stunning candles using your silicone candle mold. Enjoy the journey and let your creativity shine!