
Materials Needed for Making a Picture Frame out of Wine Corks
Creating a unique picture frame out of wine corks is a fun and creative project that adds a touch of rustic charm to your home decor. To get started, gather the following materials:
- Wine corks – Depending on the size of your frame, you might need 50-100 corks
- Picture frame base – Choose a frame in your preferred size and style
- Hot glue gun and glue sticks – Make sure you have enough for securing the corks
- Sharp knife or cutting tool – You’ll need this to trim the corks if necessary
- Decorative elements – Optional embellishments like ribbons, old keys, or small trinkets
- Backing board – A piece of cardboard or foam board to secure the picture and provide stability
- Hanging hardware – Hooks or wire for easy wall mounting
Make sure you have all these materials ready before you start, so you can enjoy a smooth and uninterrupted crafting process.
Step 1: Gather Wine Corks
The first step in making a picture frame out of wine corks is to gather an ample supply of corks. You can collect corks from your own wine bottles, ask friends and family for their leftover corks, or even check with local restaurants or wineries for unused corks. Depending on the size of your frame, you will need around 50 to 100 corks.
It’s important to note that not all corks are created equal. Synthetic corks can be used, but natural cork gives a more authentic look. It’s also a good idea to clean the corks before using them, especially if they have come into contact with wine residue. You can rinse them with warm water and let them air dry.
If you find that your corks are larger than needed for your frame, you can trim them to size using a sharp knife or cutting tool. Be cautious and take your time to ensure a clean and even cut. Remember, safety should always come first, so be sure to use a cutting tool with care.
Gathering the wine corks is an enjoyable part of the process, as each cork holds its own story and adds a personalized touch to your frame. Once you have enough corks and have prepared them, you’re ready to move on to the next step.
Step 2: Prepare the Frame Base
Now that you have gathered your wine corks, it’s time to prepare the frame base for your picture frame. Choose a frame that suits your style and the size of the picture you plan to display. You can find frames at craft stores, home decor shops, or even repurpose an old frame for this project.
If your frame has a backing, remove it carefully so that you are left with just the frame itself. This will make it easier to attach the wine corks. Next, clean the frame to remove any dust or debris that may be present. A damp cloth or a soft brush will do the trick.
Before attaching the corks, you may want to lay them out on the frame to determine the desired arrangement. This step allows you to get a sense of how the finished frame will look and make any adjustments before gluing.
If desired, you can also paint or stain the frame to match your preference or the color scheme of the room where it will be displayed. Allow the frame to dry completely before proceeding to the next step.
Preparing the frame base is an essential step in ensuring a sturdy foundation for your wine cork picture frame. By taking the time to choose the right frame and preparing it properly, you are setting yourself up for success in creating a beautiful, customized piece of decor.
Step 3: Arrange the Corks
Now that you have prepared the frame base, it’s time to get creative and arrange the wine corks in a visually appealing pattern. This step allows you to showcase the unique textures, colors, and labels of the corks, adding a personal touch to your picture frame.
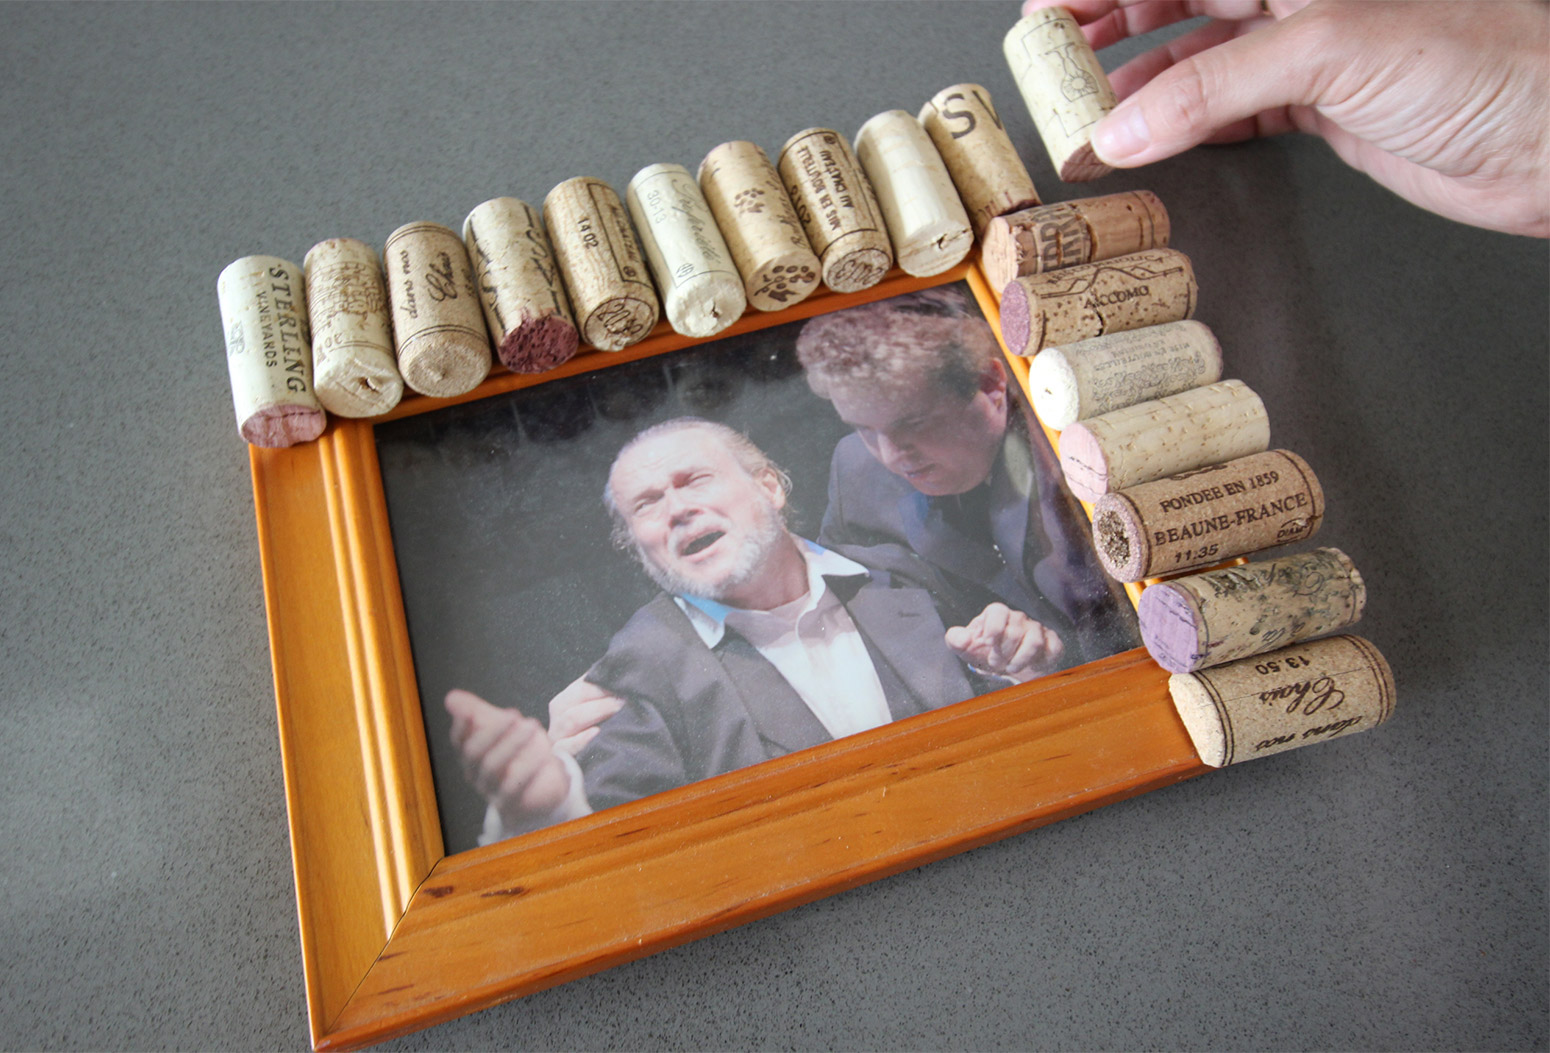
Start by laying out the corks on the frame in the desired pattern. You can arrange them horizontally, vertically, diagonally, or experiment with different designs such as a chevron or herringbone pattern. Play around with the corks until you find a layout that you’re happy with.
Keep in mind that the corks don’t necessarily have to fit perfectly. In fact, a slightly uneven or organic arrangement can add character and charm to your frame. Some corks may need to be trimmed or adjusted to fit the frame, so be prepared to make these modifications if needed.
As you arrange the corks, think about creating interesting visual elements. For example, you can alternate between wine-stained and unstained corks, position corks with unique cork branding in prominent places, or mix up the variety of designs and labels for a more eclectic look.
It’s also a good idea to step back and look at the frame from different angles to make sure you’re satisfied with the overall arrangement. Take your time with this step, as the arrangement of the corks will greatly impact the final look of your picture frame.
Once you’re happy with the cork arrangement, it’s time to move on to the next step and secure them in place with glue.
Step 4: Glue the Corks
With the arrangement of the wine corks finalized, it’s time to securely attach them to the frame using a hot glue gun. This step ensures that your picture frame will be sturdy and the corks will stay in place over time.
Begin by applying a small amount of hot glue to the back of each cork and press it firmly onto the frame. Work your way through the entire arrangement, gluing one cork at a time. Take care to align the corks properly and maintain the desired pattern as you go along.
When applying the glue, be cautious not to use too much. Excessive glue can cause it to seep out from between the corks, creating unwanted streaks or globs. A thin, even layer of glue is sufficient to secure the corks in place.
As you glue each cork, hold it down for a few seconds to ensure a strong bond. This will help prevent any corks from coming loose after completing the project. It’s a good idea to let the glued corks dry completely before moving on to the next step.
During this step, it’s important to work carefully and pay attention to detail. Make sure the corks are securely attached and aligned correctly, as these factors contribute to the finished look and durability of your wine cork picture frame.
Once all the corks are securely glued, you’ve successfully completed the crucial step of attaching them to the frame. Now, you can move on to adding some decorative touches to make your picture frame even more unique and eye-catching.
Step 5: Add Decorative Touches
With the wine corks securely glued to the frame, it’s time to add some decorative touches to enhance the overall look of your picture frame. This step allows you to personalize your creation and make it truly unique.
You can get creative and incorporate various embellishments to add flair to your frame. Consider attaching ribbons, small trinkets, or old keys to create interesting details and textures. These decorative elements can be hot glued onto the corks or directly onto the frame itself.
Another option is to paint the corks or the frame to match your desired aesthetic. You can choose a metallic finish, a bold color, or even create an ombre effect by blending different shades. Experiment with different painting techniques and textures to achieve the desired look.
If you prefer a more natural and rustic appearance, you can leave the corks as they are and focus on enhancing the overall presentation. Consider adding a burlap or lace bow at one corner of the frame, or intertwine some twine or branches around the corks for a rustic touch.
Remember, the goal is to express your creativity and make your picture frame reflect your unique style and personality. Don’t be afraid to think outside the box and explore different decorative elements that resonate with you.
Once you are satisfied with the decorative touches, it’s time to move on to the next step and complete your wine cork picture frame by attaching the backing and hanging hardware.
Step 6: Attach the Backing and Hanging Hardware
Now that your wine cork picture frame is almost complete, it’s time to secure the backing and attach the necessary hanging hardware. This step ensures that your frame is ready to be displayed on the wall.
Start by measuring and cutting a piece of cardboard or foam board to fit the back of your frame. This backing will provide stability and support to the picture and the corks. Use a sharp knife or cutting tool to achieve a clean and precise cut.
Next, position the backing on the back of the frame and secure it in place using hot glue or small nails. Make sure it fits snugly and aligns properly with the edges of the frame. This step ensures that the backing is securely attached and will hold the picture in place.
Once the backing is in place, it’s time to attach the hanging hardware. Decide whether you prefer to use hooks or wire for hanging. If using hooks, simply screw them onto the back of the frame at the desired positions. If using wire, attach it securely to each side of the frame, making sure it is taut and can support the weight of the frame.
Take a moment to double-check that the hanging hardware is properly attached and can support the weight of the frame. This step is crucial for ensuring that your frame hangs securely and remains in place once it’s mounted on the wall.
With the backing and hanging hardware securely attached, your wine cork picture frame is almost ready for display. The final step is to insert your favorite picture and enjoy the finished product.
Step 7: Insert Your Favorite Picture
Now that your wine cork picture frame is complete, it’s time to add the finishing touch by inserting your favorite picture. This step allows you to showcase a cherished memory or artwork within the unique and personalized frame you’ve created.
Start by selecting a picture that fits the size of your frame. You can choose a photograph, a print, or even a hand-drawn artwork. Ensure that the picture is the right size and proportion to fit comfortably within the frame.
Carefully remove the back of the frame, either by unclipping it or sliding it out. Gently place the picture into the frame, aligning it properly. Make any necessary adjustments to ensure the picture is centered and straight.
If your frame includes a protective glass or plexiglass covering, ensure that it is clean and free from smudges or fingerprints. Use a lint-free cloth or glass cleaner to wipe away any marks before reattaching the back of the frame.
Once the picture is securely in place and the frame is closed, take a moment to appreciate the final result. Your wine cork picture frame is now complete, and your favorite picture is beautifully displayed within it.
Now, find the perfect spot to showcase your creation. Whether it’s on a wall, a shelf, or a mantel, your wine cork picture frame is sure to draw attention and spark conversations with its unique and eye-catching design.
Remember, you can always update the picture in your frame whenever you want to showcase a new memory or artwork. The versatility and charm of your wine cork picture frame make it a timeless and cherished addition to your home decor.
Step 8: Display Your Wine Cork Picture Frame
Congratulations! You have successfully created a unique and personalized wine cork picture frame. Now it’s time to proudly display your creation and enjoy the fruits of your labor.
Choose a prominent wall or surface in your home where you want to showcase your wine cork picture frame. Consider the overall decor and aesthetics of the area to find the perfect spot that complements your frame.
Using a hammer and nails or wall hooks, securely mount the frame on the chosen area. Make sure to use a level to ensure the frame is straight and aligned with the surrounding elements.
As you hang the frame, step back and admire the finished product. Take pride in the fact that you’ve not only created a visually appealing piece of decor but also repurposed wine corks in a creative and eco-friendly way.
Invite friends and family to marvel at your unique wine cork picture frame, and share the story behind its creation. You’ll likely receive compliments and inquiries about how they can create their own wine cork masterpiece.
Remember, your wine cork picture frame is not only a decorative piece but also a representation of your creativity and individuality. It adds a charming and personal touch to your home, making it a conversation starter and a cherished item in your space.
Feel free to change the picture within the frame as often as you like to keep it fresh and showcase different memories or artwork. Your wine cork picture frame is versatile and adaptable, allowing you to continuously personalize and update its content.
Enjoy the beauty and nostalgia that your wine cork picture frame brings to your home. It’s a testament to your craftsmanship and serves as a reminder of cherished moments and the creative spirit within you.