
Choosing the Right Location for Your Wine Storage Rack
When it comes to building a wine storage rack, choosing the right location is crucial. The location you select will not only impact the accessibility of your wine collection but also affect its overall quality and flavor. Here are some factors to consider when determining the ideal spot for your wine storage rack.
- Temperature and Humidity: Wine is highly sensitive to temperature and humidity fluctuations. It is essential to place your wine storage rack in an area with a constant temperature between 45-65 °F (7-18 °C) and humidity levels of 50-70%. Avoid storing your wine rack in places prone to extreme temperature changes or high humidity, such as near appliances, windows, or heating vents.
- Away from Sunlight: Exposure to direct sunlight can negatively impact the quality and aging process of your wine. Choose a location away from windows or opt for UV-blocking window coverings to protect your collection from harmful UV rays.
- Vibration-Free: Vibrations can disrupt the sedimentation process in wine and affect its taste. Avoid placing your wine rack near appliances, speakers, or any other sources of constant vibration.
- Steady and Level: Ensure that the location you choose for your wine storage rack is steady and level. Uneven surfaces or areas prone to excessive movement can disturb the sediment in the wine bottles and impact their aging process.
- Good Ventilation: Adequate air circulation is crucial for preventing mold and mildew growth and maintaining the quality of your wine. Avoid placing your wine rack in enclosed spaces or areas with poor ventilation.
By carefully considering these factors, you can find the perfect location for your wine storage rack. Remember, the goal is to create a stable environment that optimizes the aging process and keeps your collection in top condition for years to come.
Measuring and Planning Your Wine Storage Rack
Before diving into the construction of your wine storage rack, it’s essential to take accurate measurements and carefully plan out the design. Here are the steps to follow for successful measurement and planning:
- Assess the Available Space: Measure the area where you plan to install the wine storage rack. Consider the width, height, and depth available for the rack. Take into account any obstructions, such as pipes or electrical outlets, that may affect the final dimensions.
- Determine the Number of Bottles: Decide how many wine bottles you want to store in your rack. This will help determine the size and capacity needed. Take into account future growth of your wine collection, as it’s always a good idea to plan for extra storage space.
- Consider Bottle Sizes: Be mindful of the different bottle sizes you may have in your collection. Some wine bottles, such as Champagne or Burgundy bottles, are wider or taller than standard wine bottles. Plan for adjustable or larger slots to accommodate these non-standard bottle sizes.
- Design and Layout: Sketch out a rough design for your wine storage rack, including the overall shape and configuration. Determine if you want a freestanding or wall-mounted rack, and consider additional features like shelves, dividers, or display areas. Ensure the design suits both your aesthetic preferences and functional needs.
- Structural Integrity: When planning your wine storage rack, prioritize stability and durability. Consider the weight-bearing capacity of the materials used and ensure the rack will support the combined weight of the bottles. Reinforce the structure if necessary to prevent any accidents or damage to your collection.
By carefully measuring and planning your wine storage rack, you can ensure that it fits perfectly within your chosen space and meets the needs of your wine collection. Taking the time to plan properly will save you from any headaches or rework later on.
Deciding on the Size and Capacity of Your Wine Storage Rack
When building a wine storage rack, one crucial decision you need to make is determining the size and capacity of the rack. The size of your wine rack will depend on several factors, including the available space, the number of bottles you wish to store, and your future wine collection growth. Here are some considerations to help you decide:
- Available Space: Measure the area where you plan to install the wine storage rack. Consider both the dimensions and the overall layout of the space. It’s important to choose a size that fits well in the designated area without obstructing any other furniture or walkways.
- Bottle Count: Determine how many bottles you want your wine storage rack to accommodate. Consider your current collection and any plans for future wine purchases. It’s advisable to allow some extra capacity to account for unexpected additions to your collection.
- Bottle Orientation: Decide whether you want to store your wine bottles horizontally or vertically. Horizontal storage is preferred for long-term aging, as it helps keep the cork moist and prevents oxidation. Vertical storage is suitable for short-term storage or display purposes, as it saves space and allows for easier bottle identification.
- Adjustability: Consider whether you want fixed slots or adjustable shelves in your wine storage rack. Adjustable shelves provide flexibility to accommodate different bottle sizes and can be easily reconfigured as needed.
- Additional Storage: Think about any extra storage needs you may have. Do you want space for wine glasses, decanters, or other accessories? Incorporating shelves or compartments for these items can be convenient and aesthetically pleasing.
- Aesthetic Appeal: Choose a size and capacity that complements the overall design of your space. Consider the materials, colors, and finishes that will enhance the visual appeal of the wine storage rack and complement your existing décor.
By carefully considering these factors, you can decide on the ideal size and capacity for your wine storage rack. Remember, the goal is to create a functional and visually pleasing rack that can accommodate your wine collection and enhance your overall wine experience.
Selecting the Materials for Your Wine Storage Rack
Choosing the right materials for your wine storage rack is essential for its durability, stability, and aesthetic appeal. The material you select will impact both the functionality and the overall look of your rack. Here are some common materials to consider for building your wine storage rack:
- Wood: Wood is a popular choice for wine storage racks due to its natural beauty and versatility. Hardwoods like oak, mahogany, or walnut are commonly used for their strength and durability. They also provide a classic and elegant look that complements various styles of home decor.
- Metal: Metal wine racks are known for their modern and sleek appearance. Materials like stainless steel or wrought iron offer durability and a contemporary aesthetic. Metal racks are often designed with modular components, allowing for customization and expansion as your collection grows.
- Plastic: Plastic wine racks are lightweight, affordable, and easy to assemble. They are ideal for temporary storage or for those on a budget. Plastic racks often come in a variety of colors and configurations, allowing for flexibility in design.
- Acrylic or Glass: Acrylic or glass wine racks provide a unique and visually stunning display for your wine collection. These transparent materials create a sense of elegance and allow the labels of your bottles to be prominently showcased. However, they may not have the same level of stability as other materials.
- Combination of Materials: Some wine racks combine different materials to achieve a desired aesthetic or functionality. For example, a wood and metal combination can offer the warmth of wood with the strength and sleekness of metal. Consider these options if you are looking for a unique and customizable design.
When selecting materials for your wine storage rack, consider factors such as budget, desired aesthetics, durability, and ease of maintenance. It’s also essential to ensure that the chosen materials are suitable for the weight and size of your wine collection. By carefully selecting the right materials, you can create a wine storage rack that not only showcases your collection but also enhances the overall ambiance of your space.
Tools and Equipment Needed for Building a Wine Storage Rack
Building a wine storage rack requires the use of specific tools and equipment to ensure accurate measurements, precise cuts, and secure assembly. Having the right tools on hand will make the construction process smoother and more efficient. Here are the essential tools and equipment you’ll need for building a wine storage rack:
- Tape Measure: A tape measure is essential for taking accurate measurements of the space where your wine storage rack will be installed.
- Level: A level is necessary to ensure that your rack is installed or built straight and level, preventing any instability and ensuring the bottles are stored securely.
- Saw: A saw is essential for cutting the wood or other materials to the desired size and shape for constructing the frame and individual bottle slots of the wine rack.
- Drill: A drill is required for making necessary holes, such as pilot holes for screws or installing hardware like handles or drawer pulls.
- Screwdriver: A screwdriver is necessary for tightening screws, attaching hardware, or assembling parts of the wine storage rack.
- Sanding Tools: Sanding tools like sandpaper or a sanding block are essential for smoothing the wood surfaces of your wine rack, ensuring a professional and polished finish.
- Clamps: Clamps are useful for holding pieces together while gluing or fastening them, ensuring a secure and tight fit during assembly.
- Router: A router can be used to create decorative edges or profiles on the wood pieces of your wine storage rack for an added touch of style.
- Pencil and Ruler: These basic tools are important for marking measurements, lines, and reference points on the wood or other materials.
- Safety Equipment: It’s crucial to prioritize safety when working with tools. Wear safety glasses, gloves, and ear protection if necessary to protect yourself from hazards and reduce the risk of injuries.
Having these tools and equipment readily available will ensure that you are well-equipped for building your wine storage rack. Remember to use them safely and appropriately, following the manufacturer’s instructions for each tool. With the right tools and a bit of craftsmanship, you’ll be on your way to creating a functional and stylish wine storage rack to showcase your collection.
Preparing the Wood for Your Wine Storage Rack
Preparing the wood is an important step in building a wine storage rack as it ensures the quality, durability, and aesthetics of the final product. Proper preparation helps to smooth the wood surfaces, remove imperfections, and protect it from moisture and wear. Here are the key steps to take when preparing the wood for your wine storage rack:
- Cleaning and Inspection: Before starting any treatment, clean the wood to remove any dust, dirt, or debris. Inspect the wood for any cracks, knots, or defects that may affect its strength or appearance. Repair or replace any damaged pieces as needed.
- Sanding: Use sandpaper or a sanding machine to smooth the wood surfaces. Start with a coarse-grit sandpaper to remove any roughness or uneven spots. Gradually move to finer-grit sandpaper to achieve a smooth and polished finish. Sand in the direction of the wood grain to avoid causing scratches.
- Filling and Sealing: If there are any gaps, cracks, or holes in the wood, fill them using wood filler or putty. Allow it to dry completely before sanding the filled areas. Once the wood is smooth, apply a wood sealer or primer to protect it from moisture and enhance its longevity.
- Staining or Painting: If desired, apply a wood stain or paint to achieve the desired color or finish. Test a small area first to ensure that the stain or paint adheres evenly and provides the desired result. Apply multiple coats as needed, allowing each coat to dry before applying the next.
- Applying Finish: Once the stain or paint has dried, apply a clear coat or varnish to protect the wood and enhance its appearance. Choose a finish that is compatible with the selected stain or paint and suits your desired level of sheen (e.g., matte, satin, or glossy).
- Drying and Curing: Allow the wood to dry and cure completely before proceeding with the construction of your wine storage rack. Follow the recommended drying times provided by the manufacturers of the products used.
- Sanding Between Coats: If applying multiple coats of stain, paint, or finish, lightly sand the wood between each coat to create a smooth and even surface. Use fine-grit sandpaper and be gentle to avoid damaging the previous coats.
By carefully preparing the wood before building your wine storage rack, you can achieve a polished and professional look. Take the time to properly clean, sand, fill, and finish the wood to ensure its longevity and enhance the overall appearance of your finished wine storage rack.
Cutting and Assembling the Basic Frame of Your Wine Storage Rack
The process of cutting and assembling the basic frame of your wine storage rack forms the foundation for the entire structure. This step is essential for creating a sturdy and functional rack. Here’s a step-by-step guide on cutting and assembling the basic frame:
- Measure and Mark: Measure and mark the dimensions of the frame components on the wood. Use a reliable measuring tool and ensure accurate measurements to ensure a proper fit.
- Cut the Frame Pieces: Using a saw, carefully cut the wood pieces according to the marked measurements. Use a straight edge or a miter saw for precise and clean cuts. Double-check the dimensions before cutting to ensure accuracy.
- Dry-fit the Pieces: Assemble the cut pieces together without any glue or fastener to check the fit. Make any necessary adjustments to ensure a snug and square fit. Use a level to ensure that the frame is level and plumb.
- Glue and Clamp: Apply wood glue to the joints of the frame pieces and fit them together. Use clamps to hold the pieces firmly in place. Wipe off any excess glue that squeezes out. Follow the drying time recommended by the glue manufacturer.
- Add Additional Supports: Depending on the size and design of your wine storage rack, you may need additional supports for added stability. Cut and attach these support pieces to the frame at strategic locations, such as the corners or along the length of the frame.
- Check for Squareness: Use a framing square to check for squareness. Ensure that all corners are at right angles. Make any necessary adjustments by tapping the frame with a mallet until it is square.
- Secure the Frame: Once the glue has dried, reinforce the joints by driving screws or nails through the frame components. Use a drill or hammer, depending on the type of fasteners you choose. Make sure the fasteners are countersunk to create a flush surface.
- Inspect and Sand: Inspect the assembled frame for any rough edges, splinters, or protruding screws or nails. Sand the frame using sandpaper or a sanding block to smooth any imperfections and create a professional finish.
By following these steps, you can successfully cut and assemble the basic frame of your wine storage rack. Taking the time to ensure accurate measurements, tight joints, and proper alignment will result in a sturdy and stable foundation for your wine storage rack.
Building the Individual Wine Bottle Slots
The individual wine bottle slots are the key component of your wine storage rack, providing a secure and organized space for each bottle. Building these slots requires careful planning and precision to ensure that the bottles fit snugly and are easily accessible. Here’s a step-by-step guide on building the individual wine bottle slots:
- Measure Slot Dimensions: Determine the dimensions of the wine bottle slots based on the size of your wine bottles. Consider the diameter and height of the bottles to ensure a proper fit. Leave enough space between slots for easy insertion and removal of the bottles.
- Mark the Slot Locations: Mark the location of each wine bottle slot on the frame of your wine storage rack. Use a pencil and measuring tape to ensure accurate spacing and alignment.
- Calculate Slot Depth: Measure the depth of the wine bottle slots, taking into account the size of the labels and the desired angle of the bottles. Aim for a slight downward tilt to keep the corks moist and prevent oxidation.
- Cut Slot Openings: Use a saw or router to cut out the marked slot openings on the frame. Take care to follow the measurements and guidelines precisely for each slot. Use a guide or jig if needed to ensure straight and consistent cuts.
- Create Curved or Angled Slots (Optional): If you prefer curved or angled slots for a more artistic or unique design, use a jigsaw or router with a curved cutting guide to create the desired shape.
- Smooth Slot Edges: After cutting the slot openings, sand the edges of the slots to ensure a smooth and splinter-free surface. Use sandpaper or a sanding block to soften any rough edges.
- Test Slot Fit: Insert a wine bottle into each slot to test the fit. The bottles should slide in smoothly and remain securely held in place without excessive tightness or looseness. Make any necessary adjustments to the slot dimensions for a proper fit.
- Consider Slot Protection: Depending on your preference and the materials used, you may want to add protective features to the slots. Consider adding felt or rubber inserts to prevent bottles from scratching or rattling against the wood.
- Apply Finish to Slots: Apply a finish to the slots to protect the wood and enhance the overall appearance of your wine storage rack. Use a clear coat or varnish that is compatible with the chosen finish for the rest of the rack.
By following these steps, you can build the individual wine bottle slots of your wine storage rack. Taking the time to measure, mark, and cut each slot with precision will ensure that your bottles are secure and easily accessible, creating a functional and visually appealing storage solution for your wine collection.
Adding Shelves and Dividers to Your Wine Storage Rack
Adding shelves and dividers to your wine storage rack enhances its functionality and allows for better organization of your wine collection. Shelves provide additional storage space while dividers help separate and categorize different types of wine. Here’s a step-by-step guide on adding shelves and dividers to your wine storage rack:
- Measure and Mark Shelf Locations: Determine the desired location and height for each shelf. Use a tape measure and level to ensure accurate measurements and even spacing between shelves.
- Prepare Shelf Materials: Cut the shelves to the appropriate width and depth to fit within the frame of your wine storage rack. Use a saw or appropriate cutting tool to make clean and precise cuts.
- Install Shelf Supports: Attach shelf supports to the sides or back of the frame using screws or nails. Ensure that the supports are level and securely fixed to provide a sturdy base for the shelves. Use a level and measuring tape for proper alignment.
- Place Shelves: Position the cut shelves onto the supports, ensuring that they rest securely and evenly. Double-check the levelness of the shelves and make any adjustments as necessary.
- Calculate Divider Dimensions: Determine the size and number of dividers needed based on the width and height of your shelves. Dividers can be vertically placed within each opening to create separate compartments for bottles.
- Cut Divider Materials: Cut dividers from the same material as the shelves or choose a complementary material. Measure and mark the dimensions for the dividers, then cut them using a saw or appropriate cutting tool.
- Attach Dividers: Position the dividers vertically within the shelf openings. Use glue, screws, or nails to secure them in place. Ensure that the dividers are evenly spaced and provide enough support without obstructing the bottle slots.
- Sand and Finish: Sand any rough edges or surfaces on the shelves and dividers to create a smooth finish. Apply a suitable finish or paint to protect the wood and enhance the appearance of your wine storage rack.
- Consider Additional Features: Depending on your preferences and storage needs, you can choose to add additional features such as label holders, glassware racks, or pull-out trays. Consider the available space and how these features will enhance your wine storage experience.
By following these steps, you can add shelves and dividers to your wine storage rack, maximizing its storage capacity and organization. Having designated shelves and compartments will make it easier to access and display your wine collection, while ensuring that each bottle is properly secured and protected.
Sanding and Finishing Your Wine Storage Rack
Sanding and finishing your wine storage rack is a crucial step in the construction process as it not only enhances the aesthetic appeal of the rack but also protects the wood and ensures its longevity. Here’s a step-by-step guide to sanding and finishing your wine storage rack:
- Sand the Surfaces: Start by sanding the surfaces of the wine storage rack. Use sandpaper or a sanding block to smooth any rough edges, imperfections, or raised wood grain. Start with a coarse-grit sandpaper and gradually move to a finer-grit for a polished finish.
- Smooth the Corners and Edges: Pay special attention to the corners and edges of the rack, as these areas tend to be rougher. Use a sanding block or sandpaper to round off sharp edges and create a softer profile.
- Remove Dust: After sanding, thoroughly clean the surfaces of the rack to remove any dust or debris. Use a vacuum or a clean cloth to ensure a clean working surface for the finishing process.
- Select the Finish: Choose a finish that enhances the natural beauty of the wood and provides the desired level of protection. Options include varnish, lacquer, or wood stain. Consider the look and feel you want to achieve for your wine storage rack.
- Test the Finish: Before applying the finish to the entire rack, test it on a small, inconspicuous area to ensure that it provides the desired color and appearance. This allows you to make any adjustments or changes before proceeding with the entire rack.
- Apply the Finish: Apply the chosen finish using a brush, roller, or sprayer, following the manufacturer’s instructions. Ensure even coverage across all surfaces of the rack, including the interior, shelves, dividers, and corners.
- Allow Drying Time: Give the finish sufficient drying time as recommended by the manufacturer. This will ensure that the finish properly cures and provides adequate protection for the wood.
- Inspect and Touch-Up: After the finish has dried, carefully inspect the wine storage rack for any missed spots, drips, or inconsistencies in the finish. Use sandpaper to smooth out any imperfections and touch up the finish as needed.
- Final Sanding (Optional): If desired, perform a final sanding using a very fine-grit sandpaper to achieve an extra-smooth finish. This step will provide a high-end, professional look to your completed wine storage rack.
By following these steps, you can achieve a beautifully finished wine storage rack. Sanding and finishing not only enhance the aesthetic appeal but also protect the wood, ensuring that your wine rack remains in excellent condition for years to come.
Installing the Wine Storage Rack in Your Desired Location
After completing the construction and finishing stages, it’s time to install your wine storage rack in your desired location. Proper installation ensures stability, accessibility, and showcases your wine collection effectively. Here’s a step-by-step guide on how to install your wine storage rack:
- Choose the Location: Select a suitable location for your wine storage rack. Consider factors such as temperature stability, accessibility, and visual aesthetics. Ensure the area is clear of obstructions and provides enough space for easy access to your wine bottles.
- Secure the Rack: Determine the method of securing the wine rack based on its design and the chosen location. A wall-mounted rack may require anchor screws to secure it to the wall, while a freestanding rack may need floor or wall brackets for stability.
- Mark the Wall or Floor: Use a pencil to mark the location for the rack on the wall or floor. Use a level to ensure the marks are straight and level. Double-check the measurements and alignment before proceeding.
- Drill Pilot Holes: If necessary, drill pilot holes at the marked locations. This will prevent the wood from splitting and make it easier to insert the screws or anchors during the installation process.
- Align and Install: Position the wine rack over the marked location and align it according to the pilot holes. Use a screwdriver, drill, or appropriate tool to insert the screws or anchors through the pre-drilled holes. Tighten them securely, ensuring the rack is level and sturdy.
- Check for Stability: Once the wine storage rack is installed, check for stability and ensure that it is securely attached. Shake or apply slight pressure to test its sturdiness. Make any necessary adjustments or reinforcements to ensure the rack is stable.
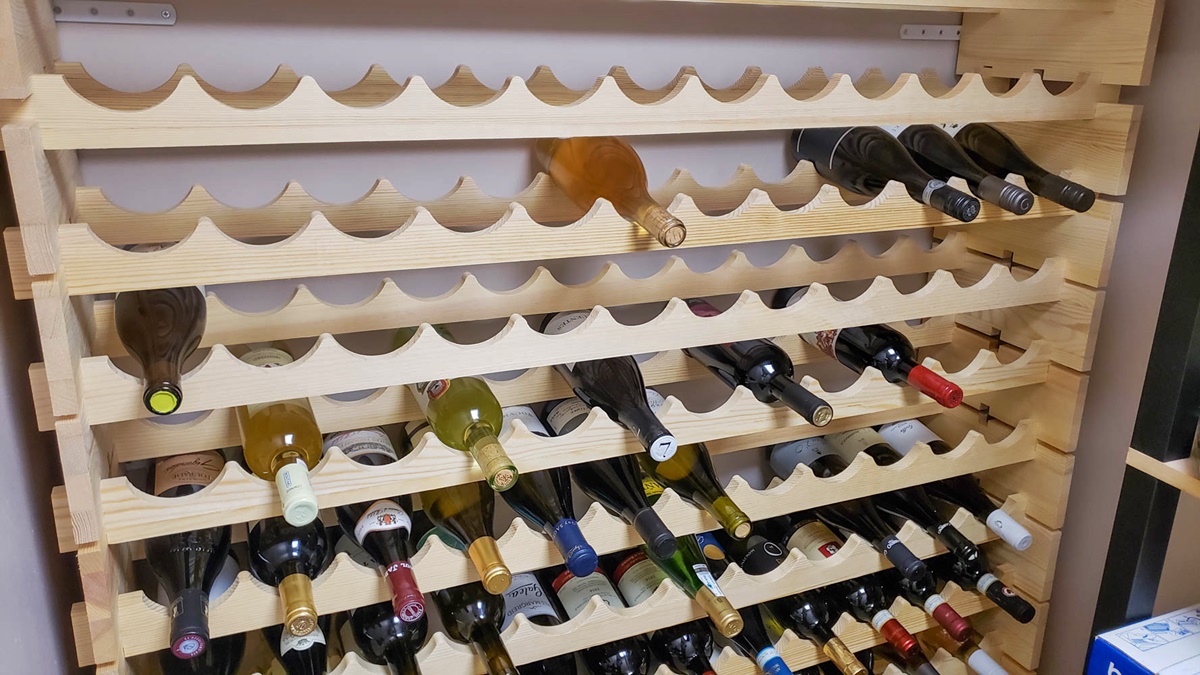
- Organize and Display Your Wine: With the wine storage rack securely installed, it’s time to organize and display your wine collection. Place your bottles into their designated slots, arranging them according to your preference. Consider organizing them by type, region, or age to make it easier to locate specific bottles.
- Enjoy Your Wine Collection: Sit back, relax, and enjoy your newly installed wine storage rack. Admire your collection and savor the convenience and accessibility it provides. Invite friends or loved ones to share in the joy of your wine collection.
By following these steps, you can successfully install your wine storage rack in your desired location, ensuring stability and creating an aesthetically pleasing display for your wine collection. Take your time during the installation process to ensure proper alignment and secure attachment, allowing you to enjoy and showcase your wine collection with pride.