
Materials Needed
Before you embark on your paper lamp shade journey, it’s important to gather all the necessary materials. Here’s a list of what you’ll need to create your own unique and beautiful paper lamp shade:
- Paper of your choice – opt for decorative or patterned paper for a more visually appealing lamp shade
- Lampshade frame – you can find these at your local craft store or repurpose an old lamp shade
- Scissors – make sure they are sharp and suited for cutting paper
- Pencil – for marking and measuring the paper
- Ruler – to ensure precise measurements
- Craft glue or double-sided tape – to secure the paper to the lampshade frame
- Decorative trim or ribbon – optional, but adds a touch of elegance to the finished lamp shade
- Embellishments – such as beads, sequins, or feathers, to personalize your lamp shade
- Light fixture – to illuminate your masterpiece
Having these materials on hand will help you smoothly navigate each step of the lamp shade-making process. Make sure to have enough paper to cover the entire frame, and consider selecting a paper that complements your existing decor or adds a pop of color to your space.
Remember, creativity is key, so feel free to experiment with different materials and designs. The most important thing is to have fun and express your own personal style.
Step 1: Gather Inspiration and Design Your Lamp Shade
The first step in creating a beautiful paper lamp shade is to gather inspiration and design your masterpiece. Take some time to explore various sources for ideas and consider the style and theme you want for your lamp shade.
Start by browsing through interior design magazines, home decor websites, and social media platforms like Pinterest and Instagram. Look for photographs or images of lamp shades that catch your eye. Pay attention to the shapes, patterns, and colors that resonate with your personal style.
Once you have a clear idea of what you want, it’s time to sketch your design. Grab a pencil and a piece of paper and start doodling. Don’t worry about being too precise at this stage. Simply let your creativity flow and capture the essence of your vision.
Think about the dimensions of your lamp shade. Consider the height, width, and overall shape. Do you prefer a traditional cone-shaped shade or a more contemporary cylindrical one? Play around with different options until you find the design that speaks to you.
Additionally, think about the pattern or design that you want to incorporate into your lamp shade. You can choose to go with a solid color, a geometric pattern, or even a floral motif. Remember to consider how the light will play through the pattern and create intriguing shadows on the surrounding surfaces.
Take your time during this stage and explore various possibilities. Experiment with different ideas and combinations until you land on a design that truly represents your personal style and adds a unique touch to your space.
Once you’re satisfied with your design, you’re ready to move on to the next step: choosing the perfect paper for your lamp shade.
Step 2: Choose Your Paper
Choosing the right paper is a crucial step in creating a stunning paper lamp shade. The type of paper you select will not only affect the overall look of the shade but also its durability and functionality. Consider the following factors when choosing your paper:
1. Weight: Opt for a paper that is sturdy enough to hold its shape when wrapped around the lampshade frame. Thin papers may tear easily and won’t provide a solid foundation for your design.
2. Texture: Decide whether you want a smooth or textured surface for your lamp shade. Textured papers can add depth and visual interest, while smoother papers provide a more clean and modern look.
3. Opacity: Consider how much light you want to transmit through your lamp shade. Transparent or semi-transparent papers will allow more light to shine through, creating a soft and atmospheric glow. If you prefer a more defined and focused illumination, opt for opaque or semi-opaque papers.
4. Pattern or Design: If you want to add a decorative element to your lamp shade, choose a paper with a pattern or design that complements your overall aesthetic. You can find a wide range of pre-printed decorative papers or even create your own using techniques like decoupage or stamping.
5. Color: Consider the color scheme of your room and pick a paper that complements or enhances it. You can go for a monochromatic shade to create a harmonious look, or opt for a contrasting color to make a bold statement.
Take your time in finding the perfect paper for your lampshade. Visit your local craft stores, specialty paper shops, or search online for a wide variety of options. Consider ordering samples if available to see how the paper looks and feels in person.
Remember, the paper you choose will be the canvas for your design, so select one that inspires you and aligns with your overall vision for the lamp shade. Once you have your paper, you’re ready to move on to the next step: measuring and cutting the paper.
Step 3: Measure and Cut the Paper
With your chosen paper in hand, it’s time to measure and cut it to fit your lamp shade frame precisely. This step is crucial to ensure a seamless and professional-looking result. Follow these steps to measure and cut the paper:
1. Take Measurements: Begin by measuring the dimensions of your lamp shade frame. Use a ruler to measure the height and circumference of the frame. Write down these measurements for reference.
2. Mark the Paper: Lay your paper flat on a clean and smooth surface. Using a pencil, mark the measurements you recorded from the lamp shade frame onto the paper. Make sure to account for any overlap or excess you’ll need to secure the paper to the frame.
3. Cut the Paper: Carefully cut along the marked lines using a pair of sharp scissors. Take your time to ensure clean and precise cuts. If you’re using a patterned paper, pay attention to aligning the design in a desirable way before cutting.
4. Test the Fit: Once you’ve cut the paper, wrap it around the lamp shade frame to check the fit. Make any necessary adjustments by trimming the edges or cutting off any excess paper.
5. Repeat as Needed: Depending on the design of your lamp shade, you may need multiple pieces of paper to cover the entire frame. Repeat the measuring and cutting process for each piece of paper, ensuring they align correctly when wrapped around the frame.
6. Label the Pieces: To avoid confusion later, label each piece of paper with a small piece of tape or a pencil mark indicating its position on the lamp shade frame. This will make it easier to assemble the pieces correctly in the next steps.
Remember to take your time and be precise when measuring and cutting the paper. Accuracy in this step will contribute to the overall quality and appearance of your paper lamp shade. Once you’ve cut all the necessary pieces, you’re ready to move on to the next step: creating the frame for your lamp shade.
Step 4: Create the Frame
Creating the frame for your paper lamp shade is an essential step in ensuring its structure and stability. The frame will provide the support that holds the paper in place. Follow these steps to create your lamp shade frame:
1. Disassemble the Old Lamp Shade (if applicable): If you’re repurposing an old lamp shade, carefully remove the fabric or paper covering and detach the frame. Clean the frame thoroughly to remove any dust or debris.
2. Use a Lamp Shade Frame Kit (optional): If you want a hassle-free method, consider purchasing a lamp shade frame kit from your local craft store. These kits come with pre-made frames in different shapes and sizes, making it easier to create consistent and well-structured lamp shades.
3. Create a Custom Frame: If you prefer a more hands-on approach, you can make your own lamp shade frame using wire or other materials. Use pliers and wire cutters to shape and bend the wire into the desired frame shape, ensuring it matches the measurements you took in the previous step.
4. Secure the Frame: Once you have your frame, use craft glue or small metal fasteners to secure the ends together. Make sure the frame is stable and properly aligned, ensuring that it can hold the weight of the paper and any additional embellishments you plan to add.
5. Test the Fit: Place the frame over the lamp base or light fixture to ensure it fits properly. Adjust the size or shape of the frame if necessary, making sure there is enough clearance for the bulb and wiring.
6. Paint or Decorate (optional): If you want to add a personal touch to your lamp shade, consider painting the frame in a color that complements your paper or adding decorative trim or ribbon. This step allows you to customize the frame to match your desired aesthetic.
Creating the frame may require some patience and precision, but it’s an important step to ensure the structural integrity of your paper lamp shade. Once you’ve created and adjusted the frame to your satisfaction, you’re ready to move on to the next step: attaching the paper to the frame.
Step 5: Attach the Paper to the Frame
Now that you have your frame ready, it’s time to attach the paper to create your beautifully crafted paper lamp shade. Follow these steps to secure the paper to the frame:
1. Apply Craft Glue or Double-Sided Tape: Apply a thin layer of craft glue or double-sided tape along one edge of the lamp shade frame. This will act as an adhesive to hold the paper in place.
2. Align the Paper: Carefully align one edge of the cut paper with the glued or taped edge of the frame. Make sure the paper is straight and centered on the frame. Slowly press the paper onto the adhesive, smoothing out any wrinkles or bubbles as you go.
3. Continue Securing the Paper: Gradually work your way around the frame, gently pressing the paper against the adhesive. Take care to ensure the paper is taut and positioned correctly as you progress. If using double-sided tape, remove one side of the backing at a time as you secure the paper.
4. Trim Excess Paper: Once all the paper is attached to the frame, trim any excess material that extends beyond the edges. Use sharp scissors to achieve clean and precise cuts.
5. Secure Overlapping Edges: If you have multiple pieces of paper due to the size of your lamp shade, overlap the edges slightly and secure them with craft glue or double-sided tape. This will create a seamless transition between the paper sections.
6. Allow the Adhesive to Dry: Give the craft glue or double-sided tape sufficient time to dry and set. Follow the instructions on the adhesive for the recommended drying time. This will ensure that the paper remains firmly attached to the frame.
By attaching the paper to the frame, you transform your lamp shade from a simple structure into a visually appealing piece of art. Take your time during this step to ensure the paper is securely attached and free from any imperfections. With the paper in place, you’re one step closer to completing your handmade paper lamp shade.
Step 6: Add Finishing Touches
With the paper securely attached to the frame, it’s time to add the finishing touches to your paper lamp shade. These final embellishments will elevate the overall look and add a personal touch. Here’s how you can enhance your lamp shade:
1. Decorative Trim: Consider adding decorative trim, such as lace, ribbon, or fringe, along the top and bottom edges of the lamp shade. Choose a trim that complements the design and color of your paper. Adhere the trim using craft glue or small stitching for a polished and stylish finish.
2. Embellishments: Get creative and add embellishments like beads, sequins, or feathers to further enhance your lamp shade. Strategically place them on the paper to create visual interest and texture. Keep in mind the size and weight of the embellishments to ensure they don’t overpower the overall design.
3. Paint or Stencil: If you have a plain paper lamp shade or want to add more depth, consider using acrylic paint or stencils to create unique designs or patterns on the paper. This is a great opportunity to let your artistic skills shine and customize the lamp shade to your liking.
4. Lining the Interior: For an added touch of elegance, you may choose to line the interior of the lamp shade with a coordinating or contrasting fabric. This will provide a soft and diffused glow when the lamp is lit, creating a cozy ambiance in your space.
5. Personalize with Stamps or Decoupage: If you want to incorporate a more personalized touch, use stamps or decoupage techniques to add images or motifs that hold special meaning to you. This adds a personal and sentimental element to your lamp shade.
6. Finishing Sprays: Consider using a clear protective spray or varnish to seal the paper and protect it from dust and moisture. This can help prolong the life of your paper lamp shade and keep it looking vibrant for years to come.
Remember, the finishing touches are an opportunity to make your paper lamp shade truly unique and reflect your personal style. Experiment with different ideas and techniques to achieve the desired look. Once you’re satisfied with the final touches, you’re ready to move on to the next step: installing your lamp shade.
Step 7: Install the Lamp Shade
Now that your paper lamp shade is complete, it’s time to install it and bring your creation to life. Follow these steps to properly install your lamp shade:
1. Disassemble the Lamp: If necessary, disassemble your lamp by removing the bulb, lampshade holder, and any other components that might obstruct the installation process.
2. Position the Lamp Shade: Carefully position the lamp shade over the lampshade holder or base. Ensure that it rests securely and evenly on top. Adjust the position as needed to achieve a balanced and pleasing look.
3. Attach the Lamp Shade: Depending on the type of lampshade holder or base, there are different methods to securely attach the lamp shade. Common attachment options include clips, finials, or a screw-on mechanism. Follow the instructions provided with your lampshade holder to attach the shade safely and securely.
4. Adjust the Fit: Take a step back and assess the placement and fit of the lamp shade. Make any necessary adjustments to ensure it is straight and properly positioned. This will help to avoid any shadows or uneven light distribution when the lamp is turned on.
5. Reassemble the Lamp: Once the lamp shade is securely installed, reassemble the rest of the lamp components. Insert the light bulb and ensure it is properly seated in the socket. Check that the lamp’s electrical components are safely connected.
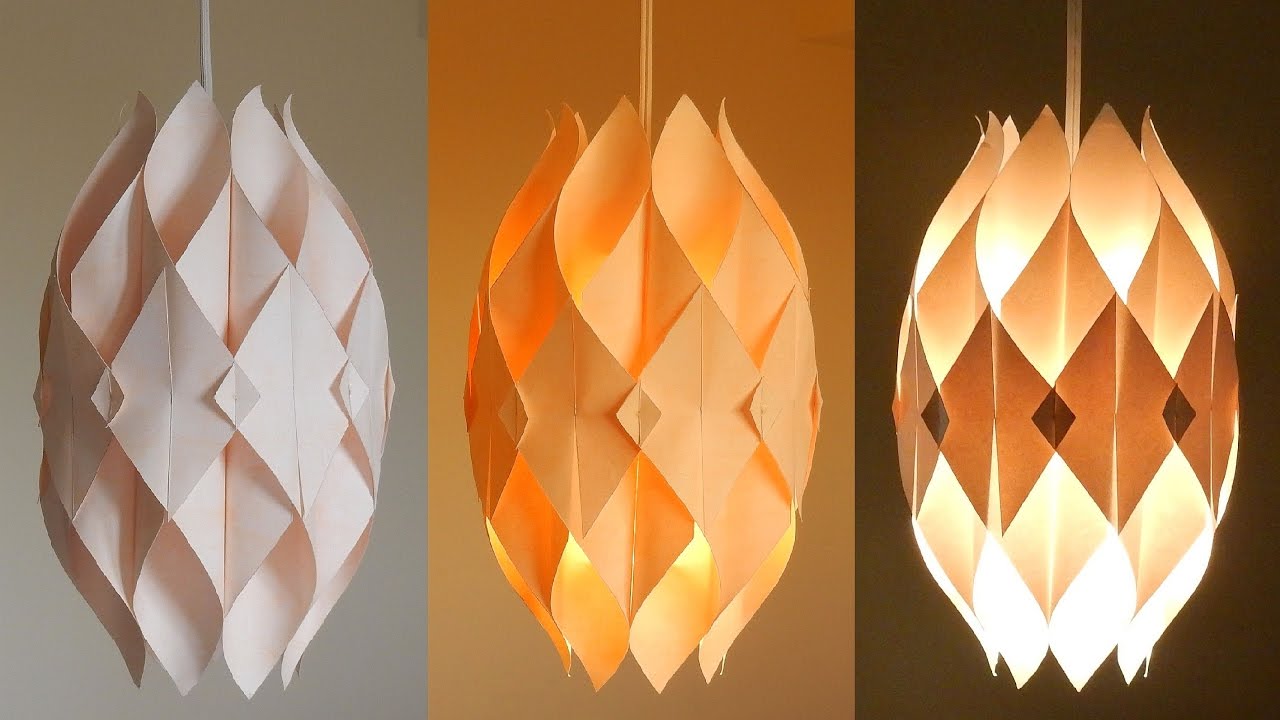
6. Test the Lighting: Turn on the lamp to test the lighting and ensure that the paper allows the desired amount of light to shine through. Make any necessary adjustments to the position or angle of the lampshade to achieve the desired lighting effect.
7. Final Touches: Take a moment to step back and admire your handiwork. Make any final adjustments or tweaks to the lampshade or overall positioning to ensure it meets your satisfaction.
By properly installing the lamp shade, you’ll showcase your artistic creation and complete the transformation of your lamp. Enjoy the soft and warm glow that your paper lamp shade produces, enhancing the ambiance of your space.
Step 8: Enjoy Your Handmade Paper Lamp Shade
Congratulations! You have successfully completed the process of creating your beautiful handmade paper lamp shade. Now it’s time to sit back, relax, and revel in the beauty of your creation. Here’s how you can fully enjoy your unique lamp shade:
1. Illuminate Your Space: Turn on your lamp and bask in the soft and captivating glow that emanates from your paper lamp shade. Watch as the light dances through the intricate patterns and adds a warm ambiance to your room.
2. Appreciate the Craftsmanship: Take a moment to admire the craftsmanship and attention to detail that went into creating your paper lamp shade. Appreciate the unique design, the intricate cutouts, and any embellishments you added to make it truly one-of-a-kind.
3. Showcase Your Style: Your handmade lamp shade is a reflection of your personal style and creativity. Share it proudly with friends, family, and guests to showcase your artistic abilities and enhance the overall aesthetic of your space.
4. Create a Serene Atmosphere: Utilize your lamp shade to set the mood in your room. Whether you’re looking for a cozy and intimate ambiance or a calm and serene environment, the soft and diffused light from your paper lamp shade can create a soothing atmosphere.
5. Share Your Experience: If you enjoyed the process of creating your handmade paper lamp shade, consider sharing your experience with others. Inspire and motivate fellow DIY enthusiasts by sharing your tips, techniques, and the joy you experienced in bringing your vision to life.
6. Experiment and Evolve: Don’t be afraid to experiment with different paper designs, colors, or techniques in the future. Your handmade lamp shade can be a versatile piece that evolves with your changing tastes and the seasons. Have fun exploring new ideas and incorporating different elements into your lamp shade creations.
Remember, your handmade paper lamp shade is not just a functional lighting fixture but also a work of art that adds personality and charm to your living space. Enjoy the beauty and the warm glow it brings to your room, and let it serve as a constant reminder of your creativity and artistic talents.